check engine Ram ProMaster City 2018 Owner's Manual
[x] Cancel search | Manufacturer: RAM, Model Year: 2018, Model line: ProMaster City, Model: Ram ProMaster City 2018Pages: 180, PDF Size: 7.52 MB
Page 82 of 180
ENGINE BREAK-IN
RECOMMENDATIONS — GASOLINE
ENGINE
A long break-in period is not required for the
engine and drivetrain (transmission and axle)
in your vehicle.
Drive moderately during the first 300 miles
(500 km). After the initial 60 miles
(100 km), speeds up to 50 or 55 mph (80 or
90 km/h) are desirable.
While cruising, brief full-throttle acceleration
within the limits of local traffic laws contrib-
utes to a good break-in. Wide-open throttle
acceleration in low gear can be detrimental
and should be avoided.
The engine oil installed in the engine at the
factory is a high-quality energy conserving
type lubricant. Oil changes should be consis-
tent with anticipated climate conditions un-
der which vehicle operations will occur. For
the recommended viscosity and quality
grades, refer to “Fluids And Lubricants” in
“Technical Specifications”.
CAUTION!
Never use Non-Detergent Oil or Straight
Mineral Oil in the engine or damage may
result.
NOTE:
A new engine may consume some oil during
its first few thousand miles (kilometers) of
operation. This should be considered a nor-
mal part of the break-in and not interpreted
as a problem. Please check your oil level with
the engine oil indicator often during the
break in period. Add oil as required.
SPEED CONTROL
When engaged, the Speed Control takes over
accelerator operations at speeds greater than
25 mph (40 km/h).
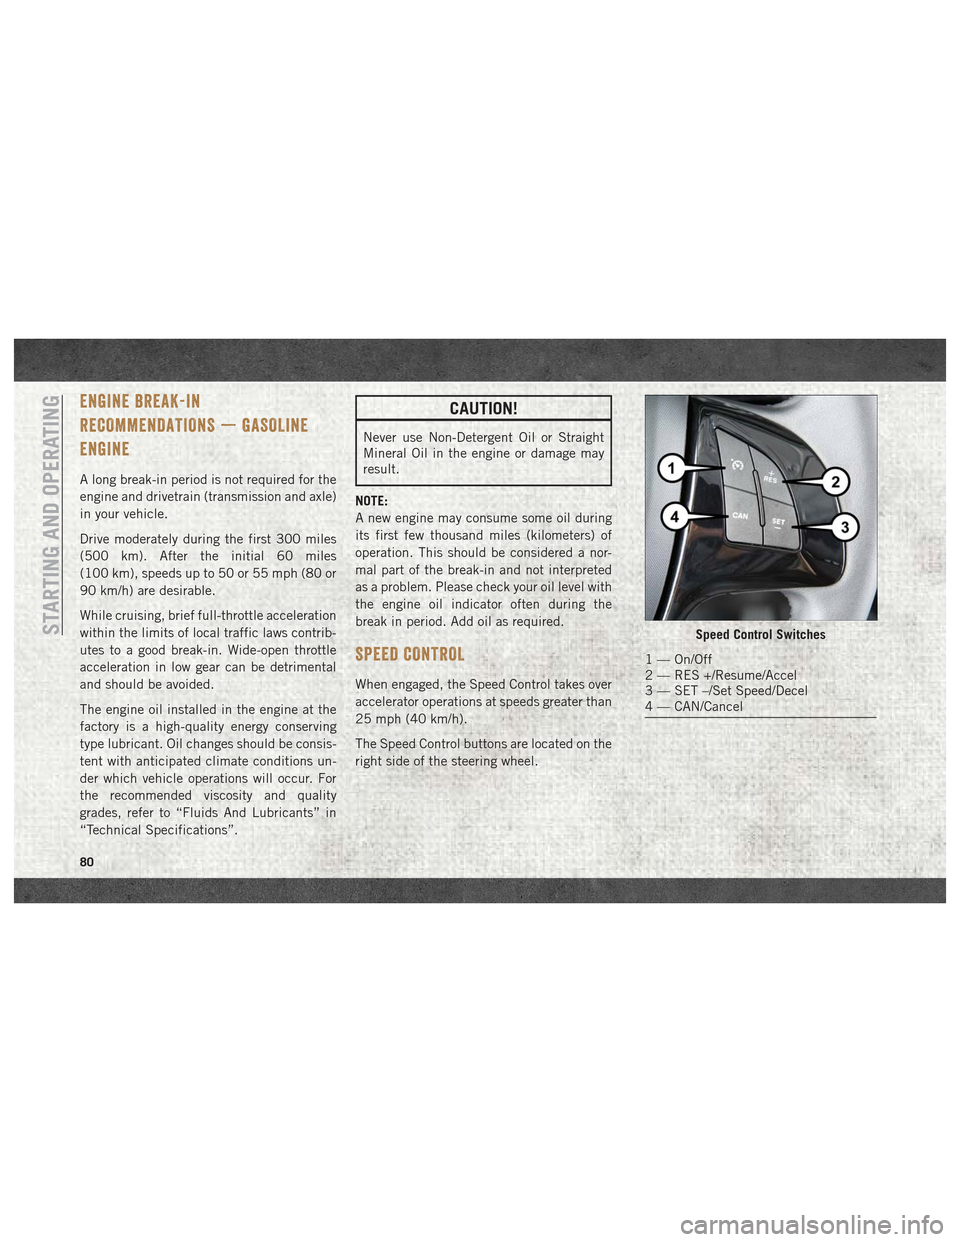
The Speed Control buttons are located on the
right side of the steering wheel.
Speed Control Switches
1 — On/Off
2 — RES +/Resume/Accel
3 — SET –/Set Speed/Decel
4 — CAN/Cancel
STARTING AND OPERATING
80
Page 103 of 180
WARNING!
stow the Tire Service Kit in the place
provided. Failure to follow these warn-
ings can result in injuries that are seri-
ous or fatal to you, your passengers, and
others around you.
• Take care not to allow the contents of
Tire Service Kit to come in contact with
hair, eyes, or clothing. Tire Service Kit
sealant is harmful if inhaled, swallowed,
or absorbed through the skin. It causes
skin, eye, and respiratory irritation.
Flush immediately with plenty of water if
there is any contact with eyes or skin.
Change clothing as soon as possible, if
there is any contact with clothing.
• Tire Service Kit Sealant solution con-
tains latex. In case of an allergic reac-
tion or rash, consult a physician imme-
diately. Keep Tire Service Kit out of
reach of children. If swallowed, rinse
mouth immediately with plenty of water
and drink plenty of water. Do not induce
vomiting! Consult a physician immedi-
ately. Insert the power plug into the vehicle power
outlet socket. Start the vehicle engine.
Push the Tire Service Kit power button to the
“I” position. The electric compressor will be
turned on, sealant and air will inflate the tire.
Minimum 26 psi (1.8 bar) of pressure should
be reached within 20 minutes. If the pressure
has not been reached, turn off and remove
the Tire Service Kit, drive the vehicle 30 feet
(10 meters) back and forth, to better distrib-
ute the sealant inside the tire.
Attach the clear flexible filling tube of the
compressor directly to the tire valve and re-
peat the inflation process.
When the correct pressure has been reached,
start driving the vehicle to uniformly distrib-
ute the sealant inside the tire. After 10 min-
utes, stop and check the tire pressure. If the
pressure is below 19 psi (1.3 bar), do not
drive the vehicle, as the tire is too damaged,
contact the nearest authorized dealer.
WARNING!
Tire Service Kit is not a permanent flat tire
repair. Have the tire inspected and re-
paired or replaced after using Tire Service
Kit. Do not exceed 65 mph (110 km/h)
until the tire is repaired or replaced. Fail-
ure to follow this warning can result in
injuries that are serious or fatal to you,
your passengers, and others around you.
Have the tire checked as soon as possible
at an authorized dealer.
If the pressure is at 19 psi (1.3 bar) or above
repeat the inflation process to reach the cor-
rect tire pressure and continue driving.
Peel off the warning label from the bottle and
place it on the dashboard as a reminder to the
driver that a tire has been treated with Tire
Service Kit.
WARNING!
The metal end fitting from Power Plug may
get hot after use, so it should be handled
carefully.
101
Page 113 of 180
Once A Month Or Before A Long Trip:
• Check engine oil level.
• Check windshield washer fluid level.
• Check tire pressure and look for unusualwear or damage. Rotate tires at the first
sign of irregular wear, even if it occurs
before the oil indicator system turns on.
• Check the fluid levels of the coolant reser- voir and brake master cylinder, fill as
needed.
• Check function of all interior and exterior lights.Maintenance Plan
Required Maintenance Intervals
Refer to the maintenance schedules on the
following page for the required maintenance
intervals.
At Every Oil Change Interval As Indicated By Oil Change Indicator System:
• Change oil and filter
• Rotate the tires
Rotate at the first sign of irregular wear, even
if it occurs before the oil indicator system
turns on
• Inspect battery and clean and tighten ter- minals as required
• Inspect brake pads, shoes, rotors, drums, hoses, lines and park brake
• Inspect engine cooling system protection and hoses
• Inspect exhaust system
• Inspect engine air cleaner if using in dusty or off-road conditions
111
Page 169 of 180
Accessories..................139
Mopar ...................139
Additives, Fuel ................85
AirBag .....................54 Air Bag Operation .............55
Driver Knee Air Bag ...........56
Enhanced Accident Response . . . .108
Event Data Recorder (EDR) ......108
If A Deployment Occurs .........59
Knee Impact Bolsters ..........56
Maintaining Your Air Bag System . . .60
Transporting Pets ............75
Air Bag Light ...............31, 76
Air Bag Maintenance .............60
Air Conditioning Filter ............25
Air Conditioning, Operating Tips ......24
Air Pressure, Tires ..............124
Antifreeze (Engine Coolant) ........137
Anti-Lock Warning Light ...........34
Ashtray .....................27
Automatic Transmission Adding Fluid ..............138
Fluid Type ................138
Auxiliary Electrical Outlet (Power Outlet). .26Axle Lubrication
...............138
Battery .....................32
Charging System Light .........32
Belts, Seat ...................76
B-Pillar Location ..............120
Brake Fluid ..................138
Brake System Fluid Check ...............138
Warning Light ...............31
Bulb Replacement ..............88
Bulbs, Light ................78, 88
Camera, Rear .................82
Capacities, Fluid ..............137
Caps, Filler Fuel ....................84
Oil (Engine) ...............114
Carbon Monoxide Warning ..........75
Changing A Flat Tire ..........92, 115
Chart, Tire Sizing ..............116
Checking Your Vehicle For Safety .....75
Checks, Safety .................75
Child Restraint ................61 Child Restraints
Booster Seats ...............63
Child Restraints ..............61
Child Seat Installation .......70, 73
How To Stow An Unused ALR Seat
Belt .....................68
Infants And Child Restraints ......62
Locating The LATCH Anchorages . . .67
Lower Anchors And Tethers For
Children ..................65
Older Children And Child
Restraints .................63
Seating Positions .............64
Cigar Lighter ..................27
Cleaning Wheels ..................130
Climate Control ................20
Manual ...................20
Clock Setting .................144
Compact Spare Tire .............129
Contract, Service ..............165
Cooling System Coolant Capacity ............137
Selection Of Coolant (Antifreeze) . .137
Cruise Light ..................38
INDEX
167
Page 171 of 180
iPod/USB/MP3 ControlBluetooth Streaming Audio ......150
Jack Operation .............92, 115
Jump Starting ................102
Keys .......................10
Lane Change Assist ..............17
Lap/Shoulder Belts ..............47
Latches .....................78
Hood ....................25
Leaks, Fluid ..................78
Life Of Tires .................126
Light Bulbs ................78, 88
Lights ...................17, 78
AirBag ................31, 76
Brake Warning ..............31
Bulb Replacement ............88
Cruise ...................38
Engine Temperature Warning .....33
Exterior ..................78
Interior ...................18
Low Fuel ..................34
Malfunction Indicator
(Check Engine) ..............36
Park ..................17, 37 Seat Belt Reminder
...........34
Service ...................88
Tire Pressure Monitoring
(TPMS) ................35, 42
Turn Signal ..............37, 78
Warning (Instrument Cluster
Description) .............33, 37
Loading Vehicle Tires ...................120
Low Tire Pressure System ..........42
Lug Nuts ...................136
Maintenance Schedule ...........110
Malfunction Indicator Light (Check Engine) ...................36
Manual, Service ...............166
Media Center Radio .............160
Memory Feature (Memory Seat) ......11
Memory Seat ..................11
Memory Seats And Radio ..........11
Monitor, Tire Pressure System .......42
Mopar .....................139
Mopar Accessories .............139
Multi-Function Control Lever ........17
Navigation ..................148 New
Vehicle Break-In Period
........80
Occupant Restraints .............45
Octane Rating, Gasoline (Fuel) ......137
Oil, Engine ..................137
Capacity .................137
Filter ...................137
Pressure Warning Light .........33
Recommendation ............137
Viscosity .................137
Oil Pressure Light ...............33
Onboard Diagnostic System .........38
Operating Precautions ............38
Overheating, Engine ............106
Owner's Manual (Operator Manual) . . .166
ParkSense System, Rear ...........82
Pets .......................75
Phone, Hands-Free (Uconnect) ......150
Phone (Pairing) ...............151
Phone (Uconnect) ..............150
Placard, Tire And Loading Information ................120
Pregnant Women And Seat Belts ......50
Preparation For Jacking ...........95
Radial Ply Tires ...............125
169