reset Ram ProMaster City 2018 User Guide
[x] Cancel search | Manufacturer: RAM, Model Year: 2018, Model line: ProMaster City, Model: Ram ProMaster City 2018Pages: 180, PDF Size: 7.52 MB
Page 19 of 180
Headlights
Rotate the end of the multifunction lever
upward to the first detent for headlight opera-
tion.
NOTE:
When the headlights are turned on, the Day-
time Running Lights, (if previously set
through the menu) will be deactivated.
High Beams
With the low beams activated, pull the mul-
tifunction lever towards the steering wheel to
turn on the high beams. A high beam symbolwill illuminate in the cluster to indicate the
high beams are on. Pull the multifunction
lever a second time to switch the headlights
back to low beam.
Parking Lights
To turn on the parking lights, remove the key
or turn the ignition to OFF/LOCK position and
turn on the headlights.
Follow Me Home/Headlight Delay
When this feature is selected, the driver can
choose to have the headlights remain on for a
preset period of time after the engine is
turned OFF.
Activation
Remove the key or turn the ignition to the
STOP (OFF/LOCK) position, and pull the mul-
tifunction lever toward the steering wheel
within two minutes. Each time the lever is
pulled, the activation of the lights will be
extended by 30 seconds. The activation of
the lights can be extended to a maximum of
210 seconds.
Deactivation
Pull the multifunction lever toward the steer-
ing wheel and hold it for more than two
seconds.
Turn Signals
Move the multifunction lever up or down and
the arrows on each side of the instrument
cluster flash to show proper operation of the
front and rear turn signal lights.
NOTE:
If either light remains on and does not flash,
or there is a very fast flash rate, check for a
defective outside light bulb. If an indicator
fails to light when the lever is moved, it would
suggest that the indicator bulb is defective.
Lane Change Assist
Tap the lever up or down once, without mov-
ing beyond the detent, and the turn signal
(right or left) will flash five times then auto-
matically turn off.
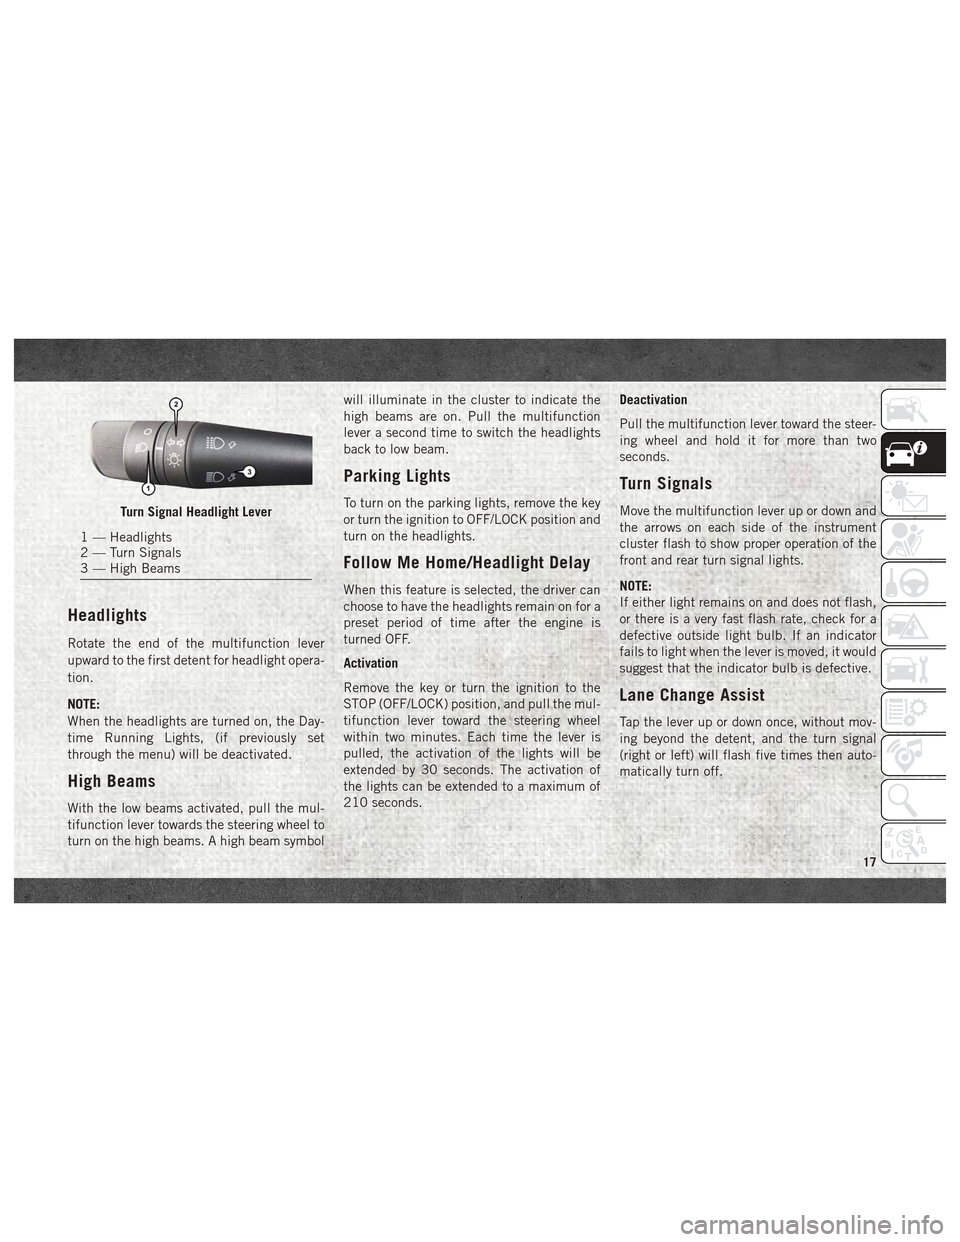
Turn Signal Headlight Lever
1 — Headlights
2 — Turn Signals
3 — High Beams
17
Page 32 of 180
INSTRUMENT CLUSTER DISPLAY
Your vehicle may be equipped with an instru-
ment cluster display, which offers useful in-
formation to the driver. With the ignition in
the STOP/OFF mode, opening/closing of a
door will activate the display for viewing, and
display the total miles, or kilometers, in the
odometer. Your instrument cluster display is
designed to display important information
about your vehicle’s systems and features.
Using a driver interactive display located on
the instrument panel, your instrument clus-
ter display can show you how systems are
working and give you warnings when they are
not. The steering wheel mounted controls
allow you to scroll through the main menus
and submenus. You can access the specific
information you want and make selections
and adjustments.
Location And Controls
The instrument cluster display features a
driver-interactive display that is located in
the instrument cluster.The menu items described below are an ex-
ample of what can be found in the vehicle's
menu:
• Dimmer
• Speed Beep
• Trip B
• Set Time
• Set Date
• Autoclose
• Units
• Language
• Buzzer Volume
• Belt Buzzer
• Day Lights
The system allows the driver to select infor-
mation by pushing the following buttons
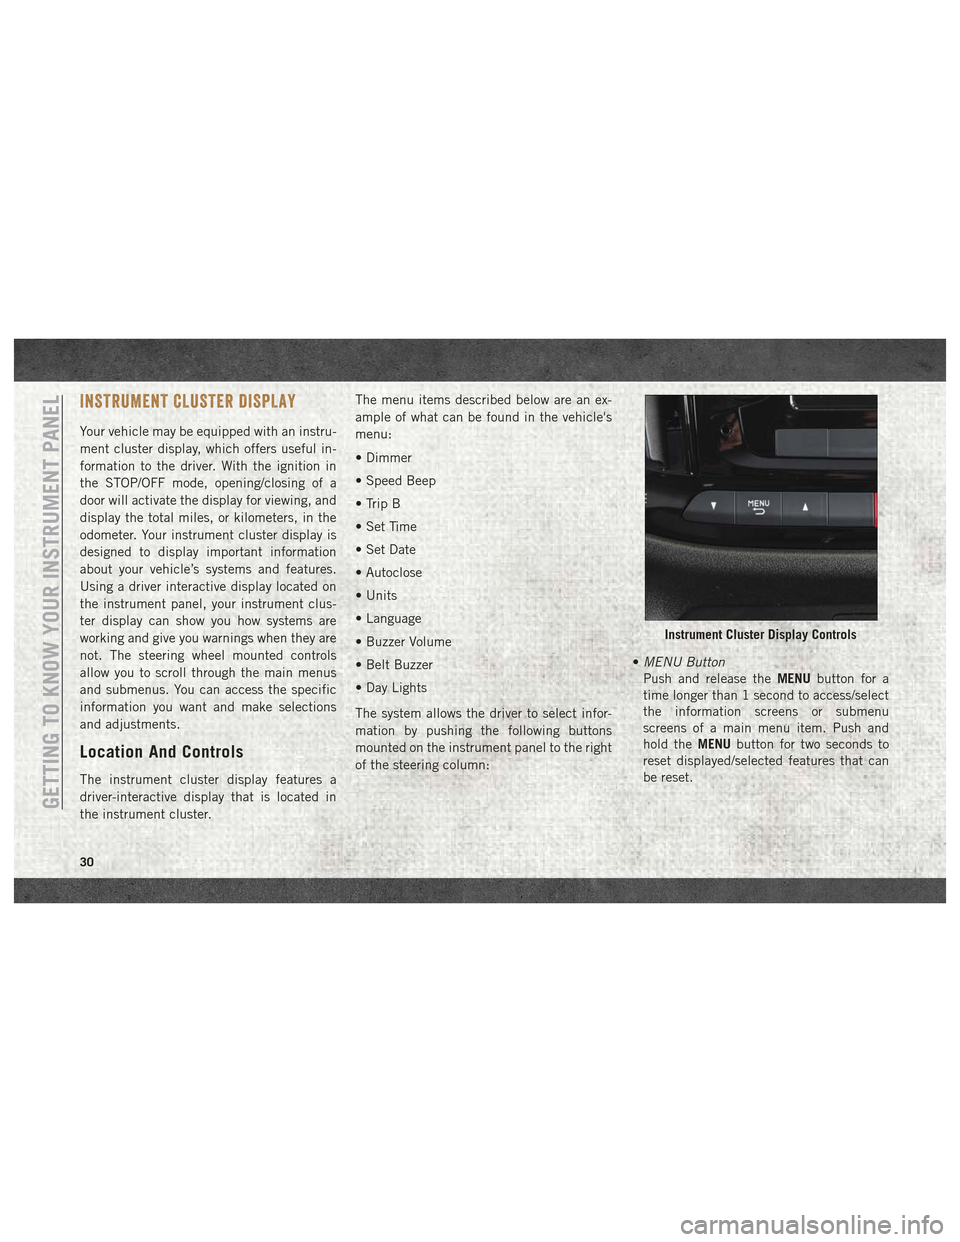
mounted on the instrument panel to the right
of the steering column:
•
MENU Button
Push and release the MENUbutton for a
time longer than 1 second to access/select
the information screens or submenu
screens of a main menu item. Push and
hold the MENUbutton for two seconds to
reset displayed/selected features that can
be reset.
Instrument Cluster Display Controls
GETTING TO KNOW YOUR INSTRUMENT PANEL
30
Page 62 of 180
NOTE:
• Air bag covers may not be obvious in theinterior trim, but they will open during air
bag deployment.
• After any collision, the vehicle should be taken to an authorized dealer immediately.
Enhanced Accident Response System
In the event of an impact, if the communica-
tion network remains intact, and the power
remains intact, depending on the nature of
the event, the ORC will determine whether to
have the Enhanced Accident Response Sys-
tem perform the following functions:
• Cut off fuel to the engine.
• Flash hazard lights as long as the batteryhas power or until the hazard light button is
pressed. The hazard lights can be deacti-
vated by pressing the hazard light button.
• Turn on the interior lights, which remain on as long as the battery has power or for
15 minutes from the intervention of the
Enhanced Accident Response System.
• Unlock the power door locks.
Enhanced Accident Response System Reset
Procedure
In order to reset the Enhanced Accident Re-
sponse System functions after an event, the
ignition switch must be changed from igni-
tion START or ON/RUN to ignition OFF. Care-
fully check the vehicle for fuel leaks in the
engine compartment and on the ground near
the engine compartment and fuel tank before
resetting the system and starting the engine.
Maintaining Your Air Bag System
WARNING!
• Modifications to any part of the air bag system could cause it to fail when you
need it. You could be injured if the air
bag system is not there to protect you.
Do not modify the components or wiring,
including adding any kind of badges or
stickers to the steering wheel hub trim
cover or the upper right side of the
instrument panel. Do not modify the
front bumper, vehicle body structure, or
add aftermarket side steps or running
boards.
WARNING!
• It is dangerous to try to repair any part ofthe air bag system yourself. Be sure to
tell anyone who works on your vehicle
that it has an air bag system.
• Do not attempt to modify any part of your
air bag system. The air bag may inflate
accidentally or may not function prop-
erly if modifications are made. Take your
vehicle to an authorized dealer for any
air bag system service. If your seat, in-
cluding your trim cover and cushion,
needs to be serviced in any way (includ-
ing removal or loosening/tightening of
seat attachment bolts), take the vehicle
to your authorized dealer. Only manufac-
turer approved seat accessories may be
used. If it is necessary to modify the air
bag system for persons with disabilities,
contact your authorized dealer.
SAFETY
60
Page 83 of 180
NOTE:
In order to ensure proper operation, the
Speed Control System has been designed to
shut down if multiple Speed Control func-
tions are operated at the same time. If this
occurs, the Speed Control System can be
reactivated by pushing the on/off button and
resetting the desired vehicle set speed.
To Activate
Push the on/off button to activate the Speed
Control. The cruise indicator light in the in-
strument cluster display will illuminate. To
turn the system off, push the on/off button a
second time. The cruise indicator light will
turn off. The system should be turned off
when not in use.
WARNING!
Leaving the Speed Control system on when
not in use is dangerous. You could acci-
dentally set the system or cause it to go
faster than you want. You could lose con-
trol and have an accident. Always leave the
system off when you are not using it.
To Set A Desired Speed
Turn the Speed Control on. When the vehicle
has reached the desired speed greater than
25 mph (40 km/h), push the SET (-) button
and release. Release the accelerator and the
vehicle will operate at the selected speed.
NOTE:
The vehicle should be traveling at a steady
speed and on level ground before pushing the
SET (-) button.
To Vary The Speed Setting
To Increase Speed
When the Speed Control is set, you can in-
crease speed by pushing the RES (+) button.
The speed increment is dependant on the
chosen speed unit of U.S. (mph) or Metric
(km/h):
U.S. Speed (mph)
• Pushing the RES (+) button once will resultin a 1 mph increase in set speed. Each
subsequent tap of the button results in an
increase of 1 mph. • If the button is continually pushed, the set
speed will continue to increase until the
button is released, then the new set speed
will be established.
Metric Speed (km/h)
• Pushing the RES (+) button once will result in a 1 km/h increase in set speed. Each
subsequent tap of the button results in an
increase of 1 km/h.
• If the button is continually pushed, the set speed will continue to increase until the
button is released, then the new set speed
will be established.
To Decrease Speed
When the Speed Control is set, you can de-
crease speed by pushing the SET (-) button.
The speed decrement is dependant on the
chosen speed unit of U.S. (mph) or Metric
(km/h):
U.S. Speed (mph)
• Pushing the SET (-) button once will result in a 1 mph decrease in set speed. Each
subsequent tap of the button results in a
decrease of 1 mph.
81
Page 112 of 180
SCHEDULED SERVICING
Your vehicle is equipped with an automatic
oil change indicator system. The oil change
indicator system will remind you that it is
time to take your vehicle in for scheduled
maintenance.
Based on engine operation conditions, the oil
change indicator message will illuminate.
This means that service is required for your
vehicle. Operating conditions such as fre-
quent short-trips, trailer tow, extended en-
gine idle time, extremely hot or cold ambient
temperatures will influence when the “Oil
Change Required” message is displayed. Se-
vere Operating Conditions can cause the
change oil message to illuminate as early as
3,500 miles (5,600 km) since last reset.
Have your vehicle serviced as soon as pos-
sible, within the next 500 miles (805 km).Your authorized dealer will reset the oil
change indicator message after completing
the scheduled oil change. If a scheduled oil
change is performed by someone other than
your authorized dealer, the message can be
reset by referring to the steps described un-
der “Oil Change Reset” in “Instrument Clus-
ter Display” in “Getting To Know Your Instru-
ment Panel” in the Owner’s Manual at
www.mopar.com/en-us/care/owners-manual.html
(U.S. Residents) or www.owners.mopar.ca
(Canadian Residents) for further information.
NOTE:
Under no circumstances should oil change
intervals exceed 10,000 miles (16,000 km),
350 hours of engine run time or twelve
months, whichever comes first. The 350
hours of engine run or idle time is generally
only a concern for fleet customers.
Severe Duty All Models
Change Engine Oil at 4,000 miles
(6,500 km) or 350 hours of engine run time
if the vehicle is operated in a dusty and off
road environment or is operated predomi-
nantly at idle, or only very low engine RPM’s.
This type of vehicle use is considered Severe
Duty.
SERVICING AND MAINTENANCE
110
Page 146 of 180
Clock Setting
1. To start the clock setting procedure, pushthe SETTINGS
button on the right
side of the display, then “Clock” button
on the touchscreen, and then “Set Time &
Format” button on the touchscreen. Se-
lect the up or down arrows as appropriate.
2. Press the up or down arrows to adjust the hours or minutes, next select the AM or
PM button on the touchscreen. You can
also select 12hr or 24hr format by press-
ing the desired button on the
touchscreen.
3. Once the time is set, press the “Done” or “back arrow” button on the touchscreen
to exit the time screen.
NOTE:
Once the time has been set on the radio, the
time will also appear in the instrument clus-
ter display.
Equalizer, Balance And Fade
1. Push the SETTINGSbutton on the
right side of the display.
2. Scroll down and press the “Audio” button on the touchscreen to open the Audio
menu.
3. The Audio Menu shows the following op- tions for you to customize your audio
settings.
Equalizer — If Equipped
• Press the “Equalizer” button on the touch- screen to adjust the Bass, Mid and Treble.
Use the “+” or “-” buttons on the touch-
screen to adjust the equalizer to your de-
sired settings.
Balance/Fade — If Equipped
• Press the “Balance/Fade” button on the touchscreen to adjust the sound from the
speakers. Use the “arrow” buttons on the
touchscreen to adjust the sound level from
the front and rear or right and left side
speakers. Press the Center “C” button on
the touchscreen to reset the balance and
fade to the factory setting. Speed Adjusted Volume — If Equipped
• Press the “Speed Adjusted Volume” button
on the touchscreen to select between OFF,
1, 2 or 3. This decreases the radio volume
relative to a decrease in vehicle speed.
AUX Volume Offset
• Press the “AUX Volume Offset” button on the touchscreen to activate the AUX Vol-
ume Offset screen.
• The AUX Volume Offset is adjusted by pressing of the “+” and “–” buttons. This
alters the AUX input audio volume. The
level value, which spans between plus or
minus three, is displayed above the adjust-
ment bar.
Auto Play
• Press the “Auto Play” button on the touch- screen to activate the Auto Play screen.
• The Auto Play feature begins playing music as soon as a USB Media device is con-
nected to one of the vehicle’s Media USB
ports, when it is turned on. Press “Off” to
turn the setting off.
MULTIMEDIA
144
Page 147 of 180
Loudness — If Equipped
• Press the “Loudness” button on the touch-screen to select the Loudness feature.
When this feature is activated, it improves
sound quality at lower volumes.
Auto-On Radio
• Press the “Auto-On Radio” button on the touchscreen, select On, Off, or Recall Last
followed by pressing “Done” or the “back
arrow” button on the touchscreen. When
this feature is activated, the radio auto-
matically turns on when the vehicle is in
run or recalls whether it was on or off at last
ignition off.
Radio Off Delay
• Press the “Radio Off Delay” button to keep the radio On for a preset amount of time
after the Ignition is switched OFF. Press the
“back arrow” button when completed.
145
Page 148 of 180
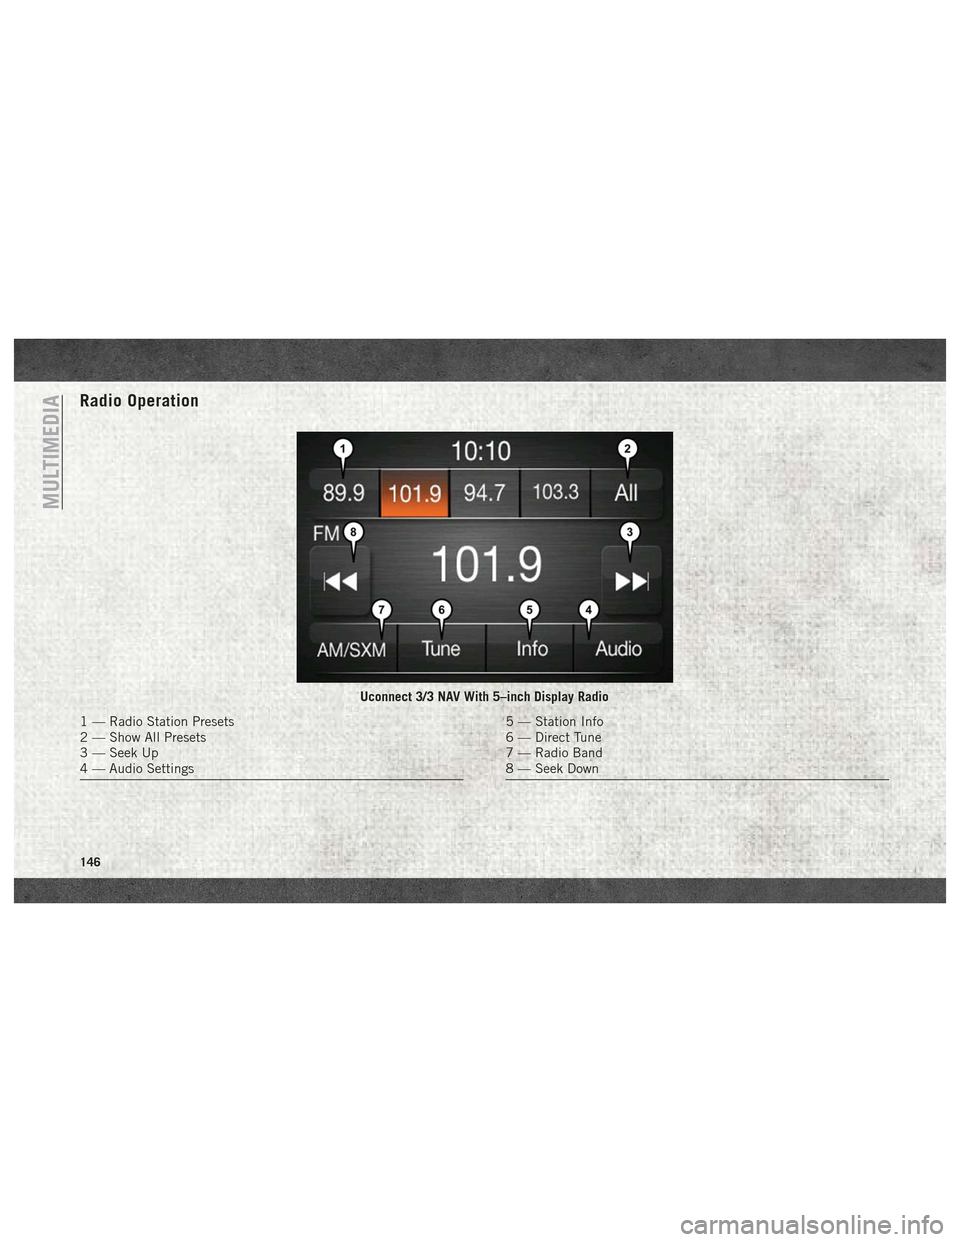
Radio Operation
Uconnect 3/3 NAV With 5–inch Display Radio
1 — Radio Station Presets
2 — Show All Presets
3 — Seek Up
4 — Audio Settings5 — Station Info
6 — Direct Tune
7 — Radio Band
8 — Seek Down
MULTIMEDIA
146
Page 149 of 180
Seek Up/Down Buttons
• Push the up or down button to seek throughradio stations in AM, FM or SXM bands.
• Hold either button to bypass stations with- out stopping.
Store Radio Presets Manually
The Radio stores up to 12 presets in each of
the Radio modes. There are four visible pre-
sets at the top of the radio screen. Pressing
the “All” button on the touchscreen will dis-
play all of the preset stations for that mode.
To store a radio preset manually, follow the
steps below:
1. Tune to the desired station.
2. Press and hold the desired numbered but- ton on the touchscreen for more than two
seconds, or until you hear a confirmation
beep.USB/Audio Jack (AUX)/Bluetooth
Operation
USB/iPod
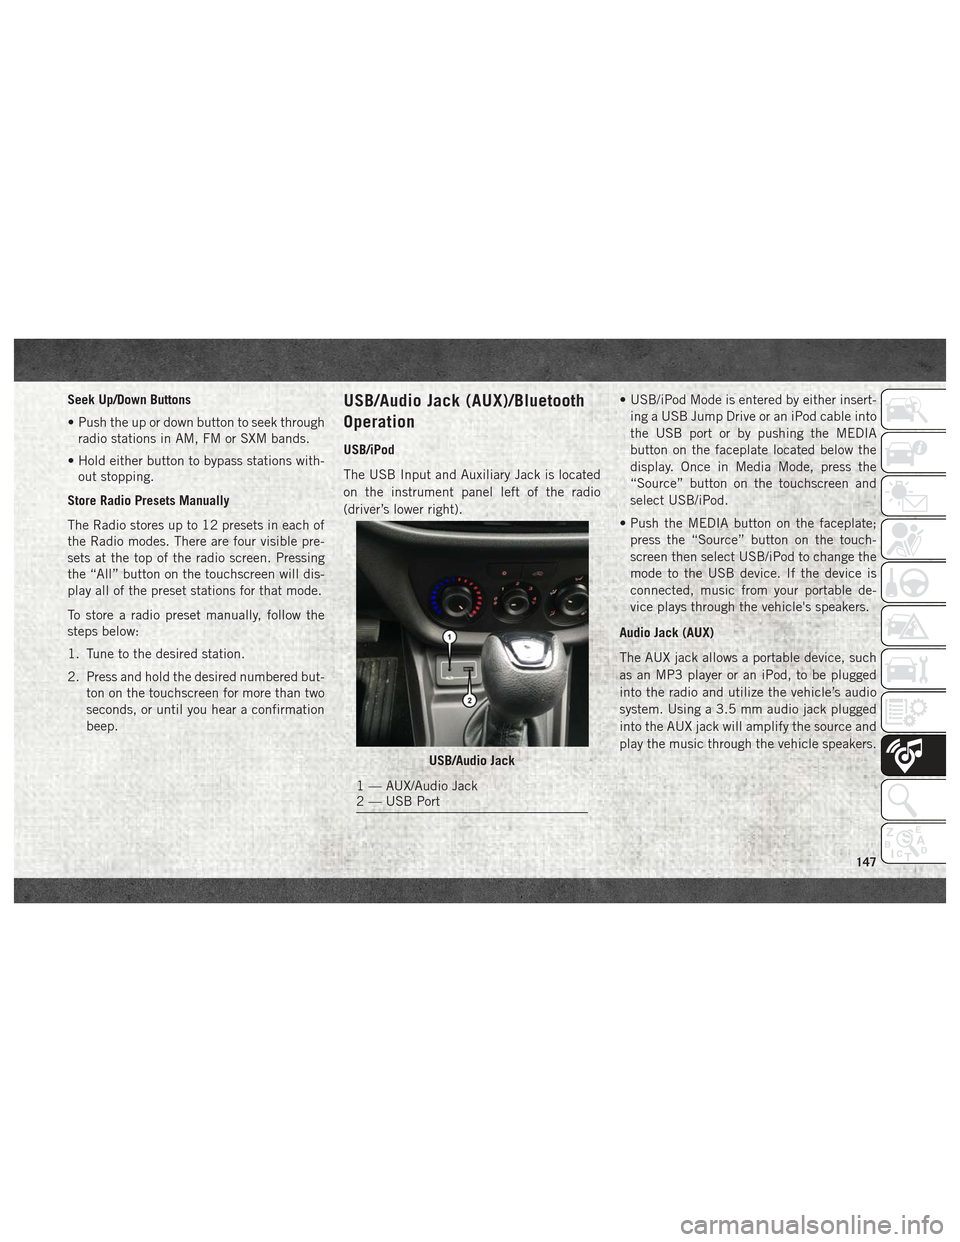
The USB Input and Auxiliary Jack is located
on the instrument panel left of the radio
(driver’s lower right). • USB/iPod Mode is entered by either insert-
ing a USB Jump Drive or an iPod cable into
the USB port or by pushing the MEDIA
button on the faceplate located below the
display. Once in Media Mode, press the
“Source” button on the touchscreen and
select USB/iPod.
• Push the MEDIA button on the faceplate; press the “Source” button on the touch-
screen then select USB/iPod to change the
mode to the USB device. If the device is
connected, music from your portable de-
vice plays through the vehicle's speakers.
Audio Jack (AUX)
The AUX jack allows a portable device, such
as an MP3 player or an iPod, to be plugged
into the radio and utilize the vehicle’s audio
system. Using a 3.5 mm audio jack plugged
into the AUX jack will amplify the source and
play the music through the vehicle speakers.
USB/Audio Jack
1 — AUX/Audio Jack
2 — USB Port
147
Page 151 of 180
Depending on the vehicles options, the following feature settings are available:
• Language• Doors & Locks
• Display • Engine Options
• Units (If Equipped) • Audio
• Voice • Phone (If Equipped)
• Clock • SiriusXM Setup (If Equipped)
• Brakes • Radio Setup
• Safety & Driving Assistance (If Equipped) • Restore Settings
• Lights • Clear Personal Data
Refer to “Uconnect Settings” in “Multime-
dia” in your Owner’s Manual on
www.mopar.com/en-us/care/owners-manual.html
(U.S. Residents) or www.owners.mopar.ca
(Canadian Residents) for further information.
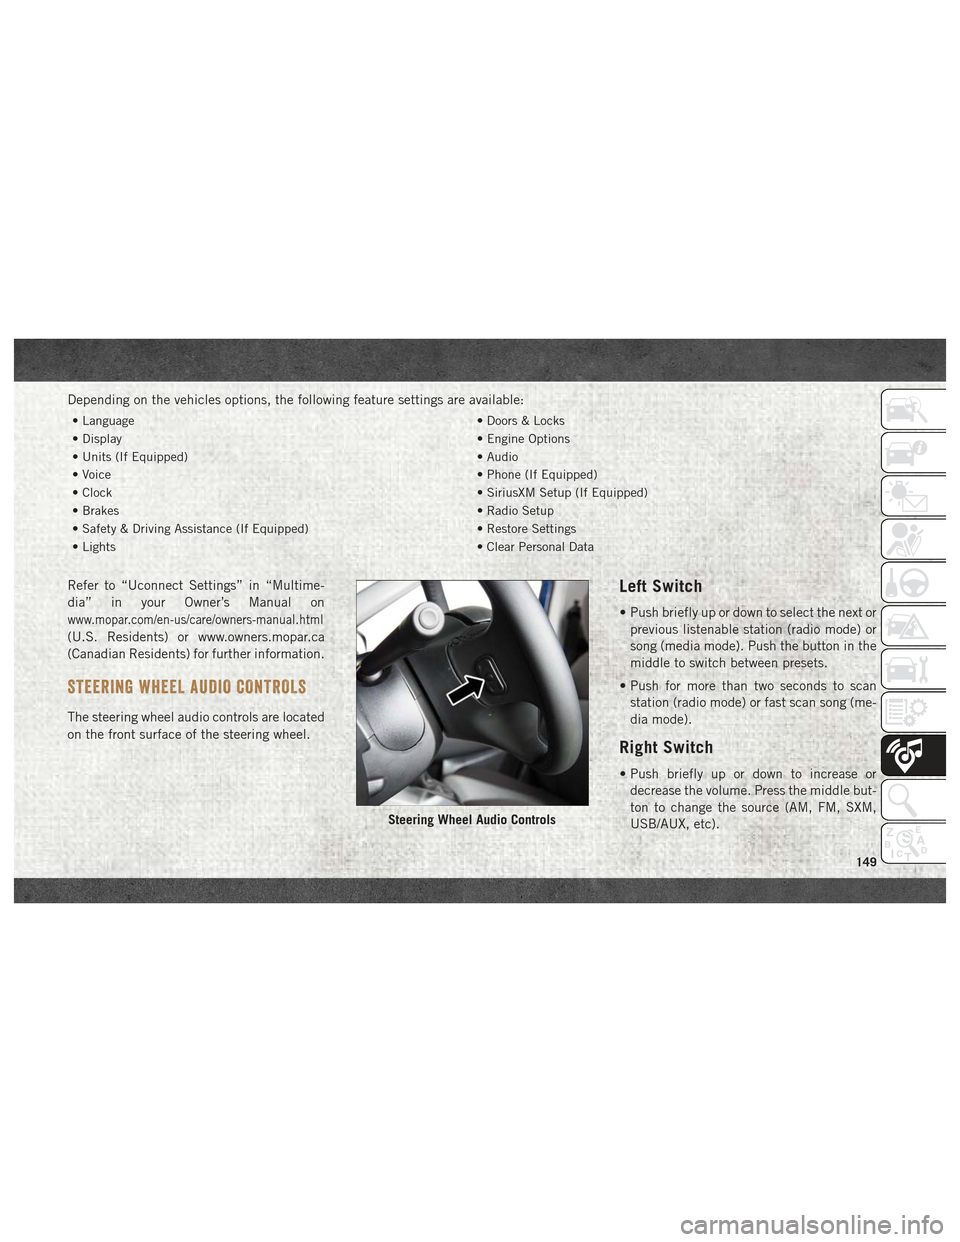
STEERING WHEEL AUDIO CONTROLS
The steering wheel audio controls are located
on the front surface of the steering wheel.
Left Switch
• Push briefly up or down to select the next or
previous listenable station (radio mode) or
song (media mode). Push the button in the
middle to switch between presets.
• Push for more than two seconds to scan station (radio mode) or fast scan song (me-
dia mode).
Right Switch
• Push briefly up or down to increase ordecrease the volume. Press the middle but-
ton to change the source (AM, FM, SXM,
USB/AUX, etc).
Steering Wheel Audio Controls
149