wiper RENAULT CAPTUR 2018 Owners Manual
[x] Cancel search | Manufacturer: RENAULT, Model Year: 2018, Model line: CAPTUR, Model: RENAULT CAPTUR 2018Pages: 258, PDF Size: 7.15 MB
Page 7 of 258

1.1
Section 1: Getting to know your vehicle
RENAULT card: General information, use, deadlocking . . . . . . . . . . . . . . . . . . . . . . . . . . . . . . . . . . 1.2
Opening and closing the doors . . . . . . . . . . . . . . . . . . . . . . . . . . . . . . . . . . . .\
. . . . . . . . . . . . . . . . . 1.11
Locking, unlocking the opening elements . . . . . . . . . . . . . . . . . . . . . . . . . . . . . . . . . . . .\
. . . . . . . . . 1.13
Automatic locking when driving . . . . . . . . . . . . . . . . . . . . . . . . . . . . . . . . . . . . \
. . . . . . . . . . . . . . . . . 1.15
Headrests - Seats . . . . . . . . . . . . . . . . . . . . . . . . . . . . . . . . . . . .\
. . . . . . . . . . . . . . . . . . . . . . . . . . . 1.16
Seat belts. . . . . . . . . . . . . . . . . . . . . . . . . . . . . . . . . . . . \
. . . . . . . . . . . . . . . . . . . . . . . . . . . . . . . . . . 1.19
Additional methods of restraint . . . . . . . . . . . . . . . . . . . . . . . . . . . . . . . . . . . .\
. . . . . . . . . . . . . . . . . 1.23in addition to the front seat belts . . . . . . . . . . . . . . . . . . . . . . . . . . . . . . . . . . . .\
. . . . . . . . . . 1.23
to the rear seat belts . . . . . . . . . . . . . . . . . . . . . . . . . . . . . . . . . . . .\
. . . . . . . . . . . . . . . . . . . 1.27
side . . . . . . . . . . . . . . . . . . . . . . . . . . . . . . . . . . . . \
. . . . . . . . . . . . . . . . . . . . . . . . . . . . . . . . . 1.28
Child safety: General information . . . . . . . . . . . . . . . . . . . . . . . . . . . . . . . . . . . .\
. . . . . . . . . . . . . . . 1.30 Choosing a child seat mounting . . . . . . . . . . . . . . . . . . . . . . . . . . . . . . . . . . . . \
. . . . . . . . . . . 1.33
Fitting a child seat . . . . . . . . . . . . . . . . . . . . . . . . . . . . . . . . . . . .\
. . . . . . . . . . . . . . . . . . . . . 1.35
Deactivating/activating the front passenger airbag . . . . . . . . . . . . . . . . . . . . . . . . . . . . . . . . 1.39
Driving position . . . . . . . . . . . . . . . . . . . . . . . . . . . . . . . . . . . .\
. . . . . . . . . . . . . . . . . . . . . . . . . . . . . 1.42
Instrument panel . . . . . . . . . . . . . . . . . . . . . . . . . . . . . . . . . . . .\
. . . . . . . . . . . . . . . . . . . . . . . . . . . . 1.46 Trip computer and warning system . . . . . . . . . . . . . . . . . . . . . . . . . . . . . . . . . . . .\
. . . . . . . . 1.53
Steering wheel/Power-assisted steering . . . . . . . . . . . . . . . . . . . . . . . . . . . . . . . . . . . . \
. . . . . . . . . . 1.63
Clock and outdoor temperature . . . . . . . . . . . . . . . . . . . . . . . . . . . . . . . . . . . . \
. . . . . . . . . . . . . . . . . 1.64
Rear view mirrors . . . . . . . . . . . . . . . . . . . . . . . . . . . . . . . . . . . .\
. . . . . . . . . . . . . . . . . . . . . . . . . . . 1.66
Exterior lighting and signals. . . . . . . . . . . . . . . . . . . . . . . . . . . . . . . . . . . . \
. . . . . . . . . . . . . . . . . . . . 1.67
Audible and visual signals . . . . . . . . . . . . . . . . . . . . . . . . . . . . . . . . . . . . \
. . . . . . . . . . . . . . . . . . . . . 1.70
Headlight beam adjustment . . . . . . . . . . . . . . . . . . . . . . . . . . . . . . . . . . . . \
. . . . . . . . . . . . . . . . . . . . 1.71
Washers, wipers . . . . . . . . . . . . . . . . . . . . . . . . . . . . . . . . . . . .\
. . . . . . . . . . . . . . . . . . . . . . . . . . . . 1.73
Fuel tank (filling with fuel) . . . . . . . . . . . . . . . . . . . . . . . . . . . . . . . . . . . .\
. . . . . . . . . . . . . . . . . . . . . 1.76
Page 79 of 258

1.73
WINDSCREEN WASH/WIPE (1/2)
A
B
C
D
1
With the ignition on, move stalk 1
– A park.
– B intermittent wiping.
The wipers will pause for several
seconds between sweeps. It is
possible to change the time be-
tween sweeps by turning ring 2.
– C normal wiping speed.
– D fast wiping speed.
Positions B, C and D are accessible
with the ignition on.
Vehicles with automatic wiper
function
With the engine running, move stalk 1
– A park.
– B automatic wiper function
When this position is selected, the
system detects water on the wind-
screen and triggers the wipers at a
suitable wiping speed. It is possi-
ble to change the triggering thresh-
old and the time sweeps by turning
ring 2:
– E: minimum sensitivity
– F: maximum sensitivity
NB: in foggy weather or during
snowfalls, the wiping is not automati-
cally triggered and remains under
the driver’s control.
– C normal wiping speed.
– D fast wiping speed.
Position C is accessible with the ig-
nition on. Positions B and D are ac-
cessible only with the engine run-
ning.
12E
F
Special note
When driving, the wiping speed slows
down whenever the vehicle stops. For
example: the speed will change from
a fast wiping speed to normal wiping
speed.
As soon as the vehicle moves off,
wiping will return to the speed originally
selected.
Any action on stalk 1 overrides and
cancels automatic operation.
Starting the vehicle with the stalk in
position D triggers a slow continuous
sweeping movement. Adjusting the
stalk to position D is necessary to trig-
ger a rapid continuous sweeping move-
ment.
Page 80 of 258

1.74
Windscreen washer
With the ignition on, pull stalk 1 to-
wards you.
A brief pull will trigger a single sweep
of the wipers, in addition to the wind-
screen washer.
A longer pull triggers, as well as the
windscreen washer, continuous sweep-
ing until the end of the request, then
three return sweeps, then after a few
seconds, a fourth.
WINDSCREEN WASH/WIPE (2/2)
In freezing or snowy weather, ensure
they are not stuck to the windscreen
(including the central area located
behind the interior rear-view mirror)
and the rear screen before starting
the wipers (risk of motor overheat-
ing).
Check the condition of the wiper
blades. You are responsible for their
service life:
– they must remain clean: clean the blades, windscreen and
rear screen regularly with soapy
water;
– do not use them when the wind- screen or rear screen are dry;
– free them from the windscreen or rear screen when they have not
been used for a long time.
In all cases, replace them as soon
as they begin to lose efficiency: ap-
proximately once a year.
Before using the windscreen wiper,
check that no objects are obstruct-
ing the travel of the blade.Do not try to lift the wiper blades.
They cannot remain detached from
the windscreen. To replace the
blades, refer to Section 5: “Wiper
blades”.
When working in the engine
compartment, ensure that
the windscreen wiper stalk
is in position A (park).
Risk of injury.
Before any action involving
the windscreen (washing
the vehicle, de-icing, clean-
ing the windscreen, etc.)
return stalk 1 to position A (park).
Risk of injury and/or damage.
A
B
C
D
1
Page 81 of 258

1.75
pRear screen wash/wipeWith ignition on, turn the end
of the stalk 1 to bring the mark 2 in line
with the symbol. When the stalk is re-
leased, it returns to the rear windscreen
wiper position.
A short pull triggers the rear windscreen
wipers.
A prolonged action triggers, in addition
to the rear windscreen wipers, a contin-
uous sweep until the stalk is released,
then two return wipes followed by a
third, after a few seconds.
Special note
If the windscreen wipers are operat-
ing or are in automatic mode, the rear
screen wiper wipes intermittently when
reverse gear is engaged.
Depending on the vehicle, you can
deactivate this function on the touch
screen. Please see the equipment in-
structions for further information.
YSpeed-dependent
timed rear screen
wiper
With the ignition on, turn the end of
stalk 1 to align mark 2 with the symbol.
Wiping frequency varies with speed.
REAR SCREEN WASH, WIPE
12In freezing or snowy weather, ensure
they are not stuck to the windscreen
(including the central area located
behind the interior rear-view mirror)
and the rear screen before starting
the wipers (risk of motor overheat-
ing).
Check the condition of the wiper
blades. You are responsible for their
service life:
– they must remain clean: clean the blades, windscreen and
rear screen regularly with soapy
water;
– do not use them when the wind- screen or rear screen are dry;
– free them from the windscreen or rear screen when they have not
been used for a long time.
In all cases, replace them as soon
as they begin to lose efficiency: ap-
proximately once a year.
Before using the rear wiper, check
that no object obstructs the travel of
the blade.
Do not use the wiper arm to open or
close the tailgate.
Before any action on the windscreen (washing the vehicle, de-icing,
cleaning the windscreen, etc.) return stalk 1 to the park position.
Risk of injury or damage.
Page 88 of 258

2.4
Operating faults
In certain cases, the hands-free
RENAULT card may not work:
– when the RENAULT card battery is drained, flat battery, etc.
– near to appliances operating on the same frequency as the card (moni-
tor, mobile phone, video game, etc.);
– vehicle located in a high electromag- netic radiation zone.
The message “PLEASE INSERT
KEYCARD” appears on the instrument
panel.
Insert the RENAULT card fully into card
reader 2.
Accessories function(switching on the ignition)
Once you have gained access to your
vehicle, you may use some of its func-
tions (radio, navigation, wipers, etc.).
STARTING, STOPPING THE ENGINE (2/3)
Driver’s responsibility when parking or stopping the vehicle
Never leave an animal, child or adult who is not self-sufficient alone in
your vehicle, even for a short time.
They may pose a risk to themselves or to others by starting the engine, \
activating
equipment such as the electric windows or locking the doors, for example\
.
Also, in hot and/or sunny weather, please remember that the temperature inside
the passenger compartment increases very quickly.
RISK OF DEATH OR SERIOUS INJURY.
For other functions:
– vehicles with remote control
RENAULT card, insert the card into
reader 2;
– vehicles with a RENAULT “hands-
free” card, with the card in the pas-
senger compartment or inserted in
the card reader 2, press button 1
without pressing the pedals.
Note: depending on the vehicle, press-
ing button 1 starts the engine.
12
Page 170 of 258

4.2
To open the bonnet, pull the handle 1.
BONNET (1/2)
1
Please note when work-
ing close to the engine that
it may be hot. The engine
cooling fan may also start
at any moment. The
warning
light in the engine compartment re-
minds you of this.
Risk of injury.
Unlocking the bonnet catch
To open, push tab 2 to the left as you
open the bonnet.
Opening the bonnetLift the bonnet, helping it up, and it will
rest in position with the help of struts.
2
Do not press down on the
bonnet: there is a risk that
the bonnet may accidentally
close.
When working in the engine
compartment, ensure that
the windscreen wiper stalk
is in the park position.
Risk of injury.
Before performing any
action in the engine com-
partment, the ignition must
be switched off (please see
the information on “Starting, stop-
ping the engine” in Section 2).
Page 174 of 258
4.6
Engine oil grade
Refer to the Maintenance Service
Booklet for your vehicle.
ENGINE OIL LEVEL: topping up, filling (2/2) OIL CHANGE
Never run the engine in an
enclosed space as exhaust
gases are poisonous.
Engine oil change: if you
are changing the oil when
the engine is hot, be careful
not to scald yourself if the
oil overflows.
Filling: take care when
topping up the oil that
no oil drips onto engine
components - risk of fire.
Remember to refit the cap securely
as there is a risk of fire if oil splashes
onto hot engine components.When working in the engine
compartment, ensure that
the windscreen wiper stalk
is in the park position.
Risk of injury.
Please note when work-
ing close to the engine that
it may be hot. The engine
cooling fan may also start
at any moment. The
warning
light in the engine compartment re-
minds you of this.
Risk of injury.
Oil change
Service interval: refer to the
Maintenance Service Booklet for your
vehicle.
Oil change capacity
Please refer to the maintenance docu-
ment for your vehicle, or contact an au-
thorised dealer.
Always check the engine oil level using
the dipstick, as explained previously (it
should never fall below the minimum
level, or be over the maximum level on
the dipstick).
Consult your approved dealer at
once if you notice an abnormal or
repeated drop in any of the fluid
levels.
Exceeding the maximum
engine oil level
Under no circumstances
must the maximum fill level
be exceeded: risk of damage to the
engine and catalytic converter.
If the oil level exceeds the maximum
level, do not start your vehicle and
contact an approved Dealer.
Page 175 of 258
4.7
Frequency of checking coolant level
Check the coolant level regularly
(very severe damage is likely to be
caused to the engine if it runs out of
coolant).
If the level needs to be topped up, only
use products approved by our Technical
Department which ensure:
– protection against freezing;
– an anti-corrosion protection for the cooling system.
Consult your approved dealer at
once if you notice an abnormal or
repeated drop in any of the fluid
levels.
No operations should be
carried out on the cooling
circuit when the engine is
hot.
Risk of burns.
Replacement interval
Refer to the Maintenance Document for
your vehicle.
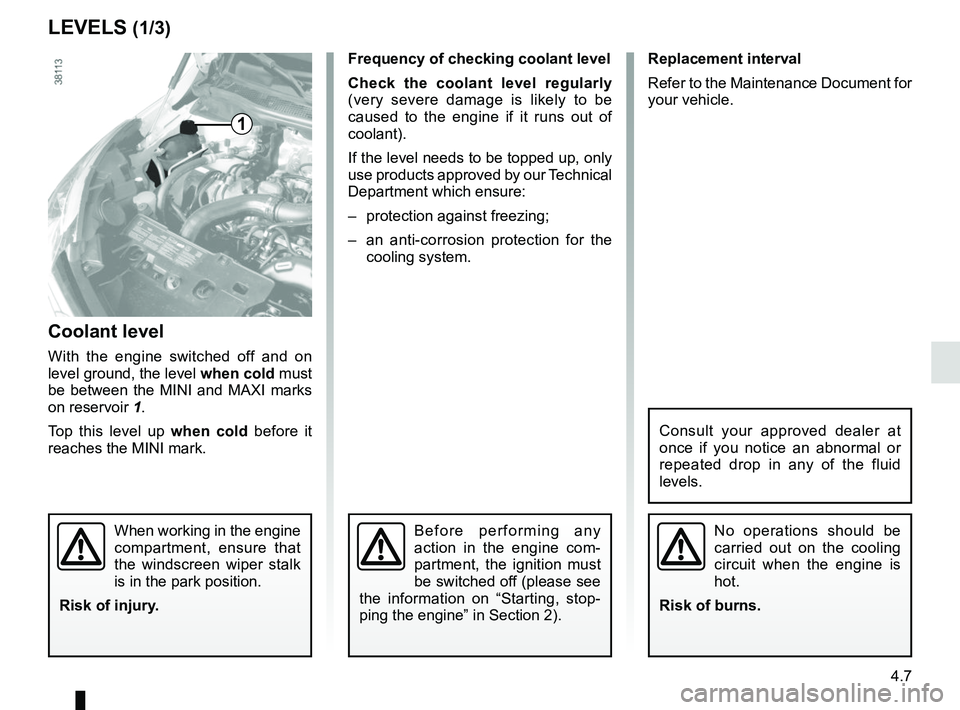
Coolant level
With the engine switched off and on
level ground, the level when cold must
be between the MINI and MAXI marks
on reservoir 1.
Top this level up when cold before it
reaches the MINI mark.
LEVELS (1/3)
1
When working in the engine
compartment, ensure that
the windscreen wiper stalk
is in the park position.
Risk of injury.Before performing any
action in the engine com-
partment, the ignition must
be switched off (please see
the information on “Starting, stop-
ping the engine” in Section 2).
Page 177 of 258
4.9
Filters
The replacement of filter components
(air filter, cabin filter, diesel filter, etc.)
is scheduled in the maintenance opera-
tions for your vehicle.
Replacement intervals for filter el-
ements: refer to the Maintenance
Document for your vehicle.
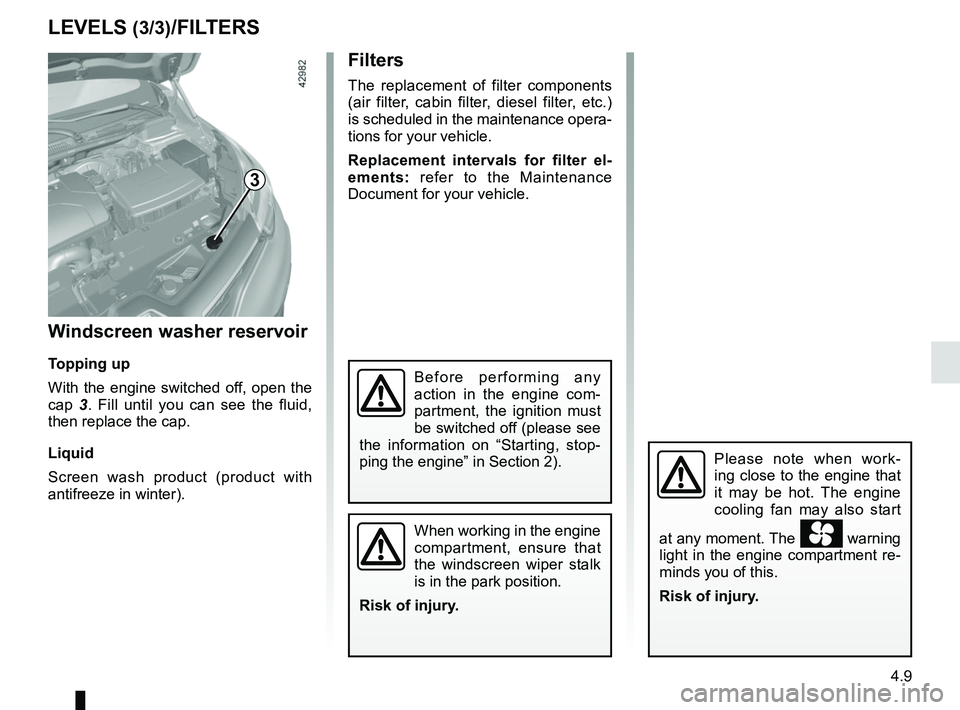
Windscreen washer reservoir
Topping up
With the engine switched off, open the
cap 3. Fill until you can see the fluid,
then replace the cap.
Liquid
Screen wash product (product with
antifreeze in winter).
LEVELS (3/3)/FILTERS
3
When working in the engine
compartment, ensure that
the windscreen wiper stalk
is in the park position.
Risk of injury.
Please note when work-
ing close to the engine that
it may be hot. The engine
cooling fan may also start
at any moment. The
warning
light in the engine compartment re-
minds you of this.
Risk of injury.
Before performing any
action in the engine com-
partment, the ignition must
be switched off (please see
the information on “Starting, stop-
ping the engine” in Section 2).
Page 183 of 258

4.15
Using a roller type car wash
Return the windscreen wiper stalk to
the Park position (refer to the informa-
tion on the “Windscreen washer, wiper”
in Section 1). Check the mounting of
external accessories, additional lights
and mirrors, and ensure that the wiper
blades are secured with adhesive tape.
Remove the radio aerial mast if your
vehicle is fitted with this equipment.
Remember to remove the tape and refit
the antenna after washing.
Vehicles with a matte paint
finish
This type of paint requires certain pre-
cautions.
You should do the following
Wash the vehicle by hand using plenty
of water, using a soft cloth or a gentle
sponge.
Do not do the following
Use wax-based products (polishing).
Rub too hard.
Wash the vehicle in a roller-type car
wash.
Attach stickers to the paintwork (risk of
leaving marks).
Wash the vehicle
using a high-pressure
cleaning device.
BODYWORK MAINTENANCE (3/3)Cleaning the headlights
As the headlights are made of plastic
“glass”, use a soft cloth or cotton wool
to clean them. If this does not clean
them properly, moisten the cloth with
soapy water, then wipe clean with a soft
damp cloth or cotton wool.
Finally, carefully dry off with a soft dry
cloth.
Do not use cleaning products con-
taining alcohol or utensils (e.g.: a
scraper).