seats RENAULT CLIO 2017 X98 / 4.G Owner's Manual
[x] Cancel search | Manufacturer: RENAULT, Model Year: 2017, Model line: CLIO, Model: RENAULT CLIO 2017 X98 / 4.GPages: 260, PDF Size: 7.98 MB
Page 52 of 260
1.46
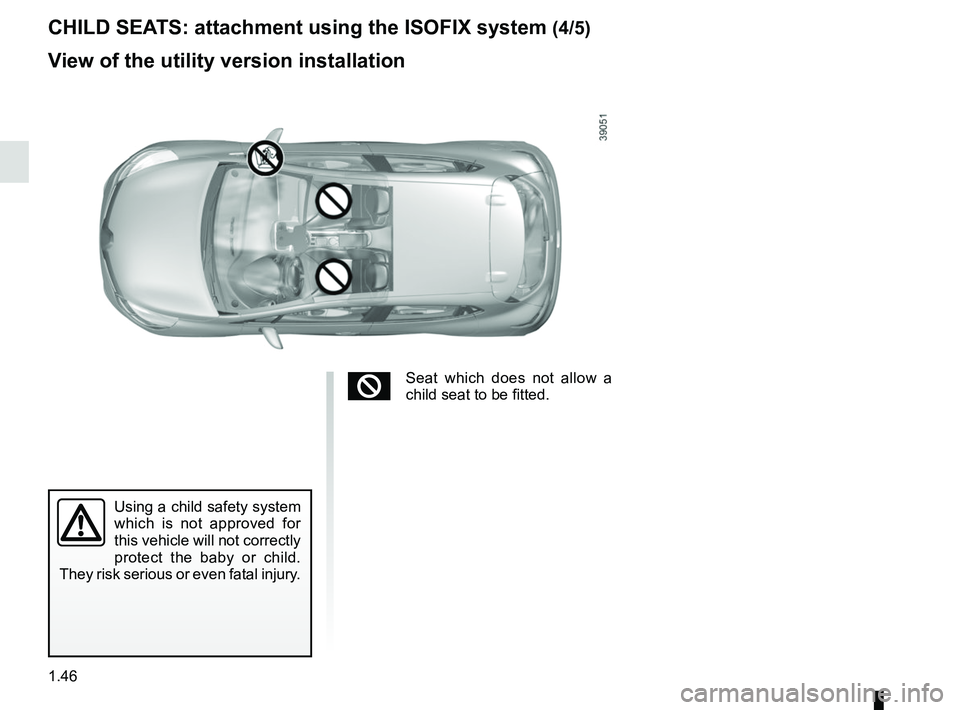
Using a child safety system
which is not approved for
this vehicle will not correctly
protect the baby or child.
They risk serious or even fatal injury.
CHILD SEATS: attachment using the ISOFIX system (4/5)
²Seat which does not allow a
child seat to be fitted.
View of the utility version installation
Page 53 of 260
1.47
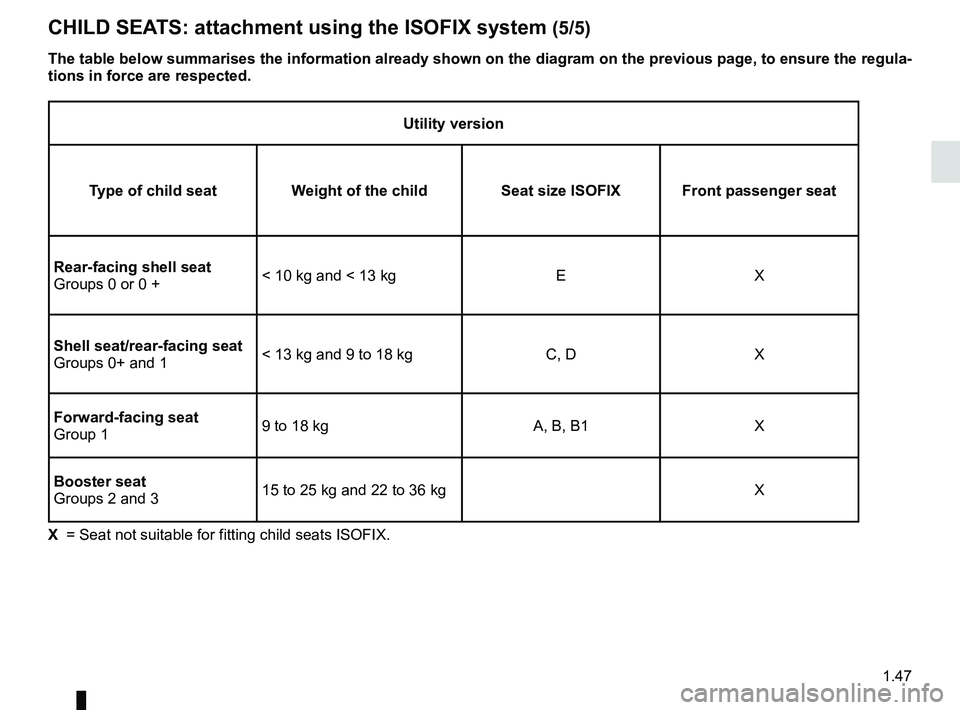
Utility version
Type of child seat Weight of the child Seat size ISOFIX Front passenger seat
Rear-facing shell seat
Groups 0 or 0 + < 10 kg and < 13 kg
EX
Shell seat/rear-facing seat
Groups 0+ and 1 < 13 kg and 9 to 18 kg
C, DX
Forward-facing seat
Group 1 9 to 18 kg
A, B, B1X
Booster seat
Groups 2 and 3 15 to 25 kg and 22 to 36 kg
X
X = Seat not suitable for fitting child seats ISOFIX.
The table below summarises the information already shown on the diagram \
on the previous page, to ensure the regula-
tions in force are respected.
CHILD SEATS: attachment using the ISOFIX system (5/5)
Page 152 of 260
3.12
ELECTRIC WINDOWS (1/2)
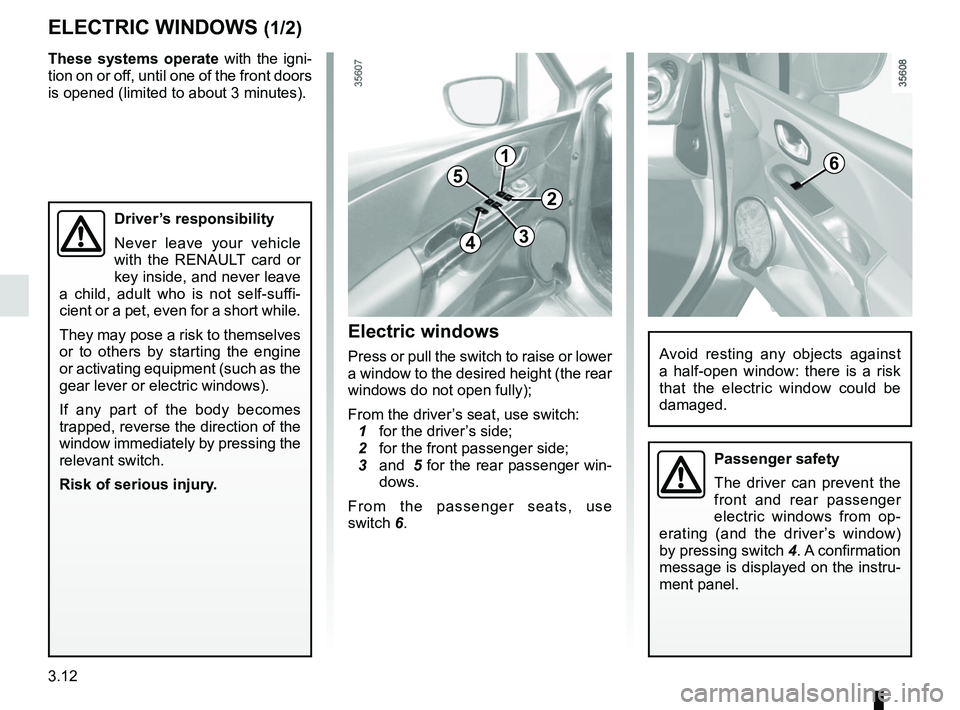
1
2
34
56
Avoid resting any objects against
a half-open window: there is a risk
that the electric window could be
damaged.
Driver’s responsibility
Never leave your vehicle
with the RENAULT card or
key inside, and never leave
a child, adult who is not self-suffi-
cient or a pet, even for a short while.
They may pose a risk to themselves
or to others by starting the engine
or activating equipment (such as the
gear lever or electric windows).
If any part of the body becomes
trapped, reverse the direction of the
window immediately by pressing the
relevant switch.
Risk of serious injury.
Passenger safety
The driver can prevent the
front and rear passenger
electric windows from op-
erating (and the driver’s window)
by pressing switch 4. A confirmation
message is displayed on the instru-
ment panel.
Electric windows
Press or pull the switch to raise or lower
a window to the desired height (the rear
windows do not open fully);
From the driver’s seat, use switch:
1 for the driver’s side;
2 for the front passenger side;
3 and 5 for the rear passenger win-
dows.
From the passenger seats, use
switch 6.
These systems operate
with the igni-
tion on or off, until one of the front doors
is opened (limited to about 3 minutes).
Page 162 of 260
3.22
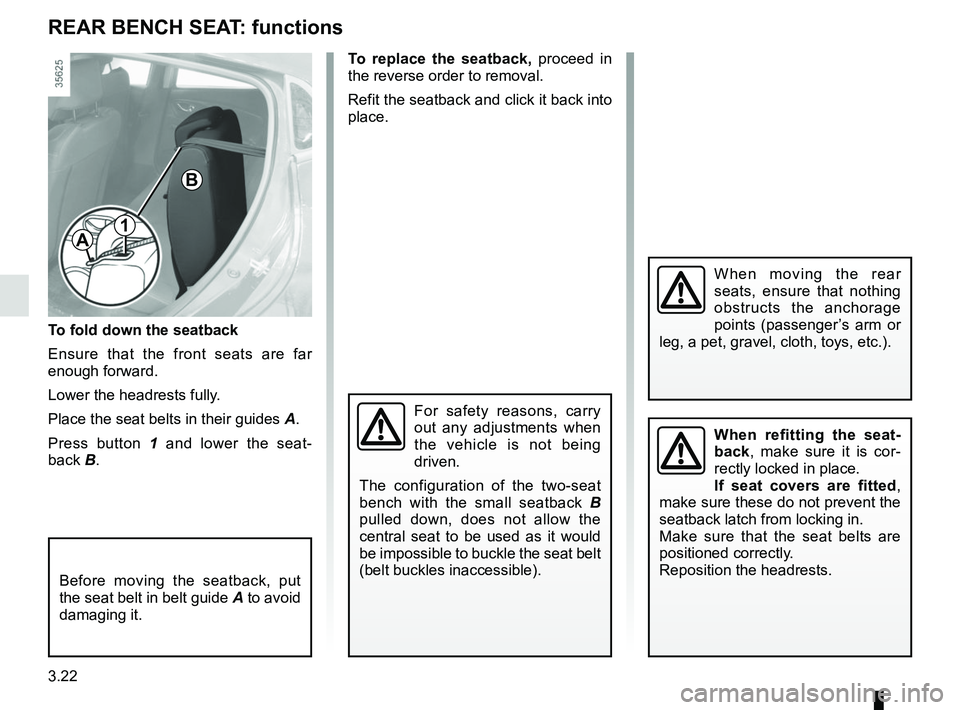
To fold down the seatback
Ensure that the front seats are far
enough forward.
Lower the headrests fully.
Place the seat belts in their guides A.
Press button 1 and lower the seat-
back B.
Before moving the seatback, put
the seat belt in belt guide A to avoid
damaging it.
For safety reasons, carry
out any adjustments when
the vehicle is not being
driven.
The configuration of the two-seat
bench with the small seatback B
pulled down, does not allow the
central seat to be used as it would
be impossible to buckle the seat belt
(belt buckles inaccessible).
REAR BENCH SEAT: functions
B
A1
To replace the seatback, proceed in
the reverse order to removal.
Refit the seatback and click it back into
place.
When moving the rear
seats, ensure that nothing
obstructs the anchorage
points (passenger’s arm or
leg, a pet, gravel, cloth, toys, etc.).
When refitting the seat-
back, make sure it is cor-
rectly locked in place.
If seat covers are fitted ,
make sure these do not prevent the
seatback latch from locking in.
Make sure that the seat belts are
positioned correctly.
Reposition the headrests.
Page 167 of 260
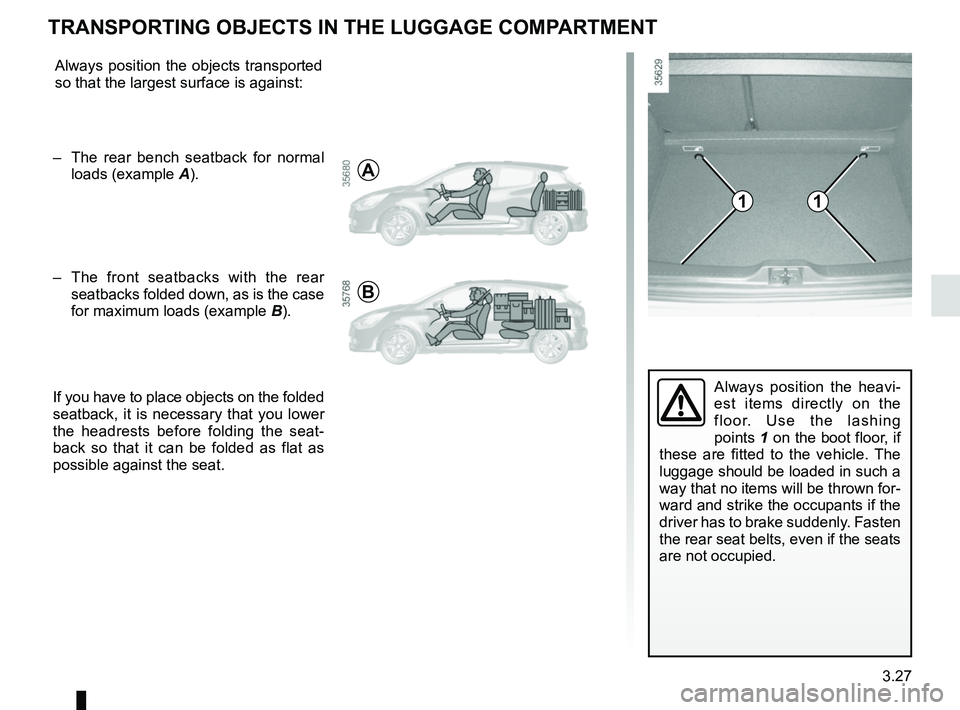
3.27
Always position the heavi-
est items directly on the
floor. Use the lashing
points 1 on the boot floor, if
these are fitted to the vehicle. The
luggage should be loaded in such a
way that no items will be thrown for-
ward and strike the occupants if the
driver has to brake suddenly. Fasten
the rear seat belts, even if the seats
are not occupied.
TRANSPORTING OBJECTS IN THE LUGGAGE COMPARTMENT
Always position the objects transported
so that the largest surface is against:
– The rear bench seatback for normal loads (example A).
– The front seatbacks with the rear seatbacks folded down, as is the case
for maximum loads (example B).
If you have to place objects on the folded
seatback, it is necessary that you lower
the headrests before folding the seat-
back so that it can be folded as flat as
possible against the seat.
11
B
A
Page 169 of 260
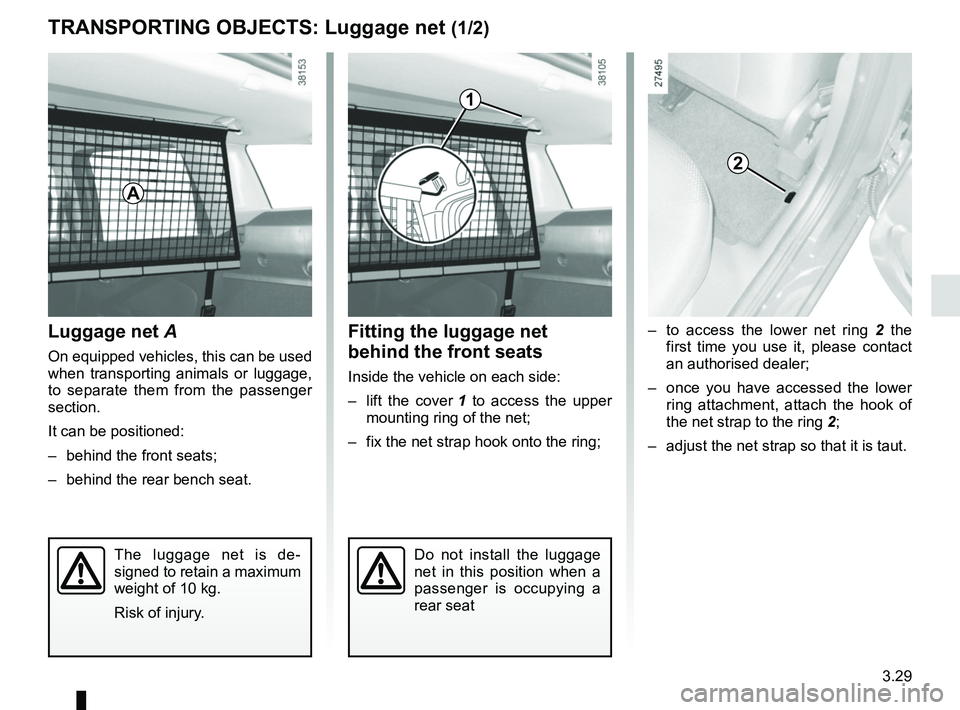
3.29
TRANSPORTING OBJECTS: Luggage net (1/2)
Luggage net A
On equipped vehicles, this can be used
when transporting animals or luggage,
to separate them from the passenger
section.
It can be positioned:
– behind the front seats;
– behind the rear bench seat.
Fitting the luggage net
behind the front seats
Inside the vehicle on each side:
– lift the cover 1 to access the upper
mounting ring of the net;
– fix the net strap hook onto the ring; – to access the lower net ring
2 the
first time you use it, please contact
an authorised dealer;
– once you have accessed the lower ring attachment, attach the hook of
the net strap to the ring 2;
– adjust the net strap so that it is taut.
2
The luggage net is de-
signed to retain a maximum
weight of 10 kg.
Risk of injury.Do not install the luggage
net in this position when a
passenger is occupying a
rear seat
1
A
Page 187 of 260
4.15
Glass instrument panel(e.g.: instrument panel, clock, exterior
temperature display, radio display, mul-
timedia or multifunction display etc.)
Use a soft cloth (or cotton wool).
If this does not clean them properly,
use a soft cloth (or cotton wool) slightly
moistened with soapy water and then
wipe clean with another soft damp cloth
or cotton wool.
Finally, carefully dry off with a soft dry
cloth.
Do not use products containing alco-
hol and/or spray fluids on the area.
Seat belts
These must be kept clean.
Use products selected by our Technical
Department (Approved outlets) or
warm, soapy water and a sponge and
wipe with a dry cloth.
Detergents or dyes must not be used
under any circumstances.
INTERIOR TRIM MAINTENANCE (1/2)
Textiles (seats, door trim, etc)
Vacuum-clean the textiles regularly.
Liquid stain
Use soapy water.
Dab lightly (never rub) with a soft cloth,
rinse and remove the excess.
Solid or pasty stain
Carefully remove the excess solid or
pasty material immediately with a
spatula (working from the edges to the
centre to avoid spreading the stain).
Clean as for a liquid stain.
Special instructions for sweets or
chewing gum
Put an ice cube on the stain to solidify
it, then proceed as for a solid stain.
A well-maintained vehicle will last
longer. It is therefore recommended to
maintain the interior of the vehicle regu-
larly.
A stain should always be dealt with
swiftly.
Whatever type of stain is on the trim,
use
cold (or warm) soapy water with
natural soap.
Detergents (washing-up liquid, pow-
dered products, alcohol-based prod-
ucts) should not be used.
Use a soft cloth.
Rinse and soak up the excess.
For further recommendations for
maintaining the interior, and/or for
any unsatisfactory results, please
see an authorised dealer.
Page 217 of 260
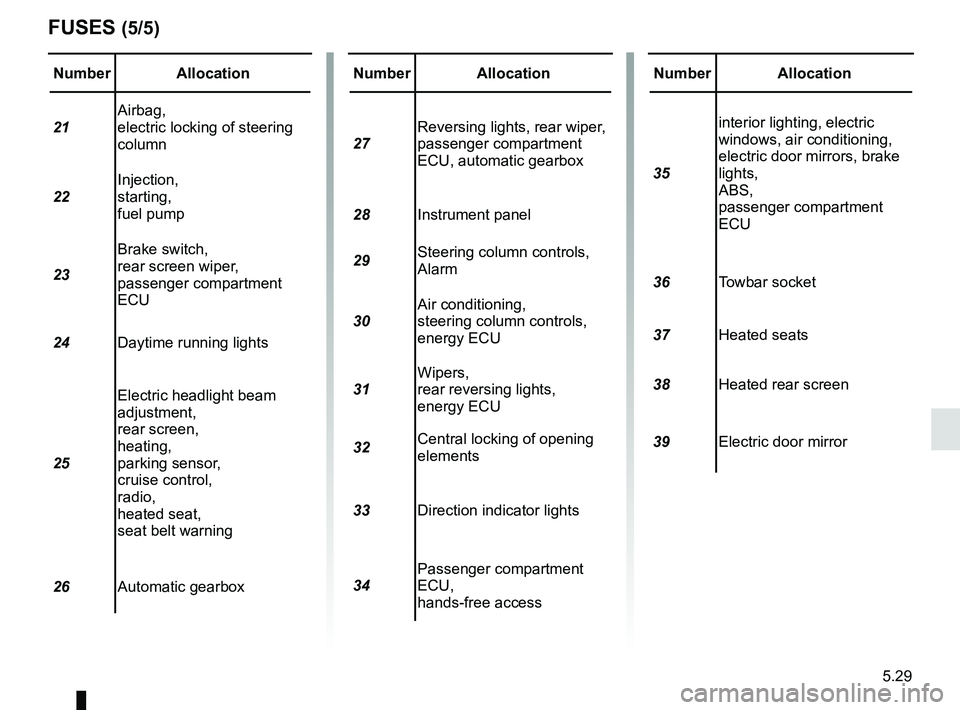
5.29
Number Allocation
21 Airbag,
electric locking of steering
column
22 Injection,
starting,
fuel pump
23 Brake switch,
rear screen wiper,
passenger compartment
ECU
24 Daytime running lights
25 Electric headlight beam
adjustment,
rear screen,
heating,
parking sensor,
cruise control,
radio,
heated seat,
seat belt warning
26 Automatic gearbox
FUSES (5/5)
Number Allocation
27 Reversing lights, rear wiper,
passenger compartment
ECU, automatic gearbox
28 Instrument panel
29 Steering column controls,
Alarm
30 Air conditioning,
steering column controls,
energy ECU
31 Wipers,
rear reversing lights,
energy ECU
32 Central locking of opening
elements
33 Direction indicator lights
34 Passenger compartment
ECU,
hands-free accessNumber Allocation
35 interior lighting, electric
windows, air conditioning,
electric door mirrors, brake
lights,
ABS,
passenger compartment
ECU
36 Towbar socket
37 Heated seats
38 Heated rear screen
39 Electric door mirror
Page 232 of 260
5.44
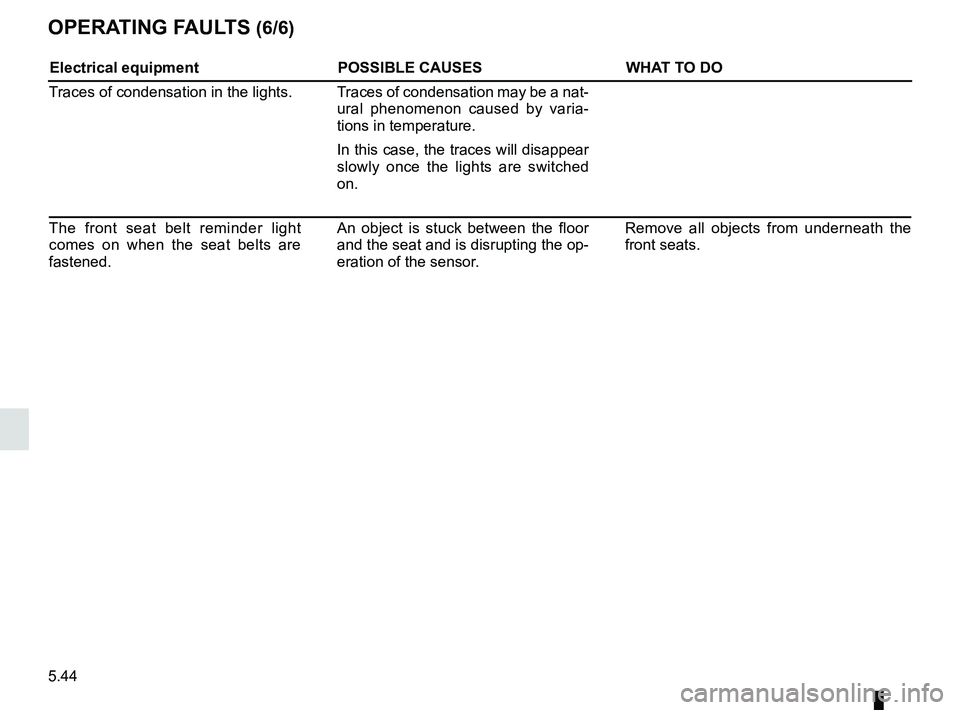
OPERATING FAULTS (6/6)
Electrical equipmentPOSSIBLE CAUSESWHAT TO DO
Traces of condensation in the lights. Traces of condensation may be a nat- ural phenomenon caused by varia-
tions in temperature.
In this case, the traces will disappear
slowly once the lights are switched
on.
The front seat belt reminder light
comes on when the seat belts are
fastened. An object is stuck between the floor
and the seat and is disrupting the op-
eration of the sensor. Remove all objects from underneath the
front seats.
Page 253 of 260
7.1
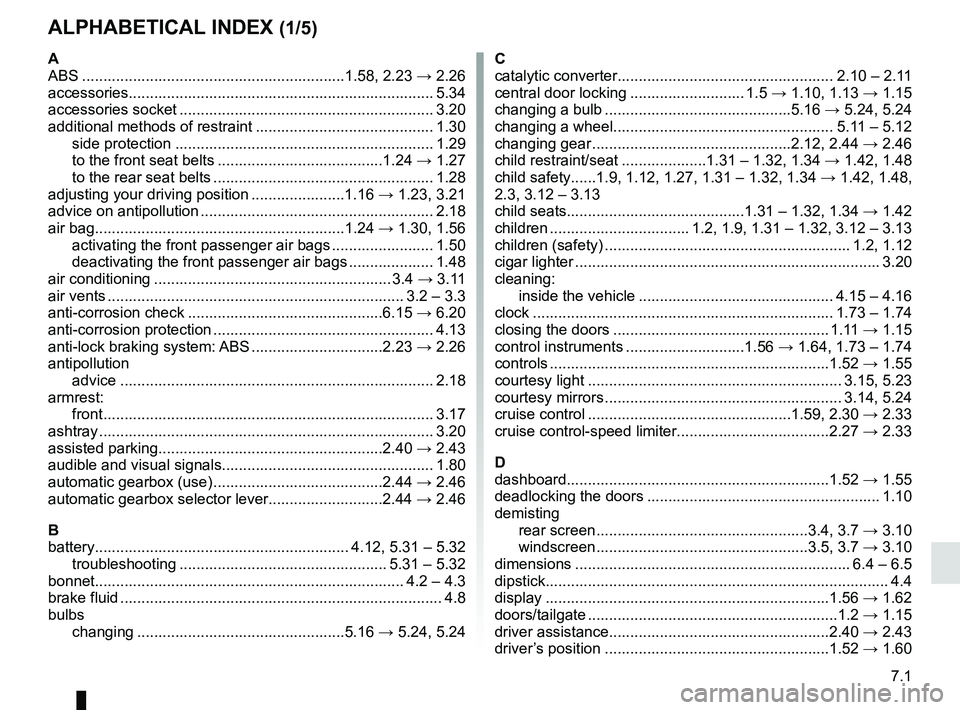
ALPHABETICAL INDEX (1/5)
A
ABS ..............................................................1.58, 2.23 → 2.26
accessories........................................................................\
5.34
accessories socket ............................................................ 3.20
additional methods of restraint .......................................... 1.30 side protection ............................................................. 1.29
to the front seat belts .......................................1.24 → 1.27
to the rear seat belts .................................................... 1.28
adjusting your driving position ......................1.16 → 1.23, 3.21
advice on antipollution ....................................................... 2.18
air bag...........................................................1.24 → 1.30, 1.56
activating the front passenger air bags ........................ 1.50
deactivating the front passenger air bags .................... 1.48
air conditioning ........................................................ 3.4 → 3.11
air vents ...................................................................... 3.2 – 3.3
anti-corrosion check ..............................................6.15 → 6.20
anti-corrosion protection .................................................... 4.13
anti-lock braking system: ABS ...............................2.23 → 2.26
antipollution advice .................................................................\
......... 2.18
armrest: front ..................................................................\
............ 3.17
ashtray ................................................................\
............... 3.20
assisted parking.....................................................2.40 → 2.43
audible and visual signals.................................................. 1.80
automatic gearbox (use) ........................................2.44 → 2.46
automatic gearbox selector lever...........................2.44 → 2.46
B
battery............................................................ 4.12, 5.31 – 5.32 troubleshooting ................................................. 5.31 – 5.32
bonnet........................................................................\
. 4.2 – 4.3
brake fluid ........................................................................\
.... 4.8
bulbs changing .................................................5.16 → 5.24, 5.24C
catalytic converter................................................... 2.10 – 2.11
central door locking ........................... 1.5
→ 1.10, 1.13 → 1.15
changing a bulb ............................................5.16 → 5.24, 5.24
changing a wheel.................................................... 5.11 – 5.12
changing gear ...............................................2.12, 2.44 → 2.46
child restraint/seat ....................1.31 – 1.32, 1.34 → 1.42, 1.48
child safety......1.9, 1.12, 1.27, 1.31 – 1.32, 1.34 → 1.42, 1.48,
2.3, 3.12 – 3.13
child seats..........................................1.31 – 1.32, 1.34 → 1.42
children ................................. 1.2, 1.9, 1.31 – 1.32, 3.12 – 3.13
children (safety) .......................................................... 1.2, 1.12
cigar lighter ........................................................................\
3.20
cleaning: inside the vehicle .............................................. 4.15 – 4.16
clock ....................................................................... 1.73 – 1.74
closing the doors ................................................... 1.11 → 1.15
control instruments ............................1.56 → 1.64, 1.73 – 1.74
controls ...............................................................\
...1.52 → 1.55
courtesy light ............................................................ 3.15, 5.23
courtesy mirrors ........................................................ 3.14, 5.24
cruise control ................................................1.59, 2.30 → 2.33
cruise control-speed limiter....................................2.27 → 2.33
D
dashboard..............................................................1.52 → 1.55
deadlocking the doors ....................................................... 1.10
demisting rear screen ..................................................3.4, 3.7 → 3.10
windscreen ..................................................3.5, 3.7 → 3.10
dimensions ................................................................. 6.4 – 6.5
dipstick................................................................\
................. 4.4
display ................................................................\
...1.56 → 1.62
doors/tailgate .........................................................\
..1.2 → 1.15
driver assistance....................................................2.40 → 2.43
driver’s position
.....................................................1.52 → 1.60