bonnet RENAULT DUSTER 2016 Owners Manual
[x] Cancel search | Manufacturer: RENAULT, Model Year: 2016, Model line: DUSTER, Model: RENAULT DUSTER 2016Pages: 256, PDF Size: 6.49 MB
Page 44 of 256
1.38
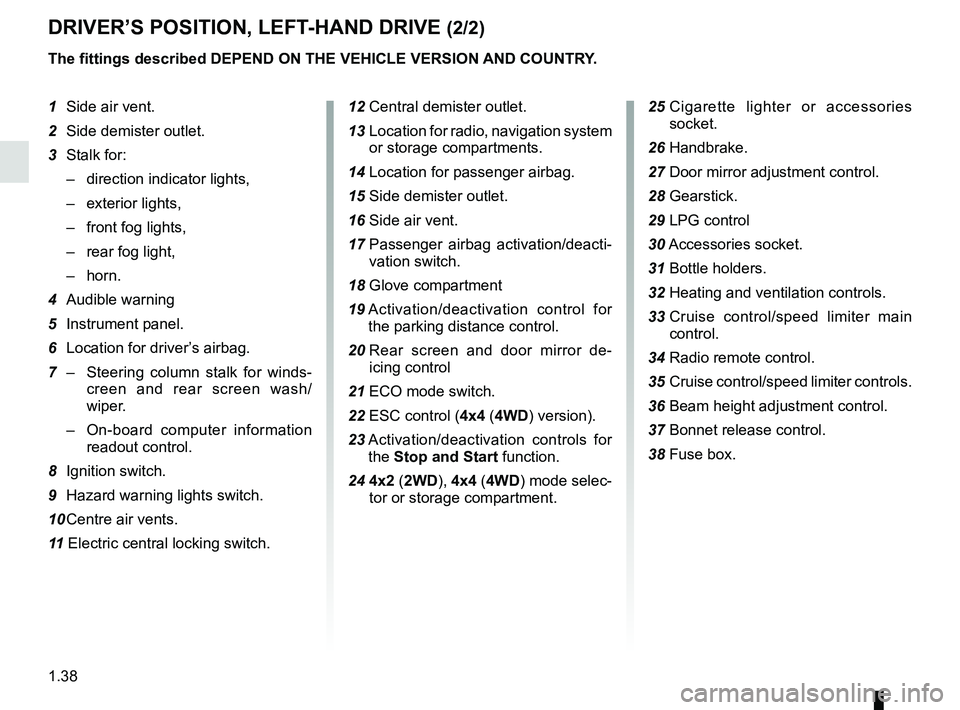
DRIVER’S POSITION, LEFT-HAND DRIVE (2/2)
The fittings described DEPEND ON THE VEHICLE VERSION AND COUNTRY.
1 Side air vent.
2 Side demister outlet.
3 Stalk for:
– direction indicator lights,
– exterior lights,
– front fog lights,
– rear fog light,
– horn.
4 Audible warning
5 Instrument panel.
6 Location for driver’s airbag.
7 – Steering column stalk for winds-
creen and rear screen wash/
wiper.
– On-board computer information
readout control.
8 Ignition switch.
9 Hazard warning lights switch.
10 Centre air vents.
11 Electric central locking switch. 12 Central demister outlet.
13 Location for radio, navigation system
or storage compartments.
14 Location for passenger airbag.
15 Side demister outlet.
16 Side air vent.
17 Passenger airbag activation/deacti-
vation switch.
18 Glove compartment
19 Activation/deactivation control for
the parking distance control.
20 Rear screen and door mirror de-
icing control
21 ECO mode switch.
22 ESC control (4x4 (4WD) version).
23 Activation/deactivation controls for
the Stop and Start function.
24 4x2 ( 2WD), 4x4 (4WD) mode selec-
tor or storage compartment. 25
Cigarette lighter or accessories
socket.
26 Handbrake.
27 Door mirror adjustment control.
28 Gearstick. 29 LPG control
30 Accessories socket.
31 Bottle holders.
32 Heating and ventilation controls.
33 Cruise control/speed limiter main
control.
34
Radio remote control.
35 Cruise control/speed limiter controls.
36 Beam height adjustment control.
37 Bonnet release control.
38 Fuse box.
Page 46 of 256
1.40
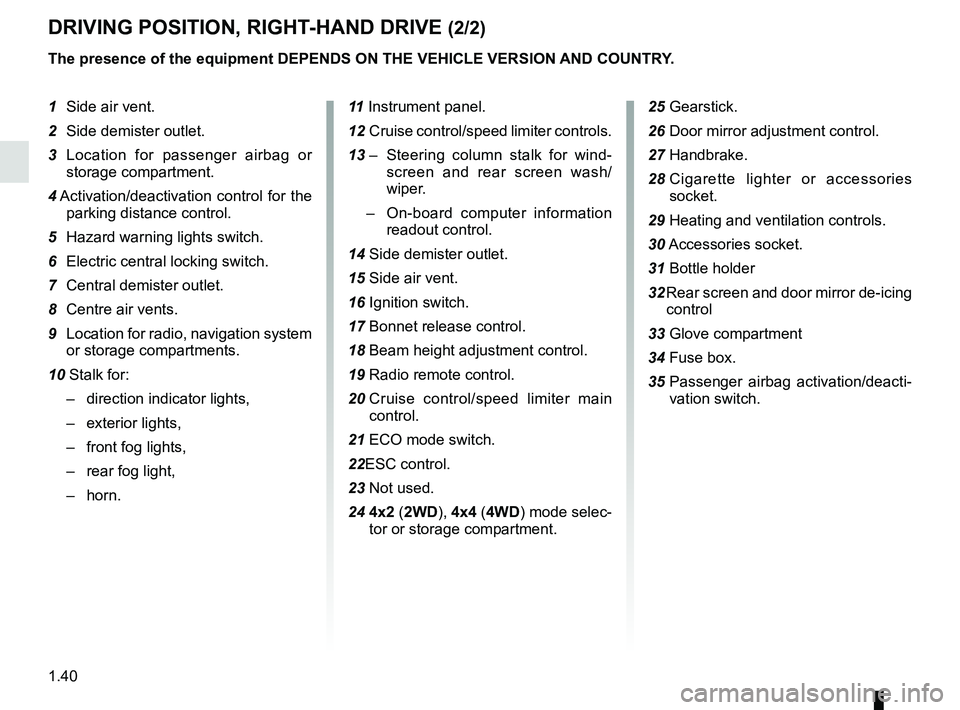
DRIVING POSITION, RIGHT-HAND DRIVE (2/2)
The presence of the equipment DEPENDS ON THE VEHICLE VERSION AND COUNTRY.
1 Side air vent.
2 Side demister outlet.
3 Location for passenger airbag or storage compartment.
4 Activation/deactivation control for the
parking distance control.
5 Hazard warning lights switch.
6 Electric central locking switch.
7 Central demister outlet.
8 Centre air vents.
9 Location for radio, navigation system or storage compartments.
10 Stalk for: – direction indicator lights,
– exterior lights,
– front fog lights,
– rear fog light,
– horn. 11
Instrument panel.
12 Cruise control/speed limiter controls.
13 – Steering column stalk for wind-
screen and rear screen wash/
wiper.
– On-board computer information
readout control.
14 Side demister outlet.
15 Side air vent.
16 Ignition switch.
17 Bonnet release control.
18 Beam height adjustment control.
19 Radio remote control.
20 Cruise control/speed limiter main
control.
21 ECO mode switch.
22ESC control.
23 Not used.
24 4x2 ( 2WD), 4x4 (4WD) mode selec-
tor or storage compartment.
25 Gearstick.
26 Door mirror adjustment control.
27 Handbrake.
28 Cigarette lighter or accessories
socket.
29 Heating and ventilation controls.
30 Accessories socket.
31 Bottle holder
32 Rear screen and door mirror de-icing control
33 Glove compartment
34 Fuse box.
35 Passenger airbag activation/deacti-
vation switch.
Page 68 of 256
1.62
ADJUSTING THE HEADLIGHT BEAM HEIGHT (2/2)
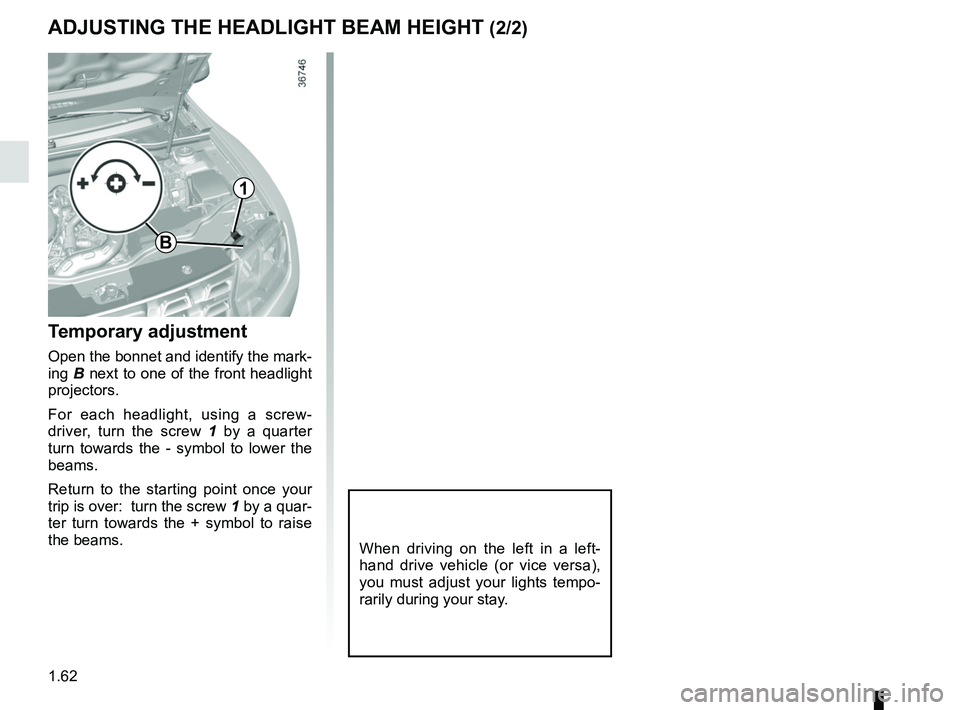
Temporary adjustment
Open the bonnet and identify the mark-
ing B next to one of the front headlight
projectors.
For each headlight, using a screw-
driver, turn the screw 1 by a quarter
turn towards the - symbol to lower the
beams.
Return to the starting point once your
trip is over: turn the screw 1 by a quar-
ter turn towards the + symbol to raise
the beams.
When driving on the left in a left-
hand drive vehicle (or vice versa),
you must adjust your lights tempo-
rarily during your stay.
1
B
Page 81 of 256
2.5
STARTING, STOPPING THE ENGINE (3/4)
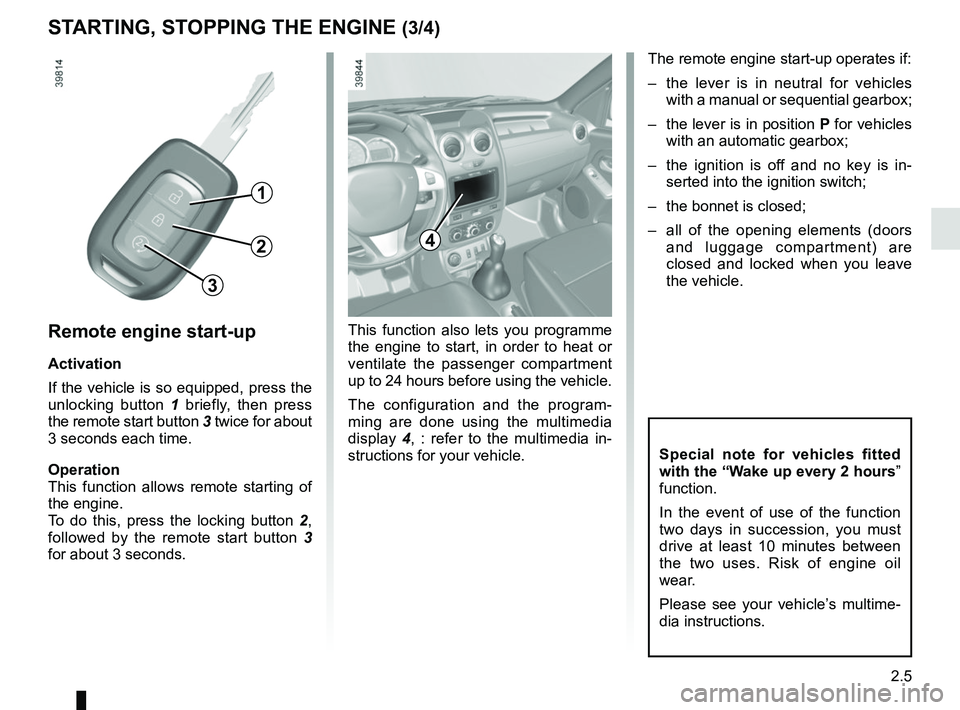
Remote engine start-up
Activation
If the vehicle is so equipped, press the
unlocking button 1 briefly, then press
the remote start button 3 twice for about
3 seconds each time.
Operation
This function allows remote starting of
the engine.
To do this, press the locking button 2,
followed by the remote start button 3
for about 3 seconds.
2
3
The remote engine start-up operates if:
– the lever is in neutral for vehicles with a manual or sequential gearbox;
– the lever is in position P for vehicles
with an automatic gearbox;
– the ignition is off and no key is in- serted into the ignition switch;
– the bonnet is closed;
– all of the opening elements (doors and luggage compartment) are
closed and locked when you leave
the vehicle.
This function also lets you programme
the engine to start, in order to heat or
ventilate the passenger compartment
up to 24 hours before using the vehicle.
The configuration and the program-
ming are done using the multimedia
display 4, : refer to the multimedia in-
structions for your vehicle.
1
4
Special note for vehicles fitted
with the “Wake up every 2 hours ”
function.
In the event of use of the function
two days in succession, you must
drive at least 10 minutes between
the two uses. Risk of engine oil
wear.
Please see your vehicle’s multime-
dia instructions.
Page 82 of 256
2.6
STARTING, STOPPING THE ENGINE (4/4)
Do not use the engine remote start-up function or its programming when:
– the vehicle is in a garage or in a confined space.
Risk of poisoning or suffocation by exhaust gas emissions.
– the vehicle is covered with a protective cover. Fire hazard.
– the bonnet is open or before it opens. Risk of burns or serious injury .
Depending on the country, the use of the remote starting function or its programming can be proh\
ibited by the legis-
lation and/or the regulations in force.
Before using this function, check the legislation and/or the regulations\
for the country in force .
Page 84 of 256
2.8
STOP AND START function (2/3)
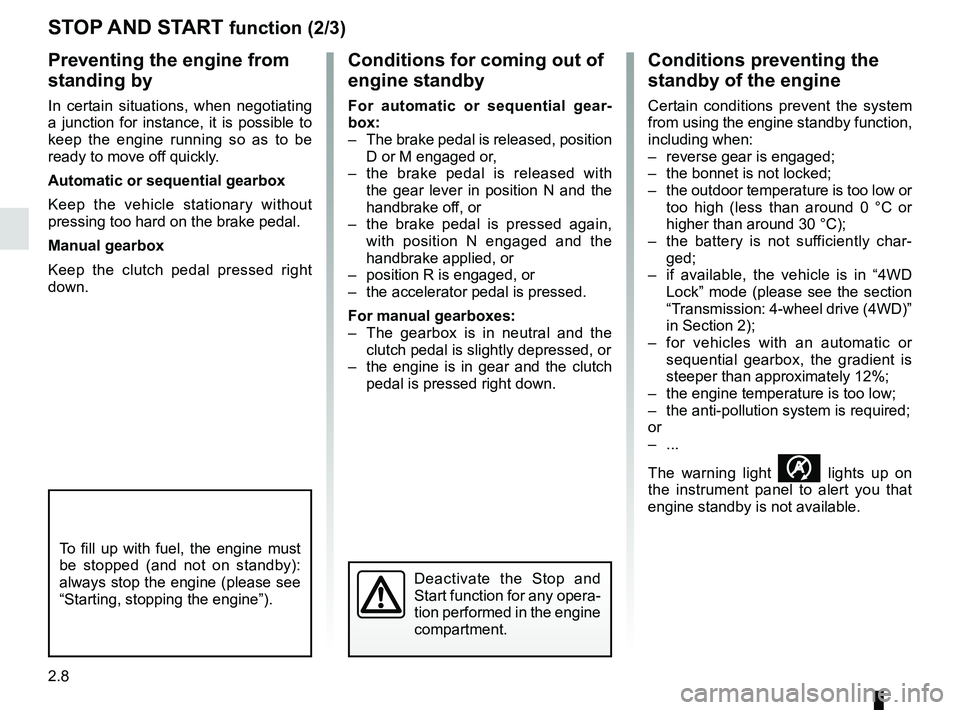
Conditions preventing the
standby of the engine
Certain conditions prevent the system
from using the engine standby function,
including when:
– reverse gear is engaged;
– the bonnet is not locked;
– the outdoor temperature is too low or too high (less than around 0 °C or
higher than around 30 °C);
– the battery is not sufficiently char- ged;
– if available, the vehicle is in “4WD Lock” mode (please see the section
“Transmission: 4-wheel drive (4WD)”
in Section 2);
– for vehicles with an automatic or sequential gearbox, the gradient is
steeper than approximately 12%;
– the engine temperature is too low;
– the anti-pollution system is required;
or
– ...
The warning light
lights up on
the instrument panel to alert you that
engine standby is not available.
To fill up with fuel, the engine must
be stopped (and not on standby):
always stop the engine (please see
“Starting, stopping the engine”).
Deactivate the Stop and
Start function for any opera-
tion performed in the engine
compartment.
Preventing the engine from
standing by
In certain situations, when negotiating
a junction for instance, it is possible to
keep the engine running so as to be
ready to move off quickly.
Automatic or sequential gearbox
Keep the vehicle stationary without
pressing too hard on the brake pedal.
Manual gearbox
Keep the clutch pedal pressed right
down.
Conditions for coming out of
engine standby
For automatic or sequential gear-
box:
– The brake pedal is released, position D or M engaged or,
– the brake pedal is released with the gear lever in position N and the
handbrake off, or
– the brake pedal is pressed again, with position N engaged and the
handbrake applied, or
– position R is engaged, or
– the accelerator pedal is pressed.
For manual gearboxes:
– The gearbox is in neutral and the clutch pedal is slightly depressed, or
– the engine is in gear and the clutch pedal is pressed right down.
Page 159 of 256
4.1
Section 4: Maintenance
Bonnet . . . . . . . . . . . . . . . . . . . . . . . . . . . . . . . . . . . . \
. . . . . . . . . . . . . . . . . . . . . . . . . . . . . . . . . . . . 4.2
Engine oil level: general information . . . . . . . . . . . . . . . . . . . . . . . . . . . . . . . . . . . .\
. . . . . . . . . . . . . 4.4
Engine oil level: topping up/filling . . . . . . . . . . . . . . . . . . . . . . . . . . . . . . . . . . . .\
. . . . . . . . . . . . . . . 4.5
Levels: . . . . . . . . . . . . . . . . . . . . . . . . . . . . . . . . . . . .\
. . . . . . . . . . . . . . . . . . . . . . . . . . . . . . . . . . . 4.8Brake fluid level . . . . . . . . . . . . . . . . . . . . . . . . . . . . . . . . . . . .\
. . . . . . . . . . . . . . . . . . . . . . . 4.8
Engine coolant . . . . . . . . . . . . . . . . . . . . . . . . . . . . . . . . . . . . \
. . . . . . . . . . . . . . . . . . . . . . . . 4.9
Power-assisted steering pump . . . . . . . . . . . . . . . . . . . . . . . . . . . . . . . . . . . . \
. . . . . . . . . . . . 4.10
Windscreen washer reservoir . . . . . . . . . . . . . . . . . . . . . . . . . . . . . . . . . . . . \
. . . . . . . . . . . . . 4.10
Filters . . . . . . . . . . . . . . . . . . . . . . . . . . . . . . . . . . . . \
. . . . . . . . . . . . . . . . . . . . . . . . . . . . . . . . . . . . . 4.11
Tyre pressure. . . . . . . . . . . . . . . . . . . . . . . . . . . . . . \
. . . . . . . . . . . . . . . . . . . . . . . . . . . . . . . . . . . . . 4.12
Battery . . . . . . . . . . . . . . . . . . . . . . . . . . . . . . . . . . . . \
. . . . . . . . . . . . . . . . . . . . . . . . . . . . . . . . . . . . 4.14
Bodywork maintenance . . . . . . . . . . . . . . . . . . . . . . . . . . . . . . . . . . . . \
. . . . . . . . . . . . . . . . . . . . . . . 4.16
Interior trim maintenance . . . . . . . . . . . . . . . . . . . . . . . . . . . . . . . . . . . . \
. . . . . . . . . . . . . . . . . . . . . . 4.18
Page 160 of 256
4.2
BONNET (1/2)
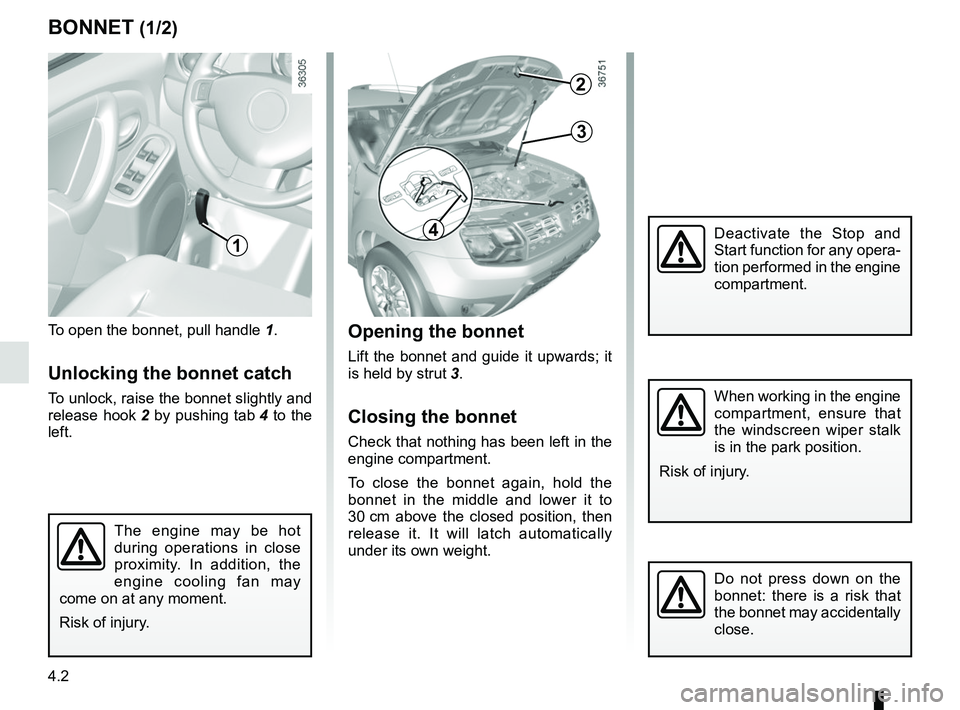
To open the bonnet, pull handle 1.
Unlocking the bonnet catch
To unlock, raise the bonnet slightly and
release hook 2 by pushing tab 4 to the
left.
Opening the bonnet
Lift the bonnet and guide it upwards; it
is held by strut 3.
Closing the bonnet
Check that nothing has been left in the
engine compartment.
To close the bonnet again, hold the
bonnet in the middle and lower it to
30 cm above the closed position, then
release it. It will latch automatically
under its own weight.
The engine may be hot
during operations in close
proximity. In addition, the
engine cooling fan may
come on at any moment.
Risk of injury.
Do not press down on the
bonnet: there is a risk that
the bonnet may accidentally
close.
1
When working in the engine
compartment, ensure that
the windscreen wiper stalk
is in the park position.
Risk of injury.
2
3
4Deactivate the Stop and
Start function for any opera-
tion performed in the engine
compartment.
Page 161 of 256

4.3
Make sure nothing is left
in the engine compartment
(cloth, tools, etc.).
Otherwise, this may lead to
engine damage or cause a fire.
In the event of even a slight
impact involving the radia-
tor grille or bonnet, have
the bonnet lock checked by
an approved Dealer as soon as pos-
sible.
Ensure that the bonnet is prop-
erly locked. Check that nothing is
preventing the catch from locking
(gravel, cloth, etc.).
BONNET (2/2)
Never activate the remote
engine start-up function
or its programming before
opening the bonnet or when
it is open.
Risk of burns or serious injury .
Page 224 of 256
5.46
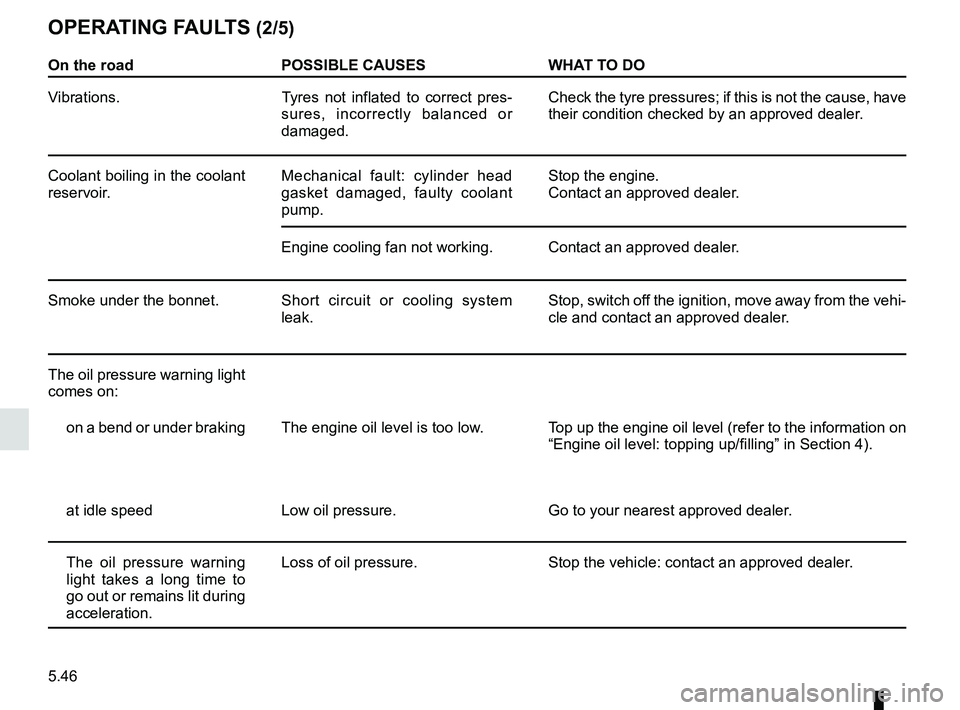
OPERATING FAULTS (2/5)
On the roadPOSSIBLE CAUSES WHAT TO DO
Vibrations. Tyres not inflated to correct pres-
sures, incorrectly balanced or
damaged. Check the tyre pressures; if this is not the cause, have
their condition checked by an approved dealer.
Coolant boiling in the coolant
reservoir. Mechanical fault: cylinder head
gasket damaged, faulty coolant
pump. Stop the engine.
Contact an approved dealer.
Engine cooling fan not working. Contact an approved dealer.
Smoke under the bonnet. Short circuit or cooling system
leak. Stop, switch off the ignition, move away from the vehi-
cle and contact an approved dealer.
The oil pressure warning light
comes on: on a bend or under braking The engine oil level is too low. Top up the engine oil level (refer to the information on “Engine oil level: topping up/filling” in Section 4).
at idle speed Low oil pressure. Go to your nearest approved dealer.
The oil pressure warning
light takes a long time to
go out or remains lit during
acceleration. Loss of oil pressure.
Stop the vehicle: contact an approved dealer.