capacity RENAULT DUSTER 2016 Owners Manual
[x] Cancel search | Manufacturer: RENAULT, Model Year: 2016, Model line: DUSTER, Model: RENAULT DUSTER 2016Pages: 256, PDF Size: 6.49 MB
Page 57 of 256

1.51
Interpreting some of the
values displayed after
resetting
The values showing average fuel
consumption, range and average
speed will become more stable and re-
liable the further you travel after pres-
sing the reset button.
For the first few miles after pressing
the reset key you will notice that the
range increases as you travel. This
range takes into account the average
fuel consumption since the last time the
reset button was pressed. Therefore,
the fuel consumption may decrease
when:– the vehicle stops accelerating,
– the engine reaches its operating
temperature (engine cold when
reset button pressed),
– when driving from a built-up area
onto the open road.
Therefore, if the average fuel
consumption decreases, the
range will increase. – You may also notice that the ave-
rage fuel consumption increases
when the vehicle is stationary and
the engine idling.
This is normal, since the computer
takes account of fuel used during
idling.
Manually resetting the journey para-
meters: with the display showing one
of the journey parameters, press the
button 2 until the display is reset.
Automatically resetting the journey
parameters: the reset is automatic
when the capacity of one of the memo-
ries is exceeded.
ON-BOARD COMPUTER (2/6)
The display of information shown below DEPENDS ON THE VEHICLE EQUIPMENT \
AND COUNTRY.
Page 71 of 256

1.65
FUEL TANK (1/6)
Petrol and diesel versions
Usable capacity of the fuel tank:
50 litres approximately.
Depending on the vehicle, to open the
fuel filler flap A, place your finger in
opening B and pull.
To close, push the fuel filler flap A by
hand as far as it will go. Depending
on the vehicle, the cap 1 is unlocked
using the ignition key. If not, it will be
connected to the vehicle by a strip of
plastic. For details on filling the fuel
tank, please refer to the information on
“Filling with fuel”.
Fuel filler cap: this is spe-
cific to the vehicle type. If
you have to replace it, make
sure the new cap is of the
same type. Contact an approved
dealer.
Never place the cap near a source
of heat or flame.
Do not wash the filler area with a
high-pressure washer.
A
3
C
B
There is a cap holder 3 on the fuel filler
flap for holding the cap when the tank is
being filled.
Depending on the vehicle, lift lever 2 to
unlock the fuel filler flap A. Open it, then
unscrew fuel filler cap 1.
1
2
Page 74 of 256
1.68
LPG versions
Useful capacity of fuel tank: approx.
34 litres.
Filling up with LPG
Engage the handbrake, stop the engine,
switch off the ignition and switch off the
lights.
Always respect the safety instructions
given at filling stations.
It is always advisable to completely fill
the tank.
When the pump stops delivering LPG,
or when the pump flow reduces sig-
nificantly, the maximum LPG level has
been reached.
At this point, do not attempt to carry on
filling.
If you exceed the LPG tank capacity when filling completely, please go
to an accredited garage or your authorised dealer to check the automatic\
filler device.
FUEL TANK (4/6)
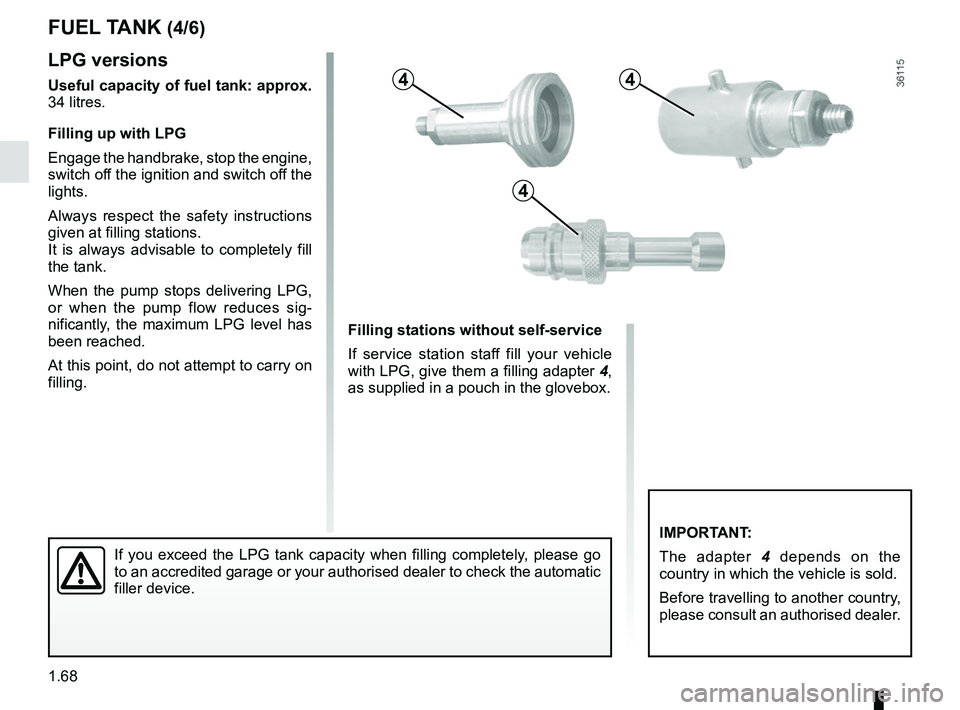
Filling stations without self-service
If service station staff fill your vehicle
with LPG, give them a filling adapter 4,
as supplied in a pouch in the glovebox.
IMPORTANT:
The adapter 4 depends on the
country in which the vehicle is sold.
Before travelling to another country,
please consult an authorised dealer.
44
4
Page 88 of 256
2.12
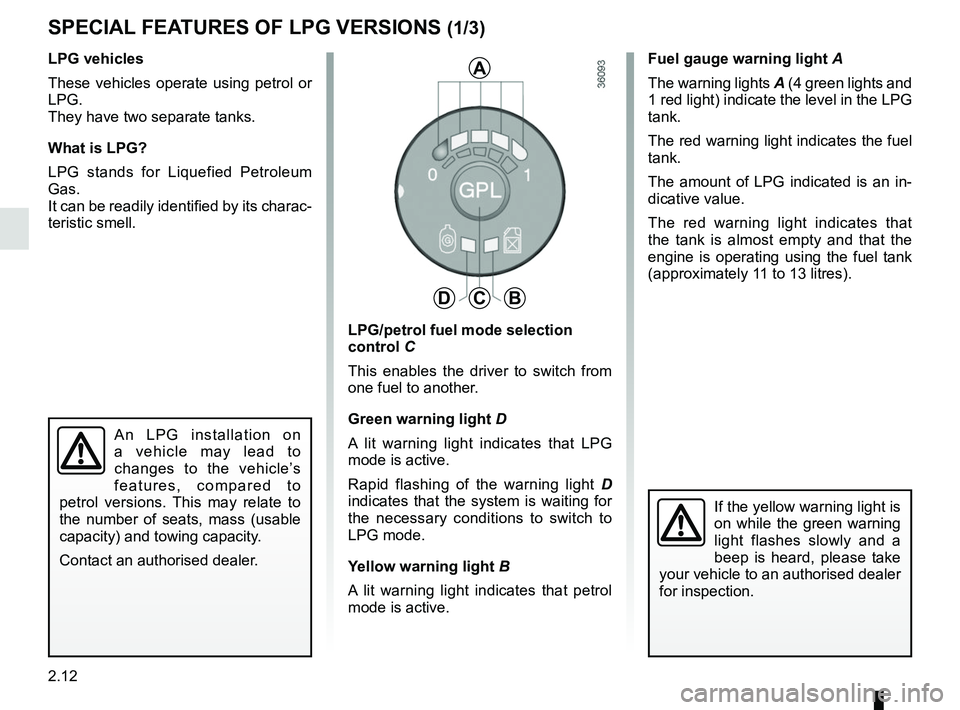
Fuel gauge warning light A
The warning lights A (4 green lights and
1 red light) indicate the level in the LPG
tank.
The red warning light indicates the fuel
tank.
The amount of LPG indicated is an in-
dicative value.
The red warning light indicates that
the tank is almost empty and that the
engine is operating using the fuel tank
(approximately 11 to 13 litres).
SPECIAL FEATURES OF LPG VERSIONS (1/3)
LPG vehicles
These vehicles operate using petrol or
LPG.
They have two separate tanks.
What is LPG?
LPG stands for Liquefied Petroleum
Gas.
It can be readily identified by its charac-
teristic smell.
An LPG installation on
a vehicle may lead to
changes to the vehicle’s
features, compared to
petrol versions. This may relate to
the number of seats, mass (usable
capacity) and towing capacity.
Contact an authorised dealer.
LPG/petrol fuel mode selection
control C
This enables the driver to switch from
one fuel to another.
Green warning light D
A lit warning light indicates that LPG
mode is active.
Rapid flashing of the warning light D
indicates that the system is waiting for
the necessary conditions to switch to
LPG mode.
Yellow warning light B
A lit warning light indicates that petrol
mode is active.
If the yellow warning light is
on while the green warning
light flashes slowly and a
beep is heard, please take
your vehicle to an authorised dealer
for inspection.
A
DCB
Page 107 of 256
2.31
TRANSMISSION: 4-wheel drive (4WD) (2/4)
This problem may be resolved by chan-
ging the tyres. Always use four identi-
cal tyres (same brand, profile, etc.) and
with similar wear.
In the event of excessive wheelspin,
the mechanical components may be
overheating.
If this happens:
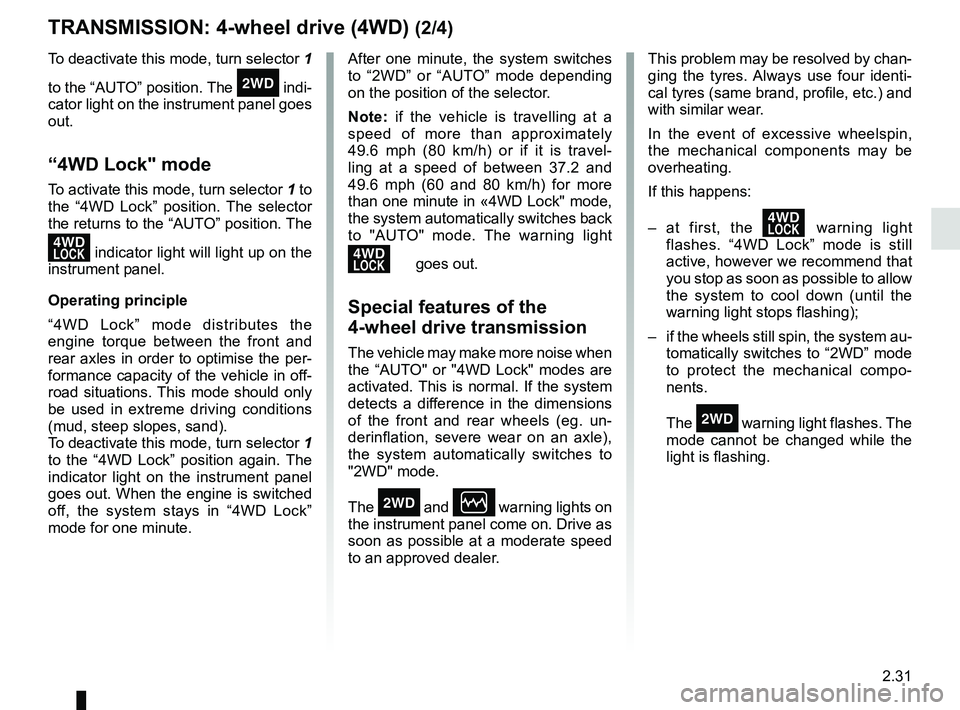
– at first, the
’ warning light
flashes. “4WD Lock” mode is still
active, however we recommend that
you stop as soon as possible to allow
the system to cool down (until the
warning light stops flashing);
– if the wheels still spin, the system au- tomatically switches to “2WD” mode
to protect the mechanical compo-
nents.
The
‘ warning light flashes. The
mode cannot be changed while the
light is flashing.
After one minute, the system switches
to “2WD” or “AUTO” mode depending
on the position of the selector.
Note: if the vehicle is travelling at a
speed of more than approximately
49.6 mph (80 km/h) or if it is travel-
ling at a speed of between 37.2 and
49.6 mph (60 and 80 km/h) for more
than one minute in «4WD Lock" mode,
the system automatically switches back
to "AUTO" mode. The warning light
’ goes out.
Special features of the
4-wheel drive transmission
The vehicle may make more noise when
the “AUTO" or "4WD Lock" modes are
activated. This is normal. If the system
detects a difference in the dimensions
of the front and rear wheels (eg. un-
derinflation, severe wear on an axle),
the system automatically switches to
"2WD" mode.
The
‘ and Ò warning lights on
the instrument panel come on. Drive as
soon as possible at a moderate speed
to an approved dealer.
To deactivate this mode, turn selector
1
to the “AUTO” position. The
‘ indi-
cator light on the instrument panel goes
out.
“4WD Lock" mode
To activate this mode, turn selector 1 to
the “4WD Lock” position. The selector
the returns to the “AUTO” position. The
’ indicator light will light up on the
instrument panel.
Operating principle
“4WD Lock” mode distributes the
engine torque between the front and
rear axles in order to optimise the per-
formance capacity of the vehicle in off-
road situations. This mode should only
be used in extreme driving conditions
(mud, steep slopes, sand).
To deactivate this mode, turn selector 1
to the “4WD Lock” position again. The
indicator light on the instrument panel
goes out. When the engine is switched
off, the system stays in “4WD Lock”
mode for one minute.
Page 165 of 256
4.7
ENGINE OIL LEVEL: topping up, filling (3/3)
Never run the engine in an
enclosed space as exhaust
gases are poisonous.
Resetting the alert after an oil
change
(depending on the vehicle)
If you change the oil yourself, you will
need to reset the oil change warning.
To do this, after switching on the igni-
tion, for ten seconds you must:
– Depress the accelerator pedal fully,
– with your foot on the accelerator, de-press the brake pedal three times in
succession.
Reinitialisation is complete when the
# indicator light goes out. If this is
not the case, repeat the operation.
Special case: if you change the oil
before the oil change interval exceeded
warning is displayed, it will also be nec-
essary to reset the display. In this case,
the
# warning light comes on for
approximately 5 seconds to confirm the
reset.
The engine may be hot
during operations in close
proximity. In addition, the
engine cooling fan may
come on at any moment.
Risk of injury.
Exceeding the maximum
engine oil level
Under no circumstances
must the maximum fill level
be exceeded: risk of damage to the
engine and catalytic converter.
If the oil level exceeds the maximum
level, do not start your vehicle .
Contact an authorised dealer.
Deactivate the Stop and
Start function for any opera-
tion performed in the engine
compartment.
Oil change
Service interval: refer to the
Maintenance Document for your vehi-
cle.
Oil change capacity
Please refer to the maintenance docu-
ment for your vehicle, or contact an au-
thorised dealer.
Always check the engine oil level using
the dipstick, as explained previously (it
should never fall below the minimum
level, or be over the maximum level on
the dipstick).
Engine oil grade
Refer to the Maintenance Document for
your vehicle.
Page 190 of 256
5.12
TYRES (1/4)
Tyre and wheel safety
The tyres are the only contact between
the vehicle and the road, so it is essen-
tial to keep them in good condition. You
must make sure that your tyres con- -
form to local road traffic regulations.
For your safety, please re-
spect the speed limit.
When they need to be re-
placed, only tyres of the
same make, size, type and profile
should be used on a single axle.
They must: either have a load ca-
pacity and a speed capacity at
least equal to the original tyres,
or correspond to those recom-
mended by your authorised
dealer.
Failure to heed these instructions
could endanger your safety and
affect your vehicle’s roadworthiness.
Risk of loss of control of the ve-
hicle.
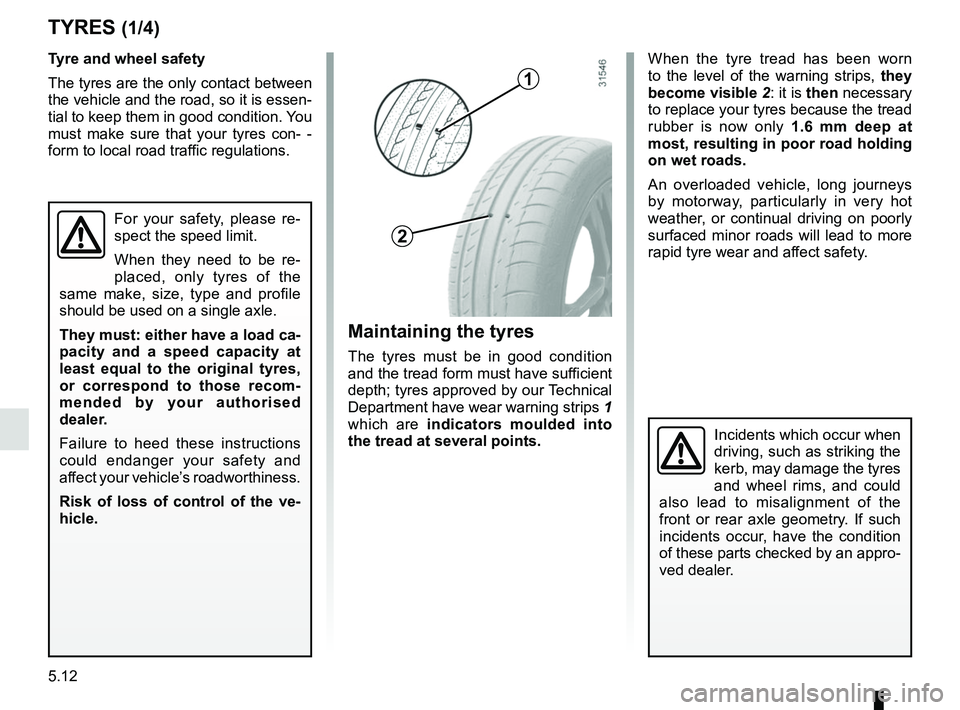
Maintaining the tyres
The tyres must be in good condition
and the tread form must have sufficient
depth; tyres approved by our Technical
Department have wear warning strips 1
which are indicators moulded into
the tread at several points. When the tyre tread has been worn
to the level of the warning strips, they
become visible 2: it is
then necessary
to replace your tyres because the tread
rubber is now only 1.6 mm deep at
most, resulting in poor road holding
on wet roads.
An overloaded vehicle, long journeys
by motorway, particularly in very hot
weather, or continual driving on poorly
surfaced minor roads will lead to more
rapid tyre wear and affect safety.
Incidents which occur when
driving, such as striking the
kerb, may damage the tyres
and wheel rims, and could
also lead to misalignment of the
front or rear axle geometry. If such
incidents occur, have the condition
of these parts checked by an appro-
ved dealer.
1
2
Page 215 of 256

5.37
BATTERY: troubleshooting (2/2)
Starting the vehicle using the
battery from another vehicle
If you have to use the battery from an-
other vehicle to start, obtain suitable
jump leads (with a large cross section)
from an approved dealer or, if you al-
ready have jump leads, ensure that
they are in perfect condition.
The two batteries must have an iden-
tical nominal voltage of 12 volts. The
battery supplying the current should
have a capacity (amp-hours, Ah) which
is at least the same as that of the dis-
charged battery.
Ensure that there is no risk of contact
between the two vehicles (risk of short
circuiting when the positive terminals
are connected) and that the discharged
battery is properly connected. Switch
off your vehicle ignition.
Start the engine of the vehicle supply-
ing the current and run it at an interme-
diate engine speed. Connect the positive (+) lead
A to (+)
terminal 1 of the discharged battery,
then to (+) terminal 2 of the battery sup-
plying the current.
Connect the negative (–) lead B to (–)
terminal 3 of the battery supplying the
current and then to (–) terminal 4 of the
discharged battery.
Start the engine as normal. As soon as
it is running, disconnect leads A and B
in the reverse order (4-3-2-1)
Check that there is no con-
tact between leads A and B
and that the positive lead A
is not touching any metal
parts on the vehicle supplying the
current.
Risk of injury and/or damage to the
vehicle.
A
B
14
23
Page 234 of 256

6.6
ENGINE SPECIFICATIONS
Versions1.6 16V 1.6 16V 2.0 16V 1.2 16V 1.5 dCi
Engine type
(see engine plate) K4M
H4M F4R H5Ft K9K
Cubic capacity (cc) 1,59815981 998 1 198 1,461
Type of fuel
Octane rating Petrol
The use of unleaded petrol is essential, with the octane rating as state\
d
on the label inside the fuel filler flap. Diesel
The label located in
the fuel filler flap in-
dicates authorised
fuels.
Spark plugs Only use spark plugs specified for your vehicle’s engine.
The type should be marked on a label stuck inside the engine compart-
ment. If it is not then contact your authorised dealer.
Fitting spark plugs other than those specified may damage the engine.
Page 249 of 256

A
ABS ....................................................................\
...2.34 → 2.37
accessories.............................................................\
....")
7.1
ALPHABETICAL INDEX (1/5)
A
ABS ....................................................................\
...2.34 → 2.37
accessories.............................................................\
........... 5.44
accessories socket ............................................................ 3.14
adjusting your driving position ...............................1.13 → 1.16
advice on antipollution ....................................................... 2.20
air bag.................................................................\
...1.17 → 1.21
deactivating the front passenger air bags .................... 1.33
air conditioning ..........................................................3.2 → 3.7
air vents ...................................................................... 3.2 – 3.3
anti-corrosion check ..............................................6.15 → 6.19
anti-corrosion protection .................................................... 4.16
anti-lock braking system: ABS ...............................2.34 → 2.37
antipollution advice .................................................................\
......... 2.20
armrest ................................................................\
.............. 3.19
ashtrays ...............................................................\
.............. 3.14
automatic gearbox (use) ...............................2.45 → 2.48, 5.42
automatic gearbox selector lever...........................2.45 → 2.48
B
battery.................................................................\
.... 4.14 – 4.15 troubleshooting ................................................. 5.36 – 5.37
battery (remote control) ..................................................... 5.38
bonnet..................................................................\
....... 4.2 – 4.3
brake fluid ........................................................................\
.... 4.8
bulbs changing ..........................................................5.16 \
→ 5.27
C
capacity of mechanical components........................... 4.4, 4.14
catalytic converter.....................................................\
......... 2.10
central door locking .................................................... 1.5 – 1.6
changing a bulb .....................................................5.16 → 5.27
changing a wheel.................................................... 5.10 – 5.11
changing fuel while driving ....................................2.12 → 2.14changing gear ...............................................2.29, 2.45
→ 2.48
child booster seat ..................................................1.22 → 1.24
child restraint/seat .................................................1.22 → 1.32
child safety.................. 1.2, 1.8 – 1.9, 1.22 → 1.32, 3.8 → 3.10
child seats.............................................................\
.1.22 → 1.32
children ....................................................... 1.5 – 1.6, 1.8 – 1.9
children (safety) .......................................................3.8 → 3.10
cigar lighter ........................................................................\
3.14
cleaning: inside the vehicle .............................................. 4.18 – 4.19
clock ..................................................................\
................ 1.57
closing the doors ........................................................ 1.8 – 1.9
control instruments ............................1.41 → 1.55, 1.59 – 1.60
controls ...............................................................\
...1.37 → 1.40
courtesy light .......................................................... 3.11 – 3.12
cruise control .........................................................2.41 → 2.44
cruise control-speed limiter....................................2.38 → 2.44
D
dashboard..............................................................1\
.37 → 1.40
dimensions .............................................................\
............. 6.5
dipstick................................................................\
................. 4.4
doors...................................................................\
.......1.5 → 1.9
driver’s position .....................................................1.37 → 1.40
driving .........2.2 → 2.6, 2.10 – 2.11, 2.15 → 2.19, 2.29 → 2.50
E
ECO driving ..................................... 1.41 → 1.47, 2.15 → 2.19
electric beam height adjustment ............................. 1.61 – 1.62
electric door locking .................................................... 1.5 – 1.6
electric windows ......................................................3.8 →
3.10
electronic stability control: ESC .............................2.34 → 2.37
emergency brake assist.........................................2.34 → 2.37
emergency braking ................................................2.34 → 2.37
emergency spare wheel ........................5.3 – 5.4, 5.12 → 5.15