beam RENAULT ESPACE 2012 J81 / 4.G Owners Manual
[x] Cancel search | Manufacturer: RENAULT, Model Year: 2012, Model line: ESPACE, Model: RENAULT ESPACE 2012 J81 / 4.GPages: 267, PDF Size: 8.95 MB
Page 7 of 267

1.1
ENG_UD25600_4
Sommaire 1 (X81 - J81 - Renault)
ENG_NU_932-3_X81ph3_Renault_1
Section 1: Getting to know your vehicle
RENAULT card: general information, use, deadlocking . . . . . . . . . . . . . . . . . . . . . . . . . . . . . . . . . . 1.2
Doors . . . . . . . . . . . . . . . . . . . . . . . . . . . . . . . . . . . . . . . . . . . . . . . . . . . . . . . . . . . . . . . . . . . . . . . . . 1.7
Engine immobiliser system . . . . . . . . . . . . . . . . . . . . . . . . . . . . . . . . . . . . . . . . . . . . . . . . . . . . . . . . 1.13
Headrests - Seats . . . . . . . . . . . . . . . . . . . . . . . . . . . . . . . . . . . . . . . . . . . . . . . . . . . . . . . . . . . . . . . 1.15
Seat belts . . . . . . . . . . . . . . . . . . . . . . . . . . . . . . . . . . . . \
. . . . . . . . . . . . . . . . . . . . . . . . . . . . . . . . . . 1.20
Additional methods of restraint . . . . . . . . . . . . . . . . . . . . . . . . . . . . . . . . . . . . . . . . . . . . . . . . . . . . . 1.23
to the seat belt . . . . . . . . . . . . . . . . . . . . . . . . . . . . . . . . . . . . . . . . . . . . . . . . . . . . . . . . . . . . 1.23
side protection devices . . . . . . . . . . . . . . . . . . . . . . . . . . . . . . . . . . . . . . . . . . . . . . . . . . . . . . 1.27
Child safety: general information . . . . . . . . . . . . . . . . . . . . . . . . . . . . . . . . . . . . . . . . . . . . . . . . . . . . 1.29
choosing a child seat mounting . . . . . . . . . . . . . . . . . . . . . . . . . . . . . . . . . . . . . . . . . . . . . . . 1.32
fitting a child seat . . . . . . . . . . . . . . . . . . . . . . . . . . . . . . . . . . . . . . . . . . . . . . . . . . . . . . . . . . 1.34
deactivating/activating the front passenger airbag . . . . . . . . . . . . . . . . . . . . . . . . . . . . . . . . . 1.38
Steering wheel . . . . . . . . . . . . . . . . . . . . . . . . . . . . . . . . . . . . . . . . . . . . . . . . . . . . . . . . . . . . . . . . . . 1.41
Driving position . . . . . . . . . . . . . . . . . . . . . . . . . . . . . . . . . . . . . . . . . . . . . . . . . . . . . . . . . . . . . . . . . 1.42
Instrument panel . . . . . . . . . . . . . . . . . . . . . . . . . . . . . . . . . . . . . . . . . . . . . . . . . . . . . . . . . . . . . . . . 1.46
On-board computer . . . . . . . . . . . . . . . . . . . . . . . . . . . . . . . . . . . . . . . . . . . . . . . . . . . . . . . . 1.52
Clock and exterior temperature . . . . . . . . . . . . . . . . . . . . . . . . . . . . . . . . . . . . . . . . . . . . . . . . . . . . . 1.63
Rear-view mirrors . . . . . . . . . . . . . . . . . . . . . . . . . . . . . . . . . . . . . . . . . . . . . . . . . . . . . . . . . . . . . . . 1.64
Audible and visual signals . . . . . . . . . . . . . . . . . . . . . . . . . . . . . . . . . . . . . . . . . . . . . . . . . . . . . . . . . 1.66
Lighting and exterior signals . . . . . . . . . . . . . . . . . . . . . . . . . . . . . . . . . . . . . . . . . . . . . . . . . . . . . . . 1.67
Headlight beam adjustment . . . . . . . . . . . . . . . . . . . . . . . . . . . . . . . . . . . . . . . . . . . . . . . . . . . . . . . . 1.70
Washers/Wipers . . . . . . . . . . . . . . . . . . . . . . . . . . . . . . . . . . . . . . . . . . . . . . . . . . . . . . . . . . . . . . . . 1.71
Fuel tank (filling with fuel) . . . . . . . . . . . . . . . . . . . . . . . . . . . . . . . . . . . . . . . . . . . . . . . . . . . . . . . . . 1.74
Page 49 of 267
JauneNoirNoir texte
1.43
ENG_UD24086_2
Poste de conduite à gauche (X81 - J81 - Renault)
ENG_NU_932-3_X81ph3_Renault_1
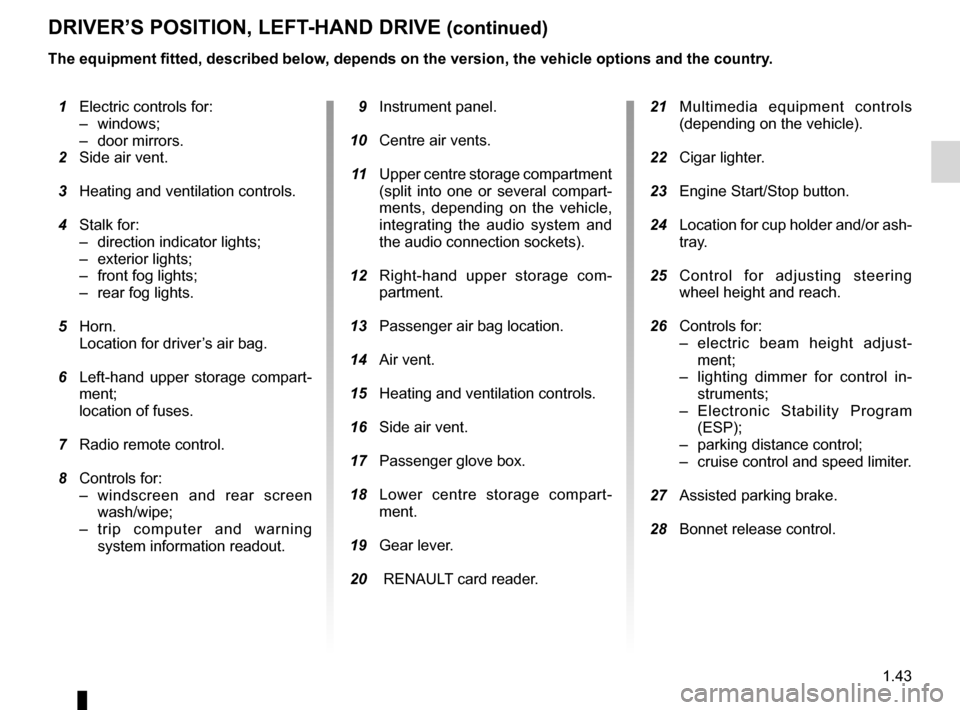
drIVer’s POsITIOn, LefT-Hand drIVe (continued)
1 Electric controls for:
– windows;
– door mirrors.
2 Side air vent.
3 Heating and ventilation controls.
4 Stalk for:
– direction indicator lights;
– exterior lights;
– front fog lights;
– rear fog lights.
5 Horn.
Location for driver’s air bag.
6 Left-hand upper storage compart -
ment;
location of fuses.
7 Radio remote control.
8 Controls for:
– windscreen and rear screen
wash/wipe;
– trip computer and warning
system information readout.
9 Instrument panel.
10 Centre air vents.
11 Upper centre storage compartment
(split into one or several compart-
ments, depending on the vehicle,
integrating the audio system and
the audio connection sockets).
12 Right-hand upper storage com -
partment.
13 Passenger air bag location.
14 Air vent.
15 Heating and ventilation controls.
16 Side air vent.
17 Passenger glove box.
18 Lower centre storage compart -
ment.
19 Gear lever.
20 RENAULT card reader. 21 Multimedia equipment controls
(depending on the vehicle).
22 Cigar lighter.
23 Engine Start/Stop button.
24 Location for cup holder and/or ash-
tray.
25 Control for adjusting steering
wheel height and reach.
26 Controls for:
– electric beam height adjust -
ment;
– lighting dimmer for control in -
struments;
– Electronic Stability Program
(ESP);
– parking distance control;
– cruise control and speed limiter.
27 Assisted parking brake.
28 Bonnet release control.
The equipment fitted, described below, depends on the version, the vehicle options and the country.
Page 51 of 267
accessories socket ................................................ (current page)
JauneNoirNoir texte
1.45
ENG_UD24087_2
Poste de conduite à droite (X81 - J81 - Renault)
ENG_NU_932-3_X81ph3_Renault_1
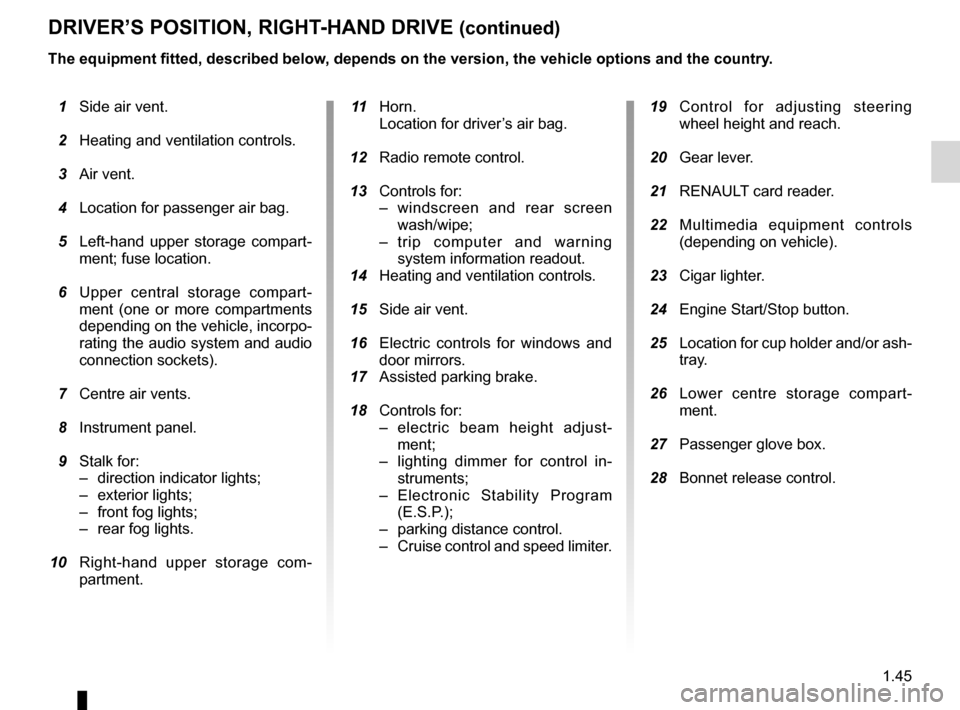
drIVer’s POsITIOn, rIGHT-Hand drIVe (continued)
1 Side air vent.
2 Heating and ventilation controls.
3 Air vent.
4 Location for passenger air bag.
5 Left-hand upper storage compart -
ment; fuse location.
6 Upper central storage compart -
ment (one or more compartments
depending on the vehicle, incorpo -
rating the audio system and audio
connection sockets).
7 Centre air vents.
8 Instrument panel.
9 Stalk for:
– direction indicator lights;
– exterior lights;
– front fog lights;
– rear fog lights.
10 Right-hand upper storage com -
partment.
11 Horn.
Location for driver’s air bag.
12 Radio remote control.
13 Controls for:
– windscreen and rear screen
wash/wipe;
– trip computer and warning
system information readout.
14 Heating and ventilation controls.
15 Side air vent.
16 Electric controls for windows and
door mirrors.
17 Assisted parking brake.
18 Controls for:
– electric beam height adjust -
ment;
– lighting dimmer for control in -
struments;
– Electronic Stability Program
(E.S.P.);
– parking distance control.
– Cruise control and speed limiter. 19 Control for adjusting steering
wheel height and reach.
20 Gear lever.
21 RENAULT card reader.
22 Multimedia equipment controls
(depending on vehicle).
23 Cigar lighter.
24 Engine Start/Stop button.
25 Location for cup holder and/or ash-
tray.
26 Lower centre storage compart -
ment.
27 Passenger glove box.
28 Bonnet release control.
The equipment fitted, described below, depends on the version, the vehicle options and the country.
Page 52 of 267
control instruments ............................... (up to the end of the DU)
indicators: instrument panel ............................. (up to the end of the DU)
instrument panel ................................... (up to the end of the DU)
warning lights ........................................ (up to the end of the DU)
display .................................................. (up to the end of the DU)
lights: fog lights .......................................................... (current page)
lights: dipped beam headlights ................................... (current page)
lights: direction indicators ........................................... (current page)
lights: main beam headlights ...................................... (current page)
indicators ............................................................... (current page)
1.46
ENG_UD20346_1
Tableau de bord : témoins lumineux (X81 - J81 - Renault)
ENG_NU_932-3_X81ph3_Renault_1
Jaune NoirNoir texte
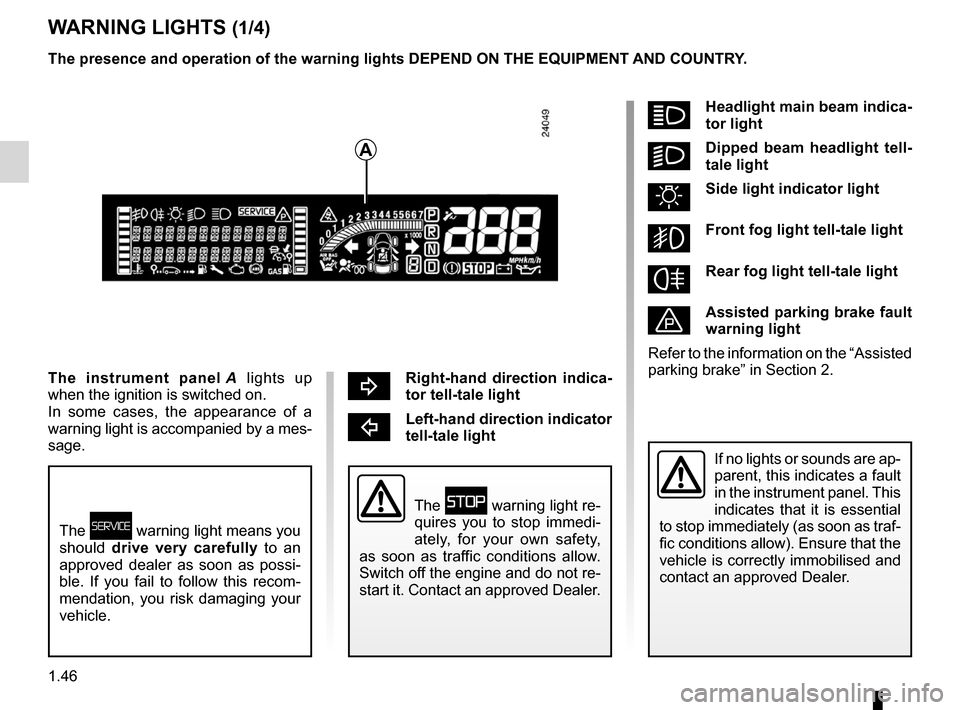
bright-hand direction indica -
tor tell-tale light
cLeft-hand direction indicator
tell-tale light
Instrument panel
WarnInG LIGHTs (1/4)
áHeadlight main beam indica-
tor light
kd ipped beam headlight tell -
tale light
uside light indicator light
gfront fog light tell-tale light
frear fog light tell-tale light
Ãassisted parking brake fault
warning light
Refer to the information on the “Assisted
parking brake” in Section 2.
a
The instrument panel A lights up
when the ignition is switched on.
In some cases, the appearance of a
warning light is accompanied by a mes-
sage.
The ú warning light means you
should drive very carefully to an
approved dealer as soon as possi -
ble. If you fail to follow this recom -
mendation, you risk damaging your
vehicle.
The û warning light re-
quires you to stop immedi -
ately, for your own safety,
as soon as traffic conditions allow.
Switch off the engine and do not re-
start it. Contact an approved Dealer.
If no lights or sounds are ap-
parent, this indicates a fault
in the instrument panel. This
indicates that it is essential
to stop immediately (as soon as traf-
fic conditions allow). Ensure that the
vehicle is correctly immobilised and
contact an approved Dealer.
The presence and operation of the warning lights dePend On THe eQUIPMenT and cOUnTrY.
Page 71 of 267
rear view mirrors ................................... (up to the end of the DU)
1.65
ENG_UD1768_1
Rétroviseurs (X81 - Renault)
ENG_NU_932-3_X81ph3_Renault_1
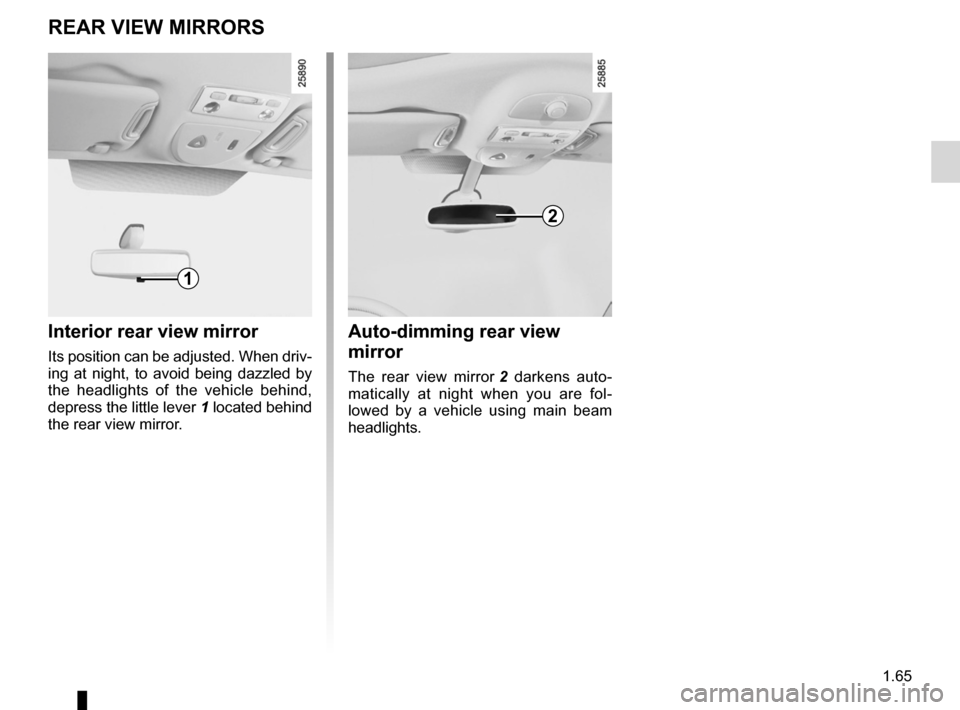
rear VIeW MIrrOrs
Interior rear view mirror
Its position can be adjusted. When driv-
ing at night, to avoid being dazzled by
the headlights of the vehicle behind,
depress the little lever 1 located behind
the rear view mirror.
auto-dimming rear view
mirror
The rear view mirror 2 darkens auto -
matically at night when you are fol -
lowed by a vehicle using main beam
headlights.
1
2
Page 72 of 267
indicators .............................................. (up to the end of the DU)
indicators: direction indicators .......................... (up to the end of the DU)
lights: direction indicators .......................... (up to the end of the DU)
hazard warning lights signal ................. (up to the end of the DU)
signals and lights .................................. (up to the end of the DU)
hazard warning lights signal ................. (up to the end of the DU)
1.66
ENG_UD20352_1
Avertisseurs sonores et lumineux (X81 - J81 - Renault)
ENG_NU_932-3_X81ph3_Renault_1
Audible and visual signals
aUdIBLe and VIsUaL sIGnaLs
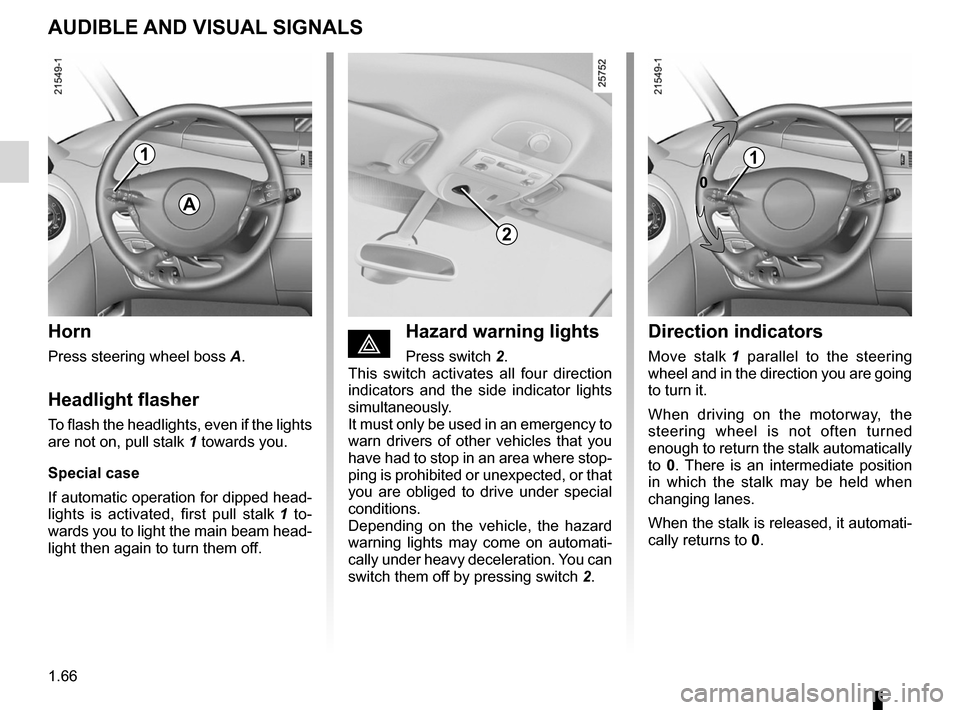
Horn
Press steering wheel boss A.
Headlight flasher
To flash the headlights, even if the lights
are not on, pull stalk 1 towards you.
special case
If automatic operation for dipped head -
lights is activated, first pull stalk 1 to -
wards you to light the main beam head -
light then again to turn them off.
éHazard warning lights
Press switch 2.
This switch activates all four direction
indicators and the side indicator lights
simultaneously.
It must only be used in an emergency to
warn drivers of other vehicles that you
have had to stop in an area where stop-
ping is prohibited or unexpected, or that
you are obliged to drive under special
conditions.
Depending on the vehicle, the hazard
warning lights may come on automati -
cally under heavy deceleration. You can
switch them off by pressing switch 2.
direction indicators
Move stalk 1 parallel to the steering
wheel and in the direction you are going
to turn it.
When driving on the motorway, the
steering wheel is not often turned
enough to return the stalk automatically
to 0. There is an intermediate position
in which the stalk may be held when
changing lanes.
When the stalk is released, it automati-
cally returns to 0.
a
1
2
0
1
Page 73 of 267

lights:dipped beam headlights ................................... (current page)
lights: side lights ......................................................... (current page)
1.67
ENG_UD20353_1
Eclairage et signalisation extérieure (X81 - J81 - Renault)
ENG_NU_932-3_X81ph3_Renault_1
Lighting and exterior signals
eXTerIOr LIGHTInG and sIGnaLs (1/3)
kdipped beam
headlights
automatic operation
With the engine running, the dipped
beam headlights are switched on or off
automatically depending on the level of
ambient light, without the need to oper-
ate stalk 1 (position 0).
This function can be deactivated or re-
activated.
– To deactivate it, with the ignition
on and engine switched off , turn
stalk 1 twice consecutively from po -
sition 0 to side lights. This action is
confirmed by an audible signal.
– To activate it, with the ignition
switched on and engine running or
off, turn stalk 1 twice consecutively
from position 0 to side lights. This
action is confirmed by an audible
signal.
– To select the main beam headlights,
pull stalk 1 towards you. To return to
the dipped beam headlight position,
pull the stalk towards you again.
– The lights go out when the engine
is stopped, when the driver’s door is
opened or when the vehicle is locked
with the RENAULT card.
Manual operation
Turn the end of stalk 1 until the symbol
is opposite mark 3.
An indicator light lights up on the instru-
ment panel in all cases.
daytime running lights
The daytime running lights come on
when the engine is started if stalk 1 is
in position 0.
If the dipped beam headlights oper -
ate automatically, the daytime running
lights only come on if the side lights are
off
1
2
1
3
uside lights
Turn the end of stalk 1 until the
symbol is opposite mark 3.
The instrument panel lights up, the
brightness can be adjusted by using
control knob 2.
Page 74 of 267
warning buzzer ...................................................... (current page)
lights: fog lights .......................................................... (current page)
lights: main beam headlights ...................................... (current page)
1.68
ENG_UD20353_1
Eclairage et signalisation extérieure (X81 - J81 - Renault)
ENG_NU_932-3_X81ph3_Renault_1
Jaune NoirNoir texte
eXTerIOr LIGHTInG and sIGnaLs (2/3)
áMain beam headlights
With the dipped beam head -
lights lit, pull the switch stalk towards
you.
When the main beam headlights are
lit, an indicator light on the instrument
panel comes on.
To return to the dipped beam headlight
position, pull the stalk towards you.
eswitching off the lights
Return stalk 1 to its original po-
sition.
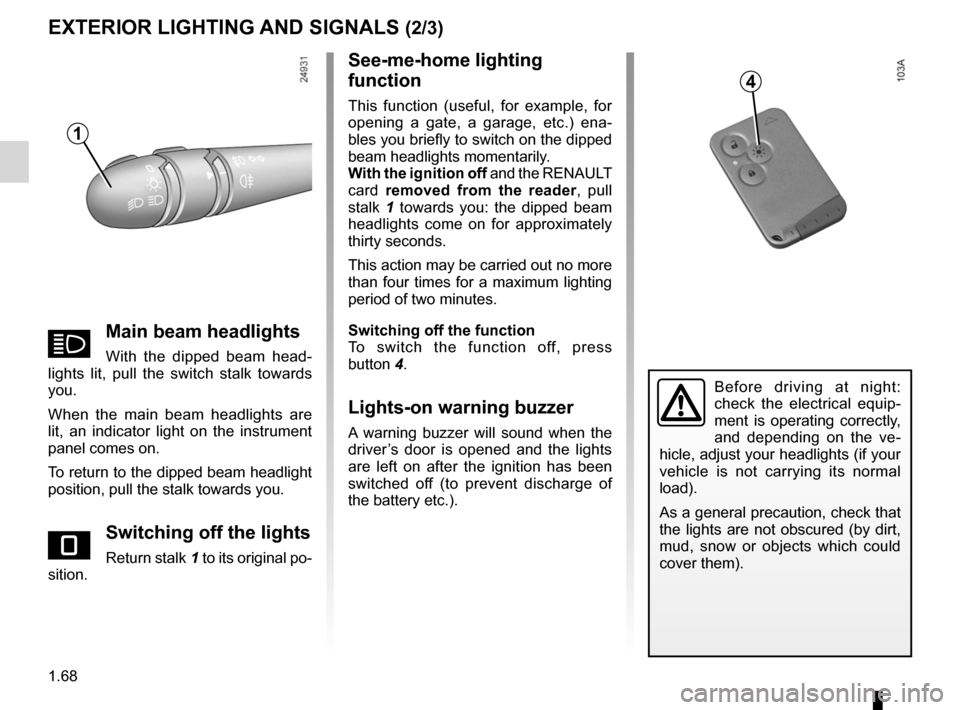
see-me-home lighting
function
This function (useful, for example, for
opening a gate, a garage, etc.) ena -
bles you briefly to switch on the dipped
beam headlights momentarily.
With the ignition off and the RENAULT
card removed from the reader , pull
stalk 1 towards you: the dipped beam
headlights come on for approximately
thirty seconds.
This action may be carried out no more
than four times for a maximum lighting
period of two minutes.
switching off the function
To switch the function off, press
button 4.
Lights-on warning buzzer
A warning buzzer will sound when the
driver’s door is opened and the lights
are left on after the ignition has been
switched off (to prevent discharge of
the battery etc.).
Before driving at night:
check the electrical equip -
ment is operating correctly,
and depending on the ve -
hicle, adjust your headlights (if your
vehicle is not carrying its normal
load).
As a general precaution, check that
the lights are not obscured (by dirt,
mud, snow or objects which could
cover them).
1
4
Page 75 of 267
fog lights ................................................................ (current page)
JauneNoirNoir texte
1.69
ENG_UD20353_1
Eclairage et signalisation extérieure (X81 - J81 - Renault)
ENG_NU_932-3_X81ph3_Renault_1
eXTerIOr LIGHTInG and sIGnaLs (3/3)
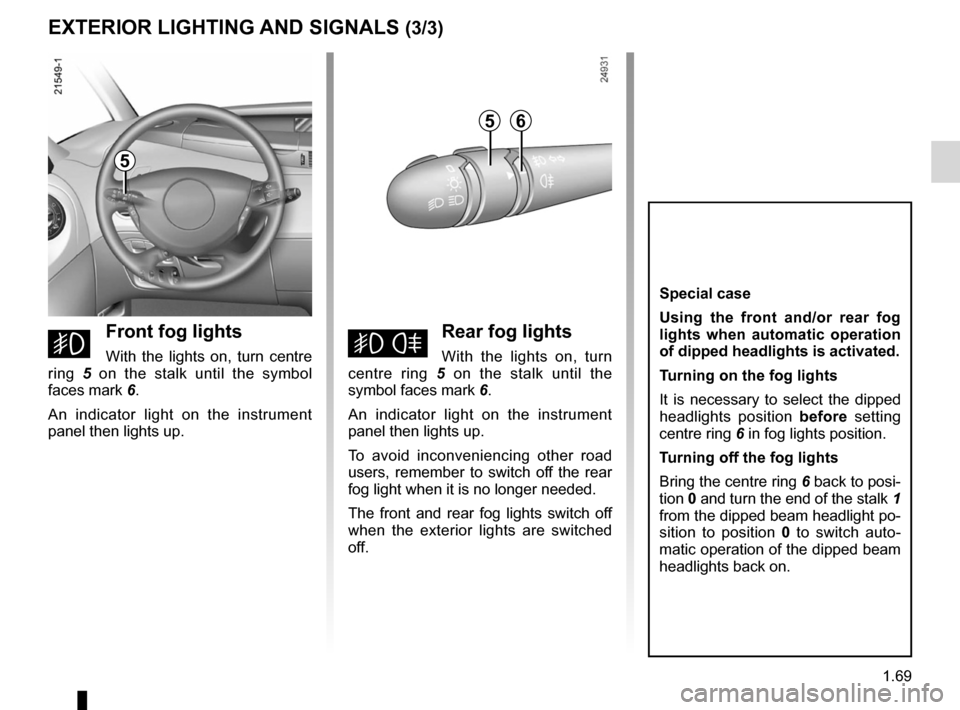
gfront fog lights
With the lights on, turn centre
ring 5 on the stalk until the symbol
faces mark 6.
An indicator light on the instrument
panel then lights up.hrear fog lights
With the lights on, turn
centre ring 5 on the stalk until the
symbol faces mark 6.
An indicator light on the instrument
panel then lights up.
To avoid inconveniencing other road
users, remember to switch off the rear
fog light when it is no longer needed.
The front and rear fog lights switch off
when the exterior lights are switched
off.
special case
Using the front and/or rear fog
lights when automatic operation
of dipped headlights is activated.
Turning on the fog lights
It is necessary to select the dipped
headlights position before setting
centre ring 6 in fog lights position.
Turning off the fog lights
Bring the centre ring 6 back to posi-
tion 0 and turn the end of the stalk 1
from the dipped beam headlight po-
sition to position 0 to switch auto -
matic operation of the dipped beam
headlights back on.
5
56
Page 76 of 267
lights:adjusting ......................................... (up to the end of the DU)
lights adjustment ...................................... (up to the end of the DU)
headlight beam adjustment .................. (up to the end of the DU)
signals and lights .................................. (up to the end of the DU)
1.70
ENG_UD1771_1
Réglage électrique de la hauteur des faisceaux (X81 - Renault)
ENG_NU_932-3_X81ph3_Renault_1
Réglage des projecteurs
eLecTrIc BeaM HeIGHT adJUsTMenT
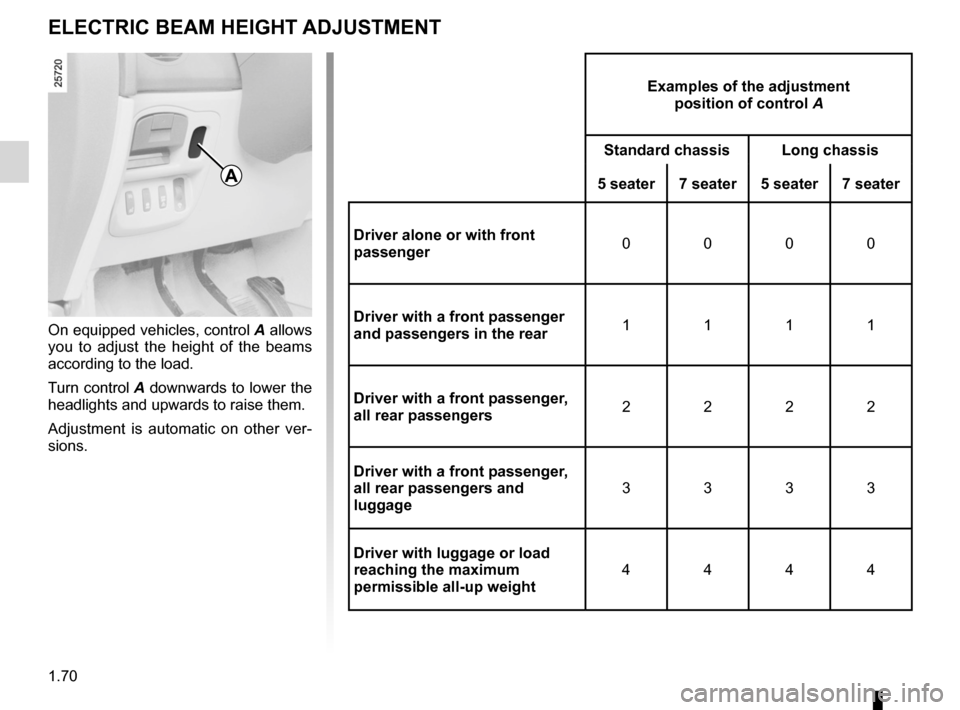
On equipped vehicles, control A allows
you to adjust the height of the beams
according to the load.
Turn control A downwards to lower the
headlights and upwards to raise them.
Adjustment is automatic on other ver -
sions.
examples of the adjustment position of control A
standard chassis Long chassis
5 seater 7 seater5 seater7 seater
driver alone or with front
passenger 0
000
driver with a front passenger
and passengers in the rear 1
111
driver with a front passenger,
all rear passengers 2
222
driver with a front passenger,
all rear passengers and
luggage 3
333
driver with luggage or load
reaching the maximum
permissible all-up weight 4
444
a