start stop button RENAULT ESPACE 2015 5.G Owner's Manual
[x] Cancel search | Manufacturer: RENAULT, Model Year: 2015, Model line: ESPACE, Model: RENAULT ESPACE 2015 5.GPages: 316, PDF Size: 6.98 MB
Page 240 of 316
4.4
ENGINE OIL LEVEL: general information
It is normal for an engine to use oil for
lubrication and cooling of moving parts
and it is normal to top up the level be-
tween oil changes.
However, contact your approved
Dealer if more than 0.5 litres is being
consumed every 600 miles (1,000 km)
after the running in period.
Oil change frequency: check the oil
level from time to time and certainly
before any long journey to avoid the
risk of damaging your engine.
Reading the oil level
The oil level should be read with the ve-
hicle on level ground, after the engine
has been switched off for some time.
The dipstick must be used to read
the exact oil level and make sure
that the maximum level has not been
exceeded (risk of engine damage).
Refer to the following pages.
The instrument panel display only
alerts the driver when the oil level is at
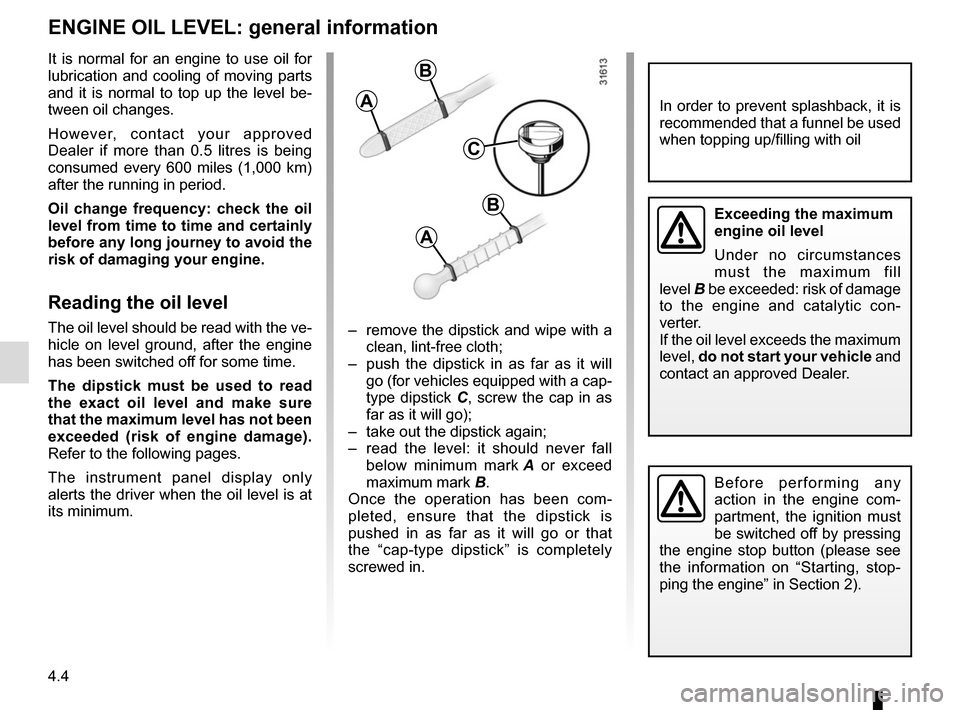
its minimum. – remove the dipstick and wipe with a
clean, lint-free cloth;
– push the dipstick in as far as it will go (for vehicles equipped with a cap-
type dipstick C, screw the cap in as
far as it will go);
– take out the dipstick again;
– read the level: it should never fall below minimum mark A or exceed
maximum mark B.
Once the operation has been com-
pleted, ensure that the dipstick is
pushed in as far as it will go or that
the “cap-type dipstick” is completely
screwed in.
C
A
B
A
B
In order to prevent splashback, it is
recommended that a funnel be used
when topping up/filling with oil
Before performing any
action in the engine com-
partment, the ignition must
be switched off by pressing
the engine stop button (please see
the information on “Starting, stop-
ping the engine” in Section 2).
Exceeding the maximum
engine oil level
Under no circumstances
must the maximum fill
level B be exceeded: risk of damage
to the engine and catalytic con-
verter.
If the oil level exceeds the maximum
level, do not start your vehicle and
contact an approved Dealer.
Page 241 of 316
4.5
ENGINE OIL LEVEL: topping up, filling (1/2)
Topping up/Filling
The vehicle must be parked on level
ground and the engine should be cold
(for instance, before the engine is
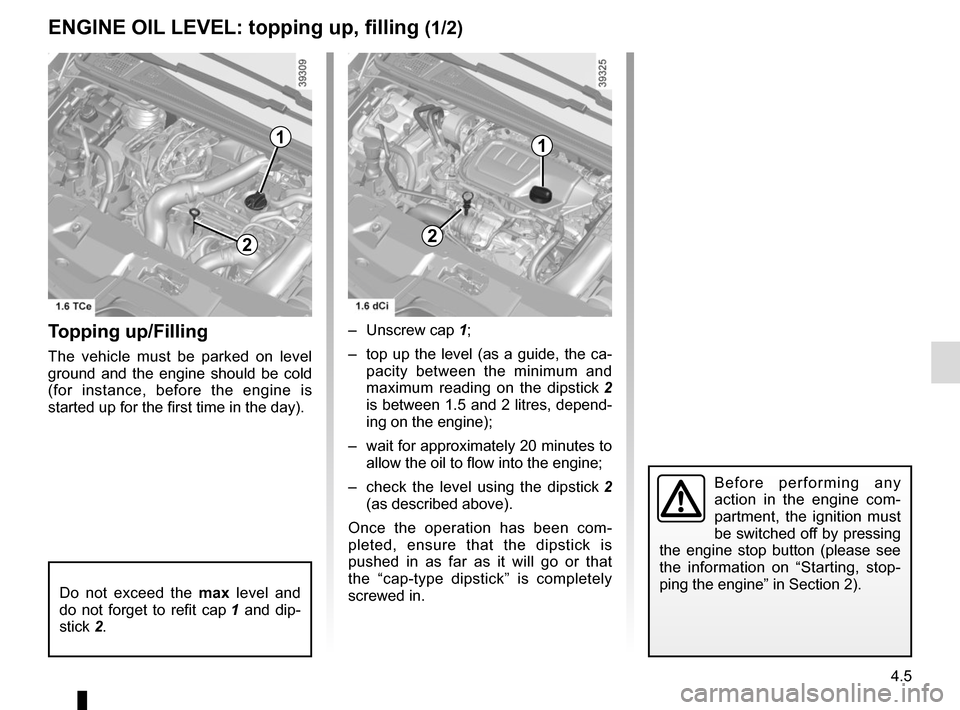
started up for the first time in the day).– Unscrew cap
1;
– top up the level (as a guide, the ca- pacity between the minimum and
maximum reading on the dipstick 2
is between 1.5 and 2 litres, depend-
ing on the engine);
– wait for approximately 20 minutes to allow the oil to flow into the engine;
– check the level using the dipstick 2
(as described above).
Once the operation has been com-
pleted, ensure that the dipstick is
pushed in as far as it will go or that
the “cap-type dipstick” is completely
screwed in.
Do not exceed the max level and
do not forget to refit cap 1 and dip-
stick 2.
1
2
1
2
Before performing any
action in the engine com-
partment, the ignition must
be switched off by pressing
the engine stop button (please see
the information on “Starting, stop-
ping the engine” in Section 2).
Page 243 of 316
4.7
Replacement intervals
Refer to the Maintenance Document for
your vehicle.
Checking intervals
Check the coolant level regularly
(very severe damage is likely to be
caused to the engine if it runs out of
coolant).
If the level needs to be topped up, only
use products approved by our Technical
Department which ensure:
– protection against freezing;
– anticorrosion protection of the cool- ing system.
LEVELS (1/3)
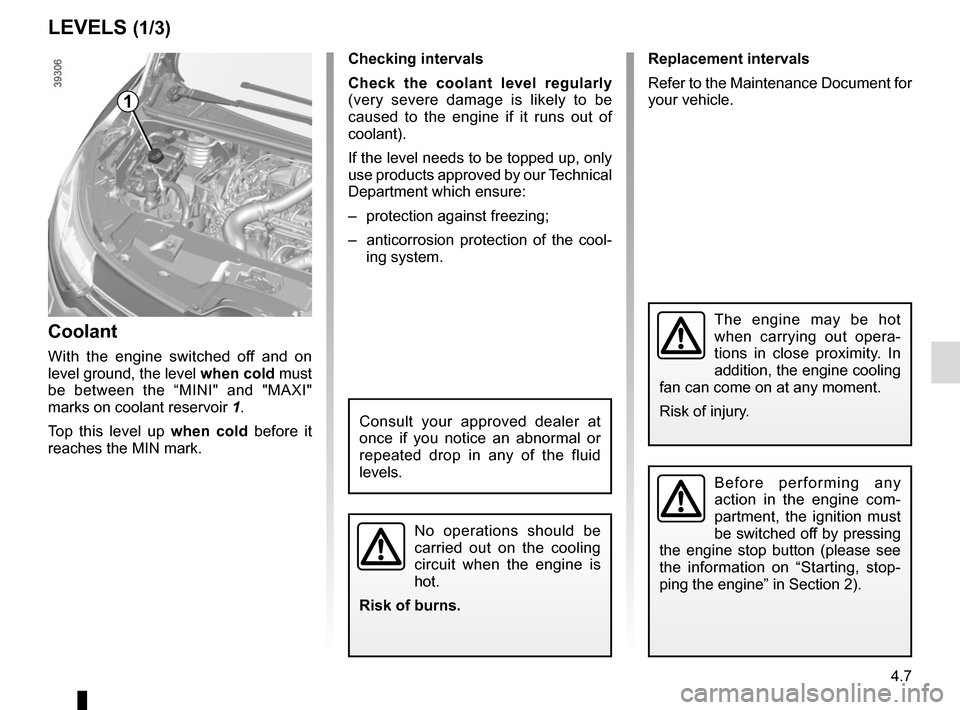
Coolant
With the engine switched off and on
level ground, the level when cold must
be between the “MINI" and "MAXI"
marks on coolant reservoir 1.
Top this level up when cold before it
reaches the MIN mark.
No operations should be
carried out on the cooling
circuit when the engine is
hot.
Risk of burns.
Consult your approved dealer at
once if you notice an abnormal or
repeated drop in any of the fluid
levels.
The engine may be hot
when carrying out opera-
tions in close proximity. In
addition, the engine cooling
fan can come on at any moment.
Risk of injury.
1
Before performing any
action in the engine com-
partment, the ignition must
be switched off by pressing
the engine stop button (please see
the information on “Starting, stop-
ping the engine” in Section 2).
Page 244 of 316
4.8
LEVELS (2/3)
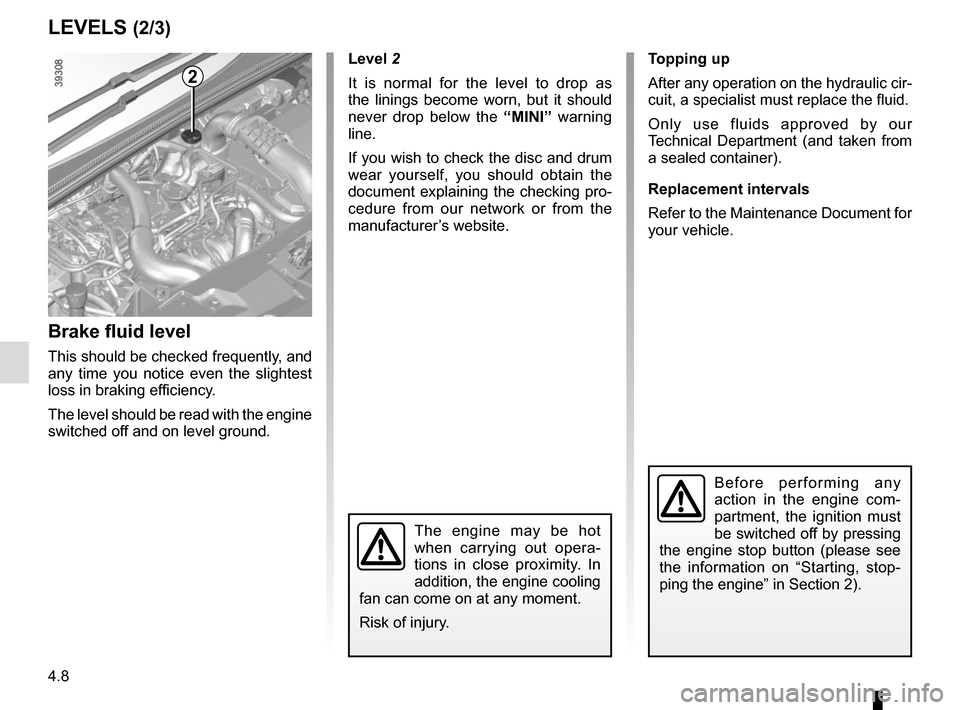
Brake fluid level
This should be checked frequently, and
any time you notice even the slightest
loss in braking efficiency.
The level should be read with the engine
switched off and on level ground.Level 2
It is normal for the level to drop as
the linings become worn, but it should
never drop below the “MINI” warning
line.
If you wish to check the disc and drum
wear yourself, you should obtain the
document explaining the checking pro-
cedure from our network or from the
manufacturer’s website. Topping up
After any operation on the hydraulic cir-
cuit, a specialist must replace the fluid.
Only use fluids approved by our
Technical Department (and taken from
a sealed container).
Replacement intervals
Refer to the Maintenance Document for
your vehicle.
The engine may be hot
when carrying out opera-
tions in close proximity. In
addition, the engine cooling
fan can come on at any moment.
Risk of injury.
2
Before performing any
action in the engine com-
partment, the ignition must
be switched off by pressing
the engine stop button (please see
the information on “Starting, stop-
ping the engine” in Section 2).
Page 246 of 316
4.10
BATTERY (1/2)
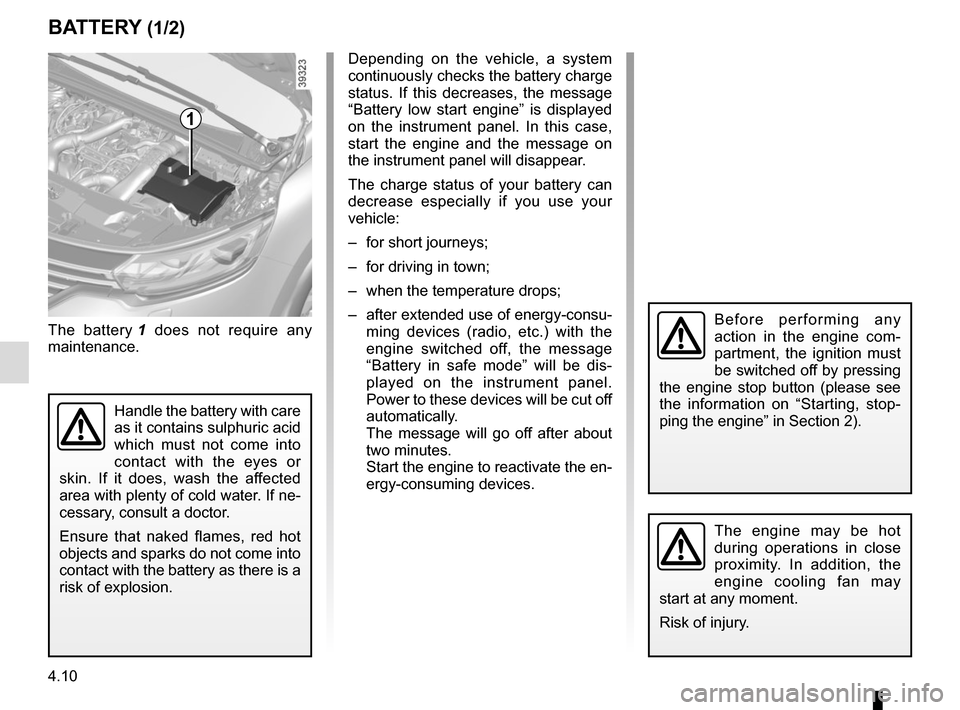
1
The battery 1 does not require any
maintenance.
Handle the battery with care
as it contains sulphuric acid
which must not come into
contact with the eyes or
skin. If it does, wash the affected
area with plenty of cold water. If ne-
cessary, consult a doctor.
Ensure that naked flames, red hot
objects and sparks do not come into
contact with the battery as there is a
risk of explosion.
Depending on the vehicle, a system
continuously checks the battery charge
status. If this decreases, the message
“Battery low start engine” is displayed
on the instrument panel. In this case,
start the engine and the message on
the instrument panel will disappear.
The charge status of your battery can
decrease especially if you use your
vehicle:
– for short journeys;
– for driving in town;
– when the temperature drops;
– after extended use of energy-consu- ming devices (radio, etc.) with the
engine switched off, the message
“Battery in safe mode” will be dis-
played on the instrument panel.
Power to these devices will be cut off
automatically.
The message will go off after about
two minutes.
Start the engine to reactivate the en-
ergy-consuming devices.
The engine may be hot
during operations in close
proximity. In addition, the
engine cooling fan may
start at any moment.
Risk of injury.
Before performing any
action in the engine com-
partment, the ignition must
be switched off by pressing
the engine stop button (please see
the information on “Starting, stop-
ping the engine” in Section 2).
Page 277 of 316
5.23
BATTERY: troubleshooting (1/2)
To avoid all risk of sparks:
– Ensure that any consumers (cour-tesy lights, etc.) are switched off
before disconnecting or reconnect-
ing the battery;
– when charging, stop the charger before connecting or disconnecting
the battery;
– to avoid creating a short circuit be- tween the terminals, do not place
metal objects on the battery;
– always wait at least one minute after the engine has been switched off
before disconnecting a battery;
– make sure that you reconnect the battery terminals after refitting.
Connecting a battery charger
The battery charger must be com-
patible with a battery with nominal
voltage of 12 volts.
Do not disconnect the battery when the
engine is running. Follow the instruc-
tions given by the manufacturer of
the battery charger you are using.
Special procedures may be
required to charge some
batteries. Contact your au-
thorised dealer.
Avoid all risk of sparks which may
cause an immediate explosion, and
charge the battery in a well-venti-
lated area. Risk of serious injury.
Handle the battery with care
as it contains sulphuric acid,
which must not come into
contact with eyes or skin. If
it does, wash the affected area with
plenty of cold water. If necessary,
consult a doctor.
Ensure that naked flames, red hot
objects and sparks do not come into
contact with the battery as there is a
risk of explosion. There is a risk of
explosion.
The engine may be hot when car-
rying out operations in close prox-
imity. In addition, the engine cooling
fan can come on at any moment.
Risk of injury.
Before performing any
action in the engine com-
partment, the ignition must
be switched off by pressing
the engine stop button (please see
the information on “Starting, stop-
ping the engine” in Section 2).
Page 281 of 316
5.27
WINDSCREEN WIPER BLADES: replacement (1/2)
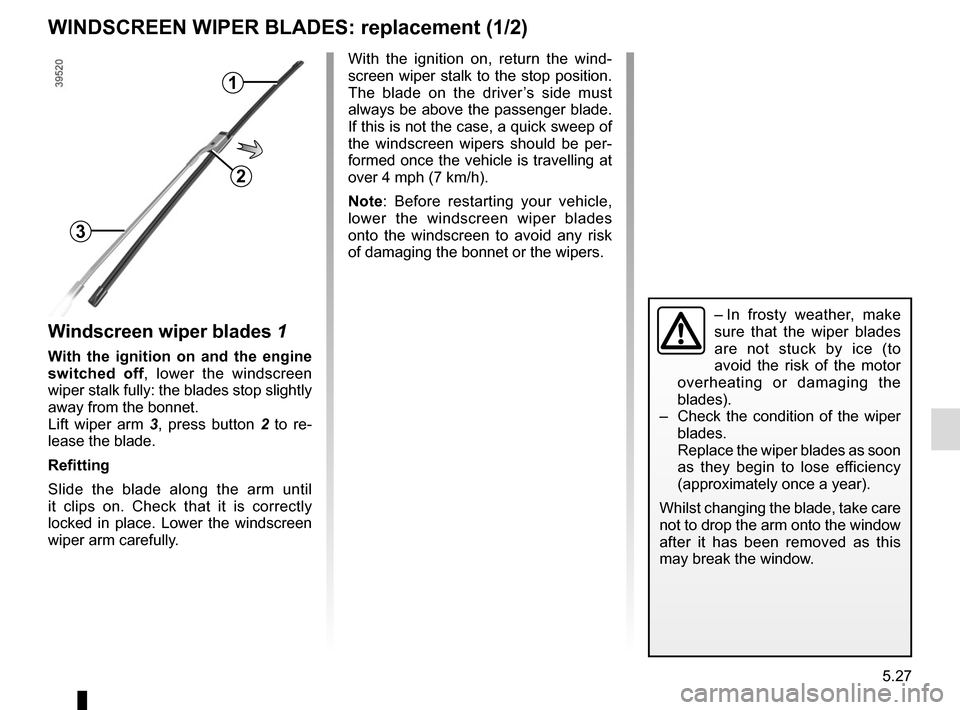
Windscreen wiper blades 1
With the ignition on and the engine
switched off, lower the windscreen
wiper stalk fully: the blades stop slightly
away from the bonnet.
Lift wiper arm 3 , press button 2 to re-
lease the blade.
Refitting
Slide the blade along the arm until
it clips on. Check that it is correctly
locked in place. Lower the windscreen
wiper arm carefully.
1
2
3
With the ignition on, return the wind-
screen wiper stalk to the stop position.
The blade on the driver’s side must
always be above the passenger blade.
If this is not the case, a quick sweep of
the windscreen wipers should be per-
formed once the vehicle is travelling at
over 4 mph (7 km/h).
Note: Before restarting your vehicle,
lower the windscreen wiper blades
onto the windscreen to avoid any risk
of damaging the bonnet or the wipers.
– In frosty weather, make
sure that the wiper blades
are not stuck by ice (to
avoid the risk of the motor
overheating or damaging the
blades).
– Check the condition of the wiper
blades.
Replace the wiper blades as soon
as they begin to lose efficiency
(approximately once a year).
Whilst changing the blade, take care
not to drop the arm onto the window
after it has been removed as this
may break the window.
Page 285 of 316
5.31
OPERATING FAULTS (1/6)
Using the RENAULT cardPOSSIBLE CAUSES WHAT TO DO
The RENAULT card does not lock or
unlock the doors. Card battery is flat.
Replace the battery. You can still lock/
unlock and start your vehicle (refer to the
information on “Locking/unlocking the
doors” in Section 1 and “Starting/Stopping
the engine” in Section 2).
Use of appliances operating on the
same frequency as the card (mobile
phone, etc.). Stop using the equipment or use the in-
tegrated key (refer to the information on
“Locking, unlocking the opening elements”
in Section 1).
Vehicle located in a high electromag-
netic radiation zone.
Vehicle battery flat. Use the key integrated in the card (refer to
the information on “Locking, unlocking the
opening elements” in Section 1).
The message “Place card close to
START button” appears on the instru-
ment panel. Hold the start button card close until the
instrument panel message stops being dis-
played, then press the same button within
2 seconds of the message going out.
Page 286 of 316
5.32
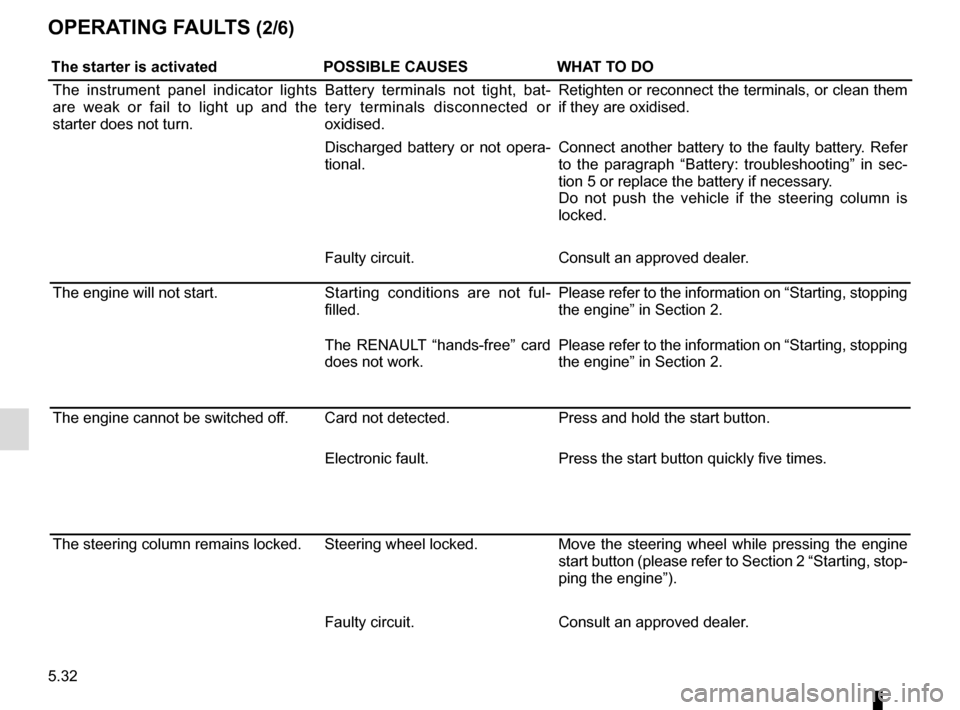
OPERATING FAULTS (2/6)
The starter is activatedPOSSIBLE CAUSESWHAT TO DO
The instrument panel indicator lights
are weak or fail to light up and the
starter does not turn. Battery terminals not tight, bat-
tery terminals disconnected or
oxidised.Retighten or reconnect the terminals, or clean them
if they are oxidised.
Discharged battery or not opera-
tional. Connect another battery to the faulty battery. Refer
to the paragraph “Battery: troubleshooting” in sec-
tion 5 or replace the battery if necessary.
Do not push the vehicle if the steering column is
locked.
Faulty circuit. Consult an approved dealer.
The engine will not start. Starting conditions are not ful-
filled.Please refer to the information on “Starting, stopping
the engine” in Section 2.
The RENAULT “hands-free” card
does not work. Please refer to the information on “Starting, stopping
the engine” in Section 2.
The engine cannot be switched off. Card not detected. Press and hold the start button.
Electronic fault. Press the start button quickly five times.
The steering column remains locked. Steering wheel locked. Move the steering wheel while pressing the engine
start button (please refer to Section 2 “Starting, stop-
ping the engine”).
Faulty circuit. Consult an approved dealer.
Page 310 of 316
7.2
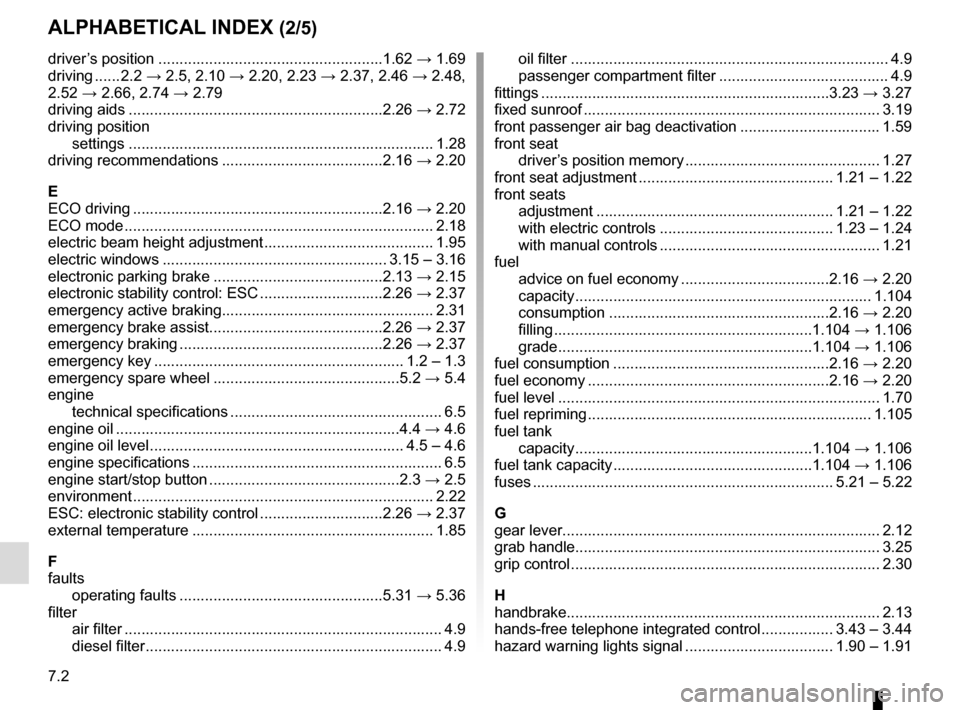
ALPHABETICAL INDEX (2/5)
driver’s position .....................................................1.62 → 1.69
driving ...... 2.2 → 2.5, 2.10 → 2.20, 2.23 → 2.37, 2.46 → 2.48,
2.52 → 2.66, 2.74 → 2.79
driving aids ............................................................2.26 → 2.72
driving position settings ...............................................................\
......... 1.28
driving recommendations ......................................2.16 → 2.20
E
ECO driving ...........................................................2.16 → 2.20
ECO mode ........................................................................\
. 2.18
electric beam height adjustment ........................................ 1.95
electric windows ..................................................... 3.15 – 3.16
electronic parking brake ........................................2.13 → 2.15
electronic stability control: ESC .............................2.26 → 2.37
emergency active braking................................................\
.. 2.31
emergency brake assist.........................................2.26 → 2.37
emergency braking ................................................2.26 → 2.37
emergency key ........................................................... 1.2 – 1.3
emergency spare wheel ............................................5.2 → 5.4
engine technical specifications .................................................. 6.5
engine oil ...................................................................4.4 → 4.6
engine oil level ............................................................ 4.5 – 4.6
engine specifications ........................................................... 6.5
engine start/stop button .............................................2.3 → 2.5
environment ............................................................\
........... 2.22
ESC: electronic stability control .............................2.26 → 2.37
external temperature ......................................................... 1.85
F
faults operating faults ................................................5.31 → 5.36
filter air filter ........................................................................\
... 4.9
diesel filter ...................................................................... 4.9 oil filter ........................................................................\
... 4.9
passenger compartment filter ........................................ 4.9
fittings ...............................................................\
.....3.23 → 3.27
fixed sunroof ...................................................................... 3.19
front passenger air bag deactivation ................................. 1.59
front seat driver’s position memory .............................................. 1.27
front seat adjustment .............................................. 1.21 – 1.22
front seats adjustment ........................................................ 1.21 – 1.22
with electric controls ......................................... 1.23 – 1.24
with manual controls .................................................... 1.21
fuel advice on fuel economy ...................................2.16 → 2.20
capacity ...............................................................\
....... 1.104
consumption ....................................................2.16 → 2.20
filling .............................................................1.1\
04 → 1.106
grade ............................................................1.104 \
→ 1.106
fuel consumption ...................................................2.16 → 2.20
fuel economy .........................................................2.16 → 2.20
fuel level ........................................................................\
.... 1.70
fuel repriming ................................................................... 1.105
fuel tank capacity ........................................................1.104 → 1.106
fuel tank capacity ...............................................1.104 → 1.106
fuses ....................................................................... 5.21 – 5.22
G
gear lever..............................................................\
............. 2.12
grab handle.............................................................\
........... 3.25
grip control ........................................................................\
.
2.30
H
handbrake...............................................................\
........... 2.13
hands-free telephone integrated control ................. 3.43 – 3.44
hazard warning lights signal ................................... 1.90 – 1.91