reset RENAULT ESPACE 2017 5.G R Link 2 User Guide
[x] Cancel search | Manufacturer: RENAULT, Model Year: 2017, Model line: ESPACE, Model: RENAULT ESPACE 2017 5.GPages: 130, PDF Size: 5.83 MB
Page 54 of 130
2.22
“Visual guidance”
This menu displays information relating
to your route on the navigation screen.
“Data fields”
The data fields in the corner of the
navigation screen can be custom-
ised. Select this option and choose the
values you want to see. The values
can differ depending on whether you
are following a route or whether you
are travelling without a set destination.
You can choose to display the remain-
ing distance to your destination/next
waypoint, the remaining time until you
reach your destination/next waypoint,
or the estimated arrival time for your
destination/next waypoint. “Signposts”
Whenever relevant information is avail-
able, such as information similar to that
displayed on road signs, it will be dis-
played in the upper section of the map.
You can turn this feature on or off.
“Junction view”
If you are approaching a motorway
junction or a complex crossroads and
the necessary information exists, the
map is replaced with a 3D view of the
junction. You can activate this function
or keep the standard display through-
out your route.
NAVIGATION SETTINGS (4/4)
For safety reasons, carry
out these operations when
the vehicle is stationary.
“Tunnel view”
When entering a tunnel, the surface
roads and buildings can count as a dis-
turbance. This feature shows a generic
image of a tunnel instead of the map.
A top-down overview of the tunnel and
the remaining distance to the tunnel
exit are also displayed.
To reset your data and go back
to the default settings, press the
pop-up menu button, then Reset.
Page 56 of 130
3.2
LISTENING TO THE RADIO (1/8)
FrequenciesStations Presets
Band
“Multimedia”
menu
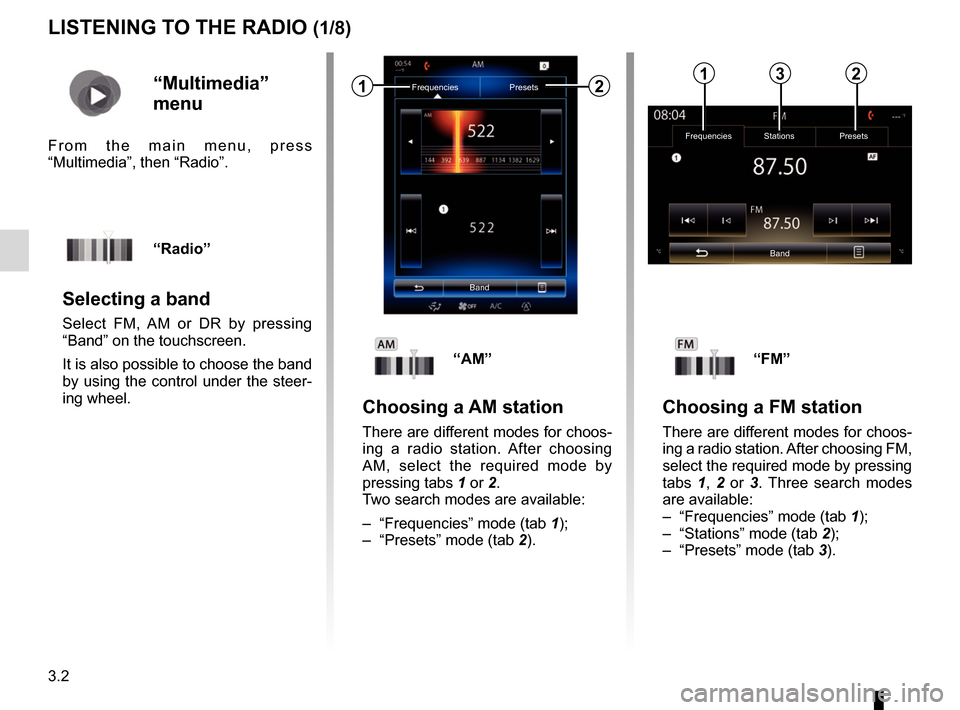
From the main menu, press
“Multimedia”, then “Radio”.
“Radio”
Selecting a band
Select FM, AM or DR by pressing
“Band” on the touchscreen.
It is also possible to choose the band
by using the control under the steer-
ing wheel.
“AM”
Choosing a AM station
There are different modes for choos-
ing a radio station. After choosing
AM, select the required mode by
pressing tabs 1 or 2.
Two search modes are available:
– “Frequencies” mode (tab 1);
– “Presets” mode (tab 2).
“FM”
Choosing a FM station
There are different modes for choos-
ing a radio station. After choosing FM,
select the required mode by pressing
tabs 1, 2 or 3 . Three search modes
are available:
– “Frequencies” mode (tab 1);
– “Stations” mode (tab 2);
– “Presets” mode (tab 3).
Frequencies Presets
Band12132
Page 57 of 130
3.3
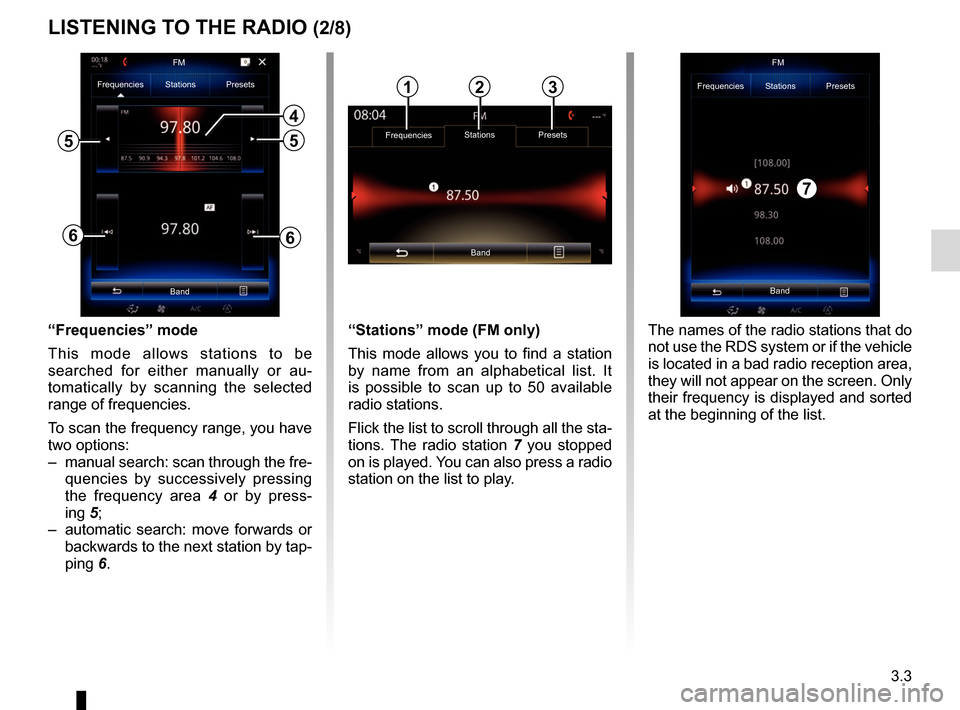
“Frequencies” mode
This mode allows stations to be
searched for either manually or au-
tomatically by scanning the selected
range of frequencies.
To scan the frequency range, you have
two options:
– manual search: scan through the fre-quencies by successively pressing
the frequency area 4 or by press-
ing 5;
– automatic search: move forwards or backwards to the next station by tap-
ping 6.
4
66
Frequencies Stations Presets
Band
55
“Stations” mode (FM only)
This mode allows you to find a station
by name from an alphabetical list. It
is possible to scan up to 50 available
radio stations.
Flick the list to scroll through all the sta-
tions. The radio station 7 you stopped
on is played. You can also press a radio
station on the list to play.
Band FM
Frequencies Stations Presets
The names of the radio stations that do
not use the RDS system or if the vehicle
is located in a bad radio reception area,
they will not appear on the screen. Only
their frequency is displayed and sorted
at the beginning of the list.
LISTENING TO THE RADIO (2/8)
Frequencies Stations Presets
Band
123
7
FM
Page 58 of 130
3.4
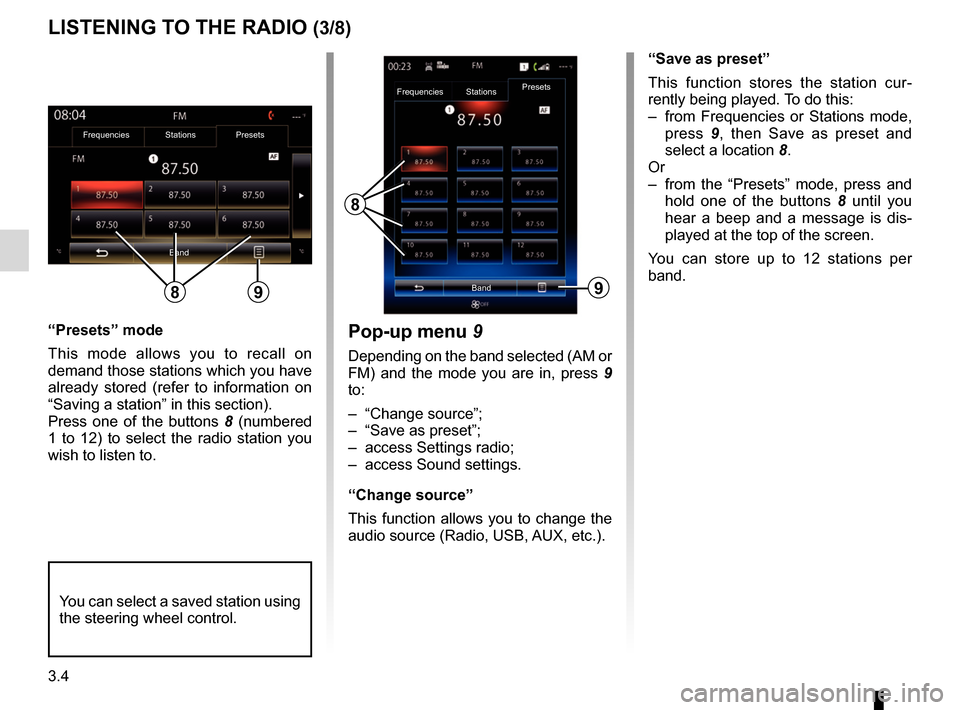
“Presets” mode
This mode allows you to recall on
demand those stations which you have
already stored (refer to information on
“Saving a station” in this section).
Press one of the buttons 8 (numbered
1 to 12) to select the radio station you
wish to listen to.
LISTENING TO THE RADIO (3/8)
“Save as preset”
This function stores the station cur-
rently being played. To do this:
– from Frequencies or Stations mode, press 9, then Save as preset and
select a location 8.
Or
– from the “Presets” mode, press and hold one of the buttons 8 until you
hear a beep and a message is dis-
played at the top of the screen.
You can store up to 12 stations per
band.
8
Band
Frequencies
StationsPresets
You can select a saved station using
the steering wheel control.
9
Pop-up menu
9
Depending on the band selected (AM or
FM) and the mode you are in, press 9
to:
– “Change source”;
– “Save as preset”;
– access Settings radio;
– access Sound settings.
“Change source”
This function allows you to change the
audio source (Radio, USB, AUX, etc.).
Frequencies Stations Presets
Band
89
Page 60 of 130
3.6
LISTENING TO THE RADIO (5/8)
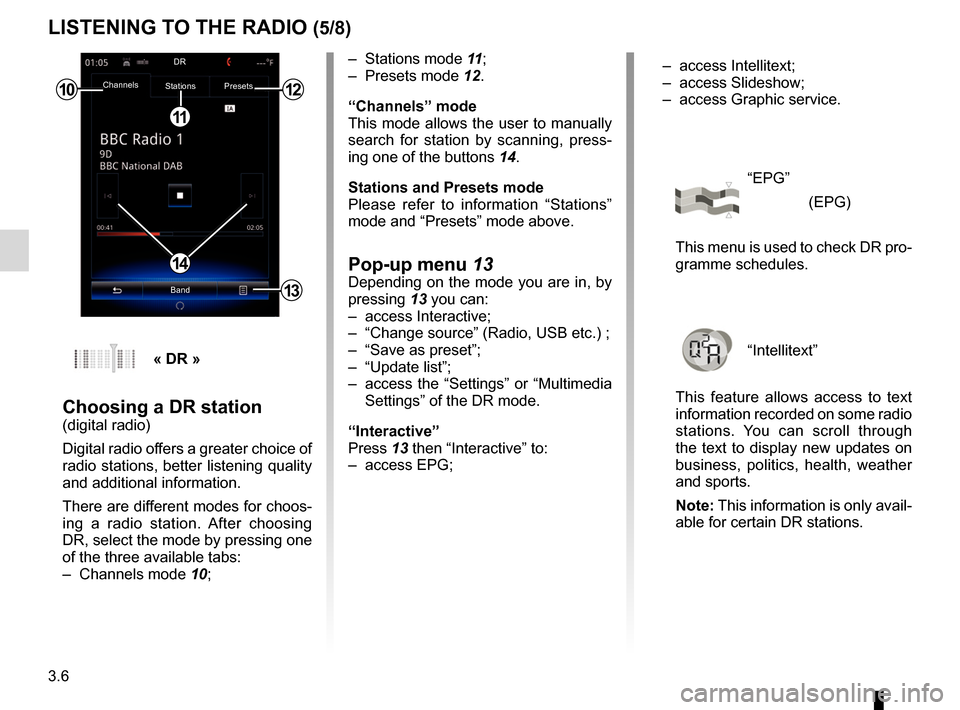
– Stations mode 11;
– Presets mode 12.
“Channels” mode
This mode allows the user to manually
search for station by scanning, press-
ing one of the buttons 14.
Stations and Presets mode
Please refer to information “Stations”
mode and “Presets” mode above.
Pop-up menu 13Depending on the mode you are in, by
pressing 13 you can:
– access Interactive;
– “Change source” (Radio, USB etc.) ;
– “Save as preset”;
– “Update list”;
– access the “Settings” or “Multimedia Settings” of the DR mode.
“Interactive”
Press 13 then “Interactive” to:
– access EPG;
10
11
12
14
13
Channels Stations Presets
BandDR
« DR »
Choosing a DR station(digital radio)
Digital radio offers a greater choice of
radio stations, better listening quality
and additional information.
There are different modes for choos-
ing a radio station. After choosing
DR, select the mode by pressing one
of the three available tabs:
– Channels mode
10; – access Intellitext;
– access Slideshow;
– access Graphic service.
“EPG”
(EPG)
This menu is used to check DR pro-
gramme schedules.
“Intellitext”
This feature allows access to text
information recorded on some radio
stations. You can scroll through
the text to display new updates on
business, politics, health, weather
and sports.
Note: This information is only avail-
able for certain DR stations.
Page 61 of 130
3.7
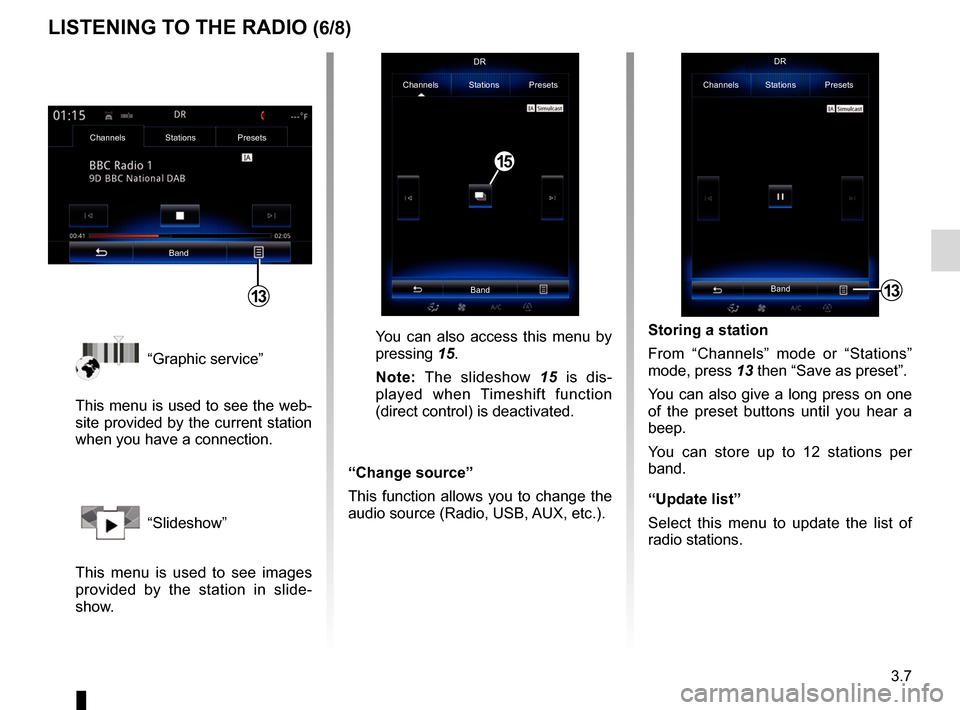
“Graphic service”
This menu is used to see the web-
site provided by the current station
when you have a connection.
“Slideshow”
This menu is used to see images
provided by the station in slide-
show.
Storing a station
From “Channels” mode or “Stations”
mode, press 13 then “Save as preset”.
You can also give a long press on one
of the preset buttons until you hear a
beep.
You can store up to 12 stations per
band.
“Update list”
Select this menu to update the list of
radio stations.
LISTENING TO THE RADIO (6/8)
13
Channels Stations Presets
BandDR
You can also access this menu by
pressing
15.
Note: The slideshow 15 is dis-
played when Timeshift function
(direct control) is deactivated.
“Change source”
This function allows you to change the
audio source (Radio, USB, AUX, etc.).
Channels Stations Presets
BandDR
15
Channels Stations Presets
Band
13
Page 62 of 130
3.8
LISTENING TO THE RADIO (7/8)
“Settings”
From modes Channels, Stations or
Presets, press 13 then Settings to
access the digital radio settings. From
the settings, you can activate or deacti-
vate the following elements:
– “Radio text”;
– “Simulcast/Handover”;
– “Time shift”;
– “TA / I-Traffic”;
– “I-Announcement”.
“Radio text”
(text information)
Some digital radio stations broadcast
text information relating to their pro-
grammes (e.g.: song titles).
Note: This information is only available
for certain radio stations.
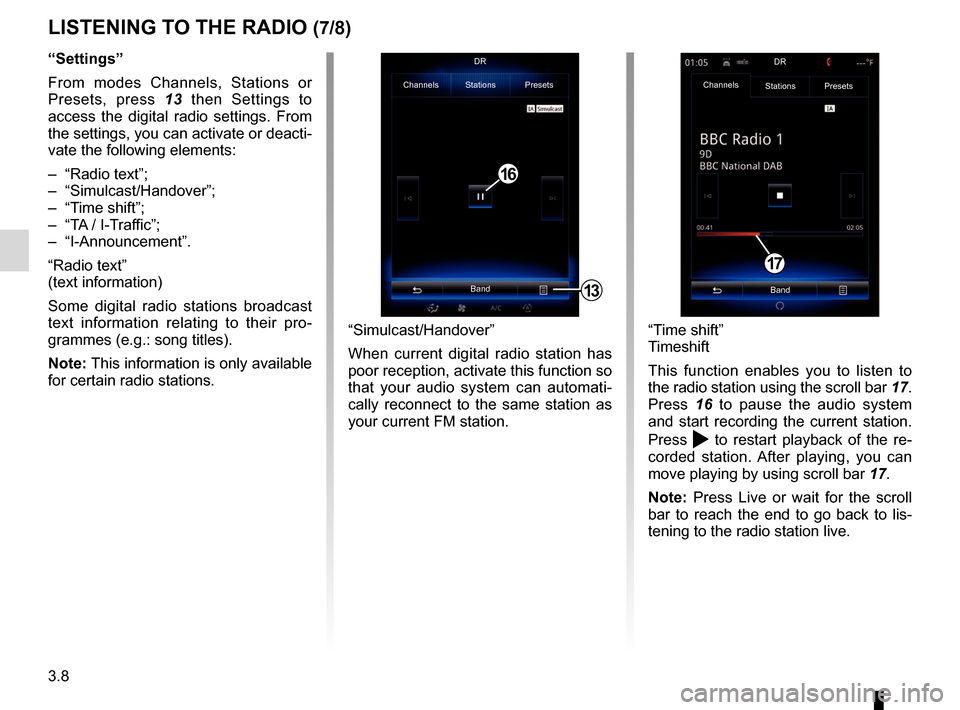
“Time shift”
Timeshift
This function enables you to listen to
the radio station using the scroll bar 17.
Press 16 to pause the audio system
and start recording the current station.
Press
to restart playback of the re-
corded station. After playing, you can
move playing by using scroll bar 17.
Note: Press Live or wait for the scroll
bar to reach the end to go back to lis-
tening to the radio station live.
17
“Simulcast/Handover”
When current digital radio station has
poor reception, activate this function so
that your audio system can automati-
cally reconnect to the same station as
your current FM station.
13
Channels Stations Presets
BandDR
16
Channels
Stations Presets
BandDR
Page 71 of 130
3.17
“Sound”
This menu allows you to configure
the different sound settings.
“Sound ambiance”
This function enables you to select a
musical environment from the follow-
ing presets:
– “Neutral”;
– “Live”;
– “Club”;
– “Lounge”.
Note: You can launch a demonstra-
tion mode that allows you to hear the
sound without Arkamys sound en-
hancement treatment.
“Bass Boost”
This function increases the bass.
Balance / Fader
centered Front Manual
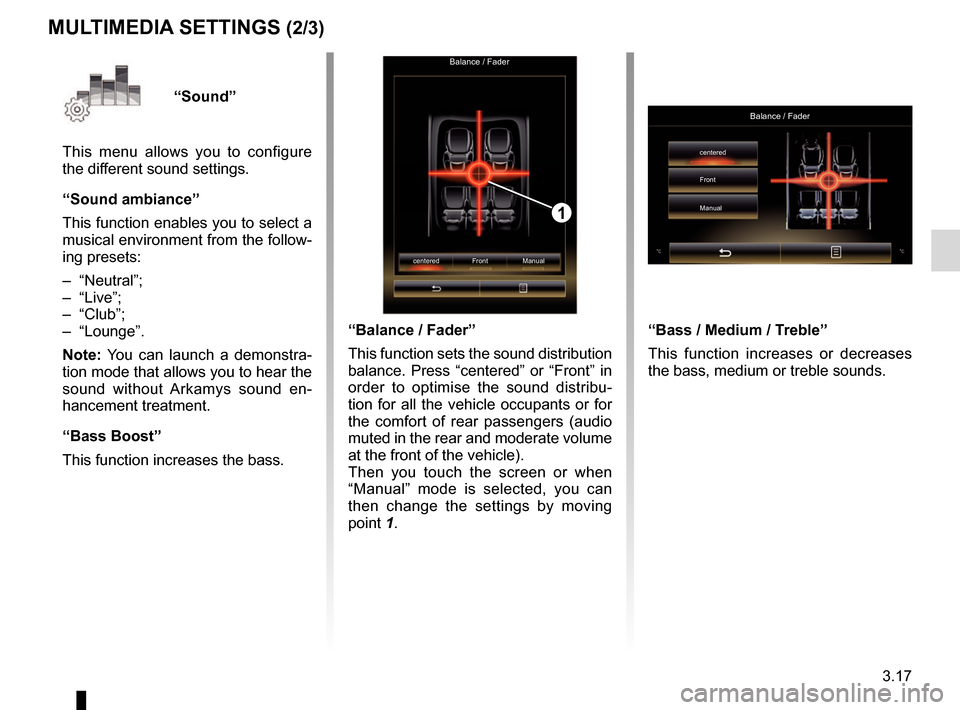
1
“Balance / Fader”
This function sets the sound distribution
balance. Press “centered” or “Front” in
order to optimise the sound distribu-
tion for all the vehicle occupants or for
the comfort of rear passengers (audio
muted in the rear and moderate volume
at the front of the vehicle).
Then you touch the screen or when
“Manual” mode is selected, you can
then change the settings by moving
point 1.
MULTIMEDIA SETTINGS (2/3)
“Bass / Medium / Treble”
This function increases or decreases
the bass, medium or treble sounds.
Balance / Fader
centered
Front
Manual
Page 72 of 130
3.18
MULTIMEDIA SETTINGS (3/3)
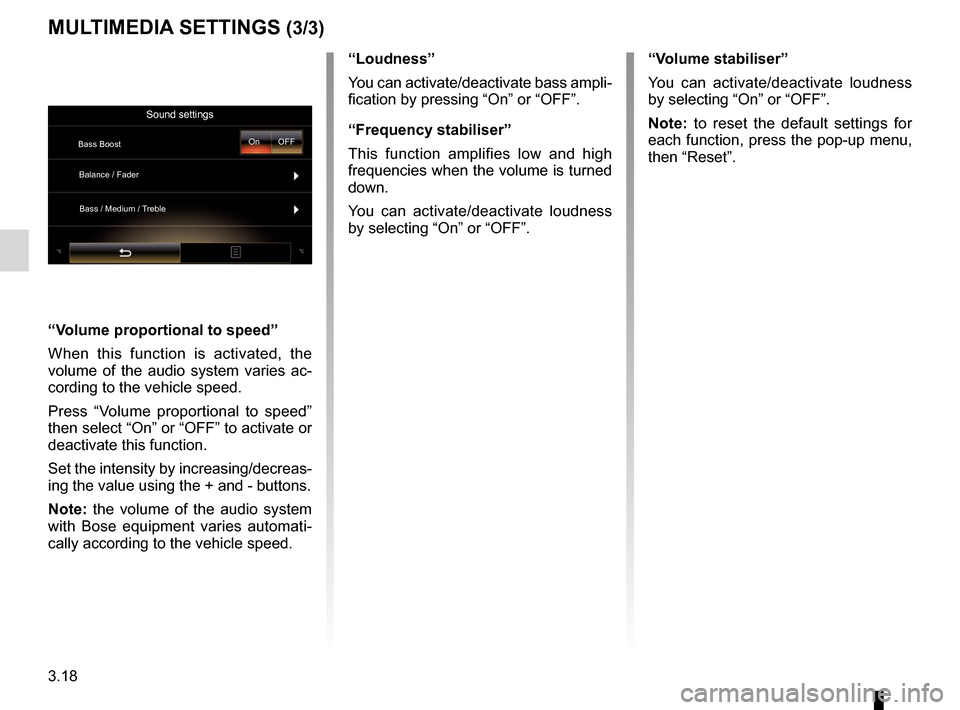
“Volume proportional to speed”
When this function is activated, the
volume of the audio system varies ac-
cording to the vehicle speed.
Press “Volume proportional to speed”
then select “On” or “OFF” to activate or
deactivate this function.
Set the intensity by increasing/decreas-
ing the value using the + and - buttons.
Note: the volume of the audio system
with Bose equipment varies automati-
cally according to the vehicle speed.“Loudness”
You can activate/deactivate bass ampli-
fication by pressing “On” or “OFF”.
“Frequency stabiliser”
This function amplifies low and high
frequencies when the volume is turned
down.
You can activate/deactivate loudness
by selecting “On” or “OFF”.
“Volume stabiliser”
You can activate/deactivate loudness
by selecting “On” or “OFF”.
Note: to reset the default settings for
each function, press the pop-up menu,
then “Reset”.
Sound settings
Bass Boost
Balance / Fader
Bass / Medium / Treble On OFF
Page 86 of 130
4.14
TELEPHONE SETTINGS (2/2)
"Sound levels"
This option adjusts the sound level of:
– the "Phone ringtone";
– the "Phone call";
– the "Microphone gain";
Note: to reset the settings, press the
pop-up menu button, then "Reset".
"Voice mail settings"
For more information, please refer to
the information on “Configuring voice-
mail” in the relevant section.
"Automatic hold"
This option activates or deactivates the
automatic placing of incoming calls on
hold."Phone ringtone"
To activate/deactivate the transfer of
the ringtone from your telephone to
the vehicle's speakers when an incom-
ing call is received, press "On". If your
phone is on silent mode, the ringtone
transfer function is not available.
Note: if the setting is "OFF", or if your
telephone does not have the ringtone
transfer function, the ringtone used for
an incoming call will be that of the ve-
hicle.
“SMS”
You can activate or deactivate SMS.
Depending on the make and model
of your phone, certain functions
may not work.