RENAULT FLUENCE Z.E. 2012 Manual PDF
Manufacturer: RENAULT, Model Year: 2012, Model line: FLUENCE Z.E., Model: RENAULT FLUENCE Z.E. 2012Pages: 195, PDF Size: 5.23 MB
Page 71 of 195

operating faults ..................................... (up to the end of the DU)
instrument panel messages ..................(up to the end of the DU)
trip computer and warning system ........(up to the end of the DU)
instrument panel ................................... (up to the end of the DU)
1.66
ENG_UD23102_1
Ordinateur de bord : messages d’anomalie de fonctionnement (L38 é\
lectrique - Renault)
ENG_NU_914-4_L38e_Renault_1
triP cOmPUter AND WArNiNg SYStem: operating fault messages
these appear with the © warning light and mean that you should drive very carefully to an authorised dealer as
soon as possible. if you fail to follow this recommendation, you risk damaging your vehicle\
.
They disappear when the display selection key is pressed or after several seconds and are stored in the computer log. The
© warning light stays on. Examples of operating fault messages are given \
in the following pages.
examples of messages interpreting the display selected
« check airbag » Indicates a fault in the restraint system in addition to the seat belts. In the event of an
accident, it is possible that they may not be triggered.
« elec. System to check » Indicates a fault on one of the pedal sensors or in the 12 V battery management
system.
« check braking system »Indicates wear or the need to check the braking system.
« Service required » Indicates that the system linked to the fast traction battery replacement should be
checked.
« elec. System to check » Indicates a fault in the traction system.
« Battery charge impossible » Indicates a fault on the traction battery recharge system.
Page 72 of 195
instrument panel messages..................(up to the end of the DU)
trip computer and warning system ........(up to the end of the DU)
instrument panel ................................... (up to the end of the DU)
1.67
ENG_UD25304_2
Ordinateur de bord : messages d’alerte (L38 électrique - Renault)\
ENG_NU_914-4_L38e_Renault_1
triP cOmPUter AND WArNiNg SYStem: warning message
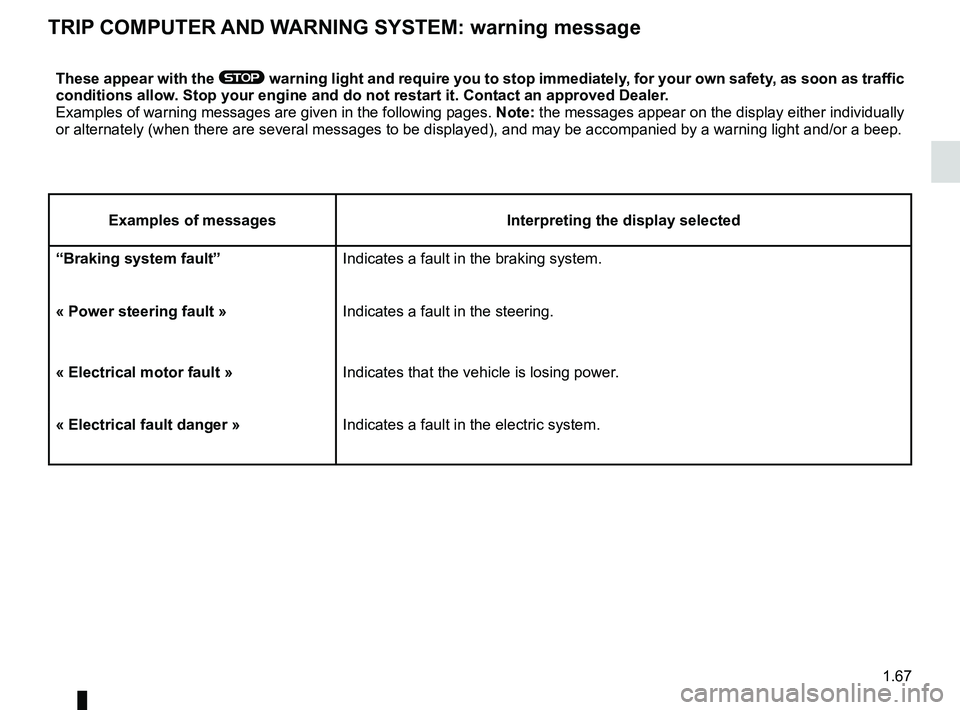
these appear with the ® warning light and require you to stop immediately, for your own safety, as soon as traffic
conditions allow. Stop your engine and do not restart it. contact an approved Dealer.
Examples of warning messages are given in the following pages. Note: the messages appear on the display either individually
or alternately (when there are several messages to be displayed), and \
may be accompanied by a warning light and/or a beep.
examples of messages interpreting the display selected
“Braking system fault” Indicates a fault in the braking system.
« Power steering fault » Indicates a fault in the steering.
« electrical motor fault » Indicates that the vehicle is losing power.
« electrical fault danger » Indicates a fault in the electric system.
Page 73 of 195
menu for customising the vehicle settings
(up to the end of the DU)
customising the vehicle settings ........... (up to the end of the DU)
customised vehicle settings .................. (up to the end of the DU)
1.68
ENG_UD21535_3
Menu de personnalisation des réglages du véhicule (L38 - X38 - Re\
nault)
ENG_NU_914-4_L38e_Renault_1
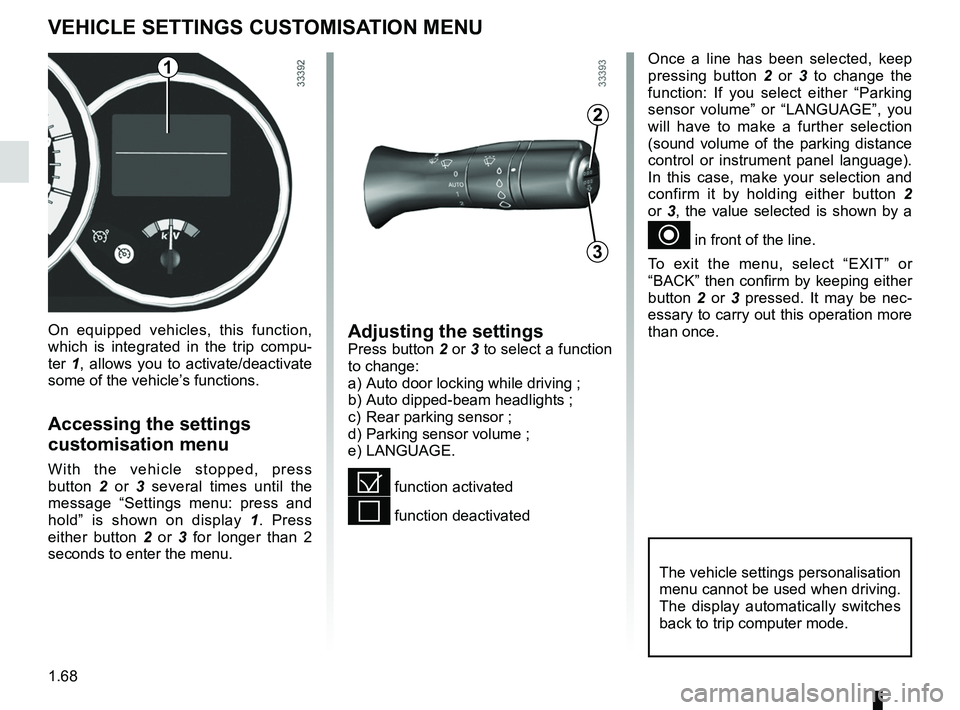
Vehicle settings customisation menu.
vehicle SettiNgS cUSt OmiSAtiON meNU
Adjusting the settingsPress button 2 or 3 to select a function
to change:
a) Auto door locking while driving ;
b) Auto dipped-beam headlights ;
c) Rear parking sensor ;
d) Parking sensor volume ;
e) LANGUAGE.
= function activated
< function deactivated
On equipped vehicles, this function,
which is integrated in the trip compu
-
ter 1, allows you to activate/deactivate
some of the vehicle’s functions.
Accessing the settings
customisation menu
With the vehicle stopped, press
button 2 or 3 several times until the
message “ Settings menu: press and
hold ” is shown on display 1 . Press
either button 2 or 3 for longer than 2
seconds to enter the menu.
Once a line has been selected, keep
pressing button 2 or 3 to change the
function: If you select either “ Parking
sensor volume ” or “LANGUAGE ”, you
will have to make a further selection
(sound volume of the parking distance
control or instrument panel language).
In this case, make your selection and
confirm it by holding either button 2
or 3, the value selected is shown by a
~ in front of the line.
To exit the menu, select “ EXIT” or
“BACK” then confirm by keeping either
button 2 or 3 pressed. It may be nec -
essary to carry out this operation more
than once.
2
3
1
The vehicle settings personalisation
menu cannot be used when driving.
The display automatically switches
back to trip computer mode.
Page 74 of 195
rear view mirrors ................................... (up to the end of the DU)
1.69
ENG_UD20062_2
Rétroviseurs (L38 - X38 - Renault)
ENG_NU_914-4_L38e_Renault_1
Rear-view mirrors
reAr-vieW mirrOrS
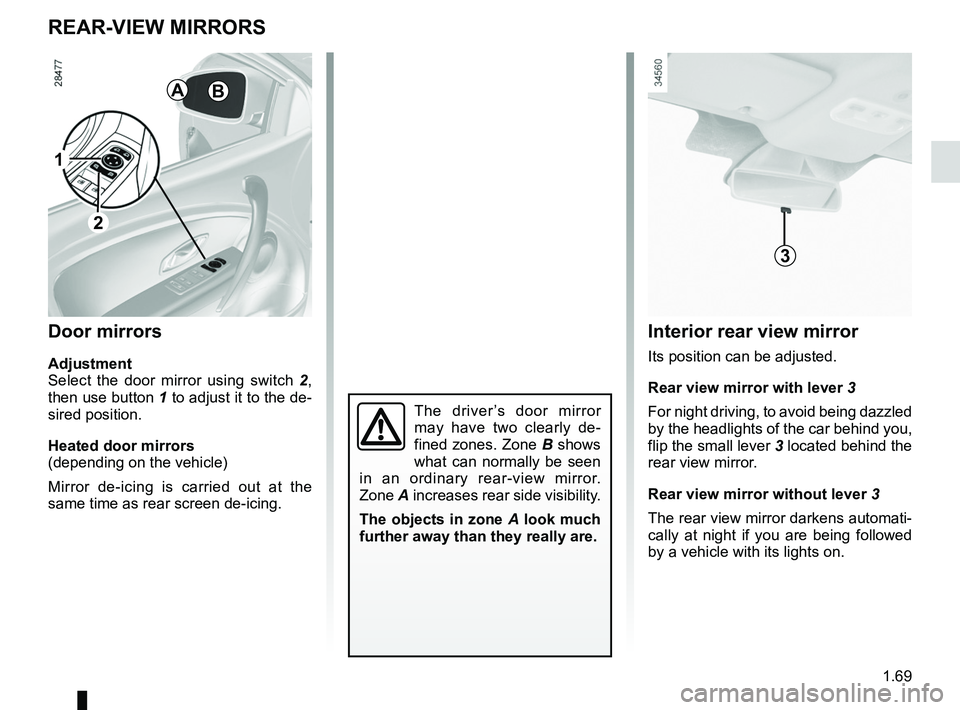
Door mirrors
Adjustment
Select the door mirror using switch 2 ,
then use button 1 to adjust it to the de-
sired position.
heated door mirrors
(depending on the vehicle)
Mirror de-icing is carried out at the
same time as rear screen de-icing.
The driver ’s door mirror
may have two clearly de -
fined zones. Zone B shows
what can normally be seen
in an ordinary rear-view mirror.
Zone A increases rear side visibility.
the objects in zone A look much
further away than they really are.
1
AB
2
3
interior rear view mirror
Its position can be adjusted.
rear view mirror with lever 3
For night driving, to avoid being dazzled
by the headlights of the car behind you,
flip the small lever 3 located behind the
rear view mirror.
rear view mirror without lever 3
The rear view mirror darkens automati-
cally at night if you are being followed
by a vehicle with its lights on.
Page 75 of 195
warning buzzer ..................................... (up to the end of the DU)
headlight flashers ................................. (up to the end of the DU)
indicators .............................................. (up to the end of the DU)
lights: hazard warning ............................... (up to the end of the DU)
lights: direction indicators .......................... (up to the end of the DU)
indicators: direction indicators .......................... (up to the end of the DU)
hazard warning lights signal ................. (up to the end of the DU)
hazard warning lights signal ................. (up to the end of the DU)
horn ...................................................... (up to the end of the DU)
horn: flash ................................................................. (current page)
horn: sounding the horn ............................................ (current page)
horn ....................................................................... (current page)
audible and visual signals .....................(up to the end of the DU)
1.70
ENG_UD19234_1
Avertisseurs sonore et lumineux (L38 - X38 - Renault)
ENG_NU_914-4_L38e_Renault_1
Audible and visual signals
AUDiBle AND viSUAl SigNAlS
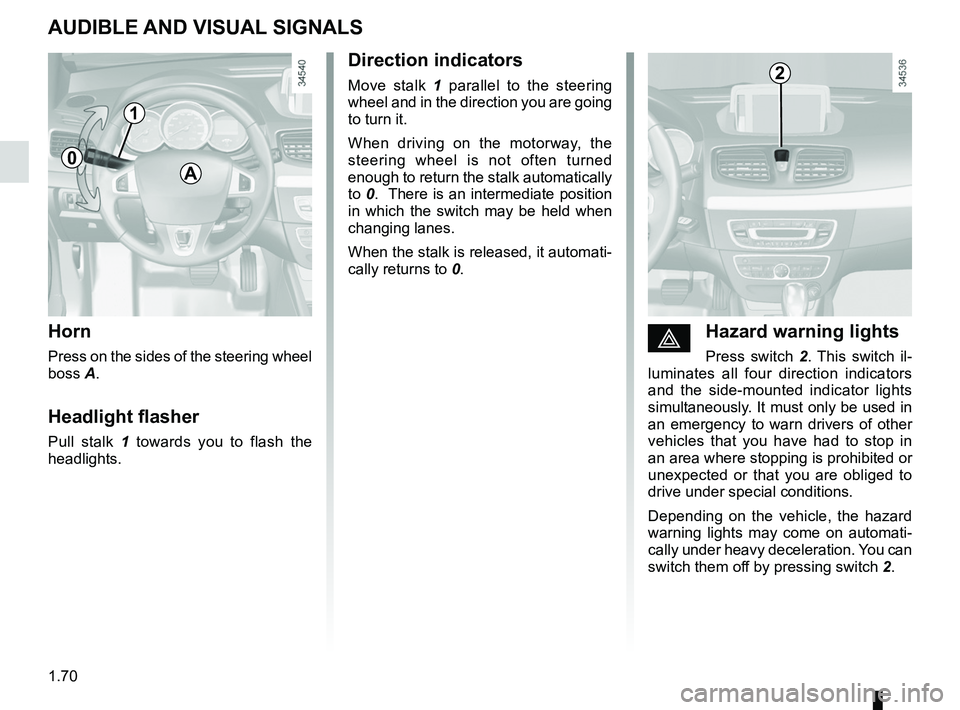
horn
Press on the sides of the steering wheel
boss A.
headlight flasher
Pull stalk 1 towards you to flash the
headlights.
éhazard warning lights
Press switch 2 . This switch il -
luminates all four direction indicators
and the side-mounted indicator lights
simultaneously. It must only be used in
an emergency to warn drivers of other
vehicles that you have had to stop in
an area where stopping is prohibited or
unexpected or that you are obliged to
drive under special conditions.
Depending on the vehicle, the hazard
warning lights may come on automati -
cally under heavy deceleration. You can
switch them off by pressing switch 2.
Direction indicators
Move stalk 1 parallel to the steering
wheel and in the direction you are going
to turn it.
When driving on the motorway, the
steering wheel is not often turned
enough to return the stalk automatically
to 0. There is an intermediate position
in which the switch may be held when
changing lanes.
When the stalk is released, it automati-
cally returns to 0.
A
2
1
0
Page 76 of 195
lighting:exterior ............................................ (up to the end of the DU)
instrument panel .................................................... (current page)
lights: side lights ......................................................... (current page)
lights: dipped beam headlights ................................... (current page)
hazard warning lights signal .................................. (current page)
signals and lights .................................. (up to the end of the DU)
lighting: instrument panel .............................................. (current page)
daytime running lights ............................................ (current page)
1.71
ENG_UD20073_2
Éclairages et signalisations extérieurs (L38 - X38 - Renault)
ENG_NU_914-4_L38e_Renault_1
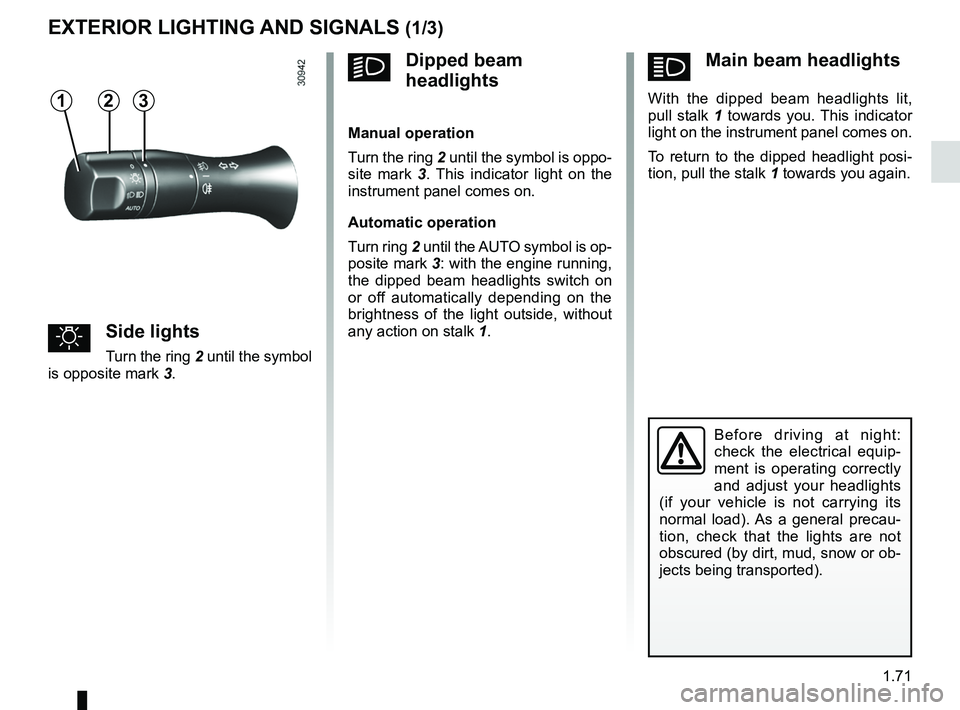
ámain beam headlights
With the dipped beam headlights lit,
pull stalk 1 towards you. This indicator
light on the instrument panel comes on.
To return to the dipped headlight posi-
tion, pull the stalk 1 towards you again.
Exterior lighting and signals
Before driving at night:
check the electrical equip -
ment is operating correctly
and adjust your headlights
(if your vehicle is not carrying its
normal load). As a general precau -
tion, check that the lights are not
obscured (by dirt, mud, snow or ob-
jects being transported).
eXteriOr lightiNg AND SigNAlS (1/3)
31
uSide lights
Turn the ring 2 until the symbol
is opposite mark 3.
kDipped beam
headlights
manual operation
Turn the ring 2 until the symbol is oppo -
site mark 3 . This indicator light on the
instrument panel comes on.
Automatic operation
Turn ring 2 until the AUTO symbol is op-
posite mark 3: with the engine running,
the dipped beam headlights switch on
or off automatically depending on the
brightness of the light outside, without
any action on stalk 1.
2
Page 77 of 195
lights:main beam headlights ...................................... (current page)
warning buzzer ...................................................... (current page)
see-me-home lighting ............................................ (current page)
1.72
ENG_UD20073_2
Éclairages et signalisations extérieurs (L38 - X38 - Renault)
ENG_NU_914-4_L38e_Renault_1
Jaune NoirNoir texte
eXteriOr lightiNg AND SigNAlS (2/3)
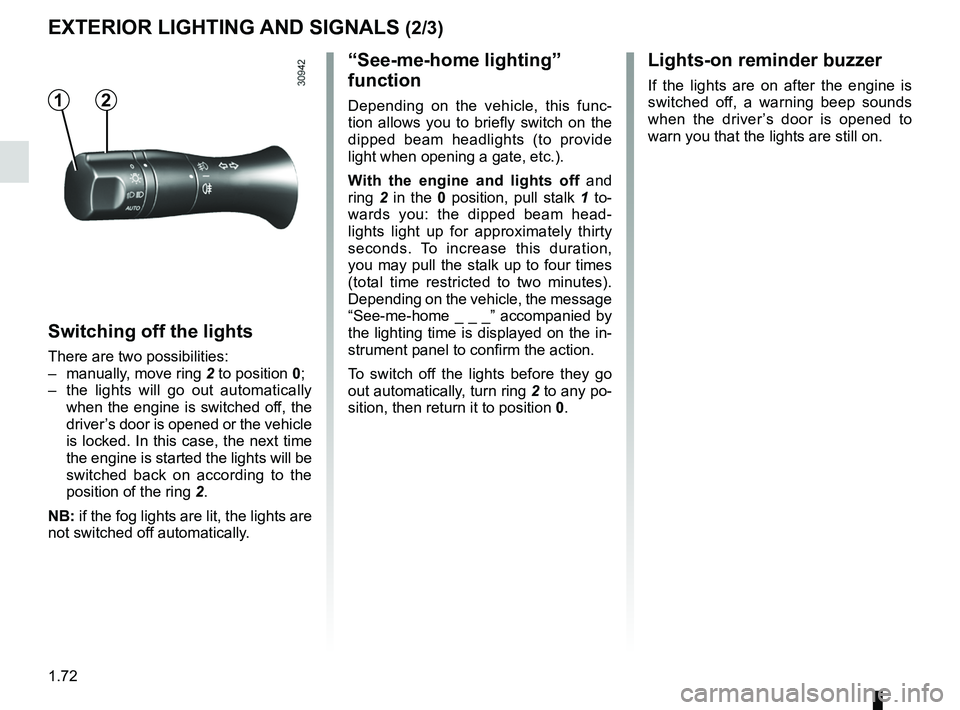
Switching off the lights
There are two possibilities:
– manually, move ring 2 to position 0;
– the lights will go out automatically
when the engine is switched off, the
driver’s door is opened or the vehicle
is locked. In this case, the next time
the engine is started the lights will be
switched back on according to the
position of the ring 2.
NB: if the fog lights are lit, the lights are
not switched off automatically.
“See-me-home lighting”
function
Depending on the vehicle, this func -
tion allows you to briefly switch on the
dipped beam headlights (to provide
light when opening a gate, etc.).
With the engine and lights off and
ring 2 in the 0 position, pull stalk 1 to-
wards you: the dipped beam head -
lights light up for approximately thirty
seconds. To increase this duration,
you may pull the stalk up to four times
(total time restricted to two minutes).
Depending on the vehicle, the message
“See-me-home _ _ _” accompanied by
the lighting time is displayed on the in-
strument panel to confirm the action.
To switch off the lights before they go
out automatically, turn ring 2 to any po-
sition, then return it to position 0.
lights-on reminder buzzer
If the lights are on after the engine is
switched off, a warning beep sounds
when the driver ’s door is opened to
warn you that the lights are still on.12
Page 78 of 195
lights:fog lights .......................................................... (current page)
JauneNoirNoir texte
1.73
ENG_UD20073_2
Éclairages et signalisations extérieurs (L38 - X38 - Renault)
ENG_NU_914-4_L38e_Renault_1
eXteriOr lightiNg AND SigNAlS (3/3)
When driving in fog or snow, or
when transporting objects which are
higher than the roof, the headlights
do not come on automatically.
The driver remains in full control of
switching on the fog lights: the indi-
cator lights on the instrument panel
inform you whether the fog lights
are lit (indicator light on) or not (indi-
cator light off).
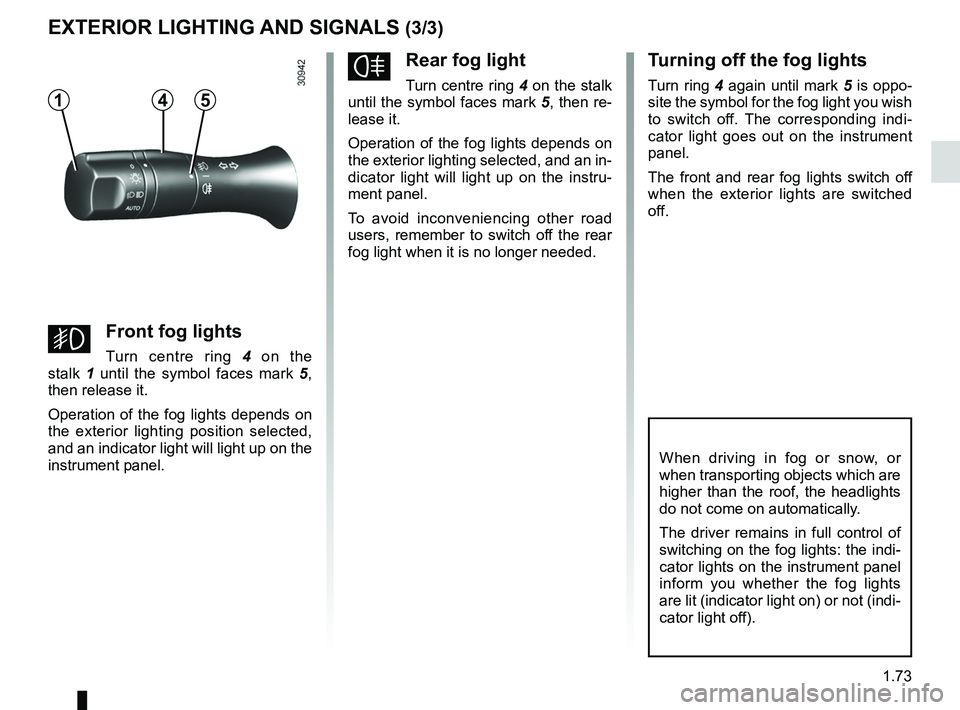
frear fog light
Turn centre ring 4 on the stalk
until the symbol faces mark 5, then re-
lease it.
Operation of the fog lights depends on
the exterior lighting selected, and an in-
dicator light will light up on the instru -
ment panel.
To avoid inconveniencing other road
users, remember to switch off the rear
fog light when it is no longer needed.
t urning off the fog lights
Turn ring 4 again until mark 5 is oppo-
site the symbol for the fog light you wish
to switch off. The corresponding indi -
cator light goes out on the instrument
panel.
The front and rear fog lights switch off
when the exterior lights are switched
off.145
gFront fog lights
Turn centre ring 4 on the
stalk 1 until the symbol faces mark 5 ,
then release it.
Operation of the fog lights depends on
the exterior lighting position selected,
and an indicator light will light up on the
instrument panel.
Page 79 of 195
electric beam height adjustment ........... (up to the end of the DU)
see-me-home lighting ........................... (up to the end of the DU)
lights: adjusting ......................................... (up to the end of the DU)
lights adjustment ...................................... (up to the end of the DU)
signals and lights .................................. (up to the end of the DU)
headlight beam adjustment .................. (up to the end of the DU)
1.74
ENG_UD20074_2
Réglage électrique de la hauteur des faisceaux (L38 - X38 - Renau\
lt)ENG_NU_914-4_L38e_Renault_1
Adjusting the headlight beam height
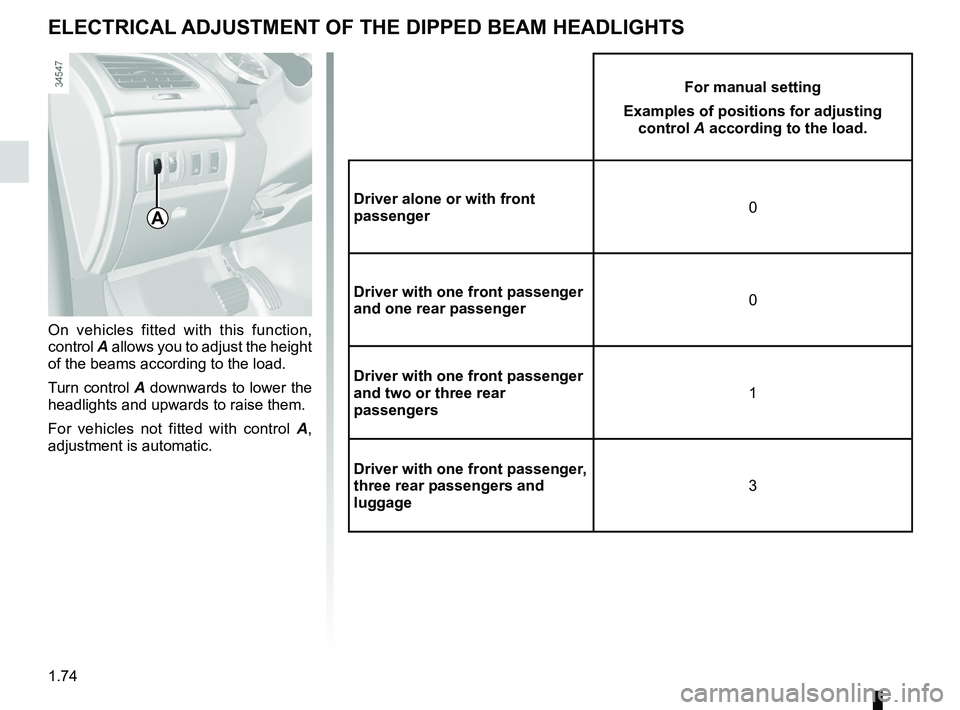
On vehicles fitted with this function,
control A allows you to adjust the height
of the beams according to the load.
Turn control A downwards to lower the
headlights and upwards to raise them.
For vehicles not fitted with control A ,
adjustment is automatic.
electricAl ADJUStmeNt OF the DiPPeD BeAm heADlightS
A
For manual setting
examples of positions for adjusting control A according to the load.
Driver alone or with front
passenger 0
Driver with one front passenger
and one rear passenger 0
Driver with one front passenger
and two or three rear
passengers 1
Driver with one front passenger,
three rear passengers and
luggage 3
Page 80 of 195

wipers ................................................... (up to the end of the DU)
windscreen washer/wiper ..................... (up to the end of the DU)
windscreen washer ............................... (up to the end of the DU)
1.75
ENG_UD19237_1
Essuie-vitre / lave-vitre avant (L38 - X38 - Renault)
ENG_NU_914-4_L38e_Renault_1
Wash, wipe
v ehicle fitted with front
windscreen wiper rain sensor
A park
B automatic wiper function.
When this position is selected, the
system detects water on the wind -
screen and triggers the wipers at a
suitable wiping speed. It is possi -
ble to change the triggering thresh-
old and the time sweeps by turning
ring 2:
– E : minimum sensitivity
– F : maximum sensitivity
NB: in foggy weather or during
snowfalls, the wiping is not automati-
cally triggered and remains under
the driver’s control.
C normal wiping speed
D fast wiping speed
Special note
When driving the vehicle
, the wiping
speed slows down whenever the ve -
hicle stops. For example, fast wiping
speed will slow to normal wiping speed.
As soon as the vehicle moves off,
wiping will return to the speed originally
selected.
If stalk 1 is operated, it overrides and
cancels the automatic function.
v ehicle fitted with intermittent
windscreen wipers
A park
B intermittent wiping
The wipers will pause for several
seconds between sweeps. It is
possible to change the time be -
tween sweeps by turning ring 2.
C normal wiping speed
D fast wiping speed
WiNDScreeN WASh/WiPe (1/2)
11
A
B
c
D
e
F2
For all vehicles, position C can be
accessed with the ignition on and
positions B and D can only be ac -
cessed with the engine running.