diagram RENAULT FLUENCE Z.E. 2012 Owners Manual
[x] Cancel search | Manufacturer: RENAULT, Model Year: 2012, Model line: FLUENCE Z.E., Model: RENAULT FLUENCE Z.E. 2012Pages: 195, PDF Size: 5.23 MB
Page 13 of 195

charging socket .................................... (up to the end of the DU)
charging cord ........................................ (up to the end of the DU)
charging flap ......................................... (up to the end of the DU)
traction battery charge .......................... (up to the end of the DU)
electric vehicle charge ............................................. (up to the end of the DU)
1.8
ENG_UD28731_4
Charge de la batterie de traction (X38 - L38 électrique - Renault)
ENG_NU_914-4_L38e_Renault_1
Jaune NoirNoir texte
Electric vehicle: charging
electric vehicle: charging (1/6)
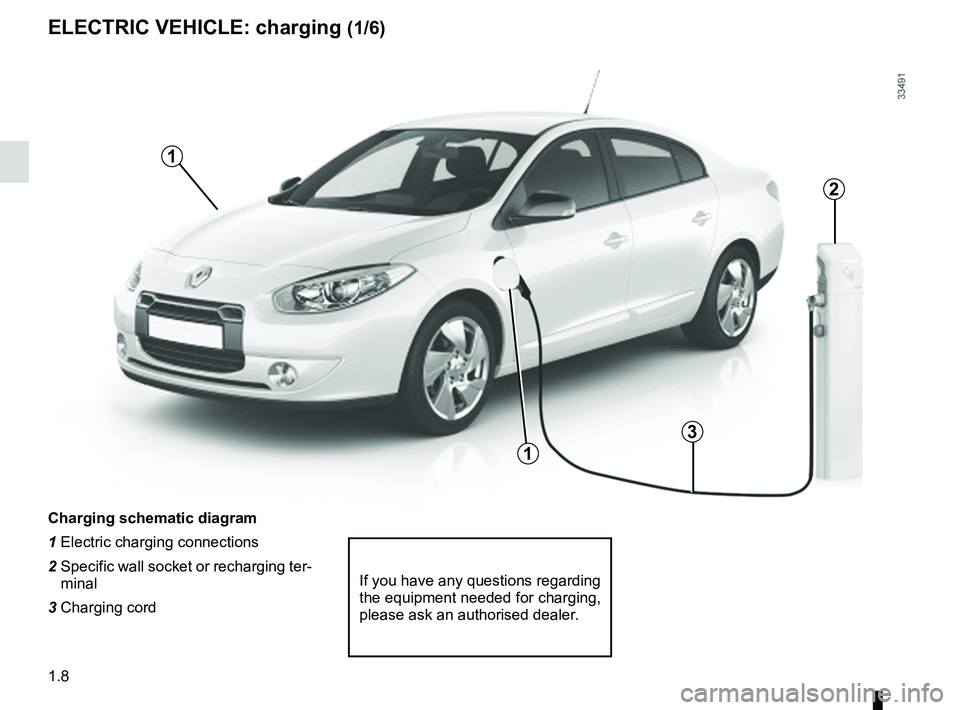
charging schematic diagram
1 Electric charging connections
2 Specific wall socket or recharging ter-
minal
3 Charging cord
1
If you have any questions regarding
the equipment needed for charging,
please ask an authorised dealer.
2
3
1
Page 19 of 195

Quickdrop (system) ............................................... (current page)
electric vehicle quick change of traction battery ....................... (current page)
1.14
ENG_UD25399_3
Quickdrop (L38 électrique - Renault)
ENG_NU_914-4_L38e_Renault_1
Traction battery quick change system
trActiON BA tterY qUicK chANge SYStem
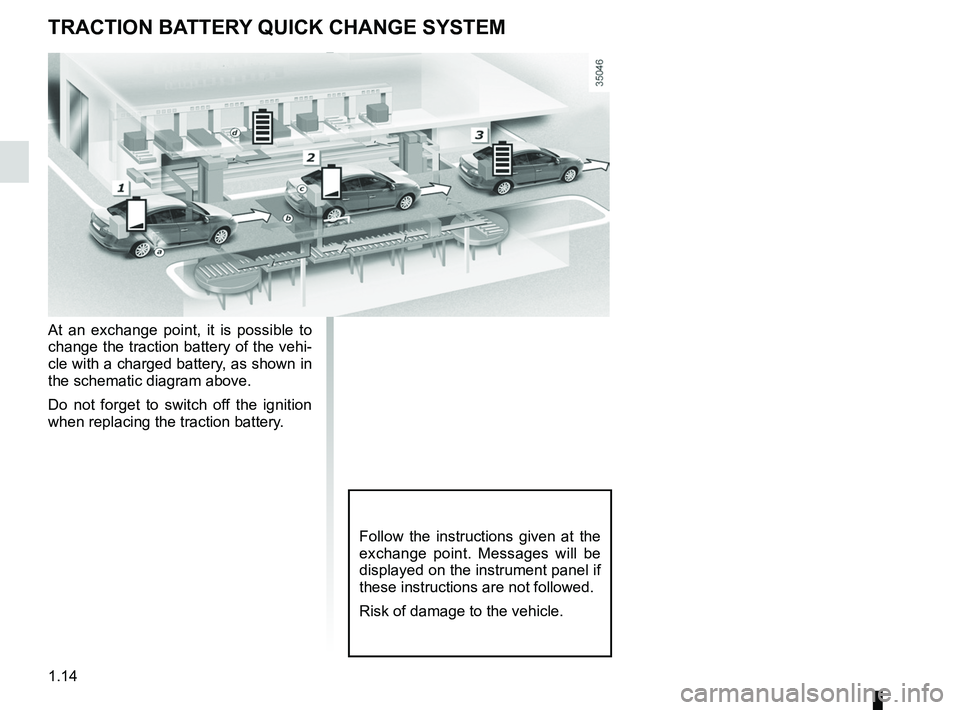
At an exchange point, it is possible to
change the traction battery of the vehi-
cle with a charged battery, as shown in
the schematic diagram above.
Do not forget to switch off the ignition
when replacing the traction battery.
Follow the instructions given at the
exchange point. Messages will be
displayed on the instrument panel if
these instructions are not followed.
Risk of damage to the vehicle.
Page 47 of 195

child restraint/seat ................................ (up to the end of the DU)
child restraint/seat ................................ (up to the end of the DU)
child restraint/seat ................................ (up to the end of the DU)
child safety ............................................ (up to the end of the DU)
child seats ............................................. (up to the end of the DU)
transporting children ............................. (up to the end of the DU)
1.42
ENG_UD21488_3
Sécurité enfants : installation du siège enfant (L38 - X38 - R\
enault)
ENG_NU_914-4_L38e_Renault_1
Jaune NoirNoir texte
Some seats are not suitable for fitting
child seats. The diagram on the follow -
ing page shows you how to attach a
child seat.
The types of child seats indicated may
not be available. Before using a differ-
ent child seat, check with the manufac-
turer that it can be fitted.
fitting a child seat
chilD SAFetY : fitting a child seat (1/4)
in the rear side seat
A carrycot can be installed across the
vehicle and will take up at least two
seats. Position the child with his or her
feet nearest the door.
Move the front seat as far forward as
possible to install a rear-facing child
seat, then move back the seat in front
as far as it will go, although without al-
lowing it to come into contact with the
child seat.
For the safety of the child in the for -
ward-facing seat, do not move the seat
in front back past the middle of the
runner, do not tilt the seatback too far
(maximum of 25°) and raise the seat as
much as possible.
Check that the forward-facing child seat
is resting against the back of the vehi-
cle seat and that the headrest of the ve-
hicle is not obstructing its use.
in the front seat
The laws concerning children travel
-
ling in the front passenger seat differ in
every country. Consult the legislation in
force and follow the indications on the
diagram on the following page.
Before fitting a child seat in this seat (if
authorised):
– lower the seat belt as far as possible;
– move the seat as far back as possi-
ble;
– gently tilt the seatback away from
vertical (approximately 25°);
– on equipped vehicles, raise the seat
base as far as possible.
Do not change these settings after the
child seat is installed.
r i S K O F D eAt h O r
S eri OUS iNJU rY: before
installing a rear-facing child
seat in this seat, check that
the airbag has been deactivated
(refer to “Child safety: front passen-
ger airbag deactivation/activation”
Section 1).
Fit the child seat in a rear
seat wherever possible.
Check that when installing
the child seat in the vehicle
it is not at risk of coming loose from
its base.
If you have to remove the headrest,
check that it is correctly stored so
that it does not come loose under
harsh braking or impact.
Always attach the child seat to the
vehicle even if it is not in use so that
it does not come loose under harsh
braking or impact.
Make sure that the child
seat or the child’s feet do
not prevent the front seat
from locking correctly. Refer
to the information on the “Front seat”
in Section 1.
Page 49 of 195

1.44
ENG_UD21488_3
Sécurité enfants : installation du siège enfant (L38 - X38 - R\
enault)
ENG_NU_914-4_L38e_Renault_1
Jaune NoirNoir texte
chilD SAFetY : fitting a child seat (3/4)
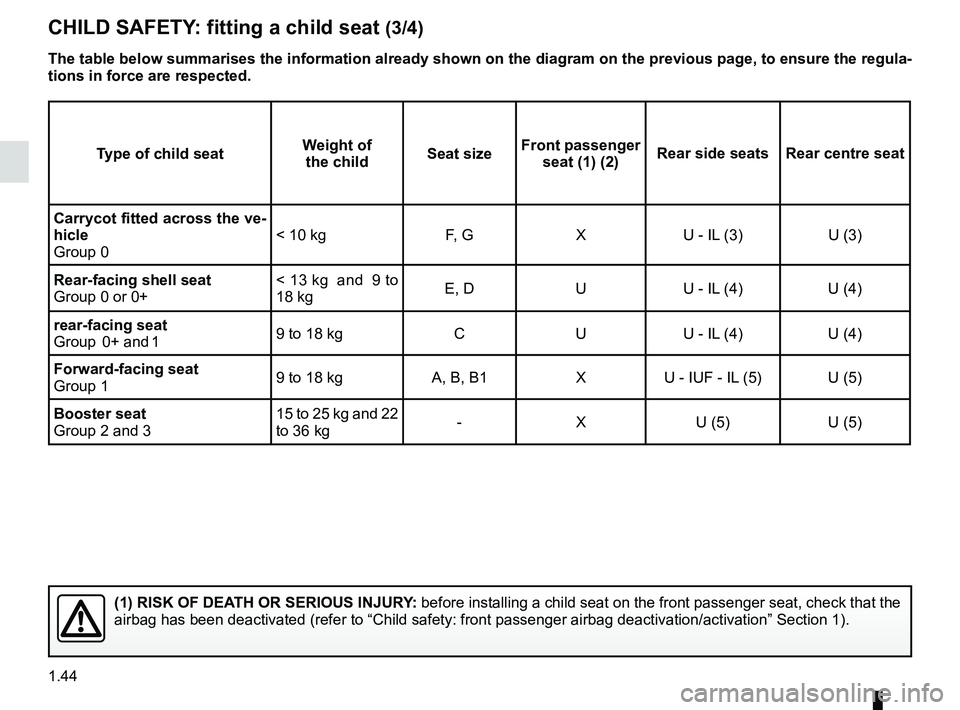
the table below summarises the information already shown on the diagram on the previous page, to ensure the regula-
tions in force are respected.
type of child seat Weight of
the child Seat sizeFront passenger
seat (1) (2) rear side seats
rear centre seat
carrycot fitted across the ve-
hicle
Group 0 < 10 kg
F, GXU - IL (3) U (3)
rear-facing shell seat
Group 0 or 0+ <
13 kg and 9 to
18 kg E, D
UU - IL (4) U (4)
rear-facing seat
Group 0+ and 1 9 to 18 kg
CUU - IL (4) U (4)
Forward-facing seat
Group 1 9 to 18 kg
A, B, B1XU - IUF - IL (5) U (5)
Booster seat
Group 2 and 3 15 to 25 kg and 22
to 36 kg
-
X U (5) U (5)
(1) riSK OF DeA th Or SeriOUS iNJUrY: before installing a child seat on the front passenger seat, check that the
airbag has been deactivated (refer to “Child safety: front passenger\
airbag deactivation/activation” Section 1).