touch RENAULT FLUENCE Z.E. 2012 Owners Manual
[x] Cancel search | Manufacturer: RENAULT, Model Year: 2012, Model line: FLUENCE Z.E., Model: RENAULT FLUENCE Z.E. 2012Pages: 195, PDF Size: 5.23 MB
Page 12 of 195

»400 volt» electrical circuit .................................... (current page)
charging flap .......................................................... (current page)
electric vehicle important recommendations ............................ (current page)
traction battery ....................................................... (current page)
1.7
ENG_UD28908_4
Recommandations importantes (X38 - X61 électrique - L38 électriqu\
e - Renault)
ENG_NU_914-4_L38e_Renault_1
Important recommendations
imPOrt ANt recOmmeNDA tiONS
Please read these instructions carefully. Failure to follow these instructions may lead to a risk of fire, serious injury
or electric shock which may present a risk to life.
in the event of an accident or impact
In the event of an accident or an impact to the underside of the vehicle (e.g.: striking a post, raised kerb or other street furni-
ture), this may damage the electric circuit or the traction battery.
Have the vehicle checked by an authorised dealer.
Never touch the “400 volt” components or orange cables which are e\
xposed and visible inside or outside the vehicle.
In the event of serious damage to the traction battery, leaks may occur:
– never touch the liquids (fluids, etc.) coming from the traction battery;
– in the event of contact with the body, wash the affected area with plenty of water and consult a doctor as soon as possibl\
e.
In the event of an impact, even slight, against the charging flap and/or valve, have them checked by an authorised dealer as
soon as possible.
in the event of fire
In the event of fire, make everyone evacuate the vehicle immediately and contact the emergency services, informing them that
this is an electric vehicle.
Only use extinguishing agents ABC or BC that are permitted for use with electrical fires. Do not use water or other extinguish -
ing agents.
In the event of damage to the electrical circuit, please call an authori\
sed dealer.
All towing operations
Please refer to the information on “Towing, breakdowns” in Section 5.
Washing the vehicle
Never wash the engine compartment, the charging connection or the tracti\
on battery with a high-pressure jet.
This risks damaging the electric circuit.
Never wash the vehicle while it is charging.
risk of electric shock and a risk to life.
Page 14 of 195

electric vehicleimportant recommendations ............................ (current page)
electrical installation .............................................. (current page)
JauneNoirNoir texte
1.9
ENG_UD28731_4
Charge de la batterie de traction (X38 - L38 électrique - Renault)
ENG_NU_914-4_L38e_Renault_1
electric vehicle: charging (2/6)
important recommendations for charging your vehiclePlease read these instructions carefully. Failure to follow these instructions may lead to a risk of fire, serious injury
or electric shocks which could result in death.
installation for using a standard charging cord
Have a special wall socket installed by a qualified professional.
installation for using an occasional charging cord
Have a qualified professional check that each socket you intend to use with the occasional charging cord complies with the
standards and regulations in force in your country, especially that they have:
– a Type A residual differential current of 30 mA;
– a device to protect against overvoltage (16A fuse or circuit breaker for the socket used);
– protection against overvoltage relating to lightning in exposed areas.
You are recommended to test the residual differential current device every month.
You are recommended to check regularly the domestic power supply as well as the special wall socket. In the event of dete-
rioration (corrosion, browning, etc.), do not use it.
Please read the instructions that come with the occasional charging cord carefully to learn about usage precautions and how
to use the cord.
charging
Do not do anything to the vehicle during charging (washing, working in \
the engine compartment, etc.).
In the event of the presence of water, signs of corrosion or foreign bodies in the charging cord connector or in the vehicle charg-
ing socket, do not charge the vehicle. Fire hazard.
Do not attempt to touch the cord contacts, the domestic socket or the ve\
hicle charging socket, or introduce objects into them.
Never plug the charging cord into a multiple socket or an extension lead\
.
Do not remove or change the vehicle charging socket or the charging cord\
. Fire hazard.
Do not modify the installation during charging.
In the event of an impact, even slight, against the charging socket or valve, have them checked by an authorised dealer as
soon as possible.
Take care of the cord: do not tread on it, immerse it in water or pull on it or let anything knock against it. Check regularly that
the charging cord is in good condition. In the event of deterioration (\
corrosion, browning, cuts, etc.), do not use it.
Page 85 of 195

handbrake.............................................................. (current page)
2.4
ENG_UD23027_2
Boîte de vitesse (L38 électrique - Renault)
ENG_NU_914-4_L38e_Renault_2
Handbrake
Parking the vehicle
When the vehicle is at a standstill,
place the lever in position P: the drive
wheels are mechanically locked by the
transmission.
Apply the handbrake.
geAr cOntrOl (2/2)/hAnDbrAke
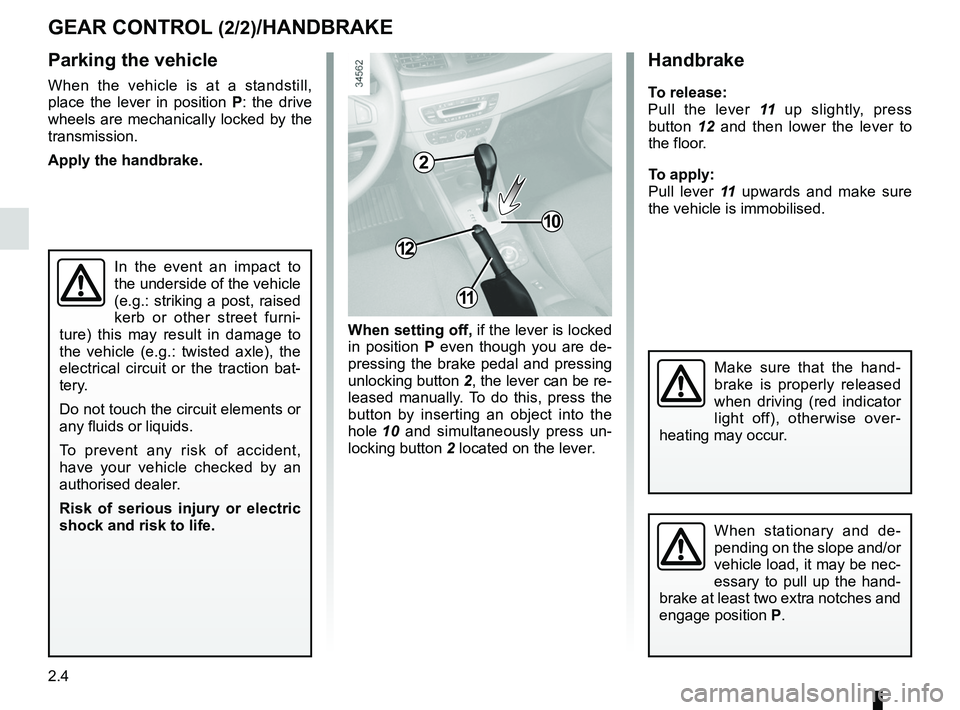
When setting off, if the lever is locked
in position P even though you are de -
pressing the brake pedal and pressing
unlocking button 2, the lever can be re-
leased manually. To do this, press the
button by inserting an object into the
hole 10 and simultaneously press un -
locking button 2 located on the lever.
10
2
In the event an impact to
the underside of the vehicle
(e.g.: striking a post, raised
kerb or other street furni -
ture) this may result in damage to
the vehicle (e.g.: twisted axle), the
electrical circuit or the traction bat -
tery.
Do not touch the circuit elements or
any fluids or liquids.
To prevent any risk of accident,
have your vehicle checked by an
authorised dealer.
r isk of serious injury or electric
shock and risk to life.
handbrake
t o release:
Pull the lever 11 up slightly, press
button 12 and then lower the lever to
the floor.
t o apply:
Pull lever 11 upwards and make sure
the vehicle is immobilised.
When stationary and de -
pending on the slope and/or
vehicle load, it may be nec-
essary to pull up the hand -
brake at least two extra notches and
engage position P.
Make sure that the hand -
brake is properly released
when driving (red indicator
light off), otherwise over -
heating may occur.
12
11
Page 115 of 195

electric windows ................................... (up to the end of the DU)
child safety ............................................................. (current page)
children (safety) ..................................................... (current page)
3.12
ENG_UD28762_3
Lève-vitres électriques (L38 - X38 - Renault)
ENG_NU_914-4_L38e_Renault_3
Jaune NoirNoir texte
These systems operate with the igni -
tion on or off, until one of the front doors
is opened (limited to about 3 minutes).
From the driver’s seat, use switch:
1 for the driver’s side;
2 for the front passenger side;
3 and 5 for the rear passengers.
From the passenger seats, use
switch 6.
Front window features: If the window
detects resistance when closing (e.g.
fingers, etc.) it stops and then lowers
again by a few centimetres.
Electric windows
ElEcTRIc wINDowS (1/2)
Electric windows
Press the window switch down or pull it
up to lower or raise the window to the
desired height: the rear windows do not
open fully.
one-touch mode
This mode works in addition to the
operation of the electric windows de -
scribed previously. It either operates on
the front windows only, or on all the win-
dows.
Briefly press or pull the window switch
fully: the window is fully lowered or
raised. Pressing the switch again stops
the window moving.
1
2
34
5
6
Safety of rear occupants
The driver can disable op -
eration of the electric win -
dows and, depending on
the vehicle, the rear doors, by
pressing switch 4. The indicator light
integrated in the switch lights up to
confirm that the locks have been ac-
tivated.
Driver’s responsibility
Never leave your vehicle with the
key inside and never leave a child
(or a pet) unsupervised, even for a
short while. They may pose a risk
to themselves or to others by start-
ing the engine, activating equipment
such as the electric windows or by
locking the doors. If a body part
gets trapped, reverse the direction
of travel of the window as soon as
possible by pressing the relevant
switch.
Risk of serious injury.
Avoid resting any objects against
a half-open window: there is a risk
that the electric window could be
damaged.
Page 152 of 195

lights:dipped beam headlights ................................... (current page)
lights: side lights ......................................................... (current page)
lights: main beam headlights ...................................... (current page)
JauneNoirNoir texte
5.15
ENG_UD26810_4
Projecteurs avant : remplacement des lampes (L38 - X38 - Renault)
ENG_NU_914-4_L38e_Renault_5
FrONT HEADLIgHTs: replacing bulbs (2/2)
Dipped beam headlights C
Remove cover C, then unclip bulb con-
nector 3.
Press the top of clip 6, remove the as-
sembly from its housing and take out
the bulb.
Bulb type: H7.
It is essential to use anti U.V. 55W
bulbs so as not to damage the plastic
on the headlights.
Do not touch the bulb glass.
When the bulb has been changed,
make sure you refit the cover correctly.
BCD2543
6
The bulbs are under pres -
sure and can break when
replaced.
Risk of injury.
The engine may be hot
when carrying out opera -
tions in close proximity. In
addition, the engine cooling
fan can come on at any moment.
Risk of injury.
main beam headlights
Unscrew cover D a quarter of a turn
and remove connector 4 with the bulb.
Remove the lamp from the connector.
Bulb type: H7.
side lights
Unscrew cover D a quarter of a turn,
pull bulb holder 5 and take out the bulb.
Bulb type: W5W.
Page 161 of 195

5.24
ENG_UD26165_2
Batterie : dépannage (L38 électrique - Renault)
ENG_NU_914-4_L38e_Renault_5
Attach positive lead A to mounting 1
attached to (+) terminal 2 then to
(+) terminal 3 of the battery supplying
the current.
Attach the negative lead B to the
(– ) terminal 4 of the battery supplying
the current, then to the (–) terminal 5
of the discharged battery.
starting the vehicle using the
battery from another vehicle
If you have to use the battery from an-
other vehicle to start, obtain suitable
jump leads (with a large cross section)
from an approved dealer or, if you al -
ready have jump leads, ensure that
they are in perfect condition.
The two batteries must have an iden-
tical nominal voltage of 12 volts. The
battery supplying the current should
have a capacity (amp-hours, Ah) which
is at least the same as that of the dis-
charged battery.
Switch off your vehicle ignition. Ensure
that there is no risk of contact between
the two vehicles (risk of short circuiting
when the positive terminals are con -
nected) and that the discharged battery
is properly connected.
Start the engine of the vehicle supply -
ing the current and run it at an interme-
diate engine speed.
12 VOLT BATTEr Y: breakdown recovery (2/2)
2
3
4
5
A
B1
Check that there is no con-
tact between leads A and B
and that the positive lead A
is not touching any metal
parts on the vehicle supplying the
current.
Risk of injury and/or damage to the
vehicle.
2
51
Do not use your electric vehicle to restart the 12 volt battery in a conventional
vehicle. The 12 volt electric power of an electric vehicle is not enough to perform
such an operation.
Risk of damage to vehicle
As soon as it starts, disconnect
cables A and B in reverse order (5 - 4
- 3 - 2).
Page 162 of 195

battery (remote control) ........................ (up to the end of the DU)
5.25
ENG_UD23947_3
Télécommande à radiofréquence : piles (L38 - X38 - X32 - B3\
2 - Renault)
ENG_NU_914-4_L38e_Renault_5
Radio frequency remote control unit: battery
rADIO FrEqUENCY rEmOTE CONTrOL: battery
replacing the battery
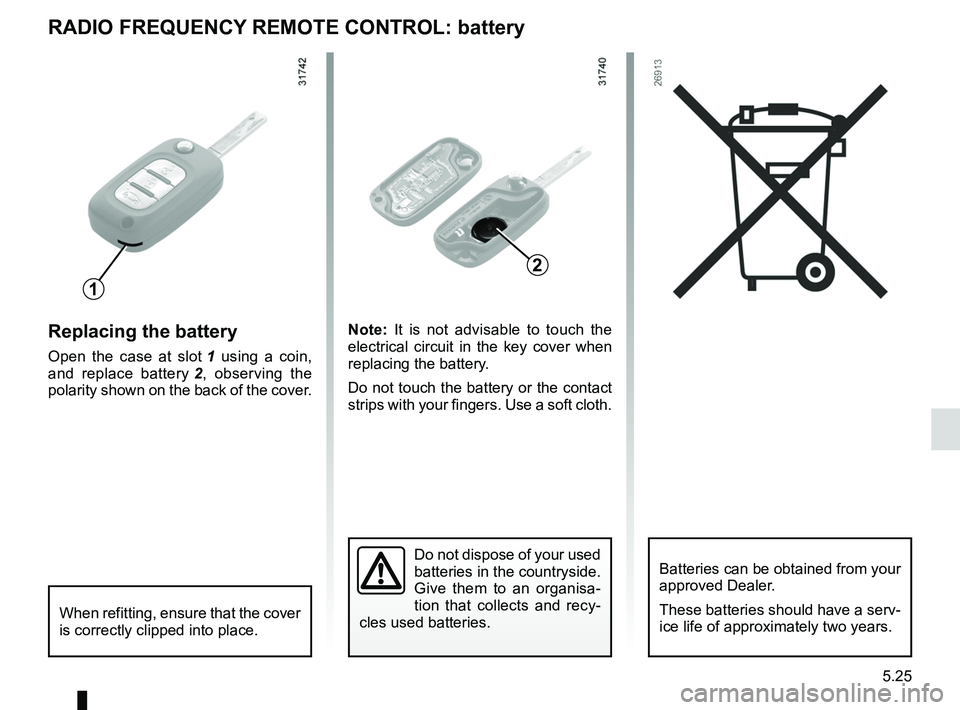
Open the case at slot 1 using a coin,
and replace battery 2 , observing the
polarity shown on the back of the cover. Note:
It is not advisable to touch the
electrical circuit in the key cover when
replacing the battery.
Do not touch the battery or the contact
strips with your fingers. Use a soft cloth.
Do not dispose of your used
batteries in the countryside.
Give them to an organisa -
tion that collects and recy -
cles used batteries.Batteries can be obtained from your
approved Dealer.
These batteries should have a serv-
ice life of approximately two years.
When refitting, ensure that the cover
is correctly clipped into place.
1
2