audio RENAULT KADJAR 2017 1.G R Link 2 Owners Manual
[x] Cancel search | Manufacturer: RENAULT, Model Year: 2017, Model line: KADJAR, Model: RENAULT KADJAR 2017 1.GPages: 130, PDF Size: 5.83 MB
Page 8 of 130
1.2
GENERAL DESCRIPTION (1/2)
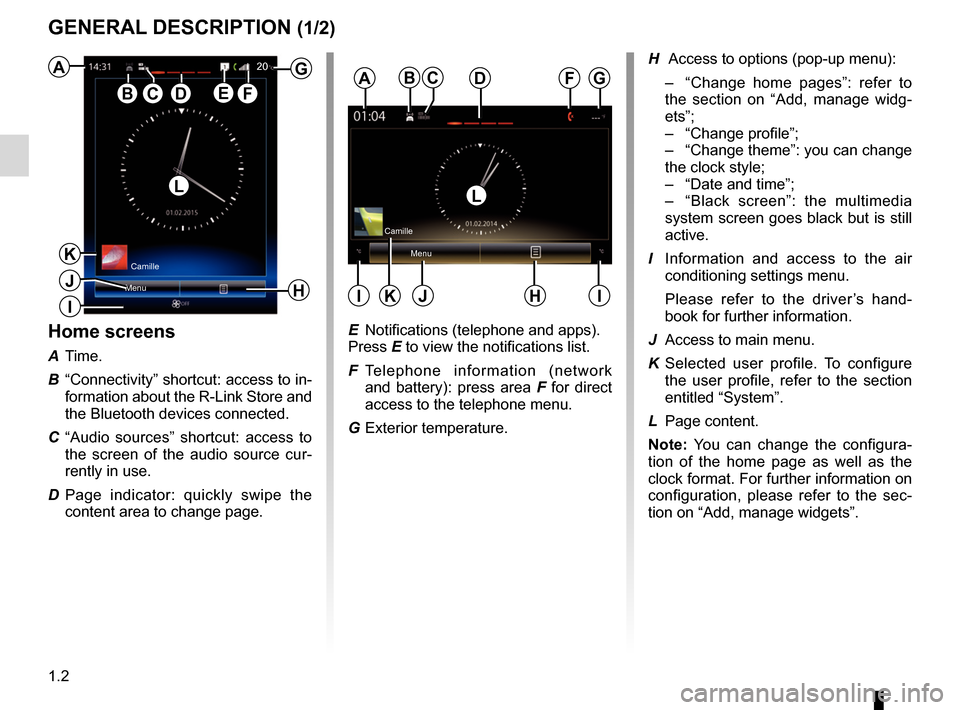
Home screens
A Time.
B “Connectivity” shortcut: access to in- formation about the R-Link Store and
the Bluetooth devices connected.
C “Audio sources” shortcut: access to the screen of the audio source cur-
rently in use.
D Page indicator: quickly swipe the content area to change page.
Menu
A
B
H
G
ED
Camille
F
H Access to options (pop-up menu):
– “Change home pages”: refer to
the section on “Add, manage widg-
ets”;
– “Change profile”;
– “Change theme”: you can change
the clock style;
– “Date and time”;
– “Black screen”: the multimedia
system screen goes black but is still
active.
I Information and access to the air conditioning settings menu.
Please refer to the driver’s hand- book for further information.
J Access to main menu.
K Selected user profile. To configure the user profile, refer to the section
entitled “System”.
L Page content.
Note: You can change the configura-
tion of the home page as well as the
clock format. For further information on
configuration, please refer to the sec-
tion on “Add, manage widgets”.
Menu
ADF
HJII
Camille
LL
G20
K
J
CBC
K
E Notifications (telephone and apps).
Press E to view the notifications list.
F Telephone information (network and battery): press area F for direct
access to the telephone menu.
G Exterior temperature.
I
Page 14 of 130
1.8
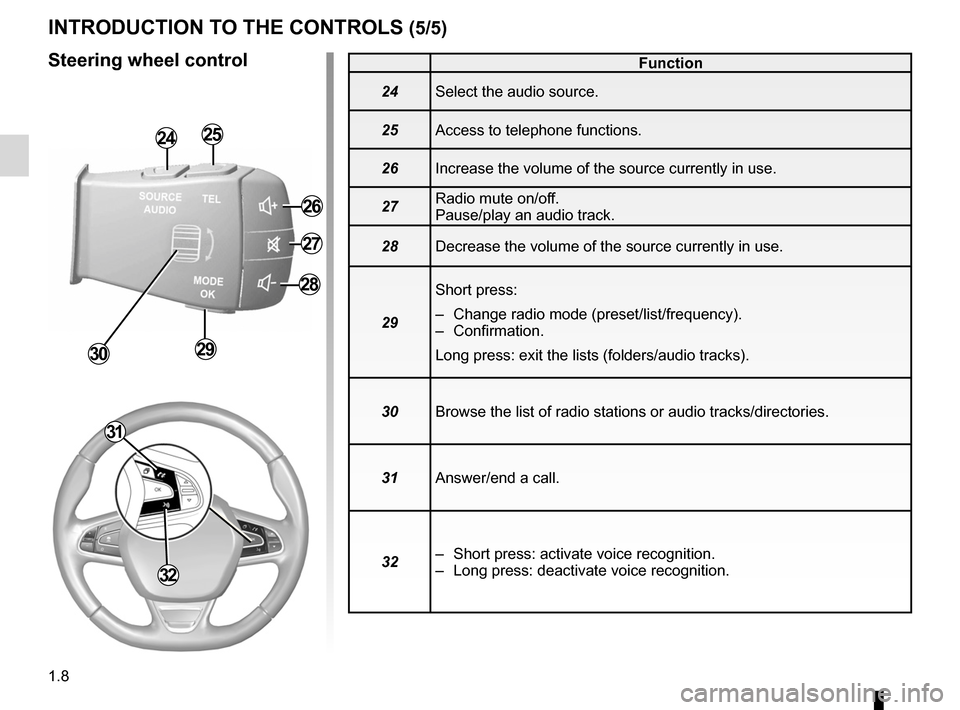
Function
24 Select the audio source.
25 Access to telephone functions.
26 Increase the volume of the source currently in use.
27 Radio mute on/off.
Pause/play an audio track.
28 Decrease the volume of the source currently in use.
29 Short press:
– Change radio mode (preset/list/frequency).
– Confirmation.
Long press: exit the lists (folders/audio tracks).
30 Browse the list of radio stations or audio tracks/directories.
31 Answer/end a call.
32 – Short press: activate voice recognition.
– Long press: deactivate voice recognition.
INTRODUCTION TO THE CONTROLS (5/5)
Steering wheel control
2425
26
28
2930
27
32
31
Page 19 of 130
1.13
OPERATING PRINCIPLES (5/5)
12
Menu
Phone Multimedia
Apps
Navigation
Vehicle System
Log In
Presentation of the
instructions provided with
your multimedia system
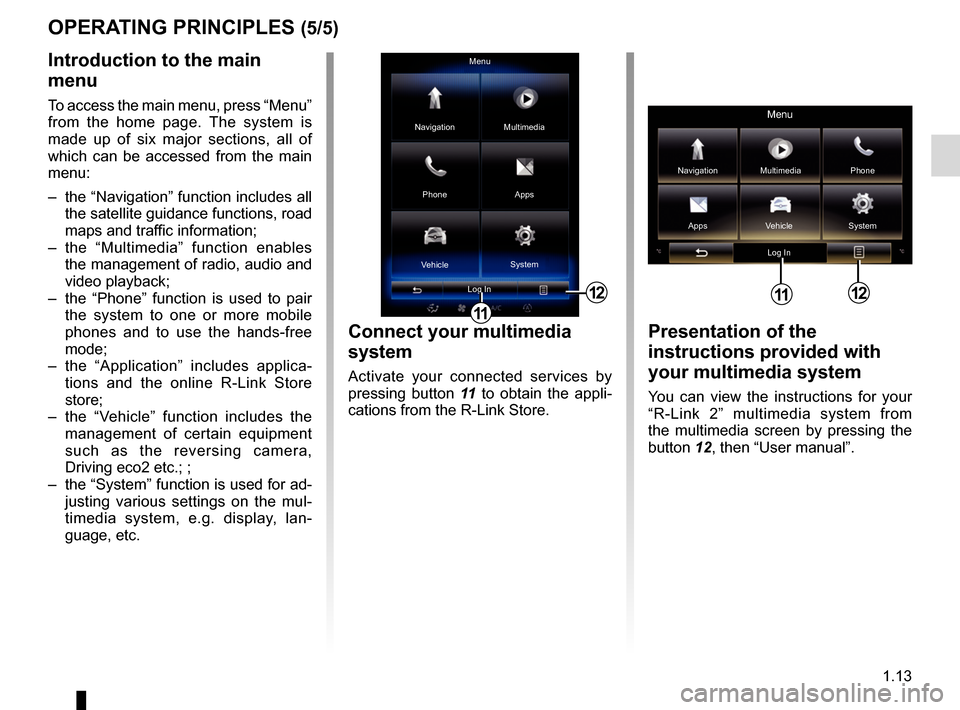
You can view the instructions for your
“R-Link 2” multimedia system from
the multimedia screen by pressing the
button 12, then “User manual”.
Menu
Navigation Multimedia
Phone
Apps Vehicle System
Log In
12
Introduction to the main
menu
To access the main menu, press “Menu”
from the home page. The system is
made up of six major sections, all of
which can be accessed from the main
menu:
– the “Navigation” function includes all the satellite guidance functions, road
maps and traffic information;
– the “Multimedia” function enables the management of radio, audio and
video playback;
– the “Phone” function is used to pair the system to one or more mobile
phones and to use the hands-free
mode;
– the “Application” includes applica- tions and the online R-Link Store
store;
– the “Vehicle” function includes the management of certain equipment
such as the reversing camera,
Driving eco2 etc.; ;
– the “System” function is used for ad- justing various settings on the mul-
timedia system, e.g. display, lan-
guage, etc.
Connect your multimedia
system
Activate your connected services by
pressing button 11 to obtain the appli-
cations from the R-Link Store.
11
11
Page 24 of 130
1.18
USING VOICE RECOGNITION (1/9)
Introduction
Your multimedia system has a voice
recognition system that enables you to
control certain functions by voice while
keeping your hands on the steering
wheel.
Activation
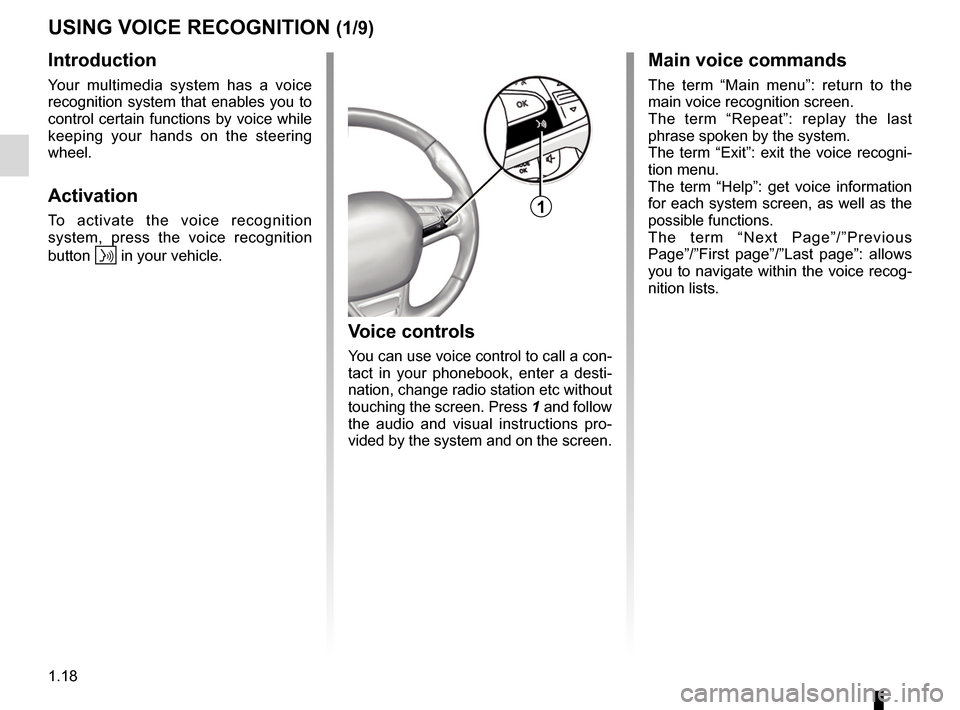
To activate the voice recognition
system, press the voice recognition
button
in your vehicle.
Main voice commands
The term “Main menu”: return to the
main voice recognition screen.
The term “Repeat”: replay the last
phrase spoken by the system.
The term “Exit”: exit the voice recogni-
tion menu.
The term “Help”: get voice information
for each system screen, as well as the
possible functions.
The term “Next Page”/”Previous
Page”/”First page”/”Last page”: allows
you to navigate within the voice recog-
nition lists.
Voice controls
You can use voice control to call a con-
tact in your phonebook, enter a desti-
nation, change radio station etc without
touching the screen. Press 1 and follow
the audio and visual instructions pro-
vided by the system and on the screen.
1
Page 30 of 130
1.24
To change the audio source, say
“change source” from the “Media
menu”.
USING VOICE RECOGNITION (7/9)
Voice menu
Leave Help
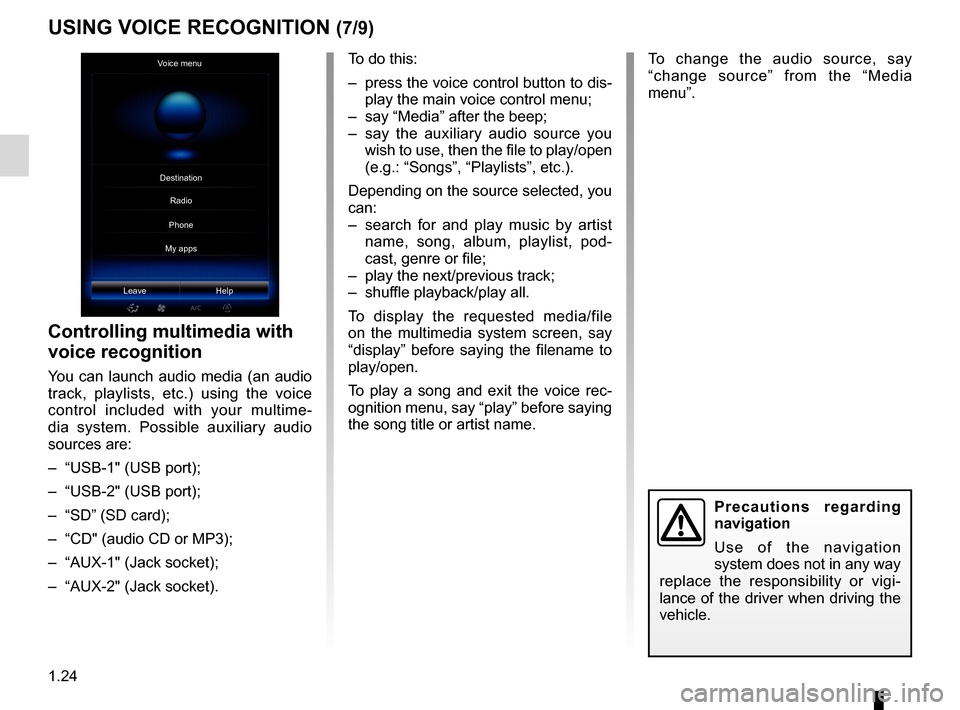
Controlling multimedia with
voice recognition
You can launch audio media (an audio
track, playlists, etc.) using the voice
control included with your multime-
dia system. Possible auxiliary audio
sources are:
– “USB-1" (USB port);
– “USB-2" (USB port);
– “SD” (SD card);
– “CD" (audio CD or MP3);
– “AUX-1" (Jack socket);
– “AUX-2" (Jack socket). To do this:
– press the voice control button to dis-
play the main voice control menu;
– say “Media” after the beep;
– say the auxiliary audio source you wish to use, then the file to play/open
(e.g.: “Songs”, “Playlists”, etc.).
Depending on the source selected, you
can:
– search for and play music by artist name, song, album, playlist, pod-
cast, genre or file;
– play the next/previous track;
– shuffle playback/play all.
To display the requested media/file
on the multimedia system screen, say
“display” before saying the filename to
play/open.
To play a song and exit the voice rec-
ognition menu, say “play” before saying
the song title or artist name.
Precautions regarding
navigation
Use of the navigation
system does not in any way
replace the responsibility or vigi-
lance of the driver when driving the
vehicle.
Destination
Phone
My apps Radio
Page 52 of 130
2.20
NAVIGATION SETTINGS (2/4)
“Speed warning”
Maps may contain information about
the speed limits of the road segments.
The navigation system is able to warn
you if you exceed the current limit. This
information may not be available for
your region, or may not be fully correct
for all roads on the map.
The following warning types are avail-
able:
– “Speed limit always visible”: acti-vate this function so that the speed
limit for the section of road taken is
always displayed on the navigation
screen.
– “Speed warning”: the current speed limit is displayed in red and flashes
on the map when you exceed it.
– “Overspeed warning sound”: a beep sounds when you exceed the speed
limit.“Safety warnings”
This function enables you to get a beep
and/or visual warning when you ap-
proach sensitive areas such as near
schools, level crossings, hazardous
areas, etc.
You can programme the navigation
system so that it displays these in-
creased vigilance points on the map,
and so that you can be warned by a
beep when you approach these areas.
For some of these areas, there is a
legal or recommended speed limit. The
beep may differ depending on whether
you are driving under or over the speed
limit.
Choose to be warned when approach-
ing these increased vigilance areas or
only when you are exceeding the speed
limit.
Precautions regarding
navigation
Use of the navigation
system does not in any way
replace the responsibility or vigi-
lance of the driver while driving the
vehicle.
In certain countries it is illegal to ac-
tivate the camera warning option
and this could lead to prosecution.
“Warning sign alerts”
Activate this function to be informed
when approaching specific sections of
road (obstacles, tight corners, cross-
ings, etc.) by road sign displays on
the map screen. For each category
of warning sign, set the warning type
(audio and/or visual) and the distance
from the hazard from which you want to
receive a warning.
Page 58 of 130
3.4
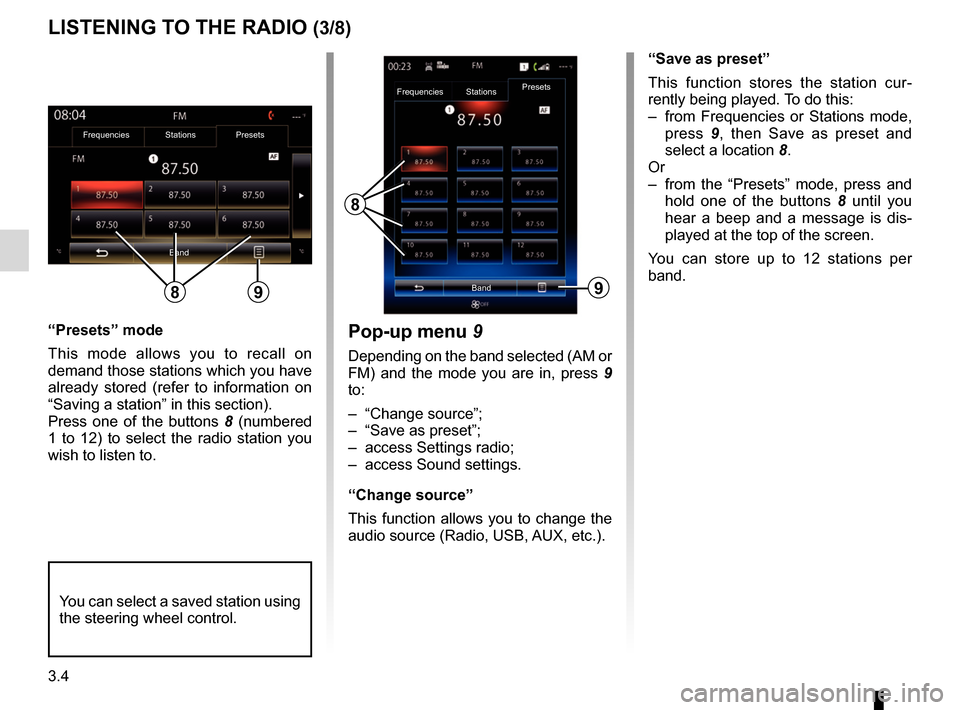
“Presets” mode
This mode allows you to recall on
demand those stations which you have
already stored (refer to information on
“Saving a station” in this section).
Press one of the buttons 8 (numbered
1 to 12) to select the radio station you
wish to listen to.
LISTENING TO THE RADIO (3/8)
“Save as preset”
This function stores the station cur-
rently being played. To do this:
– from Frequencies or Stations mode, press 9, then Save as preset and
select a location 8.
Or
– from the “Presets” mode, press and hold one of the buttons 8 until you
hear a beep and a message is dis-
played at the top of the screen.
You can store up to 12 stations per
band.
8
Band
Frequencies
StationsPresets
You can select a saved station using
the steering wheel control.
9
Pop-up menu
9
Depending on the band selected (AM or
FM) and the mode you are in, press 9
to:
– “Change source”;
– “Save as preset”;
– access Settings radio;
– access Sound settings.
“Change source”
This function allows you to change the
audio source (Radio, USB, AUX, etc.).
Frequencies Stations Presets
Band
89
Page 59 of 130
3.5
“Settings”
From this menu, you can activate or de-
activate the following elements:
– “AM";
– “Radio text”;
– “Region”;
– “TA / I-Traffic”;
”AM“
This menu enables you to activate/de-
activate the band AM.
“Radio text”
(Text information)
Some FM radio stations broadcast
text information relating to their pro-
grammes (e.g. song titles).
Note: This information is only available
for certain radio stations.
LISTENING TO THE RADIO (4/8)
“Region”
The frequency of an “FM” radio station
may change depending on the geo-
graphical area.
Activate this function to continue listen-
ing to the same radio station while driv-
ing. The audio system will automatically
track frequency changes without inter-
ruption.
Note: Stations in the same network
sometimes broadcast different pro-
grammes or use different programme
service names.“TA / I-Traffic”
(Traffic information)
When this function is activated, your
audio system makes it possible to auto-
matically receive traffic bulletins when
they are broadcast on certain FM radio
stations (depending on the country).
If the “Region” function is activated,
the “Region” function always has
priority over the “AF" function.
Page 61 of 130
3.7
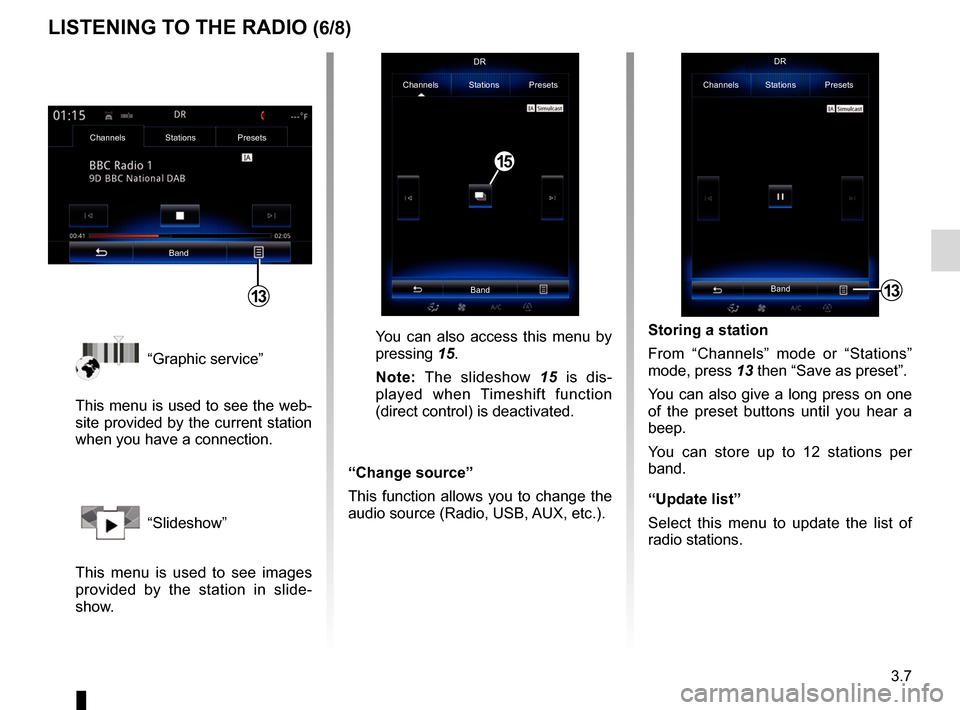
“Graphic service”
This menu is used to see the web-
site provided by the current station
when you have a connection.
“Slideshow”
This menu is used to see images
provided by the station in slide-
show.
Storing a station
From “Channels” mode or “Stations”
mode, press 13 then “Save as preset”.
You can also give a long press on one
of the preset buttons until you hear a
beep.
You can store up to 12 stations per
band.
“Update list”
Select this menu to update the list of
radio stations.
LISTENING TO THE RADIO (6/8)
13
Channels Stations Presets
BandDR
You can also access this menu by
pressing
15.
Note: The slideshow 15 is dis-
played when Timeshift function
(direct control) is deactivated.
“Change source”
This function allows you to change the
audio source (Radio, USB, AUX, etc.).
Channels Stations Presets
BandDR
15
Channels Stations Presets
Band
13
Page 62 of 130
3.8
LISTENING TO THE RADIO (7/8)
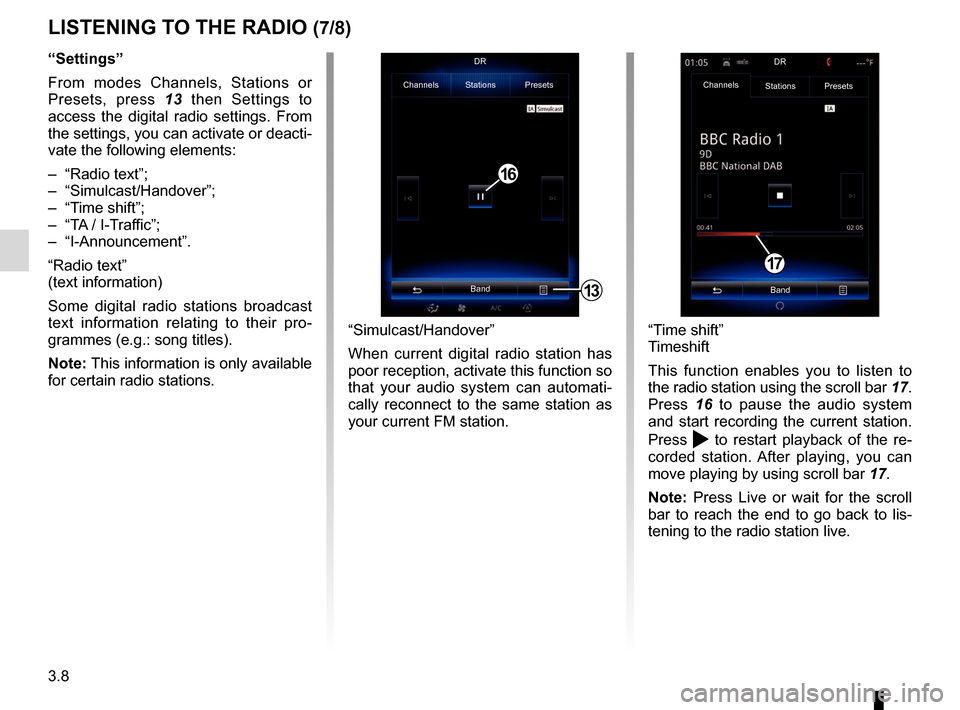
“Settings”
From modes Channels, Stations or
Presets, press 13 then Settings to
access the digital radio settings. From
the settings, you can activate or deacti-
vate the following elements:
– “Radio text”;
– “Simulcast/Handover”;
– “Time shift”;
– “TA / I-Traffic”;
– “I-Announcement”.
“Radio text”
(text information)
Some digital radio stations broadcast
text information relating to their pro-
grammes (e.g.: song titles).
Note: This information is only available
for certain radio stations.
“Time shift”
Timeshift
This function enables you to listen to
the radio station using the scroll bar 17.
Press 16 to pause the audio system
and start recording the current station.
Press
to restart playback of the re-
corded station. After playing, you can
move playing by using scroll bar 17.
Note: Press Live or wait for the scroll
bar to reach the end to go back to lis-
tening to the radio station live.
17
“Simulcast/Handover”
When current digital radio station has
poor reception, activate this function so
that your audio system can automati-
cally reconnect to the same station as
your current FM station.
13
Channels Stations Presets
BandDR
16
Channels
Stations Presets
BandDR