check engine RENAULT KADJAR 2018 Owner's Manual
[x] Cancel search | Manufacturer: RENAULT, Model Year: 2018, Model line: KADJAR, Model: RENAULT KADJAR 2018Pages: 310, PDF Size: 8.35 MB
Page 133 of 310
2.25
MAINTENANCE AND ANTIPOLLUTION ADVICE
Your vehicle complies with criteria for
recycling and recovering vehicles at the
end of their service life, which entered
into force in 2015.
Some parts of your vehicle have there-
fore been designed to facilitate future
recycling.
These parts are easy to remove so
that they can be recovered and reproc-
essed by recycling companies.
By virtue of its design, moderate fuel
consumption and initial settings, your
vehicle also conforms to current anti-
pollution regulations. The manufac-
turer is actively striving to reduce pol-
lutant exhaust gas emissions and to
save energy. But the fuel consumption
of your vehicle and the level of pollutant
exhaust gas emissions are also your
responsibility. Ensure that it is main-
tained and used correctly.
Maintenance
It is important to remember that fail-
ure to respect antipollution regulations
could lead to legal action being taken
against the vehicle owner.In addition, replacing engine, fuel
supply system and exhaust compo-
nents with parts other than those origi-
nally recommended by the manufac-
turer may alter your vehicle so that it
no longer complies with anti-pollution
regulations.
Have your vehicle adjusted and
checked by an authorised dealer, in ac-
cordance with the instructions given in
your maintenance schedule: they will
have all the equipment necessary for
ensuring that your vehicle is maintained
to its original standard.
Engine adjustments
– Spark plugs:
for optimum condi-
tions of use, output and performance
the specifications laid down by our
Design Department must be strictly
applied.
If the spark plugs have to be changed, use the make, type and gap specified
for your vehicle’s engine. Contact an
authorised dealer for this.
– Ignition and idle speed: no adjust-
ment is needed.
– Air filter, fuel filter: a choked ele-
ment will reduce efficiency. It must
be replaced.
Exhaust gas monitoring
system
The exhaust gas monitoring system will
detect any operating faults in the vehi-
cle’s antipollution system.
If this system malfunctions, toxic sub-
stances may be released into the at-
mosphere or damage may occur.
ÄThis warning light on the in-
strument panel will indicate if
there are any faults in the system:
This lights up when the ignition is
switched on and goes out when the
engine is started.
– If it lights up continuously, consult an approved Dealer as soon as possi-
ble;
– if it flashes, reduce the engine speed until the light stops flashing. Contact
an authorised dealer as soon as pos-
sible.
Refer to the information on
“Reagent tank” in Section 1.
Page 139 of 310
2.31
DRIVING CORRECTION DEVICES AND AIDS (2/10)
Operating faults:
–
© and x lit up on the in-
strument panel alongside mes-
sages “Check ABS”, “Check braking
system” and “Check ESC”: indicates
the ABS, ESC and emergency brake
assist are deactivated. Braking is
always enabled;
–
x, D, © and ® lit
up on the instrument panel alongside
the message “Braking system fault”:
this indicates a fault in the braking
system.
In both cases, consult an approved
dealer.
Your braking systems
are partially operational.
However, it is dangerous
to brake suddenly and
it is essential to stop immediately,
as soon as traffic conditions allow.
Contact an approved dealer.Warning light ® re-
quires you to stop immedi-
ately, for your own safety,
as soon as traffic conditions
allow. Switch off the engine and do
not restart it. Contact an approved
Dealer.
Page 140 of 310
2.32
Electronic stability control
ESC with understeer control
and traction control
Electronic stability control ESC
This system helps you to keep control
of the vehicle in critical driving condi-
tions (avoiding an obstacle, loss of grip
on a bend, etc.).
Operating principle
A sensor in the steering wheel detects
the direction selected by the driver.
Other sensors throughout the vehicle
measure the actual direction.
The system compares driver input to
the actual trajectory of the vehicle and
corrects the trajectory if necessary by
controlling the braking of certain wheels
and/or engine power. In the event that
the system is engaged, indicator light
\b flashes on the instrument panel.Understeer control
This system optimises the action of the
ESC in the case of pronounced under-
steer (loss of front axle road holding).
Traction control
This system helps to limit wheelspin of
the drive wheels and to control the ve-
hicle when pulling away accelerating or
decelerating.
Operating principle
Using the wheel sensors, the system
measures and compares the speed of
the drive wheels at all times and slows
down their over-rotation. If a wheel is
starting to slip, the system brakes au-
tomatically until the drive supplied be-
comes compatible with the level of grip
under the wheel again.
The system also adjusts the engine
speed to the grip available under the
wheels, independently of the pressure
exerted on the accelerator pedal.
DRIVING CORRECTION DEVICES AND AIDS (3/10)
Operating faults
When the system detects an operat-
ing fault the message “Check ESC” and
warning light
© and \b appear
on the instrument panel.
In this case, the ESC and traction con-
trol system are deactivated. Consult an
authorised dealer.
Page 150 of 310
2.42
TRANSMISSION: 4-wheel drive (4WD) (3/4)
Electronic stability program and
traction control when driving off-
road
When driving on soft ground (sand,
mud, deep snow), we recommend that
you deactivate the ESC function by
pressing the “ESC” switch.
In this case, only individual wheel brak-
ing remains active. This function ap-
plies the brake to any wheel that is slip-
ping, allowing the engine torque to be
transferred to the wheels with the most
grip. This is particularly useful when
crossing a bridge.
All the ESC functions will be reacti-
vated when the vehicle speed reaches
approximately 31 mph (50 km/h) (24.8
mph [40 km/h] in 4WD Lock mode),
when the engine is restarted or when
the “ESC” switch is pressed again.Operating faults
If the system detects an operating fault,
it automatically switches to “2WD”
mode. The message “Check 4WD” is
displayed on the instrument panel, and
the
‘ and © warning lights
come on.
Drive as soon as possible at a moder-
ate speed to an approved dealer.
For certain operating faults, the system
may not be able to switch to “2WD" or
"4WD Lock" mode. "AUTO" mode re-
mains active.
Contact an approved dealer as soon as
possible.
After stopping the engine, the system
may take up to five minutes to cool
down.
If the system detects excessive wheel-
spin on the front wheels, it adapts the
engine to run in a way that reduces
wheelspin.
Anti-lock braking in
LOCK mode
When “4WD Lock" mode is active, the
ABS switches to off-road mode. In this
case, the wheels may lock intermit-
tently to achieve better grip, thus reduc-
ing braking distances on soft ground.
When this mode is active:
– the vehicle’s manoeuvrability is lim- ited during braking. This operating
mode is therefore not recommended
in very low-grip conditions (eg. ice).
– there may be some noise. This is normal, and does not indicate an op-
erating fault.
Page 158 of 310
2.50
Operating faults
If the system detects a fault, the mes-
sage “Check blind spot alert” is dis-
played on the instrument panel. Consult
an authorised dealer.
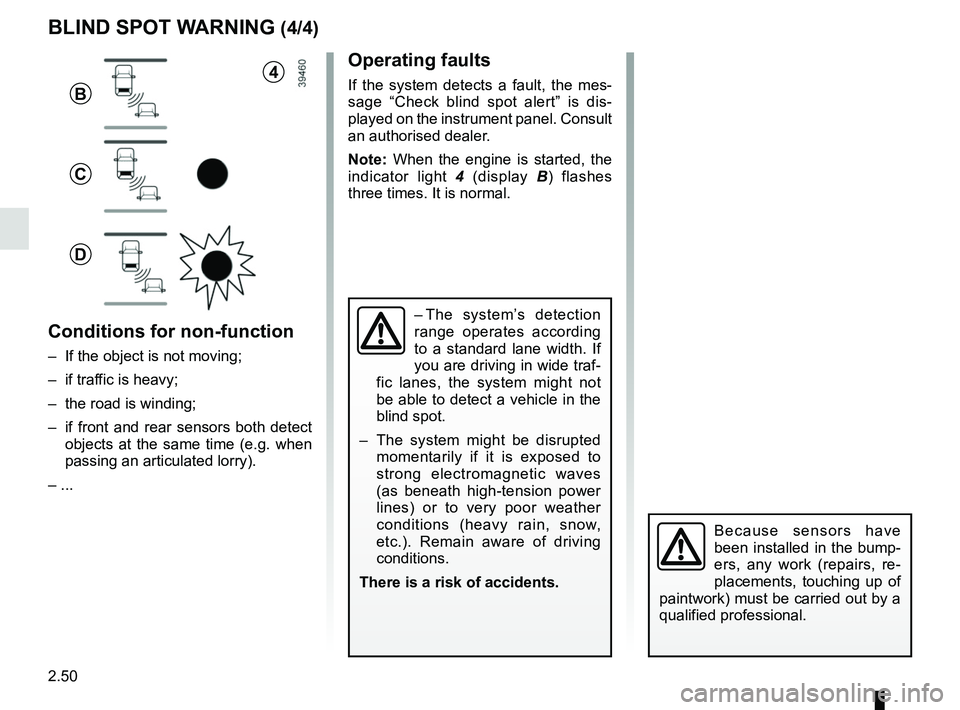
Note: When the engine is started, the
indicator light 4 (display B) flashes
three times. It is normal.
– The system’s detection
range operates according
to a standard lane width. If
you are driving in wide traf-
fic lanes, the system might not
be able to detect a vehicle in the
blind spot.
– The system might be disrupted momentarily if it is exposed to
strong electromagnetic waves
(as beneath high-tension power
lines) or to very poor weather
conditions (heavy rain, snow,
etc.). Remain aware of driving
conditions.
There is a risk of accidents.
BLIND SPOT WARNING (4/4)
Because sensors have
been installed in the bump-
ers, any work (repairs, re-
placements, touching up of
paintwork) must be carried out by a
qualified professional.
4
B
C
D
Conditions for non-function
– If the object is not moving;
– if traffic is heavy;
– the road is winding;
– if front and rear sensors both detect objects at the same time (e.g. when
passing an articulated lorry).
– ...
Page 195 of 310
3.13
AIR CONDITIONING: information and operating instructions (1/2)
Do not add anything to the
vehicle’s ventilation circuit
(for example, to remove
bad odours).
There is a risk of damage or of
fire.
Do not open the refriger-
ant fluid circuit. The fluid
may damage eyes or skin.
Fuel consumption
You will normally notice an increase in
fuel consumption (especially in town)
when the air conditioning is operating.
For vehicles fitted with air conditioning
with no automatic mode, switch off the
system when it is not required.
Advice for reducing consumption
and helping to preserve the environ-
ment
Drive with the air vents open and the
windows closed.
If the vehicle has been parked in the
sun, open the doors for a few moments
to let the hot air escape before starting
the engine.
Maintenance
Refer to the Maintenance Document
for your vehicle for the inspection fre-
quency.
Operating faults
As a general rule, contact your ap-
proved dealer in the event of an oper-
ating fault.
– Reduction in de-icing, demisting or air conditioning performance.
This may be caused by the passen-
ger compartment filter cartridge be-
coming clogged.
– No cold air is being produced .
Check that the controls are set cor-
rectly and that the fuses are sound.
Otherwise, switch off the system.
Presence of water under the
vehicle
After prolonged use of the air condi-
tioning system, it is normal for water
to be present under the vehicle. This is
caused by condensation.
Advice on use
In some situations (air conditioning off,
air recirculation activated, ventilation
speed at zero or low etc.), you may
notice that condensation starts to form
on the windows and windscreen.
If there is condensation, use the “Clear
View” function to remove it, then use
the air conditioning in automatic mode
to stop it forming again.
Vehicles equipped with ECO
mode: once activated, ECO mode
may reduce the performance of the
air conditioning. Please refer to the
information on “Driving advice, Eco-
driving” in Section 2.
Use the air conditioning system reg-
ularly, even in cold weather, running
it at least once a month for approxi-
mately 5 minutes.
Page 225 of 310
4.3
BONNET (2/2)
Closing the bonnet
Before closing the bonnet, make sure
that nothing has been left in the engine
compartment.
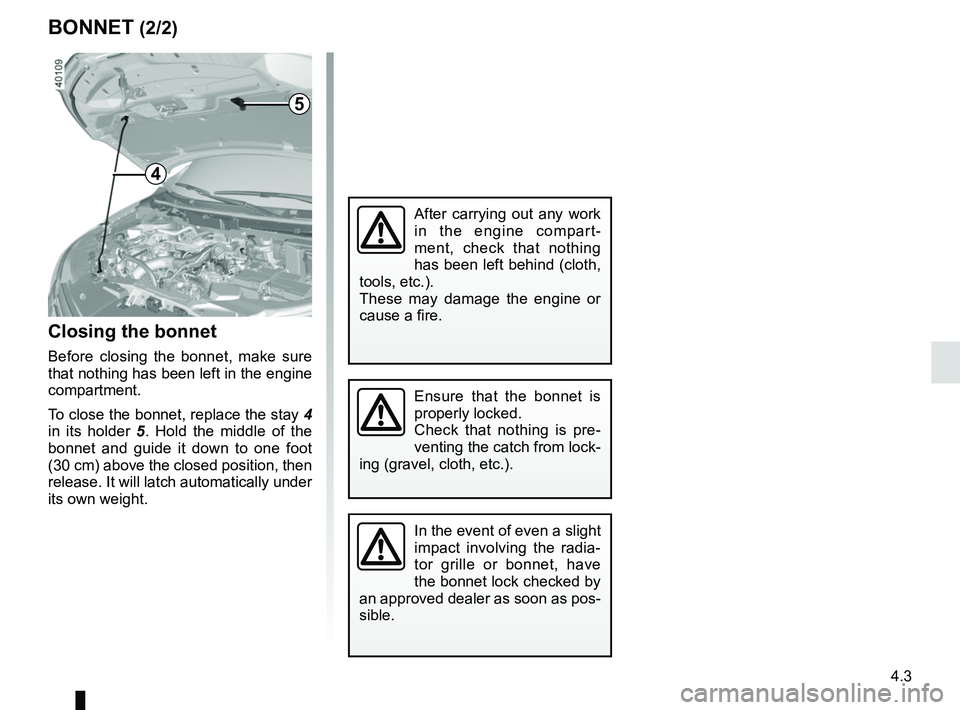
To close the bonnet, replace the stay 4
in its holder 5 . Hold the middle of the
bonnet and guide it down to one foot
(30 cm) above the closed position, then
release. It will latch automatically under
its own weight.
After carrying out any work
in the engine compart-
ment, check that nothing
has been left behind (cloth,
tools, etc.).
These may damage the engine or
cause a fire.
Ensure that the bonnet is
properly locked.
Check that nothing is pre-
venting the catch from lock-
ing (gravel, cloth, etc.).
In the event of even a slight
impact involving the radia-
tor grille or bonnet, have
the bonnet lock checked by
an approved dealer as soon as pos-
sible.
4
5
Page 226 of 310
4.4
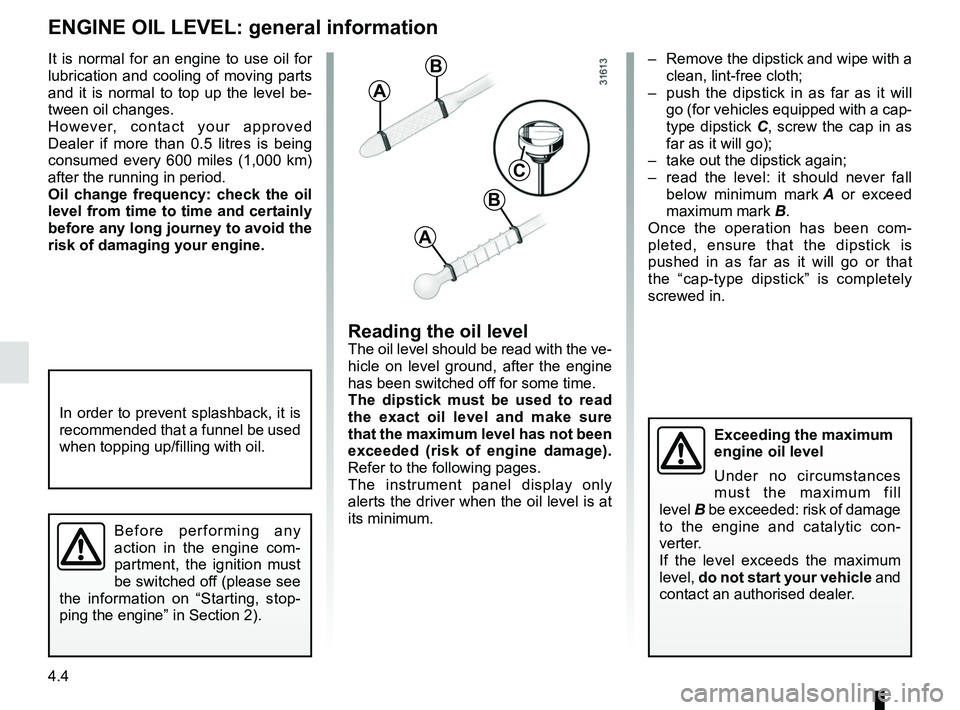
– Remove the dipstick and wipe with a clean, lint-free cloth;
– push the dipstick in as far as it will go (for vehicles equipped with a cap-
type dipstick C, screw the cap in as
far as it will go);
– take out the dipstick again;
– read the level: it should never fall below minimum mark A or exceed
maximum mark B.
Once the operation has been com-
pleted, ensure that the dipstick is
pushed in as far as it will go or that
the “cap-type dipstick” is completely
screwed in.
Reading the oil levelThe oil level should be read with the ve-
hicle on level ground, after the engine
has been switched off for some time.
The dipstick must be used to read
the exact oil level and make sure
that the maximum level has not been
exceeded (risk of engine damage).
Refer to the following pages.
The instrument panel display only
alerts the driver when the oil level is at
its minimum.
It is normal for an engine to use oil for
lubrication and cooling of moving parts
and it is normal to top up the level be-
tween oil changes.
However, contact your approved
Dealer if more than 0.5 litres is being
consumed every 600 miles (1,000 km)
after the running in period.
Oil change frequency: check the oil
level from time to time and certainly
before any long journey to avoid the
risk of damaging your engine.
ENGINE OIL LEVEL: general information
A
B
A
B
C
Exceeding the maximum
engine oil level
Under no circumstances
must the maximum fill
level B be exceeded: risk of damage
to the engine and catalytic con-
verter.
If the level exceeds the maximum
level, do not start your vehicle and
contact an authorised dealer.
In order to prevent splashback, it is
recommended that a funnel be used
when topping up/filling with oil.
Before performing any
action in the engine com-
partment, the ignition must
be switched off (please see
the information on “Starting, stop-
ping the engine” in Section 2).
Page 227 of 310
4.5
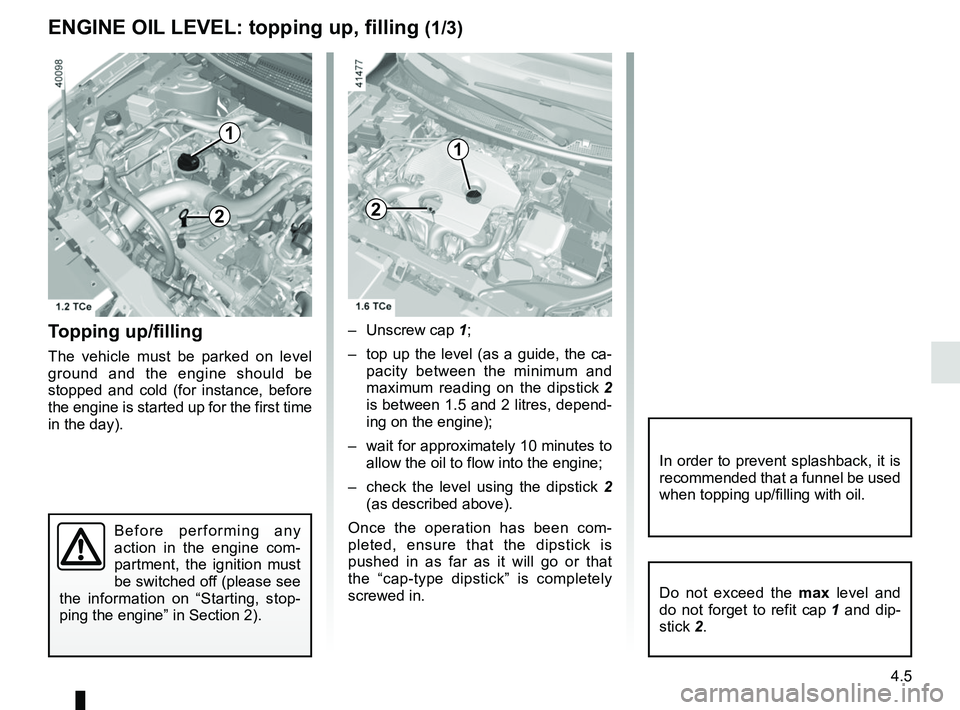
Topping up/filling
The vehicle must be parked on level
ground and the engine should be
stopped and cold (for instance, before
the engine is started up for the first time
in the day).– Unscrew cap
1;
– top up the level (as a guide, the ca- pacity between the minimum and
maximum reading on the dipstick 2
is between 1.5 and 2 litres, depend-
ing on the engine);
– wait for approximately 10 minutes to allow the oil to flow into the engine;
– check the level using the dipstick 2
(as described above).
Once the operation has been com-
pleted, ensure that the dipstick is
pushed in as far as it will go or that
the “cap-type dipstick” is completely
screwed in.
ENGINE OIL LEVEL: topping up, filling (1/3)
Do not exceed the max level and
do not forget to refit cap 1 and dip-
stick 2.
In order to prevent splashback, it is
recommended that a funnel be used
when topping up/filling with oil.
1
2
Before performing any
action in the engine com-
partment, the ignition must
be switched off (please see
the information on “Starting, stop-
ping the engine” in Section 2).
1
2
Page 229 of 310
4.7
Engine oil grade
Refer to the maintenance document for
your vehicle.
ENGINE OIL LEVEL: topping up, filling (3/3)/OIL CHANGE
Never run the engine in an
enclosed space as exhaust
gases are poisonous.
Engine oil change: if you
are changing the oil when
the engine is hot, be care-
ful not to scald yourself as
the oil drains.
Filling: take care when
topping up the oil that
no oil drips onto engine
components - risk of fire.
Remember to refit the cap securely
as there is a risk of fire if oil splashes
onto hot engine components.
When working in the engine
compartment, ensure that
the windscreen wiper stalk
is in the park position.
Risk of injury.
Oil change
Service interval: refer to the
Maintenance Service Booklet for your
vehicle.
Oil change capacity
Please refer to the maintenance docu-
ment for your vehicle, or contact an au-
thorised dealer.
Always check the engine oil level using
the dipstick, as explained previously (it
should never fall below the minimum
level, or be over the maximum level on
the dipstick).Consult your approved dealer at
once if you notice an abnormal or
repeated drop in any of the fluid
levels.
Exceeding the maximum
engine oil level
Under no circumstances
should maximum filling level
be exceeded: this could damage the
engine and the catalytic converter.
If the level exceeds the maximum
level, do not start your vehicle and
contact an authorised dealer.
Please note when work-
ing close to the engine that
it may be hot. The engine
cooling fan may also start
at any moment. The
warning
light in the engine compartment re-
minds you of this.
Risk of injury.