check engine RENAULT KANGOO 2017 X61 / 2.G User Guide
[x] Cancel search | Manufacturer: RENAULT, Model Year: 2017, Model line: KANGOO, Model: RENAULT KANGOO 2017 X61 / 2.GPages: 260, PDF Size: 5.68 MB
Page 119 of 260
2.27
DRIVING CORRECTION DEVICES AND AIDS (2/5)
Electronic stability program
ESC with understeer control
and traction control
Electronic stability control ESC
This system helps you to keep control
of the vehicle in critical driving condi-
tions (avoiding an obstacle, loss of grip
on a bend, etc.).
Operating principle
A sensor in the steering wheel detects
the direction selected by the driver.
Other sensors throughout the vehicle
measure the actual direction.
The system compares driver input to
the actual trajectory of the vehicle and
corrects the trajectory if necessary by
controlling the braking of certain wheels
and/or engine power. In the event that
the system is engaged, indicator light
flashes on the instrument panel. Understeer control
This system optimises the action of the
ESC in the case of pronounced under-
steer (loss of front axle road holding).
Traction control
This system helps to limit wheelspin of
the drive wheels and to control the ve-
hicle when pulling away accelerating or
decelerating.
Operating principle
Using the wheel sensors, the system
measures and compares the speed of
the drive wheels at all times and slows
down their over-rotation. If a wheel is
starting to slip, the system brakes au-
tomatically until the drive supplied be-
comes compatible with the level of grip
under the wheel again.
The system also adjusts the engine
speed to the grip available under the
wheels, independently of the pressure
exerted on the accelerator pedal. Operating faults
When the system detects an operating
fault the message “CHECK ESC” and
warning light
© appear on the in-
strument panel. In this case, the ESC
and traction control system are deacti-
vated.
Consult an approved dealer.
Page 131 of 260
2.39
Temporary deactivation of
the system
(depending on vehicle)
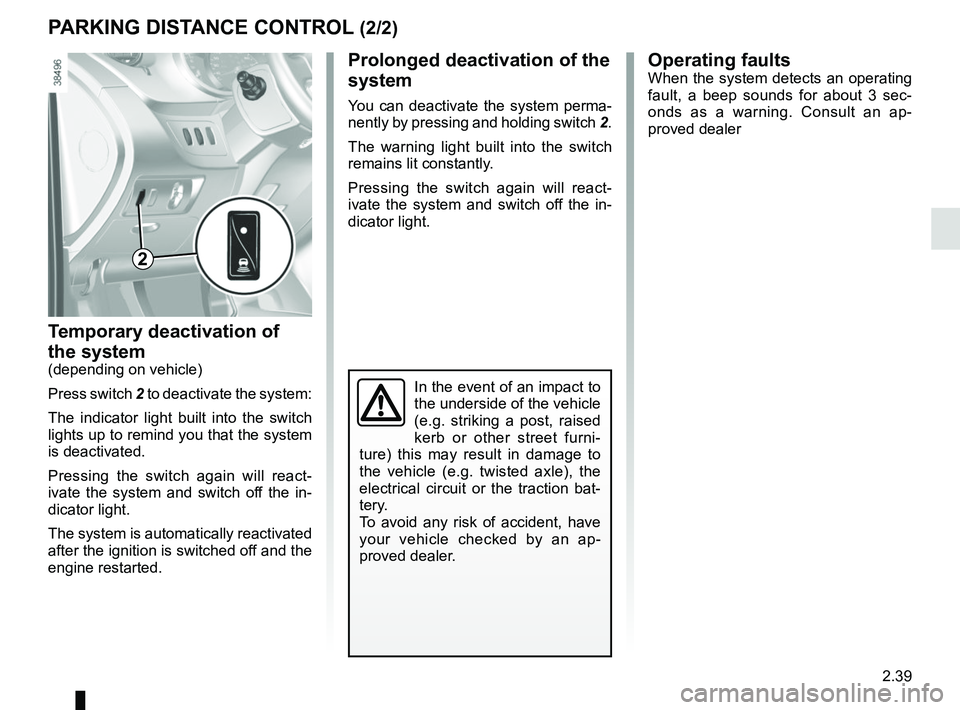
Press switch 2 to deactivate the system:
The indicator light built into the switch
lights up to remind you that the system
is deactivated.
Pressing the switch again will react-
ivate the system and switch off the in-
dicator light.
The system is automatically reactivated
after the ignition is switched off and the
engine restarted.
PARKING DISTANCE CONTROL (2/2)
Operating faultsWhen the system detects an operating
fault, a beep sounds for about 3 sec-
onds as a warning. Consult an ap-
proved dealer
In the event of an impact to
the underside of the vehicle
(e.g. striking a post, raised
kerb or other street furni-
ture) this may result in damage to
the vehicle (e.g. twisted axle), the
electrical circuit or the traction bat-
tery.
To avoid any risk of accident, have
your vehicle checked by an ap-
proved dealer.
2
Prolonged deactivation of the
system
You can deactivate the system perma-
nently by pressing and holding switch 2.
The warning light built into the switch
remains lit constantly.
Pressing the switch again will react-
ivate the system and switch off the in-
dicator light.
Page 136 of 260
2.44
Operating faults
– When driving, if the “CHECK
GEARBOX” message and the
© warning light appear on the
instrument panel, this indicates a
fault.
Contact your approved Dealer as
soon as possible.
– When driving, if the message
“GEARBOX OVERHEATING” ap-
pears on the instrument panel, drive
at a moderate speed and avoid leav-
ing the gearstick in the D (or R) po-
sition, where traffic conditions allow:
always return to N while the vehicle
is stationary.
Contact your approved Dealer as
soon as possible.
– If a vehicle with an automatic gearbox breaks down, refer to the
information on “Towing” in Section 5.
AUTOMATIC GEARBOX (3/3)
Parking the vehicleWhen the vehicle is stopped, move the
lever to position P while keeping your
foot on the brake pedal: the gearbox is
in neutral and the drive wheels are me-
chanically locked by the driveshaft.
Apply the handbrake.Special circumstances
– If the bends and road surface do
not allow you to stay in automatic
mode (eg. in the mountains), we rec-
ommend that you change to manual
mode.
This will prevent the automatic gear-
box from changing gear repeatedly
when climbing, and permit engine
braking on long descents.
– In cold weather, start the engine
and wait a few seconds before
moving the selector lever from posi-
tion P or N and engaging it in D or R
to prevent the engine stalling..
Page 151 of 260
3.15
Operating faults
As a general rule, contact your ap-
proved dealer in the event of an oper-
ating fault.
– Reduction in de-icing, demisting or air conditioning performance.
This may be caused by the passen-
ger compartment filter cartridge be-
coming clogged.
– No cold air is being produced .
Check that the controls are set cor-
rectly and that the fuses are sound.
Otherwise, switch off the system.
Presence of water under the
vehicle
After prolonged use of the air condi-
tioning system, it is normal for water
to be present under the vehicle. This is
caused by condensation.
AIR CONDITIONING: information and operating instructions (1/2)
Do not open the refriger-
ant fluid circuit. The fluid
may damage eyes or skin.
Fuel consumption
You will normally notice an increase in
fuel consumption (especially in town)
when the air conditioning is operating.
For vehicles fitted with air conditioning
with no automatic mode, switch off the
system when it is not required.
Advice for reducing consumption
and helping to preserve the environ-
ment
Drive with the air vents open and the
windows closed.
If the vehicle has been parked in the
sun, open the doors for a few moments
to let the hot air escape before starting
the engine.
Advice on use
In some situations (air conditioning off,
air recirculation activated, ventilation
speed at zero or low etc.), you may
notice that condensation starts to form
on the windows and windscreen.
If there is condensation, use the “Clear
View” function to remove it, then use
the air conditioning in automatic mode
to stop it forming again.
Maintenance
Refer to the Maintenance Document
for your vehicle for the inspection fre-
quency.
Do not add anything to the
vehicle’s ventilation circuit
(for example, to remove
bad odours).
There is a risk of damage or of
fire.
Page 177 of 260
4.3
Closing the bonnet
Check that nothing has been left in the
engine compartment.
To close the bonnet again, hold the
bonnet in the middle and lower it to
30 cm above the closed position, then
release it. It will latch automatically
under its own weight.
After carrying out any work
in the engine compart-
ment, check that nothing
has been left behind (cloth,
tools, etc.).
These may damage the engine or
cause a fire.
Ensure that the bonnet is
properly locked.
Check that nothing is pre-
venting the catch from lock-
ing (gravel, cloth, etc.).
In the event of even a slight
impact involving the radia-
tor grille or bonnet, have
the bonnet lock checked by
an approved dealer as soon as pos-
sible.
BONNET (2/2)
Page 178 of 260
4.4
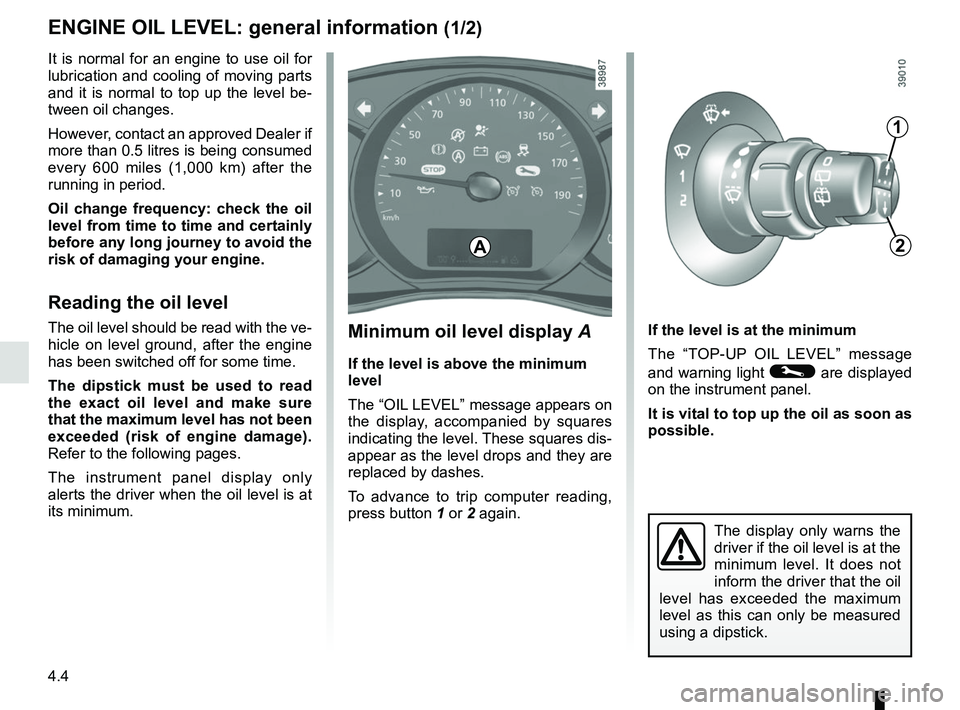
Minimum oil level display A
If the level is above the minimum
level
The “OIL LEVEL” message appears on
the display, accompanied by squares
indicating the level. These squares dis-
appear as the level drops and they are
replaced by dashes.
To advance to trip computer reading,
press button 1 or 2 again. If the level is at the minimum
The “TOP-UP OIL LEVEL” message
and warning light © are displayed
on the instrument panel.
It is vital to top up the oil as soon as
possible.
The display only warns the
driver if the oil level is at the
minimum level. It does not
inform the driver that the oil
level has exceeded the maximum
level as this can only be measured
using a dipstick.
It is normal for an engine to use oil for
lubrication and cooling of moving parts
and it is normal to top up the level be-
tween oil changes.
However, contact an approved Dealer if
more than 0.5 litres is being consumed
every 600 miles (1,000 km) after the
running in period.
Oil change frequency: check the oil
level from time to time and certainly
before any long journey to avoid the
risk of damaging your engine.
Reading the oil level
The oil level should be read with the ve-
hicle on level ground, after the engine
has been switched off for some time.
The dipstick must be used to read
the exact oil level and make sure
that the maximum level has not been
exceeded (risk of engine damage).
Refer to the following pages.
The instrument panel display only
alerts the driver when the oil level is at
its minimum.
1
2A
ENGINE OIL LEVEL: general information (1/2)
Page 180 of 260
4.6
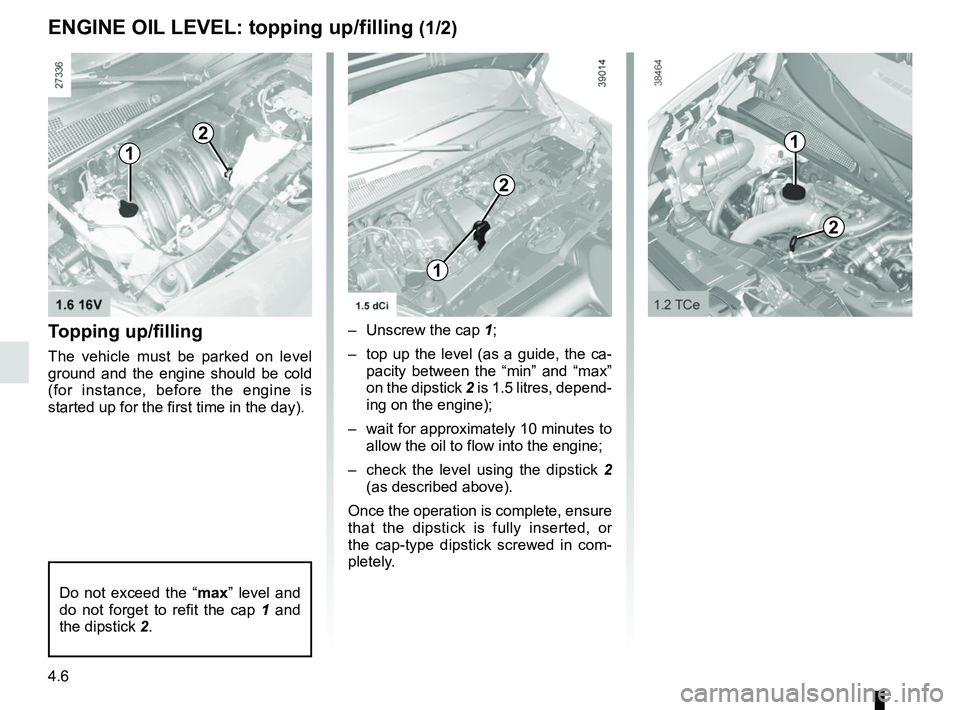
Topping up/filling
The vehicle must be parked on level
ground and the engine should be cold
(for instance, before the engine is
started up for the first time in the day).– Unscrew the cap 1;
– top up the level (as a guide, the ca- pacity between the “min” and “max”
on the dipstick 2 is 1.5 litres, depend-
ing on the engine);
– wait for approximately 10 minutes to allow the oil to flow into the engine;
– check the level using the dipstick 2
(as described above).
Once the operation is complete, ensure
that the dipstick is fully inserted, or
the cap-type dipstick screwed in com-
pletely.
Do not exceed the “ max” level and
do not forget to refit the cap 1 and
the dipstick 2.
1
2
2
1
ENGINE OIL LEVEL: topping up/filling (1/2)
1
2
Page 181 of 260
4.7
Oil change
Service interval: refer to the
Maintenance Service Booklet for your
vehicle.
Oil change capacity
Please refer to the maintenance docu-
ment for your vehicle, or contact an au-
thorised dealer.
Always check the engine oil level using
the dipstick, as explained previously (it
should never fall below the minimum
level, or be over the maximum level on
the dipstick).
Engine oil change: if you
are changing the oil when
the engine is hot, be careful
not to scald yourself if the
oil overflows.
Consult your approved Dealer at
once if you notice an abnormal or
repeated drop in any of the fluid
levels.
Never run the engine in an
enclosed space as exhaust
gases are poisonous.
Filling: take care when
topping up the oil that
no oil drips onto engine
components - risk of fire.
Remember to refit the cap securely
as there is a risk of fire if oil splashes
onto hot engine components.
The engine may be hot
when carrying out opera-
tions in close proximity. In
addition, the engine cooling
fan can come on at any moment.
Risk of injury.
ENGINE OIL LEVEL: topping up/filling (2/2)ENGINE OIL CHANGE
Engine oil grade
Refer to the Maintenance Service
Booklet for your vehicle.
Exceeding the maximum
engine oil level
Under no circumstances
must the maximum fill level
be exceeded: risk of damage to the
engine and catalytic converter.
If the oil level exceeds the maximum
level, do not start your vehicle and
contact an approved Dealer.
Page 182 of 260
4.8
LEVELS (1/3)
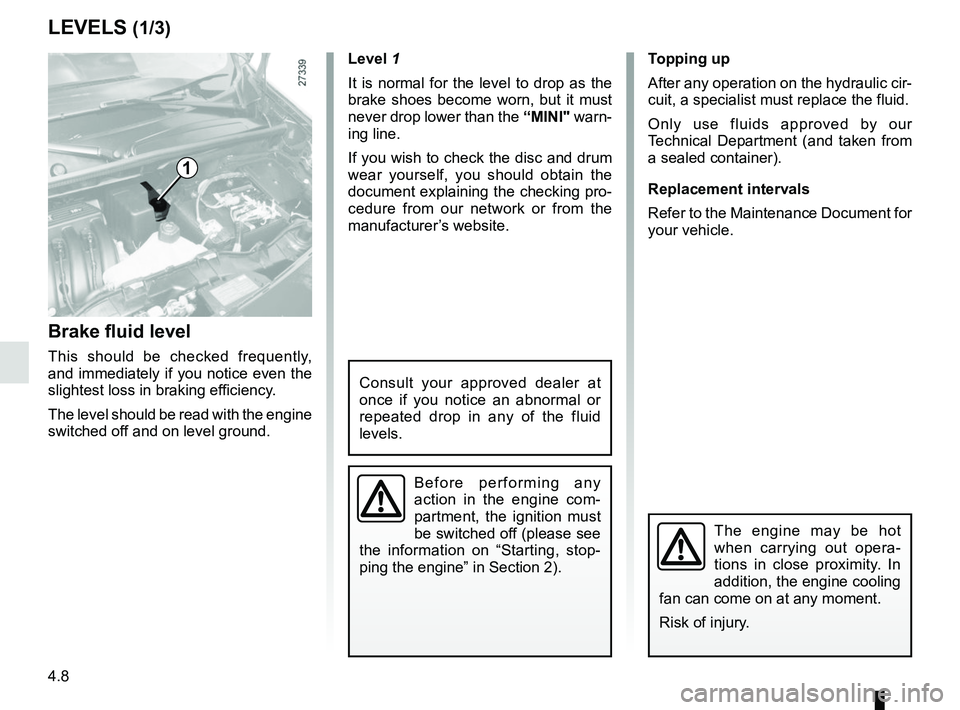
Brake fluid level
This should be checked frequently,
and immediately if you notice even the
slightest loss in braking efficiency.
The level should be read with the engine
switched off and on level ground. Level 1
It is normal for the level to drop as the
brake shoes become worn, but it must
never drop lower than the
“MINI" warn-
ing line.
If you wish to check the disc and drum
wear yourself, you should obtain the
document explaining the checking pro-
cedure from our network or from the
manufacturer’s website. Topping up
After any operation on the hydraulic cir-
cuit, a specialist must replace the fluid.
Only use fluids approved by our
Technical Department (and taken from
a sealed container).
Replacement intervals
Refer to the Maintenance Document for
your vehicle.
The engine may be hot
when carrying out opera-
tions in close proximity. In
addition, the engine cooling
fan can come on at any moment.
Risk of injury.
1
Consult your approved dealer at
once if you notice an abnormal or
repeated drop in any of the fluid
levels.
Before performing any
action in the engine com-
partment, the ignition must
be switched off (please see
the information on “Starting, stop-
ping the engine” in Section 2).
Page 183 of 260
4.9
LEVELS (2/3)
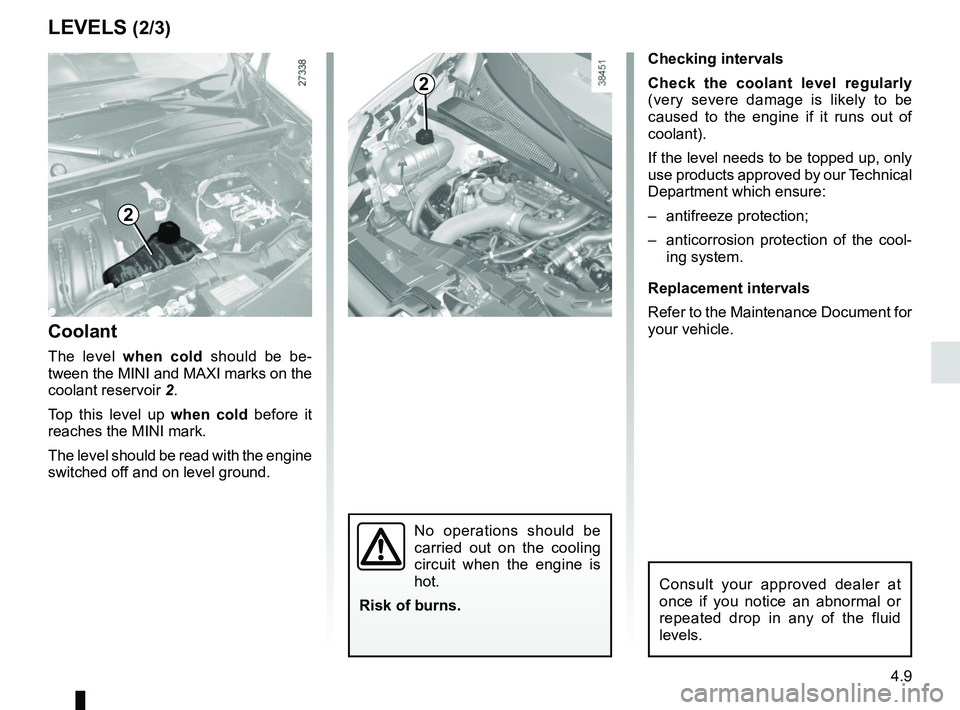
Coolant
The level when cold should be be-
tween the MINI and MAXI marks on the
coolant reservoir 2.
Top this level up when cold before it
reaches the MINI mark.
The level should be read with the engine
switched off and on level ground.
No operations should be
carried out on the cooling
circuit when the engine is
hot.
Risk of burns.
Checking intervals
Check the coolant level regularly
(very severe damage is likely to be
caused to the engine if it runs out of
coolant).
If the level needs to be topped up, only
use products approved by our Technical
Department which ensure:
– antifreeze protection;
– anticorrosion protection of the cool- ing system.
Replacement intervals
Refer to the Maintenance Document for
your vehicle.
Consult your approved dealer at
once if you notice an abnormal or
repeated drop in any of the fluid
levels.
2
2