Body RENAULT KANGOO 2017 X61 / 2.G Owners Manual
[x] Cancel search | Manufacturer: RENAULT, Model Year: 2017, Model line: KANGOO, Model: RENAULT KANGOO 2017 X61 / 2.GPages: 260, PDF Size: 5.68 MB
Page 27 of 260
1.21
FRONT SEATS (3/3)
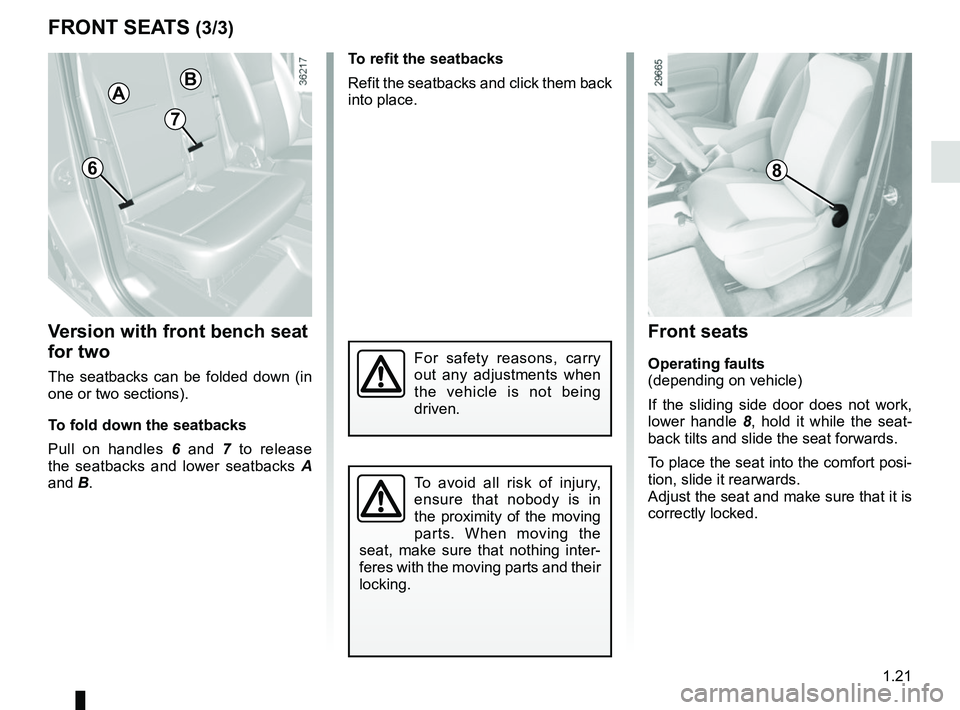
Version with front bench seat
for two
The seatbacks can be folded down (in
one or two sections).
To fold down the seatbacks
Pull on handles 6 and 7 to release
the seatbacks and lower seatbacks A
and B.
To refit the seatbacks
Refit the seatbacks and click them back
into place.
For safety reasons, carry
out any adjustments when
the vehicle is not being
driven.
To avoid all risk of injury,
ensure that nobody is in
the proximity of the moving
parts. When moving the
seat, make sure that nothing inter-
feres with the moving parts and their
locking.
8
Front seats
Operating faults
(depending on vehicle)
If the sliding side door does not work,
lower handle 8, hold it while the seat-
back tilts and slide the seat forwards.
To place the seat into the comfort posi-
tion, slide it rearwards.
Adjust the seat and make sure that it is
correctly locked.
AB
6
7
Page 31 of 260
1.25
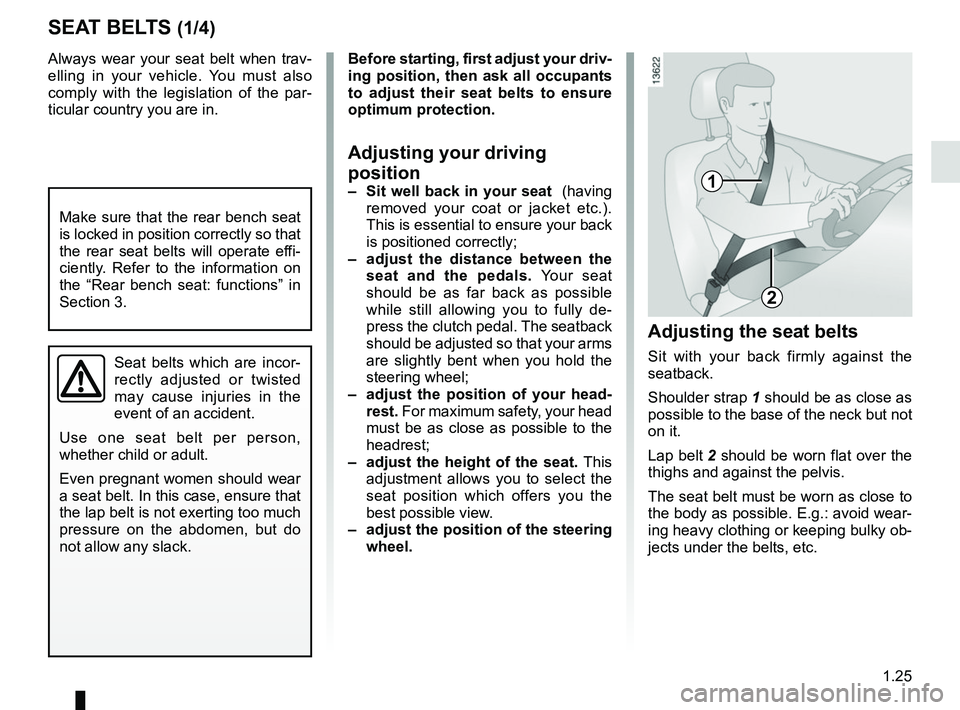
SEAT BELTS (1/4)Adjusting the seat belts
Sit with your back firmly against the
seatback.
Shoulder strap 1 should be as close as
possible to the base of the neck but not
on it.
Lap belt 2 should be worn flat over the
thighs and against the pelvis.
The seat belt must be worn as close to
the body as possible. E.g.: avoid wear-
ing heavy clothing or keeping bulky ob-
jects under the belts, etc.
1
2
Always wear your seat belt when trav-
elling in your vehicle. You must also
comply with the legislation of the par-
ticular country you are in.
Seat belts which are incor-
rectly adjusted or twisted
may cause injuries in the
event of an accident.
Use one seat belt per person,
whether child or adult.
Even pregnant women should wear
a seat belt. In this case, ensure that
the lap belt is not exerting too much
pressure on the abdomen, but do
not allow any slack.
Before starting, first adjust your driv-
ing position, then ask all occupants
to adjust their seat belts to ensure
optimum protection.
Adjusting your driving
position
– Sit well back in your seat (having
removed your coat or jacket etc.).
This is essential to ensure your back
is positioned correctly;
– adjust the distance between the seat and the pedals. Your seat
should be as far back as possible
while still allowing you to fully de-
press the clutch pedal. The seatback
should be adjusted so that your arms
are slightly bent when you hold the
steering wheel;
– adjust the position of your head- rest. For maximum safety, your head
must be as close as possible to the
headrest;
– adjust the height of the seat. This
adjustment allows you to select the
seat position which offers you the
best possible view.
– adjust the position of the steering
wheel.
Make sure that the rear bench seat
is locked in position correctly so that
the rear seat belts will operate effi-
ciently. Refer to the information on
the “Rear bench seat: functions” in
Section 3.
Page 35 of 260
1.29
METHODS OF RESTRAINT IN ADDITION TO THE FRONT SEAT BELTS (1/3)
12
Depending on the vehicle, they are
composed of:
– seat belt pretensioners;
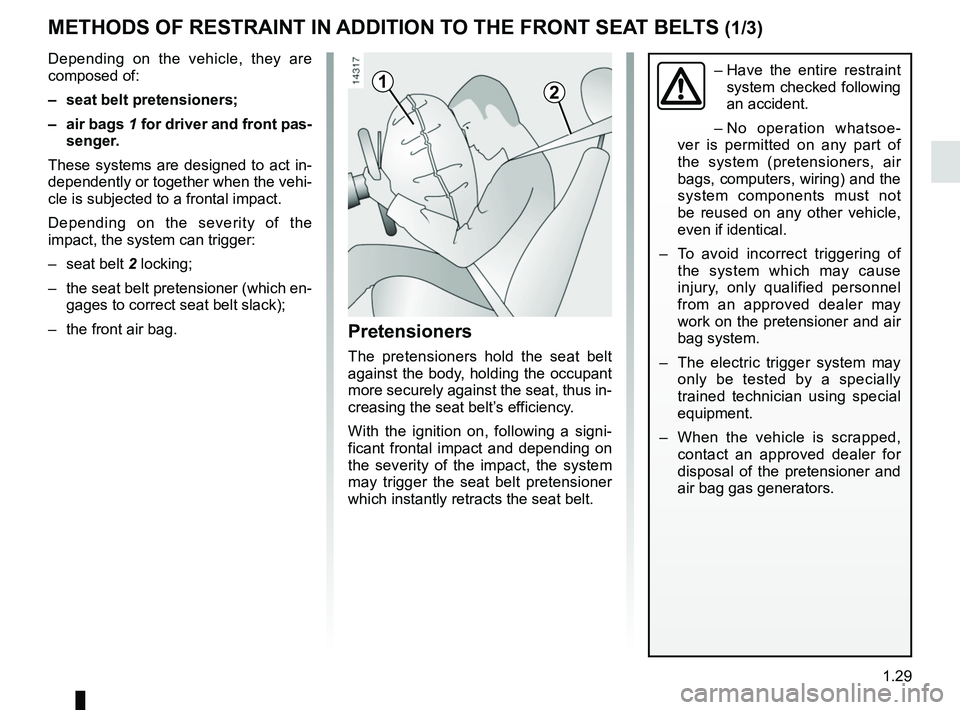
– air bags 1 for driver and front pas-
senger.
These systems are designed to act in-
dependently or together when the vehi-
cle is subjected to a frontal impact.
Depending on the severity of the
impact, the system can trigger:
– seat belt 2 locking;
– the seat belt pretensioner (which en- gages to correct seat belt slack);
– the front air bag.
Pretensioners
The pretensioners hold the seat belt
against the body, holding the occupant
more securely against the seat, thus in-
creasing the seat belt’s efficiency.
With the ignition on, following a signi-
ficant frontal impact and depending on
the severity of the impact, the system
may trigger the seat belt pretensioner
which instantly retracts the seat belt.
– Have the entire restraint
system checked following
an accident.
– No operation whatsoe-
ver is permitted on any part of
the system (pretensioners, air
bags, computers, wiring) and the
system components must not
be reused on any other vehicle,
even if identical.
– To avoid incorrect triggering of the system which may cause
injury, only qualified personnel
from an approved dealer may
work on the pretensioner and air
bag system.
– The electric trigger system may only be tested by a specially
trained technician using special
equipment.
– When the vehicle is scrapped, contact an approved dealer for
disposal of the pretensioner and
air bag gas generators.
Page 36 of 260
1.30
METHODS OF RESTRAINT IN ADDITION TO THE FRONT SEAT BELTS (2/3)
Air bags for driver and front
passenger
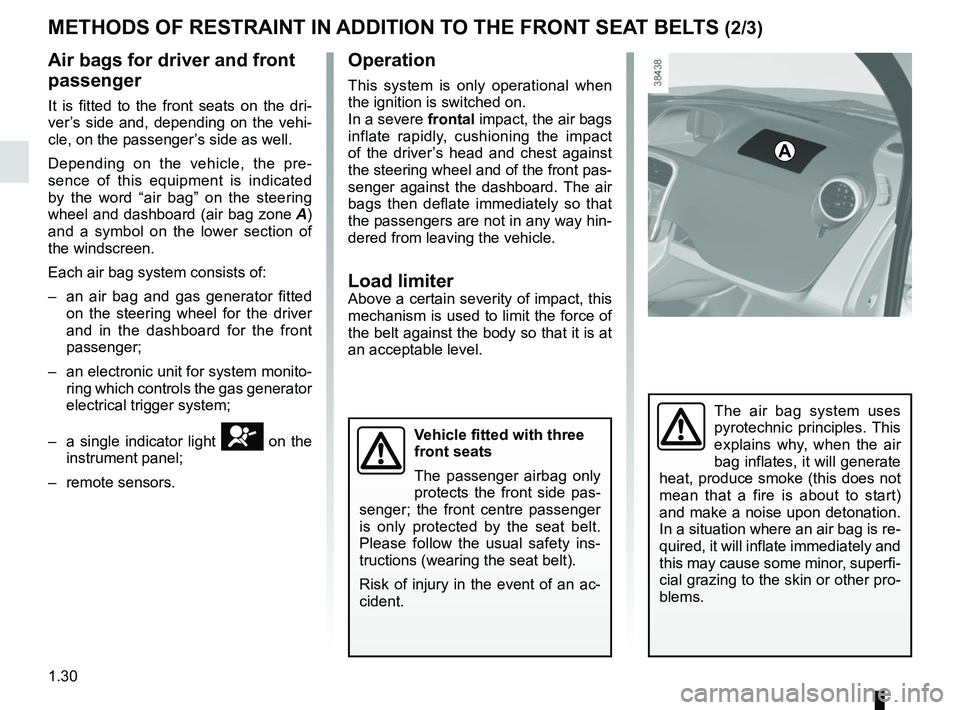
It is fitted to the front seats on the dri-
ver’s side and, depending on the vehi-
cle, on the passenger’s side as well.
Depending on the vehicle, the pre-
sence of this equipment is indicated
by the word “air bag” on the steering
wheel and dashboard (air bag zone A)
and a symbol on the lower section of
the windscreen.
Each air bag system consists of:
– an air bag and gas generator fitted on the steering wheel for the driver
and in the dashboard for the front
passenger;
– an electronic unit for system monito- ring which controls the gas generator
electrical trigger system;
– a single indicator light
å on the
instrument panel;
– remote sensors.
A
Operation
This system is only operational when
the ignition is switched on.
In a severe frontal impact, the air bags inflate rapidly, cushioning the impact
of the driver’s head and chest against
the steering wheel and of the front pas-
senger against the dashboard. The air
bags then deflate immediately so that
the passengers are not in any way hin-
dered from leaving the vehicle.
Load limiterAbove a certain severity of impact, this
mechanism is used to limit the force of
the belt against the body so that it is at
an acceptable level.
The air bag system uses
pyrotechnic principles. This
explains why, when the air
bag inflates, it will generate
heat, produce smoke (this does not
mean that a fire is about to start)
and make a noise upon detonation.
In a situation where an air bag is re-
quired, it will inflate immediately and
this may cause some minor, superfi-
cial grazing to the skin or other pro-
blems.
Vehicle fitted with three
front seats
The passenger airbag only
protects the front side pas-
senger; the front centre passenger
is only protected by the seat belt.
Please follow the usual safety ins-
tructions (wearing the seat belt).
Risk of injury in the event of an ac-
cident.
Page 37 of 260
1.31
METHODS OF RESTRAINT IN ADDITION TO THE FRONT SEAT BELTS (3/3)
Warnings concerning the driver’s air bag
– Do not modify the steering wheel or the steering wheel boss.
– Do not cover the steering wheel boss under any circumstances.
– Do not attach any objects (badge, logo, clock, telephone cradle, etc.)\
to the steering wheel boss.
– The steering wheel must not be removed (except by qualified personnel f\
rom our Network).
– Do not sit too close to the steering wheel when driving: sit with your a\
rms slightly bent (see Section 1 “Adjusting your driv ing
position”). This will allow sufficient space for the air bag to deploy correctly and be fully effective.
Warnings concerning the passenger air bag
– Do not attach or glue any objects (badge, logo, clock, telephone cradle\
, etc.) to the dashboard in the air bag zone.
– Do not place anything between the dashboard and the passenger (animal, \
umbrella, walking stick, parcels, etc.).
– The passenger must not put his or her feet on the dashboard or seat as t\
here is a risk that serious injuries may occur. As a general rule, keep all body parts (knees, hands, head, etc.) away from\
the dashboard.
– The devices in addition to the front passenger seat belt should be react\
ivated as soon as a child seat is removed, to ensure the protection of the passenger in the event of an impact.
A REAR-FACING CHILD SEAT MUST NOT BE FITTED TO THE FRONT PASSENGER SEAT UNLESS THE ADDITIONAL RESTRAINT SYSTEMS, I.E. THE PASSENGER AIR BAG, ARE DEACTIVATED.
(Refer to the information on “Child safety: deactivating/activating \
the front passenger air bag” in Section 1).
All of the warnings below are given so that the air bag is not obstructe\
d in any way when it is inflated and also to prevent
the risk of serious injuries caused by items which may be dislodged when\
the air bag inflates.
Page 156 of 260
3.20
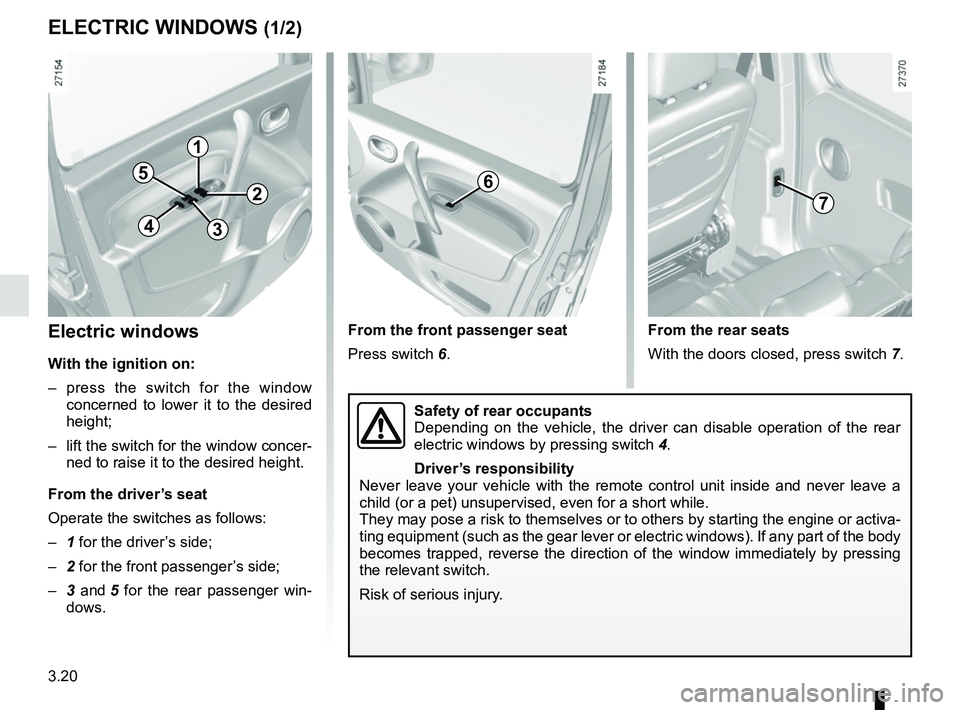
Electric windows
With the ignition on:
– press the switch for the window concerned to lower it to the desired
height;
– lift the switch for the window concer- ned to raise it to the desired height.
From the driver’s seat
Operate the switches as follows:
– 1 for the driver’s side;
– 2 for the front passenger’s side;
– 3 and 5 for the rear passenger win-
dows.
ELECTRIC WINDOWS (1/2)
From the rear seats
With the doors closed, press switch 7.
From the front passenger seat
Press switch 6.
1
2
34
56
Safety of rear occupants
Depending on the vehicle, the driver can disable operation of the rear
electric windows by pressing switch
4.
Driver’s responsibility
Never leave your vehicle with the remote control unit inside and never l\
eave a
child (or a pet) unsupervised, even for a short while.
They may pose a risk to themselves or to others by starting the engine o\
r activa-
ting equipment (such as the gear lever or electric windows). If any pa\
rt of the body
becomes trapped, reverse the direction of the window immediately by pres\
sing
the relevant switch.
Risk of serious injury.
7
Page 175 of 260
4.1
Section 4: Maintenance
Bonnet . . . . . . . . . . . . . . . . . . . . . . . . . . . . . . . . . . . . \
. . . . . . . . . . . . . . . . . . . . . . . . . . . . . . . . . . . . 4.2
Engine oil level: . . . . . . . . . . . . . . . . . . . . . . . . . . . . . . . . . . . . \
. . . . . . . . . . . . . . . . . . . . . . . . . . . . . 4.4general information, use . . . . . . . . . . . . . . . . . . . . . . . . . . . . . . . . . . . . \
. . . . . . . . . . . . . . . . . 4.4
topping up, filling . . . . . . . . . . . . . . . . . . . . . . . . . . . . . . . . . . . .\
. . . . . . . . . . . . . . . . . . . . . . 4.6
Levels . . . . . . . . . . . . . . . . . . . . . . . . . . . . . . . . . . . .\
. . . . . . . . . . . . . . . . . . . . . . . . . . . . . . . . . . . . 4.8
Filters . . . . . . . . . . . . . . . . . . . . . . . . . . . . . . . . . . . . \
. . . . . . . . . . . . . . . . . . . . . . . . . . . . . . . . . . . . . 4.10
Battery . . . . . . . . . . . . . . . . . . . . . . . . . . . . . . . . . . . . \
. . . . . . . . . . . . . . . . . . . . . . . . . . . . . . . . . . . . 4.11
Tyre pressure. . . . . . . . . . . . . . . . . . . . . . . . . . . . . . . . . . . . \
. . . . . . . . . . . . . . . . . . . . . . . . . . . . . . . 4.13
Bodywork maintenance . . . . . . . . . . . . . . . . . . . . . . . . . . . . . . . . . . . . \
. . . . . . . . . . . . . . . . . . . . . . . 4.15
Interior trim maintenance . . . . . . . . . . . . . . . . . . . . . . . . . . . . . . . . . . . . \
. . . . . . . . . . . . . . . . . . . . . . 4.17
Page 189 of 260
4.15
BODYWORK MAINTENANCE (1/2)
You should
Wash your car frequently, with the
engine off, with cleaning products rec-
ommended by the manufacturer (never
use abrasive products). Rinse thor-
oughly beforehand with a jet:
– spots of tree resin and industrial
grime;
– mud in the wheel arches and under-
neath the body which forms damp
patches;
– bird droppings , which cause a
chemical reaction with the paint that
rapidly discolours paintwork and
may even cause the paint to peel
off;
wash the vehicle immediately to
remove these marks since it is im-
possible to remove them by polish-
ing;
– salt, particularly in the wheel arches
and underneath the body after driv-
ing in areas where the roads have
been gritted.
Remove any plant matter (resin, leaves,
etc.) from the vehicle regularly.
What you should not doDo not degrease or clean mechani-
cal components (e.g. the engine com-
partment), underneath the body, parts
with hinges (e.g. inside the doors) and
painted plastic external fittings (e.g.
bumpers) using high-pressure clean-
ing equipment or by spraying on prod-
ucts not approved by our Technical
Department. Doing this could give rise
to corrosion or operational faults.
Wash the vehicle in bright sunlight or
freezing temperatures.
Do not scrape off mud or dirt without
pre-wetting.
Allow dirt to accumulate on the exterior.
Allow rust to form following minor im-
pacts.
Do not use solvents not approved by
our Technical Department to remove
stains as this could damage the paint-
work.
Do not drive in snow or muddy condi-
tions without washing the vehicle, par-
ticularly under the wheel arches and
body.
A well-maintained vehicle will last
longer. It is therefore recommended to
maintain the exterior of the vehicle reg-
ularly.
Your vehicle has been treated with very
effective anti-corrosion products. It is
nevertheless subject to various outside
influences.
Corrosive agents in the atmosphere
–
atmospheric pollution (built-up and
industrial areas),
– saline atmospheres (near the sea,
particularly in hot weather),
– seasonal and damp weather condi-
tions (e.g. road salt in winter, water
from road cleaners, etc.).
Minor impacts
Abrasive action
Dust and sand in the air, mud, road grit
thrown up by other vehicles, etc.
You should take a number of minor pre-
cautions in order to safeguard your ve-
hicle against such risks.
Page 190 of 260
4.16
Respect local regulations about wash-
ing vehicles (e.g. do not wash your ve-
hicle on a public highway).
Observe the vehicle stopping distances
when driving on gravelled surfaces to
prevent paint damage.
Repair, or have repaired quickly, areas
where the paint has been damaged, to
prevent corrosion spreading.
Remember to visit the body shop pe-
riodically in order to maintain your
anti-corrosion warranty. Refer to the
Maintenance Document.
If it is necessary to clean mechani-
cal components, hinges, etc., spray
them with products approved by our
Technical Department to protect them
after they have been cleaned.
BODYWORK MAINTENANCE (2/2)
We have selected special products
to care for your vehicle and you can
obtain these from the manufactur-
er’s accessory outlets.
Using a roller type car wash
Return the windscreen wiper stalk to
the Park position (refer to the informa-
tion on the “Windscreen washer, wiper”
in Section 1). Check the mounting of
external accessories, additional lights
and mirrors, and ensure that the wiper
blades are secured with adhesive tape.
Remove the radio aerial mast if your
vehicle is fitted with this equipment.
Remember to remove the tape and refit
the antenna after washing.
Cleaning the headlights
As the headlights are made of plastic
“glass”, use a soft cloth or cotton wool
to clean them. If this does not clean
them properly, moisten the cloth with
soapy water, then wipe clean with a soft
damp cloth or cotton wool.
Finally, carefully dry off with a soft dry
cloth.
Cleaning products containing alco-
hol must not be used.
Vehicles with a matte paint
finish
This type of paint requires certain pre-
cautions.
Do not do the following
– use wax-based products (polishing);
– rub hard;
– wash the vehicle in a roller-type car
wash;
– wash the vehicle using a high-pres-
sure device;
– attach stickers to the paintwork (risk
of leaving marks).
You should do the following
Wash the vehicle by hand using plenty
of water, using a soft cloth or a gentle
sponge.
Page 196 of 260
5.4
TYRE INFLATION KIT (1/4)
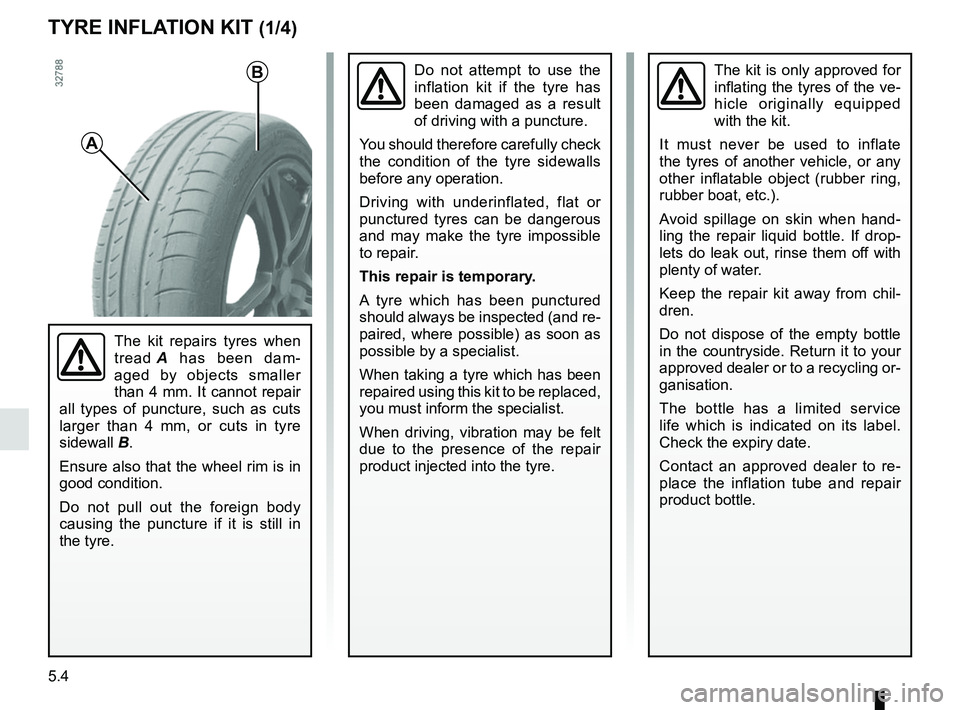
The kit repairs tyres when
tread A has been dam-
aged by objects smaller
than 4 mm. It cannot repair
all types of puncture, such as cuts
larger than 4 mm, or cuts in tyre
sidewall B.
Ensure also that the wheel rim is in
good condition.
Do not pull out the foreign body
causing the puncture if it is still in
the tyre.
Do not attempt to use the
inflation kit if the tyre has
been damaged as a result
of driving with a puncture.
You should therefore carefully check
the condition of the tyre sidewalls
before any operation.
Driving with underinflated, flat or
punctured tyres can be dangerous
and may make the tyre impossible
to repair.
This repair is temporary.
A tyre which has been punctured
should always be inspected (and re-
paired, where possible) as soon as
possible by a specialist.
When taking a tyre which has been
repaired using this kit to be replaced,
you must inform the specialist.
When driving, vibration may be felt
due to the presence of the repair
product injected into the tyre.The kit is only approved for
inflating the tyres of the ve-
hicle originally equipped
with the kit.
It must never be used to inflate
the tyres of another vehicle, or any
other inflatable object (rubber ring,
rubber boat, etc.).
Avoid spillage on skin when hand-
ling the repair liquid bottle. If drop-
lets do leak out, rinse them off with
plenty of water.
Keep the repair kit away from chil-
dren.
Do not dispose of the empty bottle
in the countryside. Return it to your
approved dealer or to a recycling or-
ganisation.
The bottle has a limited service
life which is indicated on its label.
Check the expiry date.
Contact an approved dealer to re-
place the inflation tube and repair
product bottle.
A
B