key RENAULT KANGOO 2018 User Guide
[x] Cancel search | Manufacturer: RENAULT, Model Year: 2018, Model line: KANGOO, Model: RENAULT KANGOO 2018Pages: 264, PDF Size: 7.09 MB
Page 19 of 264
1.13
CENTRAL DOOR LOCKING, UNLOCKING (2/2)
2
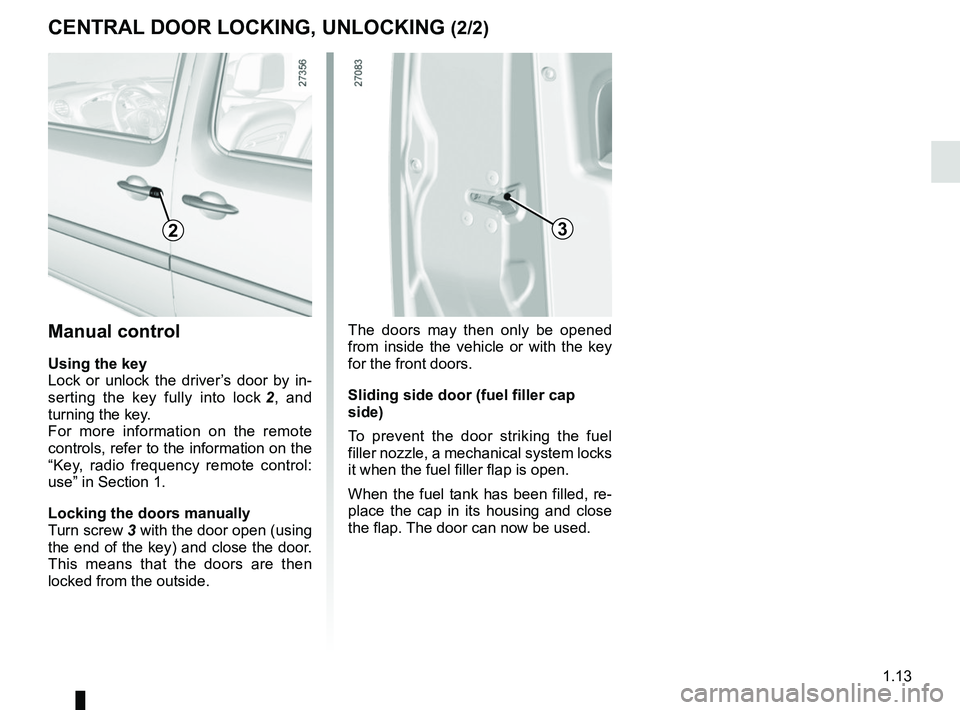
Manual control
Using the key
Lock or unlock the driver’s door by in-
serting the key fully into lock 2, and
turning the key.
For more information on the remote
controls, refer to the information on the
“Key, radio frequency remote control:
use” in Section 1.
Locking the doors manually
Turn screw 3 with the door open (using
the end of the key) and close the door.
This means that the doors are then
locked from the outside.
The doors may then only be opened
from inside the vehicle or with the key
for the front doors.
Sliding side door (fuel filler cap
side)
To prevent the door striking the fuel
filler nozzle, a mechanical system locks
it when the fuel filler flap is open.
When the fuel tank has been filled, re-
place the cap in its housing and close
the flap. The door can now be used.
3
Page 66 of 264
1.60
DISPLAYS AND INDICATORS (3/3)
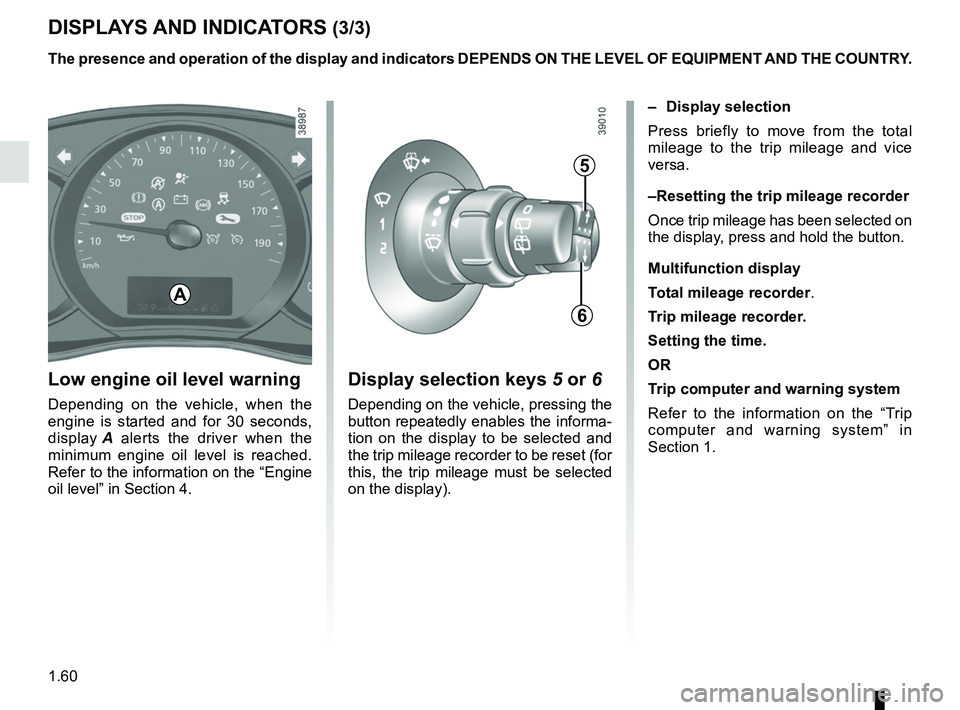
Low engine oil level warning
Depending on the vehicle, when the
engine is started and for 30 seconds,
display A alerts the driver when the
minimum engine oil level is reached.
Refer to the information on the “Engine
oil level” in Section 4.
Display selection keys 5 or 6
Depending on the vehicle, pressing the
button repeatedly enables the informa-
tion on the display to be selected and
the trip mileage recorder to be reset (for
this, the trip mileage must be selected
on the display). – Display selection
Press briefly to move from the total
mileage to the trip mileage and vice
versa.
– Resetting the trip mileage recorder
Once trip mileage has been selected on
the display, press and hold the button.
Multifunction display
Total mileage recorder.
Trip mileage recorder.
Setting the time.
OR
Trip computer and warning system
Refer to the information on the “Trip
computer and warning system” in
Section 1.
A
The presence and operation of the display and indicators DEPENDS ON THE \
LEVEL OF EQUIPMENT AND THE COUNTRY.
5
6
Page 67 of 264
1.61
TRIP COMPUTER: general information (1/2)
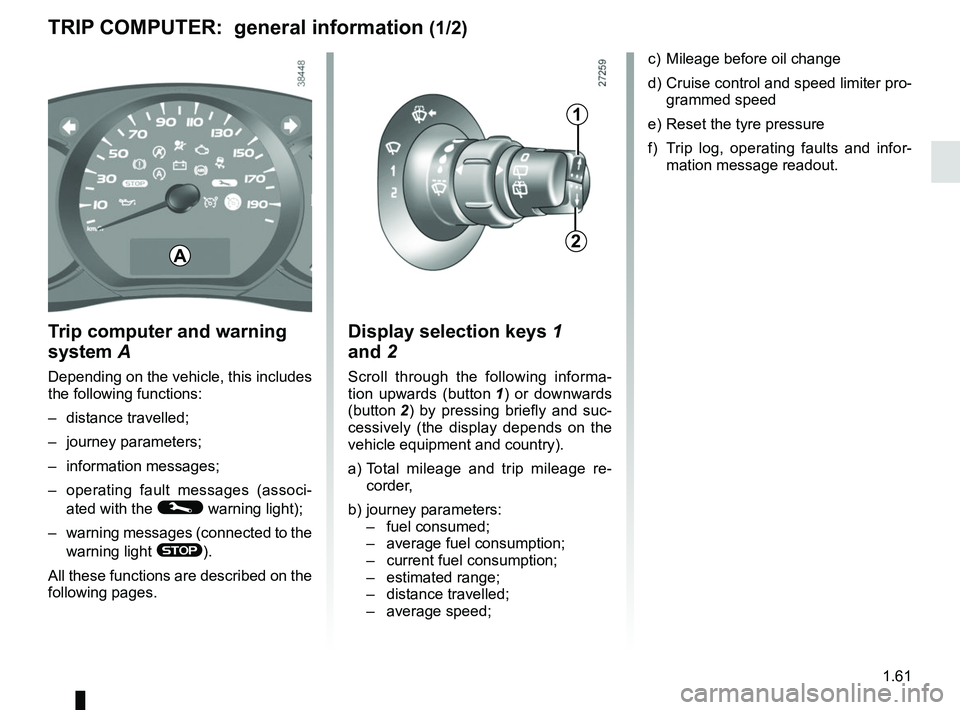
Trip computer and warning
system A
Depending on the vehicle, this includes
the following functions:
– distance travelled;
– journey parameters;
– information messages;
– operating fault messages (associ-
ated with the
© warning light);
– warning messages (connected to the warning light
®).
All these functions are described on the
following pages.
Display selection keys 1
and 2
Scroll through the following informa-
tion upwards (button 1) or downwards
(button 2 ) by pressing briefly and suc-
cessively (the display depends on the
vehicle equipment and country).
a) Total mileage and trip mileage re- corder,
b) journey parameters: – fuel consumed;
– average fuel consumption;
– current fuel consumption;
– estimated range;
– distance travelled;
– average speed; c) Mileage before oil change
d) Cruise control and speed limiter pro-
grammed speed
e) Reset the tyre pressure
f) Trip log, operating faults and infor- mation message readout.
A
1
2
Page 68 of 264
1.62
TRIP COMPUTER: general information (2/2)
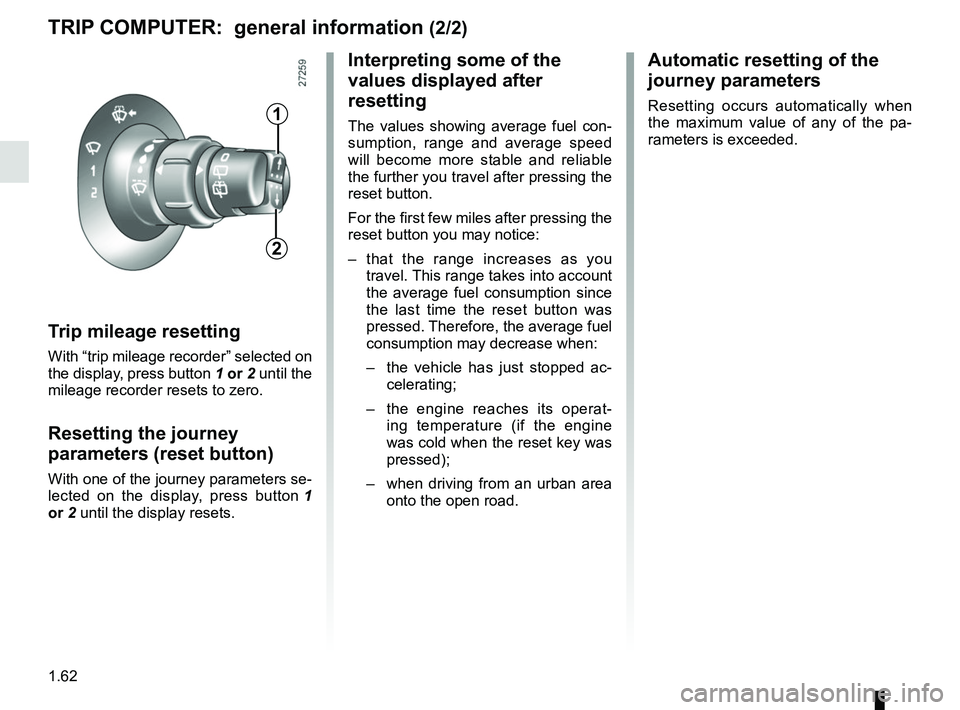
Trip mileage resetting
With “trip mileage recorder” selected on
the display, press button 1 or 2 until the
mileage recorder resets to zero.
Resetting the journey
parameters (reset button)
With one of the journey parameters se-
lected on the display, press button 1
or 2 until the display resets.
Interpreting some of the
values displayed after
resetting
The values showing average fuel con-
sumption, range and average speed
will become more stable and reliable
the further you travel after pressing the
reset button.
For the first few miles after pressing the
reset button you may notice:
– that the range increases as you travel. This range takes into account
the average fuel consumption since
the last time the reset button was
pressed. Therefore, the average fuel
consumption may decrease when:
– the vehicle has just stopped ac-
celerating;
– the engine reaches its operat-
ing temperature (if the engine
was cold when the reset key was
pressed);
– when driving from an urban area
onto the open road.
Automatic resetting of the
journey parameters
Resetting occurs automatically when
the maximum value of any of the pa-
rameters is exceeded.1
2
Page 74 of 264

1.68
These appear with the © warning light and mean that you should drive very carefully to an approv\
ed Dealer as
soon as possible. If you fail to follow this recommendation, you risk da\
maging your vehicle.
They disappear when the display selection key is pressed or after severa\
l seconds and are stored in the computer log. The
© warning light stays on. Examples of operating fault messages are given \
on the following pages .
Examples of messages Interpretation of messages « CHECK ESC » Indicates a fault in the Electronic Stability Program and the traction c\
ontrol system
(see “Driver correction devices and aids” in Section 2).
« CHECK FUEL FILTER » Indicates that there is water present in the diesel fuel.
Contact an approved Dealer as soon as possible.
« CHECK GEARBOX » Indicates that a fault has occurred in the gearbox; contact an approved \
Dealer as
soon as possible.
« CHECK AUTO LIGHTS » Indicates an automatic lighting operating fault; contact an approved Dea\
ler.
« CHECK STEERING » Indicates a power-assisted steering system operating fault.
TRIP COMPUTER AND WARNING SYSTEM: operating fault messages
Page 89 of 264
1.83
FUEL TANK (1/3)
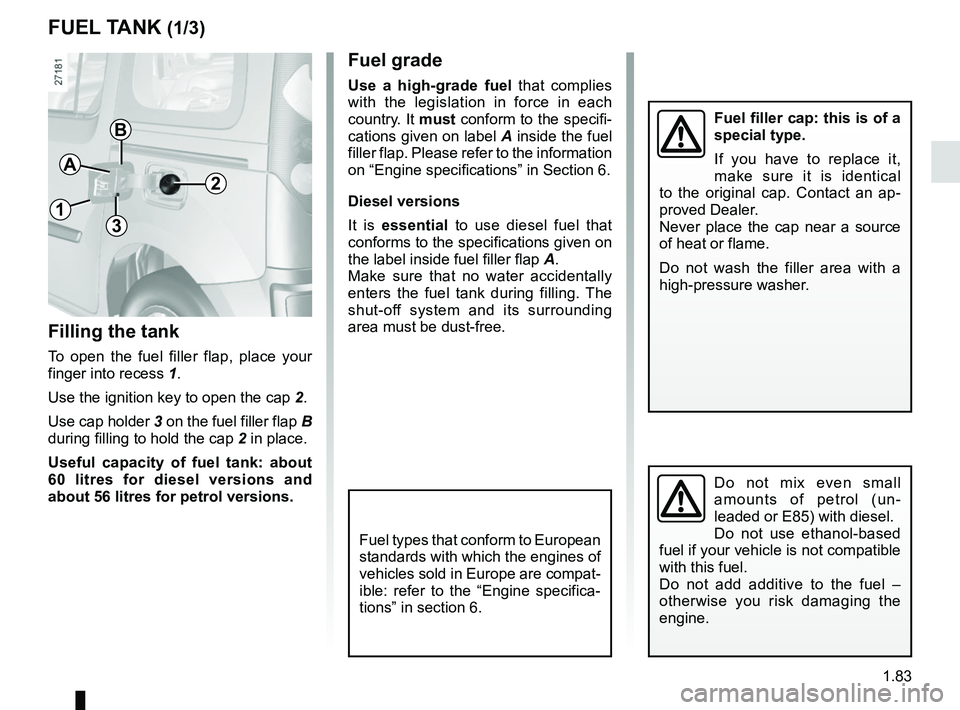
A
Fuel filler cap: this is of a
special type.
If you have to replace it,
make sure it is identical
to the original cap. Contact an ap-
proved Dealer.
Never place the cap near a source
of heat or flame.
Do not wash the filler area with a
high-pressure washer.
Filling the tank
To open the fuel filler flap, place your
finger into recess 1.
Use the ignition key to open the cap 2.
Use cap holder 3 on the fuel filler flap B
during filling to hold the cap 2 in place.
Useful capacity of fuel tank: about
60 litres for diesel versions and
about 56 litres for petrol versions.
1
2
3
B
Do not mix even small
amounts of petrol (un-
leaded or E85) with diesel.
Do not use ethanol-based
fuel if your vehicle is not compatible
with this fuel.
Do not add additive to the fuel –
otherwise you risk damaging the
engine.
Fuel grade
Use a high-grade fuel that complies
with the legislation in force in each
country. It must conform to the specifi-
cations given on label A inside the fuel
filler flap. Please refer to the information
on “Engine specifications” in Section 6.
Diesel versions
It is essential to use diesel fuel that
conforms to the specifications given on
the label inside fuel filler flap A.
Make sure that no water accidentally
enters the fuel tank during filling. The
shut-off system and its surrounding
area must be dust-free.
Fuel types that conform to European
standards with which the engines of
vehicles sold in Europe are compat-
ible: refer to the “Engine specifica-
tions” in section 6.
Page 91 of 264

1.85
Repriming the fuel circuit
After a breakdown caused by com-
pletely running out of fuel, the system
must be reprimed before the engine is
restarted:
The engine may be hot
when carrying out opera-
tions in close proximity. In
addition, the engine cooling
fan can come on at any moment.
Risk of injury .
The peripheral components (alter-
nator, starter, engine mountings,
etc.) should be protected against
splashes of fuel.
Vehicles with a manual priming bulb
– If fitted to the vehicle, turn the bleed
screw located on the diesel filter;
– activate the priming bulb 1 until it
hardens and fuel runs in the pipes.
1
FUEL TANK (3/3)
Vehicles without a manual priming
bulb
– Put the ignition key in “On” posi- tion M (please see the information
on the “Ignition switch” in Section
2) and wait for a few minutes before
starting, to enable the fuel circuit to
be primed;
– turn the key to position D . If the
engine does not start, repeat the pro-
cedure.
Page 94 of 264
2.2
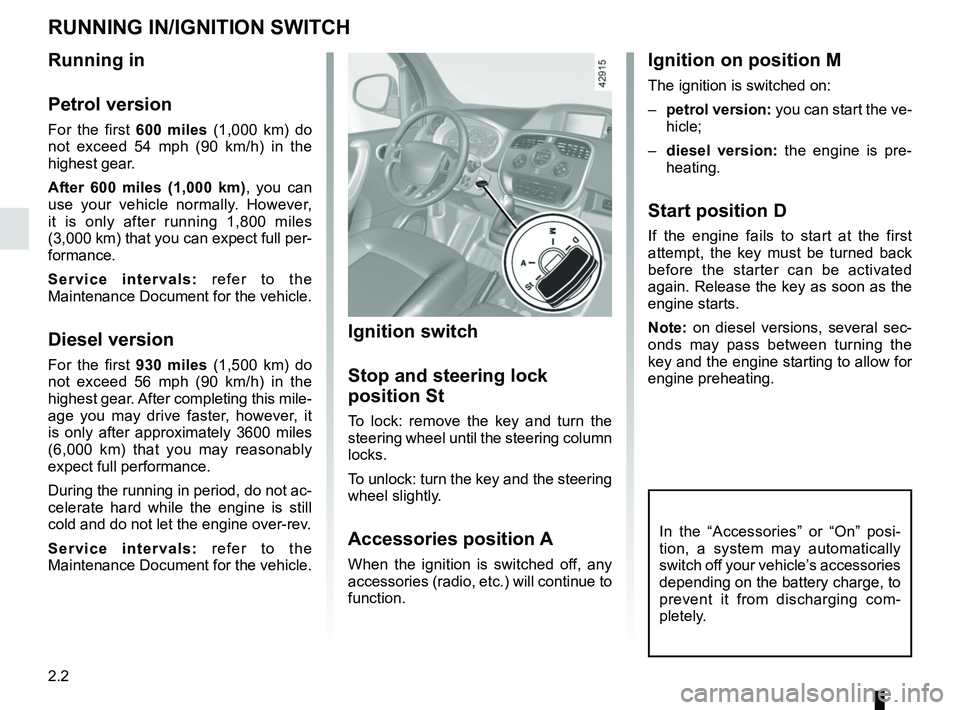
Ignition on position M
The ignition is switched on:
– petrol version: you can start the ve-
hicle;
– diesel version: the engine is pre-
heating.
Start position D
If the engine fails to start at the first
attempt, the key must be turned back
before the starter can be activated
again. Release the key as soon as the
engine starts.
Note: on diesel versions, several sec-
onds may pass between turning the
key and the engine starting to allow for
engine preheating.
Ignition switch
Stop and steering lock
position St
To lock: remove the key and turn the
steering wheel until the steering column
locks.
To unlock: turn the key and the steering
wheel slightly.
Accessories position A
When the ignition is switched off, any
accessories (radio, etc.) will continue to
function.
Running in
Petrol version
For the first 600 miles (1,000 km) do
not exceed 54 mph (90 km/h) in the
highest gear.
After 600 miles (1,000 km) , you can
use your vehicle normally. However,
it is only after running 1,800 miles
(3,000 km) that you can expect full per-
formance.
Service intervals: refer to the
Maintenance Document for the vehicle.
Diesel version
For the first 930 miles (1,500 km) do
not exceed 56 mph (90 km/h) in the
highest gear. After completing this mile-
age you may drive faster, however, it
is only after approximately 3600 miles
(6,000 km) that you may reasonably
expect full performance.
During the running in period, do not ac-
celerate hard while the engine is still
cold and do not let the engine over-rev.
Service intervals: refer to the
Maintenance Document for the vehicle.
RUNNING IN/IGNITION SWITCH
In the “Accessories” or “On” posi-
tion, a system may automatically
switch off your vehicle’s accessories
depending on the battery charge, to
prevent it from discharging com-
pletely.
Page 95 of 264

2.3
ÉDiesel versions
– Turn the ignition key to the
“Ignition on” position M, and hold
this position until the engine pre-
heating light goes off;
– turn the key to starter position D
without depressing the accel-
erator pedal;
– release the key as soon as the
engine starts.
Special note: if starting the engine
when the outdoor temperature is very
low (below - 10 ° C): hold down the
clutch pedal until the engine starts.
Starting the engine
Petrol versions
– Activate the starter without ac-
celerating;
– release the key as soon as the
engine starts.
Stopping the engine
With the engine idling, turn the key to
the “Stop” position St.
STARTING, STOPPING THE ENGINE
Never switch off the igni-
tion before the vehicle has
stopped completely. Once
the engine has stopped, the
brake servo, power-assisted steer-
ing, etc., and the passive safety de-
vices such as the airbags and pre-
tensioners will no longer operate.
Driver’s responsibility
when parking or stopping
the vehicle
Never leave an animal,
child or adult who is not self-suffi-
cient alone in your vehicle, even for
a short time.
They may pose a risk to themselves
or to others by starting the engine,
activating equipment such as the
electric windows or locking the
doors, for example.
Also, in hot and/or sunny weather,
please remember that the tempera-
ture inside the passenger compart-
ment increases very quickly.
RISK OF DEATH OR SERIOUS
INJURY.
Page 195 of 264

5.1
Section 5: Practical advice
Puncture . . . . . . . . . . . . . . . . . . . . . . . . . . . . . . . . . . . .\
. . . . . . . . . . . . . . . . . . . . . . . . . . . . . . . . . . 5.2
Emergency spare wheel . . . . . . . . . . . . . . . . . . . . . . . . . . . . . . . . . . . .\
. . . . . . . . . . . . . . . . . . . . . . 5.2
Tyre inflation kit . . . . . . . . . . . . . . . . . . . . . . . . . . . . . . . . . . . .\
. . . . . . . . . . . . . . . . . . . . . . . . . . . . . 5.4
Tools . . . . . . . . . . . . . . . . . . . . . . . . . . . . . . . . . . . .\
. . . . . . . . . . . . . . . . . . . . . . . . . . . . . . . . . . . . . 5.8
Wheels, trim . . . . . . . . . . . . . . . . . . . . . . . . . . . . . . . . . . . . \
. . . . . . . . . . . . . . . . . . . . . . . . . . . . . . . . 5.10
Changing a wheel . . . . . . . . . . . . . . . . . . . . . . . . . . . . . . . . . . . .\
. . . . . . . . . . . . . . . . . . . . . . . . . . . 5.11
Tyres . . . . . . . . . . . . . . . . . . . . . . . . . . . . . . . . . . . .\
. . . . . . . . . . . . . . . . . . . . . . . . . . . . . . . . . . . . . 5.13
Headlights: changing bulbs . . . . . . . . . . . . . . . . . . . . . . . . . . . . . . . . . . . . \
. . . . . . . . . . . . . . . . . . . . 5.16
Fog lights: changing bulbs . . . . . . . . . . . . . . . . . . . . . . . . . . . . . . . . . . . . \
. . . . . . . . . . . . . . . . . . . . . 5.18
Rear lights: changing bulbs . . . . . . . . . . . . . . . . . . . . . . . . . . . . . . . . . . . . \
. . . . . . . . . . . . . . . . . . . . 5.19
Indicator lights: changing bulbs . . . . . . . . . . . . . . . . . . . . . . . . . . . . . . . . . . . . \
. . . . . . . . . . . . . . . . . 5.22
Interior lighting: changing bulbs . . . . . . . . . . . . . . . . . . . . . . . . . . . . . . . . . . . . \
. . . . . . . . . . . . . . . . . 5.23
Battery: troubleshooting. . . . . . . . . . . . . . . . . . . . . . . . . . . . . . . . . . . . \
. . . . . . . . . . . . . . . . . . . . . . . 5.25
Fuses . . . . . . . . . . . . . . . . . . . . . . . . . . . . . . . . . . . . \
. . . . . . . . . . . . . . . . . . . . . . . . . . . . . . . . . . . . . 5.27
Wiper blades . . . . . . . . . . . . . . . . . . . . . . . . . . . . . . . . . . . .\
. . . . . . . . . . . . . . . . . . . . . . . . . . . . . . . 5.29
Towing: breakdown . . . . . . . . . . . . . . . . . . . . . . . . . . . . . . . . . . . .\
. . . . . . . . . . . . . . . . . . . . . . . . . . 5.31
Fitting a radio . . . . . . . . . . . . . . . . . . . . . . . . . . . . . . . . . . . . \
. . . . . . . . . . . . . . . . . . . . . . . . . . . . . . . 5.33
Accessories . . . . . . . . . . . . . . . . . . . . . . . . . . . . . . . . . . . . \
. . . . . . . . . . . . . . . . . . . . . . . . . . . . . . . . 5.35
Key, radio frequency remote control: battery . . . . . . . . . . . . . . . . . . . . . . . . . . . . . . . . . . . . \
. . . . . . . 5.36
Operating faults . . . . . . . . . . . . . . . . . . . . . . . . . . . . . . . . . . . . \
. . . . . . . . . . . . . . . . . . . . . . . . . . . . . 5.37