light RENAULT KANGOO 2018 User Guide
[x] Cancel search | Manufacturer: RENAULT, Model Year: 2018, Model line: KANGOO, Model: RENAULT KANGOO 2018Pages: 264, PDF Size: 7.09 MB
Page 31 of 264

1.25
SEAT BELTS (1/4)Adjusting the seat belts
Sit with your back firmly against the
seatback.
Shoulder strap 1 should be as close as
possible to the base of the neck but not
on it.
Lap belt 2 should be worn flat over the
thighs and against the pelvis.
The seat belt must be worn as close to
the body as possible. E.g.: avoid wear-
ing heavy clothing or keeping bulky ob-
jects under the belts, etc.
1
2
Always wear your seat belt when trav-
elling in your vehicle. You must also
comply with the legislation of the par-
ticular country you are in.
Seat belts which are incor-
rectly adjusted or twisted
may cause injuries in the
event of an accident.
Use one seat belt per person,
whether child or adult.
Even pregnant women should wear
a seat belt. In this case, ensure that
the lap belt is not exerting too much
pressure on the abdomen, but do
not allow any slack.
Before starting, first adjust your driv-
ing position, then ask all occupants
to adjust their seat belts to ensure
optimum protection.
Adjusting your driving
position
– Sit well back in your seat (having
removed your coat or jacket etc.).
This is essential to ensure your back
is positioned correctly;
– adjust the distance between the seat and the pedals. Your seat
should be as far back as possible
while still allowing you to fully de-
press the clutch pedal. The seatback
should be adjusted so that your arms
are slightly bent when you hold the
steering wheel;
– adjust the position of your head- rest. For maximum safety, your head
must be as close as possible to the
headrest;
– adjust the height of the seat. This
adjustment allows you to select the
seat position which offers you the
best possible view.
– adjust the position of the steering
wheel.
Make sure that the rear bench seat
is locked in position correctly so that
the rear seat belts will operate effi-
ciently. Refer to the information on
the “Rear bench seat: functions” in
Section 3.
Page 32 of 264
1.26
SEAT BELTS (2/4)
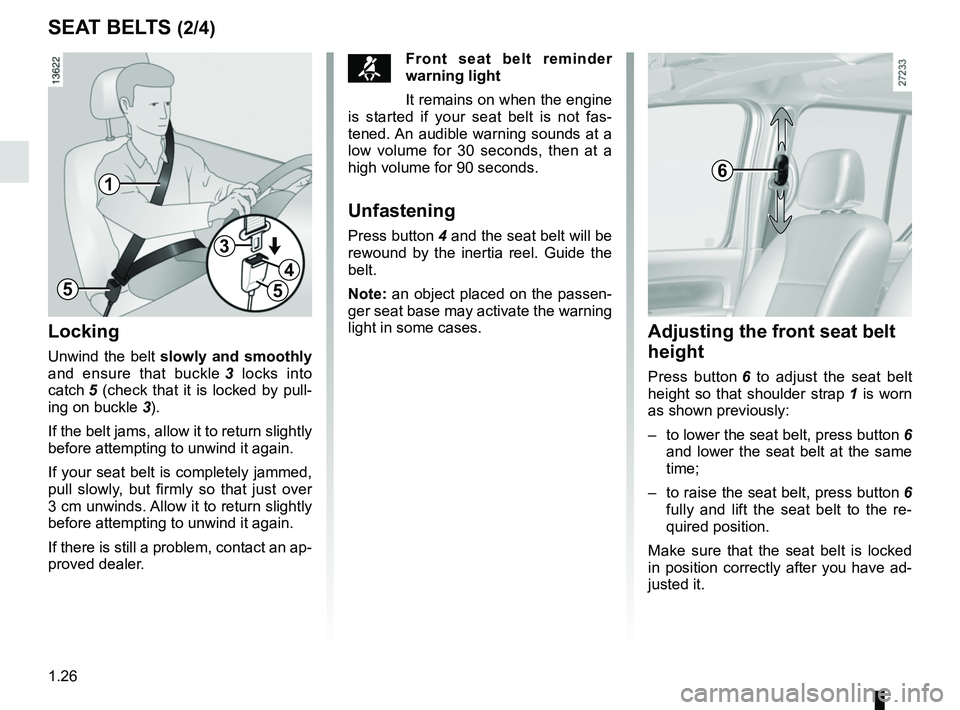
™Front seat belt reminder
warning light
It remains on when the engine
is started if your seat belt is not fas-
tened. An audible warning sounds at a
low volume for 30 seconds, then at a
high volume for 90 seconds.
Unfastening
Press button 4 and the seat belt will be
rewound by the inertia reel. Guide the
belt.
Note: an object placed on the passen-
ger seat base may activate the warning
light in some cases.
6
Adjusting the front seat belt
height
Press button 6 to adjust the seat belt
height so that shoulder strap 1 is worn
as shown previously:
– to lower the seat belt, press button 6 and lower the seat belt at the same
time;
– to raise the seat belt, press button 6
fully and lift the seat belt to the re-
quired position.
Make sure that the seat belt is locked
in position correctly after you have ad-
justed it.
Locking
Unwind the belt slowly and smoothly
and ensure that buckle 3 locks into
catch 5 (check that it is locked by pull- ing on buckle 3).
If the belt jams, allow it to return slightly
before attempting to unwind it again.
If your seat belt is completely jammed,
pull slowly, but firmly so that just over
3 cm unwinds. Allow it to return slightly
before attempting to unwind it again.
If there is still a problem, contact an ap-
proved dealer.
1
5
3
4
5
Page 36 of 264
1.30
METHODS OF RESTRAINT IN ADDITION TO THE FRONT SEAT BELTS (2/3)
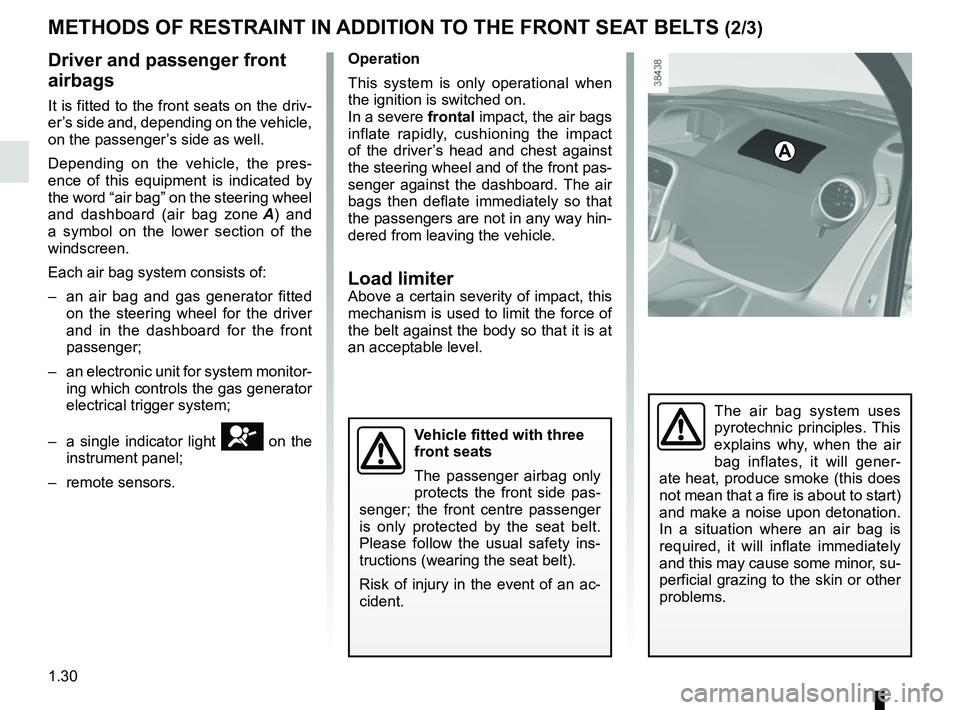
Driver and passenger front
airbags
It is fitted to the front seats on the driv-
er’s side and, depending on the vehicle,
on the passenger’s side as well.
Depending on the vehicle, the pres-
ence of this equipment is indicated by
the word “air bag” on the steering wheel
and dashboard (air bag zone A) and
a symbol on the lower section of the
windscreen.
Each air bag system consists of:
– an air bag and gas generator fitted on the steering wheel for the driver
and in the dashboard for the front
passenger;
– an electronic unit for system monitor- ing which controls the gas generator
electrical trigger system;
– a single indicator light
å on the
instrument panel;
– remote sensors.
A
Operation
This system is only operational when
the ignition is switched on.
In a severe frontal impact, the air bags inflate rapidly, cushioning the impact
of the driver’s head and chest against
the steering wheel and of the front pas-
senger against the dashboard. The air
bags then deflate immediately so that
the passengers are not in any way hin-
dered from leaving the vehicle.
Load limiterAbove a certain severity of impact, this
mechanism is used to limit the force of
the belt against the body so that it is at
an acceptable level.
The air bag system uses
pyrotechnic principles. This
explains why, when the air
bag inflates, it will gener-
ate heat, produce smoke (this does
not mean that a fire is about to start)
and make a noise upon detonation.
In a situation where an air bag is
required, it will inflate immediately
and this may cause some minor, su-
perficial grazing to the skin or other
problems.
Vehicle fitted with three
front seats
The passenger airbag only
protects the front side pas-
senger; the front centre passenger
is only protected by the seat belt.
Please follow the usual safety ins-
tructions (wearing the seat belt).
Risk of injury in the event of an ac-
cident.
Page 37 of 264
1.31
METHODS OF RESTRAINT IN ADDITION TO THE FRONT SEAT BELTS (3/3)
Warnings concerning the driver’s air bag
– Do not modify the steering wheel or the steering wheel boss.
– Do not cover the steering wheel boss under any circumstances.
– Do not attach any objects (badge, logo, clock, telephone cradle, etc.)\
to the steering wheel boss.
– The steering wheel must not be removed (except by qualified personnel f\
rom our Network).
– Do not sit too close to the steering wheel when driving: sit with your a\
rms slightly bent (see Section 1 “Adjusting your driv ing
position”). This will allow sufficient space for the air bag to deploy correctly and be fully effective.
Warnings concerning the passenger air bag
– Do not attach or glue any objects (badge, logo, clock, telephone cradle\
, etc.) to the dashboard in the air bag zone.
– Do not place anything between the dashboard and the passenger (animal, \
umbrella, walking stick, parcels, etc.).
– The passenger must not put his or her feet on the dashboard or seat as t\
here is a risk that serious injuries may occur. As a general rule, keep all body parts (knees, hands, head, etc.) away from\
the dashboard.
– The devices in addition to the front passenger seat belt should be react\
ivated as soon as a child seat is removed, to ensure the protection of the passenger in the event of an impact.
A REAR-FACING CHILD SEAT MUST NOT BE FITTED TO THE FRONT PASSENGER SEAT UNLESS THE ADDITIONAL RESTRAINT SYSTEMS, I.E. THE PASSENGER AIR BAG, ARE DEACTIVATED.
(Refer to the information on “Child safety: deactivating/activating \
the front passenger air bag” in Section 1).
All of the warnings below are given so that the air bag is not obstructe\
d in any way when it is inflated and also to prevent
the risk of serious injuries caused by items which may be dislodged when\
the air bag inflates.
Page 39 of 264
1.33
The air bag is designed to complement the action of the seat belt. Both \
the air bags and seat belts are integral parts of the same protection
system. It is therefore essential to wear seat belts at all times. If se\
at belts
are not worn, the occupants are exposed to the risk of serious injury in\
the event of an accident. It may also increase the risk of minor superfi\
cial injuries
occurring when the air bag is deployed, although such minor injuries are\
always
possible with air bags.
If the vehicle should overturn or suffer a rear impact, however severe, the pre-
tensioners and air bags are not always triggered. Impacts to the undersi\
de of the
vehicle, eg. from pavements, potholes or stones, can all trigger these s\
ystems.
– No work or modification whatsoever may be carried out on any part of the air
bag system (air bags, pretensioners, computer, wiring harness, etc.), except
by qualified personnel from an approved Dealer.
– To ensure that the system is in good working order and to avoid accidenta\
l trig- gering of the system which may cause injury, only qualified Network personnel
may work on the air bag system.
– As a safety precaution, have the air bag system checked if your vehicle \
has been involved in an accident, or is stolen or broken into.
– When selling or lending the vehicle, inform the user of these points and\
hand over this handbook with the vehicle.
– When scrapping your vehicle, contact your approved Dealer for disposal o\
f the gas generator(s).
ADDITIONAL METHODS OF RESTRAINT
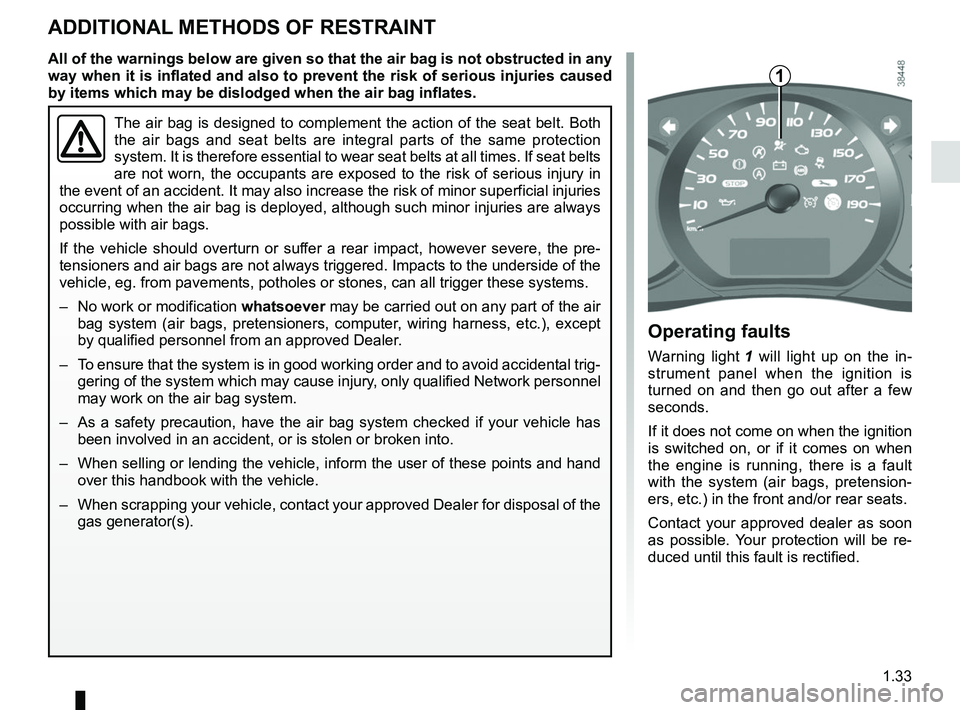
Operating faults
Warning light 1 will light up on the in-
strument panel when the ignition is
turned on and then go out after a few
seconds.
If it does not come on when the ignition
is switched on, or if it comes on when
the engine is running, there is a fault
with the system (air bags, pretension-
ers, etc.) in the front and/or rear seats.
Contact your approved dealer as soon
as possible. Your protection will be re-
duced until this fault is rectified.
1
All of the warnings below are given so that the air bag is not obstructed in any
way when it is inflated and also to prevent the risk of serious injuries caused
by items which may be dislodged when the air bag inflates.
Page 51 of 264

1.45
X = Seat not suitable for fitting child seats.
U = Seat which allows a child seat with “Universal” approval to be ins\
talled using a seat belt; check that it can be fitted.
IUF/IL = On equipped vehicles, seat which allows an approved “Universal/semi-u\
niversal” or “vehicle specific” child seat to be at-
tached using the ISOFIX system; check that it can be fitted.
(2) Only a rear-facing child seat can be fitted in this seat: raise the seat\
to the maximum and position it as far back as possible ,
tilting the seatback slightly (approximately 25°).
(3) A carrycot is fitted crosswise and occupies at least two seats (the chil\
d’s feet are placed nearest the door).
(4) Move the front seat as far forward as possible to install a rear-facing \
child seat, then move back the seat in front as far as it will
go, although without allowing it to come into contact with the child sea\
t.
(5) Forward-facing child seat; position the seatback of the child seat in co\
ntact with the seatback of the vehicle seat. Adjust the
headrest, or remove it if necessary. In addition, do not push the seat in front of the child further than h\
alfway along its runners,
or incline the seatback more than 25°.
CHILD SAFETY: fitting a child seat (7/7)
Page 52 of 264
1.46
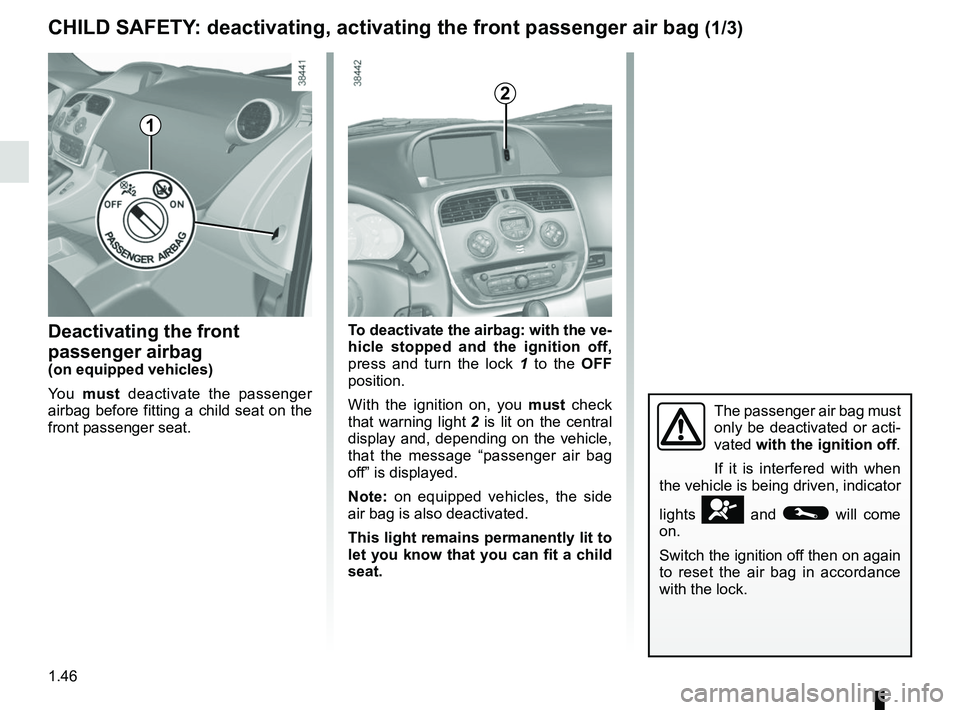
Deactivating the front
passenger airbag
(on equipped vehicles)
Yo u must deactivate the passenger
airbag before fitting a child seat on the
front passenger seat. To deactivate the airbag: with the ve-
hicle stopped and the ignition off,
press and turn the lock 1 to the OFF
position.
With the ignition on, you must check
that warning light 2 is lit on the central
display and, depending on the vehicle,
that the message “passenger air bag
off” is displayed.
Note: on equipped vehicles, the side
air bag is also deactivated.
This light remains permanently lit to
let you know that you can fit a child
seat.
CHILD SAFETY: deactivating, activating the front passenger air bag (1/3)
The passenger air bag must
only be deactivated or acti-
vated with the ignition off.
If it is interfered with when
the vehicle is being driven, indicator
lights
å and © will come
on.
Switch the ignition off then on again
to reset the air bag in accordance
with the lock.
1
2
Page 54 of 264
1.48
The passenger air bag must
only be deactivated or acti-
vated with the ignition off.
If it is interfered with when
the vehicle is being driven, indicator
lights
å and © will come
on.
Switch the ignition off then on again
to reset the air bag in accordance
with the lock.
Operating faults
If the front passenger airbag activation/
deactivation system is faulty, child seats
must not be fitted to the front seat.
Allowing any other passenger to sit in
that seat is not recommended.
Contact your approved Dealer as soon
as possible.
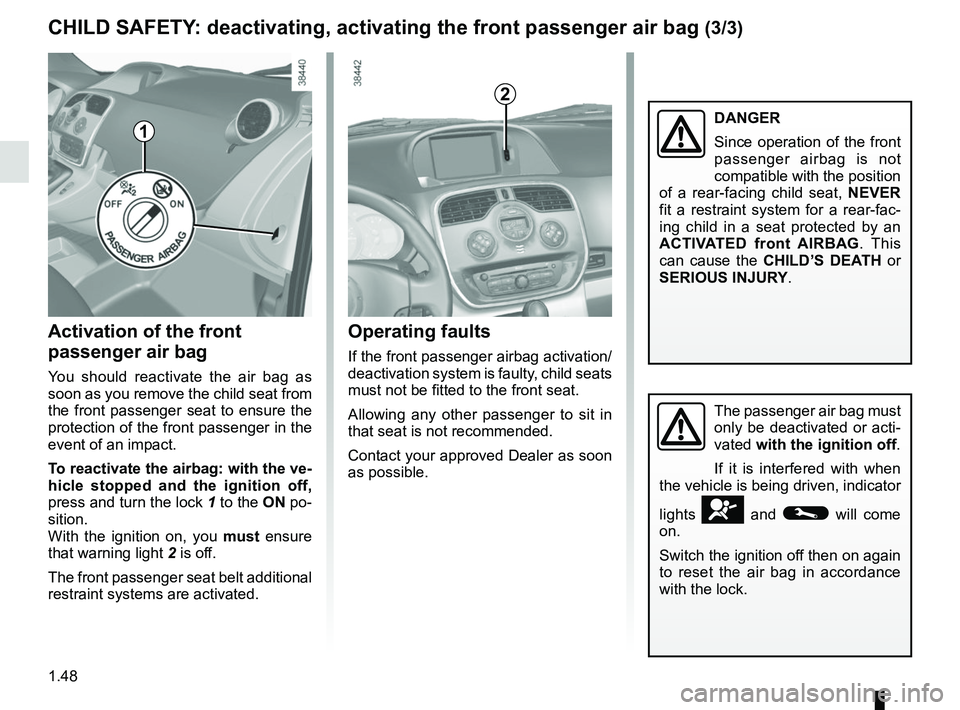
Activation of the front
passenger air bag
You should reactivate the air bag as
soon as you remove the child seat from
the front passenger seat to ensure the
protection of the front passenger in the
event of an impact.
To reactivate the airbag: with the ve-
hicle stopped and the ignition off,
press and turn the lock 1 to the ON po-
sition.
With the ignition on, you must ensure
that warning light 2 is off.
The front passenger seat belt additional
restraint systems are activated.
CHILD SAFETY: deactivating, activating the front passenger air bag (3/3)
1
2
DANGER
Since operation of the front
passenger airbag is not
compatible with the position
of a rear-facing child seat, NEVER
fit a restraint system for a rear-fac-
ing child in a seat protected by an
ACTIVATED front AIRBAG . This
can cause the CHILD’S DEATH or
SERIOUS INJURY.
Page 57 of 264
1.51
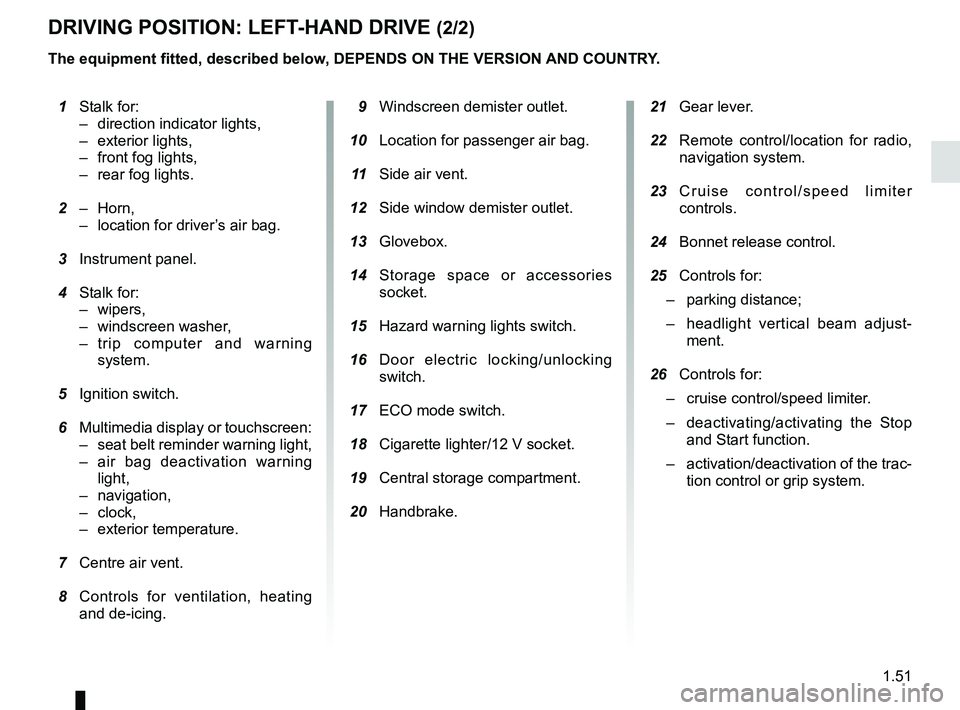
21 Gear lever.
22 Remote control/location for radio,
navigation system.
23 Cruise control/speed limiter
controls.
24 Bonnet release control.
25 Controls for:
– parking distance;
– headlight vertical beam adjust-
ment.
26 Controls for:
– cruise control/speed limiter.
– deactivating/activating the Stop
and Start function.
– activation/deactivation of the trac-
tion control or grip system.
1 Stalk for:
– direction indicator lights,
– exterior lights,
– front fog lights,
– rear fog lights.
2 – Horn,
– location for driver’s air bag.
3 Instrument panel.
4 Stalk for:
– wipers,
– windscreen washer,
– trip computer and warning system.
5 Ignition switch.
6 Multimedia display or touchscreen:
– seat belt reminder warning light,
– air bag deactivation warning light,
– navigation,
– clock,
– exterior temperature.
7 Centre air vent.
8 Controls for ventilation, heating
and de-icing. 9 Windscreen demister outlet.
10 Location for passenger air bag.
11 Side air vent.
12 Side window demister outlet.
13 Glovebox.
14 Storage space or accessories
socket.
15 Hazard warning lights switch.
16 Door electric locking/unlocking
switch.
17 ECO mode switch.
18 Cigarette lighter/12 V socket.
19 Central storage compartment.
20 Handbrake.
DRIVING POSITION: LEFT-HAND DRIVE (2/2)
The equipment fitted, described below, DEPENDS ON THE VERSION AND COUNTRY.
Page 59 of 264
1.53
DRIVING POSITION: RIGHT-HAND DRIVE (2/2)
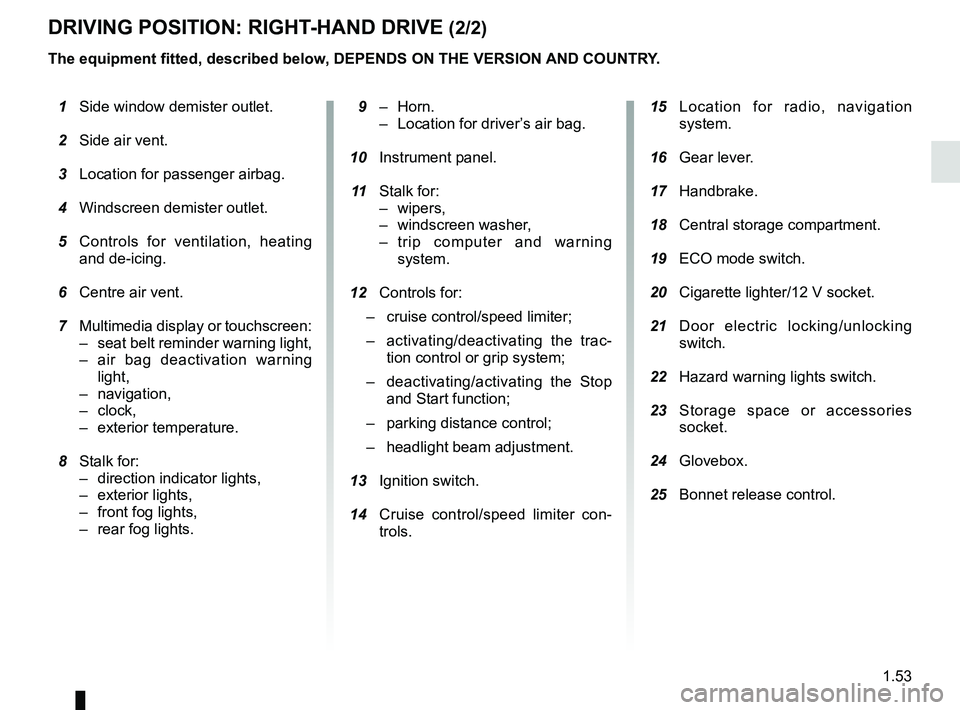
15 Location for radio, navigation
system.
16 Gear lever.
17 Handbrake.
18 Central storage compartment.
19 ECO mode switch.
20 Cigarette lighter/12 V socket.
21 Door electric locking/unlocking
switch.
22 Hazard warning lights switch.
23 Storage space or accessories
socket.
24 Glovebox.
25 Bonnet release control.
9 – Horn.
– Location for driver’s air bag.
10 Instrument panel.
11 Stalk for:
– wipers,
– windscreen washer,
– trip computer and warning system.
12 Controls for:
– cruise control/speed limiter;
– activating/deactivating the trac-
tion control or grip system;
– deactivating/activating the Stop
and Start function;
– parking distance control;
– headlight beam adjustment.
13 Ignition switch.
14 Cruise control/speed limiter con-
trols.
1 Side window demister outlet.
2 Side air vent.
3 Location for passenger airbag.
4 Windscreen demister outlet.
5 Controls for ventilation, heating
and de-icing.
6 Centre air vent.
7 Multimedia display or touchscreen:
– seat belt reminder warning light,
– air bag deactivation warning light,
– navigation,
– clock,
– exterior temperature.
8 Stalk for:
– direction indicator lights,
– exterior lights,
– front fog lights,
– rear fog lights.
The equipment fitted, described below, DEPENDS ON THE VERSION
AND COUNTRY.