display RENAULT KANGOO 2018 Owner's Manual
[x] Cancel search | Manufacturer: RENAULT, Model Year: 2018, Model line: KANGOO, Model: RENAULT KANGOO 2018Pages: 264, PDF Size: 7.09 MB
Page 104 of 264

2.12
DRIVING ADVICE, ECO-DRIVING (2/4)
ECO mode
ECO mode is a function which opti-
mises fuel consumption. It acts upon
certain power consuming systems in
the vehicle (heating, air conditioning,
power-assisted steering, etc.) and on
certain driving actions (acceleration,
gear changing, cruise control, deceler-
ation, etc.).
Activating the function
Press switch 4.
The warning light in the 4 switch lights
up.
4
While driving, it is possible to leave the
ECO mode temporarily in order to im-
prove engine performance.
To do this, press the accelerator pedal
firmly and fully.
ECO mode is reactivated when you
take pressure off the accelerator pedal.
Disabling the function
Press switch 4.
The indicator light in the switch 4 goes
out.
Journey record
Once the engine is switched off, you
will see “Journey record” displayed on
the screen 3, enabling you to view in-
formation relating to your last journey.
This indicates:
– average fuel consumption;
– number of miles/kilometres travelled;
– number of miles/kilometres saved.
3
Depending on the vehicle, the func-
tion is active every time the engine
is started. A label is attached to the
dashboard to notify you.
Page 111 of 264
2.19
SYSTEM A (cntd.)
Resetting the standard level for the
tyre pressures
This should be done:
– after each reinflation or readjustment of the pressure of one of the tyres;
– when the standard tyre pressure needs to be changed to adapt to
usage conditions (empty, carrying a
load, motorway driving, etc.);
– after changing a wheel;
– after using the tyre inflation kit;
– after swapping a wheel (however, this practice is not recommended).
It should always be done after checking
the tyre pressure of all four tyres when
cold.
Tyre pressures must correspond to the
current usage of the vehicle (empty,
carrying a load, motorway driving, etc.).
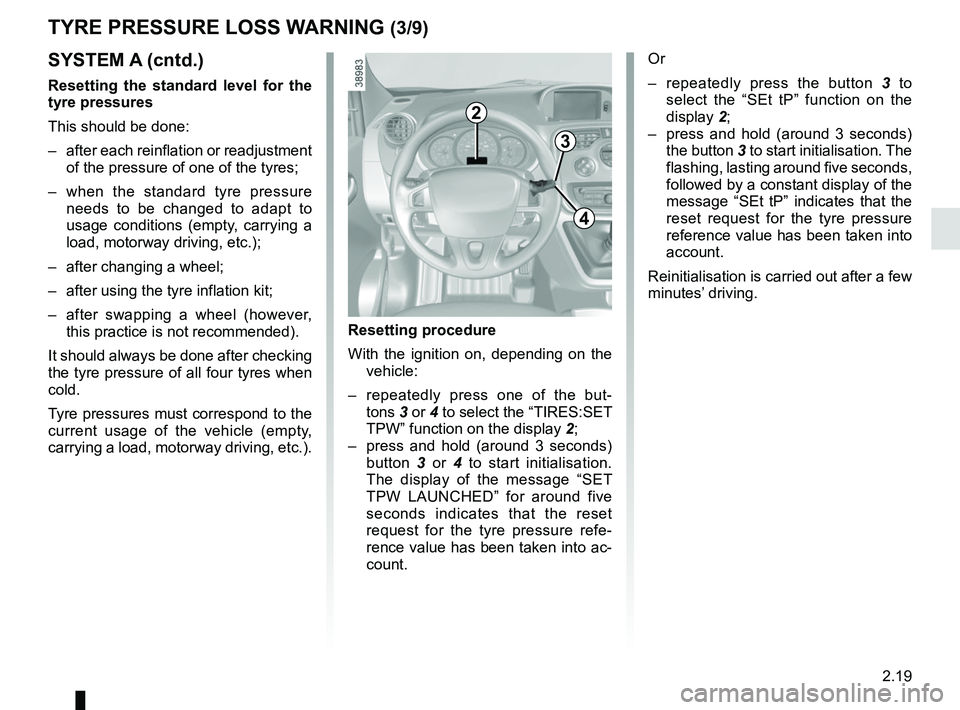
2
3
4
Resetting procedure
With the ignition on, depending on the vehicle:
– repeatedly press one of the but- tons 3 or 4 to select the “TIRES:SET
TPW” function on the display 2;
– press and hold (around 3 seconds) button 3 or 4 to start initialisation.
The display of the message “SET
TPW LAUNCHED” for around five
seconds indicates that the reset
request for the tyre pressure refe-
rence value has been taken into ac-
count. Or
– repeatedly press the button 3
to
select the “SEt tP” function on the
display 2;
– press and hold (around 3 seconds) the button 3 to start initialisation. The
flashing, lasting around five seconds,
followed by a constant display of the
message “SEt tP” indicates that the
reset request for the tyre pressure
reference value has been taken into
account.
Reinitialisation is carried out after a few
minutes’ driving.
TYRE PRESSURE LOSS WARNING (3/9)
Page 112 of 264
2.20
TYRE PRESSURE LOSS WARNING (4/9)
SYSTEM A (cntd.)
Display
The display 2 on the instrument panel
informs you of any tyre pressure faults
(flat tyre, punctured tyre, etc.).
INFLATE TIRES AND SET TPW
The warning light
stays on and,
depending on the vehicle, along with
the message “INFLATE TIRES AND
SET TPW”.
They indicate that at least one tyre is
flat or punctured.
In the event of a flat tyre, inflate the re-
levant tyre.
In the event of a puncture, change the
tyre or consult an authorised dealer.
Check and readjust the pressure of the
four tyres when cold, and launch the
reinitialisation of the tyre pressure refe-
rence value.
Warning light
goes out after
launching the reinitialisation of the tyre
pressure reference value.
The sudden loss of pressure in a
tyre (burst tyre, etc.) cannot be de-
tected by the system.
RECALIBRATE SET TPW
The warning light
flashes for se-
veral seconds, then stays on and, de-
pending on the vehicle, together with
the message “RECALIBRATE SET
TPW”.
They indicate that the request to reset
the reference value of the tyre pres-
sures must be restarted.
TPW UNAVAILABLE
The warning light
flashes for se-
veral seconds, then stays on and, de-
pending on the vehicle, together with
the message “TPW UNAVAILABLE”.
They indicate that the vehicle is equip-
ped with an emergency spare wheel
which is smaller than the other four and
that it is fitted to the vehicle. CHECK TPW
The warning light
flashes for se-
veral seconds, then stays on and, de-
pending on the vehicle, together with
the message “CHECK TPW”.
This message is accompanied by the
warning light
©.
They indicate a system fault. Please
consult an authorised dealer.
Page 115 of 264

2.23
TYRE PRESSURE LOSS WARNING (7/9)
2
3
4
The display of the message “TP ACQUISTION LAUNCHED” for
around five seconds indicates that
the reset request for the tyre pres-
sure reference value has been taken
into account.
Or
– repeatedly press the button 3 to
select the “SEt PP” function on the
display 2;
– press and hold (around 3 seconds) the button 3 to start initialisation. The
flashing, lasting around five seconds,
followed by a constant display of the
message “SEt PP” indicates that the
reset request for the tyre pressure
reference value has been taken into
account.
Reinitialisation is carried out after a few
minutes’ driving.
Note:
The standard tyre pressure cannot be
less than that recommended and indi-
cated on the door frame.
SYSTEM B (cntd.)
Resetting procedure
With the ignition on, depending on the vehicle:
– repeatedly press one of the buttons 3
or 4 to select the “TYRE PRESSURE
ACQUISITION” function on the dis-
play 2;
– press and hold (around 3 seconds) button 3 or 4 to start initialisation.
Page 116 of 264

2.24
TYRE PRESSURE LOSS WARNING (8/9)
TYRE PUNCTURE
The warning light
stays on to-
gether with a beep and, depending
on the vehicle, the message “TYRE
PUNCTURE”.
This message is accompanied by the
warning light
®.
They indicate that at least one wheel
is punctured or severely underinfla-
ted. Replace it or contact an authorised
dealer if it is punctured. Top up the tyre
pressure if the wheel is deflated.
Warning light ® re-
quires you to stop immedi-
ately, for your own safety,
as soon as traffic conditions
allow.
The sudden loss of pressure in a
tyre (burst tyre, etc.) cannot be de-
tected by the system.
CHECK TYRE SENSORS
The warning light
flashes for
several seconds, then stays on and,
depending on the vehicle, together
with the message “CHECK TYRE
SENSORS”.
This message is accompanied by the
warning light
©.
They indicate that at least one tyre is
not fitted with sensors (e.g. emergency
spare wheel). In other cases, contact
an authorised dealer.
SYSTEM B (cntd.)
Display
The display 2 on the instrument panel
informs you of any tyre pressure faults
(flat tyre, punctured tyre, etc.).
CHECK TYRE PRESSURES
The warning light
stays on
and, depending on the vehicle, along
with the message “CHECK TYRE
PRESSURES”.
These indicate that at least one tyre is
flat.
Check and, if necessary, readjust the
pressures of the four wheels when cold.
The warning light
goes off after a
few minutes’ driving.
Page 120 of 264

2.28
Disabling the traction control
system
(depending on vehicle)
In some situations (driving on very wet
ground: snow, mud, etc. or driving with
snow chains fitted), the system may
reduce the engine output to limit wheel-
spin. If this is not required, it is possible
to deactivate the function by pressing
switch 1.
The message “TRACTION CONTROL
OFF” is displayed on the instrument
panel to inform you.The traction control system offers ad-
ditional safety. It is recommended that
you do not drive with the function di-
sabled. Correct this as soon as pos-
sible by pressing the switch
1 again.
Note: The function is reactivated auto-
matically when the ignition is switched
on or when a speed of approximately
24 mph (40 km/h) is exceeded.
Emergency brake assist
This is an additional system to ABS
which helps reduce vehicle stopping
distances.
Operating principle
The system detects an emergency
braking situation. In this case, the brak-
ing assistance immediately develops
maximum power and may trigger ABS
regulation.
ABS braking is maintained as long as
the brake pedal is not released.
DRIVING CORRECTION DEVICES AND AIDS (3/5)
Hazard warning lights switching on
Depending on the vehicle, these may
light up in the event of sudden decel-
eration.
Operating faults
When the system detects an operating
fault the message “BRAKING FAULT”
appears on the instrument panel along
with the
© warning light.
Consult an approved dealer.
Braking anticipation
Depending on the vehicle, when you
rapidly release the accelerator, the
system anticipates the braking ma-
noeuvre in order to reduce stopping
distances.
Special cases
When using the cruise control:
– if you use the accelerator, when you release it, the system may be trig-
gered;
– if you do not use the accelerator, the system will not be triggered.1
Page 121 of 264
2.29
DRIVING CORRECTION DEVICES AND AIDS (4/5)
Grip control
If fitted on the vehicle, grip control
makes it easier to control the vehicle on
low grip surfaces (soft ground, etc.).
“Road” mode
Upon starting up the vehicle, the
“STANDARD HIGHWAY MODE” mes-
sage is displayed on the instrument
panel. Warning light
on the in-
strument panel is out.
This position enables optimal usage
under normal driving conditions (dry-
ness, humidity, light snow, etc.).
“Road” mode uses traction control func-
tions. “Soft ground” mode
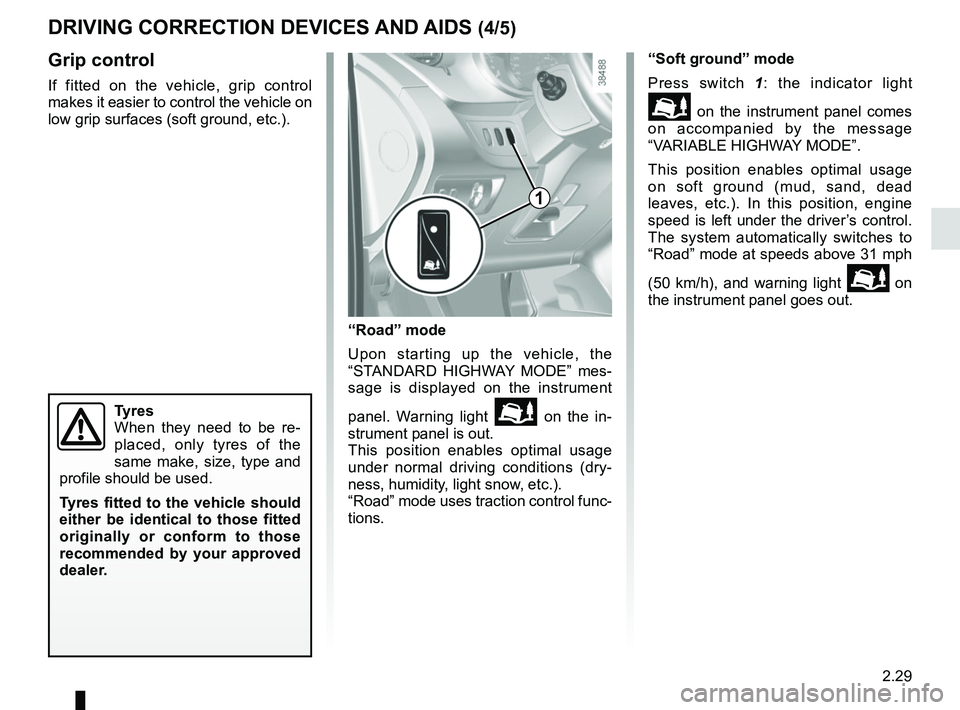
Press switch 1
: the indicator light
on the instrument panel comes
on accompanied by the message
“VARIABLE HIGHWAY MODE”.
This position enables optimal usage
on soft ground (mud, sand, dead
leaves, etc.). In this position, engine
speed is left under the driver’s control.
The system automatically switches to
“Road” mode at speeds above 31 mph
(50 km/h), and warning light
on
the instrument panel goes out.
Tyres
When they need to be re-
placed, only tyres of the
same make, size, type and
profile should be used.
Tyres fitted to the vehicle should
either be identical to those fitted
originally or conform to those
recommended by your approved
dealer.
1
Page 124 of 264
2.32
SPEED LIMITER (2/3)Exceeding the limit speed
It is possible to exceed the limit speed
at any moment. To do this: press the
accelerator pedal firmly and fully
(beyond the kickdown point).
Whilst the speed is being exceeded,
the cruising speed displayed on the in-
strument panel flashes.
Then, release the accelerator pedal:
the speed limiter function will return as
soon as you reach a speed lower than
the stored speed.
Limited speed cannot be maintained
When driving down a steep gradient,
the system is unable to maintain the
limit speed: the stored speed will flash
on the instrument panel information dis-
play to inform you of this situation.
The speed limiter function is
in no way linked to the brak-
ing system.
Driving
When a limited speed has been stored
and this speed is not reached, driving is
similar to driving a vehicle without the
speed limiter function.
Once you have reached the stored
speed, no effort on the accelera-
tor pedal will allow you to exceed
the programmed speed except in an
emergency (refer to information on
“Exceeding the limit speed”).
Varying the limit speed
The limit speed may be changed by re-
peatedly pressing:
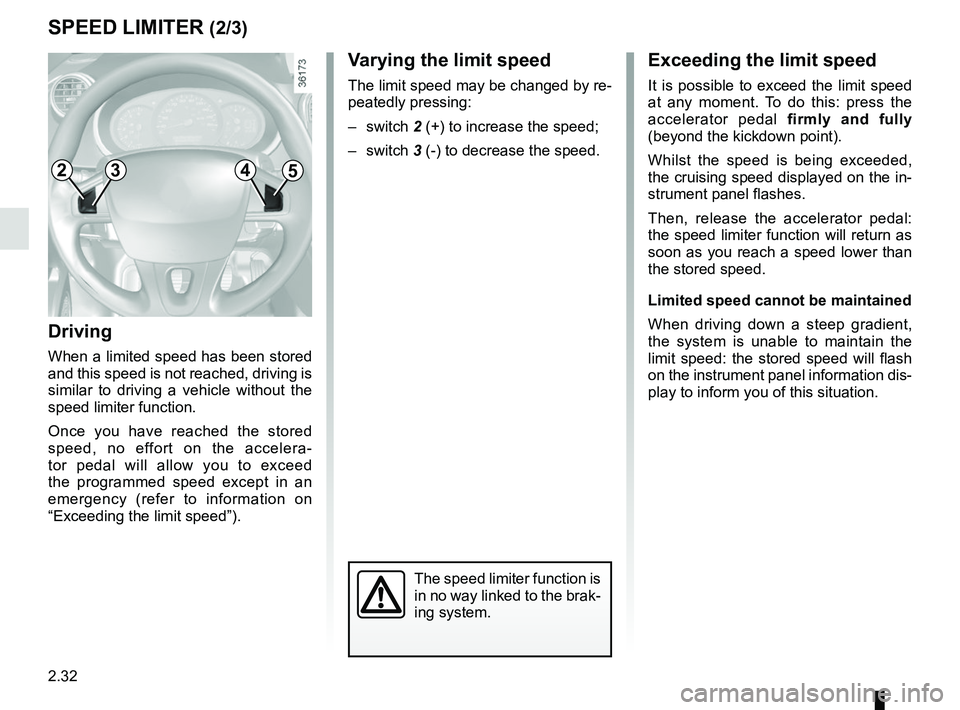
– switch 2 (+) to increase the speed;
– switch 3 (-) to decrease the speed.
2453
Page 128 of 264
2.36
CRUISE CONTROL (3/4)
Exceeding the cruising speed
The cruising speed may be exceeded
at any time by depressing the accelera-
tor pedal. While it is being exceeded,
the cruising speed flashes on the in-
strument panel.
Then, release the accelerator: after a
few seconds, the vehicle will automati-
cally return to its set cruising speed.
Cruising speed cannot be
maintained
When driving down a steep gradient,
the system is unable to maintain the
cruising speed: the stored speed will
flash on the instrument panel informa-
tion display to inform you of this situ-
ation.
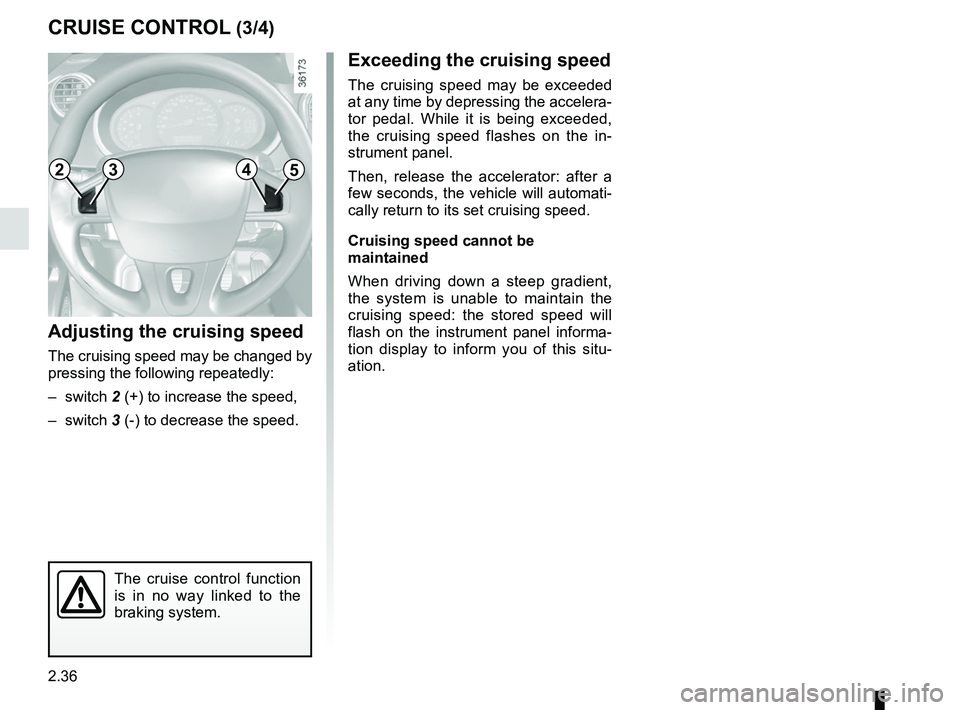
Adjusting the cruising speed
The cruising speed may be changed by
pressing the following repeatedly:
– switch 2 (+) to increase the speed,
– switch 3 (-) to decrease the speed.
The cruise control function
is in no way linked to the
braking system.
2453
Page 132 of 264
2.40
REVERSING CAMERA (1/2)
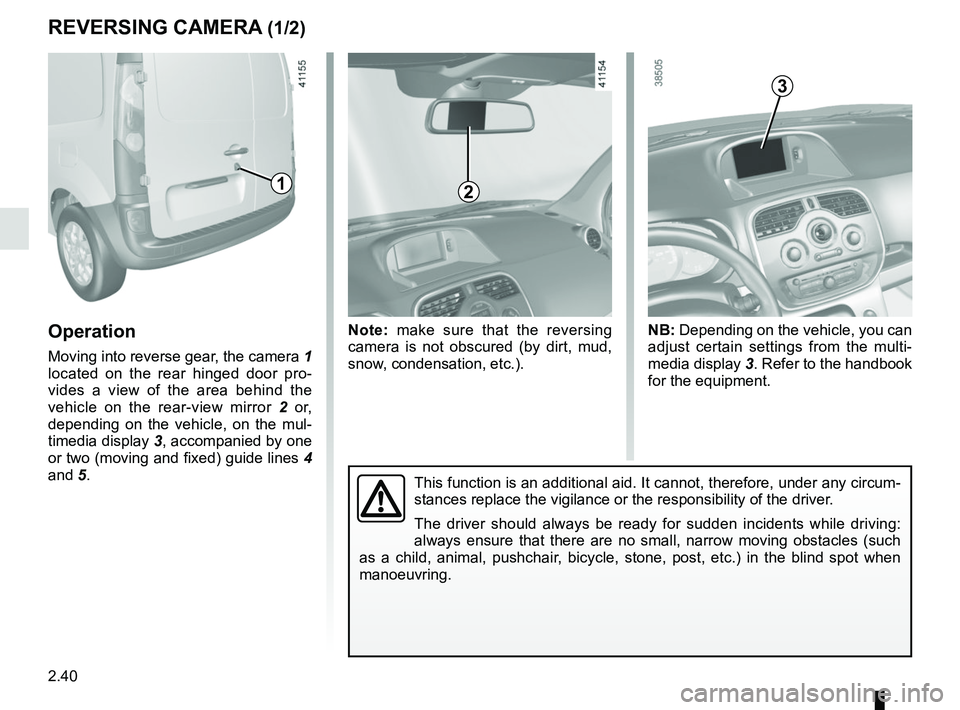
Operation
Moving into reverse gear, the camera 1
located on the rear hinged door pro-
vides a view of the area behind the
vehicle on the rear-view mirror 2 or,
depending on the vehicle, on the mul-
timedia display 3, accompanied by one
or two (moving and fixed) guide lines 4
and 5.
Note: make sure that the reversing
camera is not obscured (by dirt, mud,
snow, condensation, etc.). NB: Depending on the vehicle, you can
adjust certain settings from the multi-
media display
3. Refer to the handbook
for the equipment.
This function is an additional aid. It cannot, therefore, under any circ\
um-
stances replace the vigilance or the responsibility of the driver.
The driver should always be ready for sudden incidents while driving:
always ensure that there are no small, narrow moving obstacles (such
as a child, animal, pushchair, bicycle, stone, post, etc.) in the blind spot when
manoeuvring.
2
3
1