check engine light RENAULT KANGOO ZERO EMISSION 2012 X61 / 2.G Owners Manual
[x] Cancel search | Manufacturer: RENAULT, Model Year: 2012, Model line: KANGOO ZERO EMISSION, Model: RENAULT KANGOO ZERO EMISSION 2012 X61 / 2.GPages: 213, PDF Size: 6.08 MB
Page 12 of 213
»400 volt» electrical circuit .................................... (current page)
charging flap .......................................................... (current page)
electric vehicle important recommendations ............................ (current page)
traction battery ....................................................... (current page)
1.7
ENG_UD28908_4
Recommandations importantes (X38 - X61 électrique - L38 électriqu\
e - Renault)
ENG_NU_911-4_F61e_Renault_1
Important recommendations
imPOrt ANt recOmmeNDA tiONS
Please read these instructions carefully. Failure to follow these instructions may lead to a risk of fire, serious injury
or electric shock which may present a risk to life.
in the event of an accident or impact
In the event of an accident or an impact to the underside of the vehicle (e.g.: striking a post, raised kerb or other street furni-
ture), this may damage the electric circuit or the traction battery.
Have the vehicle checked by an authorised dealer.
Never touch the “400 volt” components or orange cables which are e\
xposed and visible inside or outside the vehicle.
In the event of serious damage to the traction battery, leaks may occur:
– never touch the liquids (fluids, etc.) coming from the traction battery;
– in the event of contact with the body, wash the affected area with plenty of water and consult a doctor as soon as possibl\
e.
In the event of an impact, even slight, against the charging flap and/or valve, have them checked by an authorised dealer as
soon as possible.
in the event of fire
In the event of fire, make everyone evacuate the vehicle immediately and contact the emergency services, informing them that
this is an electric vehicle.
Only use extinguishing agents ABC or BC that are permitted for use with electrical fires. Do not use water or other extinguish -
ing agents.
In the event of damage to the electrical circuit, please call an authori\
sed dealer.
All towing operations
Please refer to the information on “Towing, breakdowns” in Section 5.
Washing the vehicle
Never wash the engine compartment, the charging connection or the tracti\
on battery with a high-pressure jet.
This risks damaging the electric circuit.
Never wash the vehicle while it is charging.
risk of electric shock and a risk to life.
Page 14 of 213
electric vehicleimportant recommendations ............................ (current page)
electrical installation .............................................. (current page)
JauneNoirNoir texte
1.9
ENG_UD28552_4
Véhicule électrique : charge (X61 - X61 électrique - Renault)\
ENG_NU_911-4_F61e_Renault_1
electric vehicle: charging (2/6)
important recommendations for charging your vehiclePlease read these instructions carefully. Failure to follow these instructions may lead to a risk of fire, serious injury
or electric shocks which could result in death.
installation for using a standard charging cord
Have a special wall socket installed by a qualified professional.
installation for using an occasional charging cord
Have a qualified professional check that each socket you intend to use with the occasional charging cord complies with the
standards and regulations in force in your country, especially that they have:
– a Type A residual differential current of 30 mA;
– a device to protect against overvoltage (16A fuse or circuit breaker for the socket used);
– protection against overvoltage relating to lightning in exposed areas.
You are recommended to test the residual differential current device every month.
You are recommended to check regularly the domestic power supply as well as the special wall socket. In the event of dete-
rioration (corrosion, browning, etc.), do not use it.
Please read the instructions that come with the occasional charging cord carefully to learn about usage precautions and how
to use the cord.
charging
Do not do anything to the vehicle during charging (washing, working in \
the engine compartment, etc.).
In the event of the presence of water, signs of corrosion or foreign bodies in the charging cord connector or in the vehicle charg-
ing socket, do not charge the vehicle. Fire hazard.
Do not attempt to touch the cord contacts, the domestic socket or the ve\
hicle charging socket, or introduce objects into them.
Never plug the charging cord into a multiple socket or an extension lead\
.
Do not remove or change the vehicle charging socket or the charging cord\
. Fire hazard.
Do not modify the installation during charging.
In the event of an impact, even slight, against the charging socket or valve, have them checked by an authorised dealer as
soon as possible.
Take care of the cord: do not tread on it, immerse it in water or pull on it or let anything knock against it. Check regularly that
the charging cord is in good condition. In the event of deterioration (\
corrosion, browning, cuts, etc.), do not use it.
Page 29 of 213
RENAULT ANTI-INTRUDER DEVICE (RAID) .......(current page)
doors ...................................................................... (current page)
1.24
ENG_UD21602_3
Condamnation automatique des ouvrants en roulage (X61 - F61 - Renault)\
ENG_NU_911-4_F61e_Renault_1
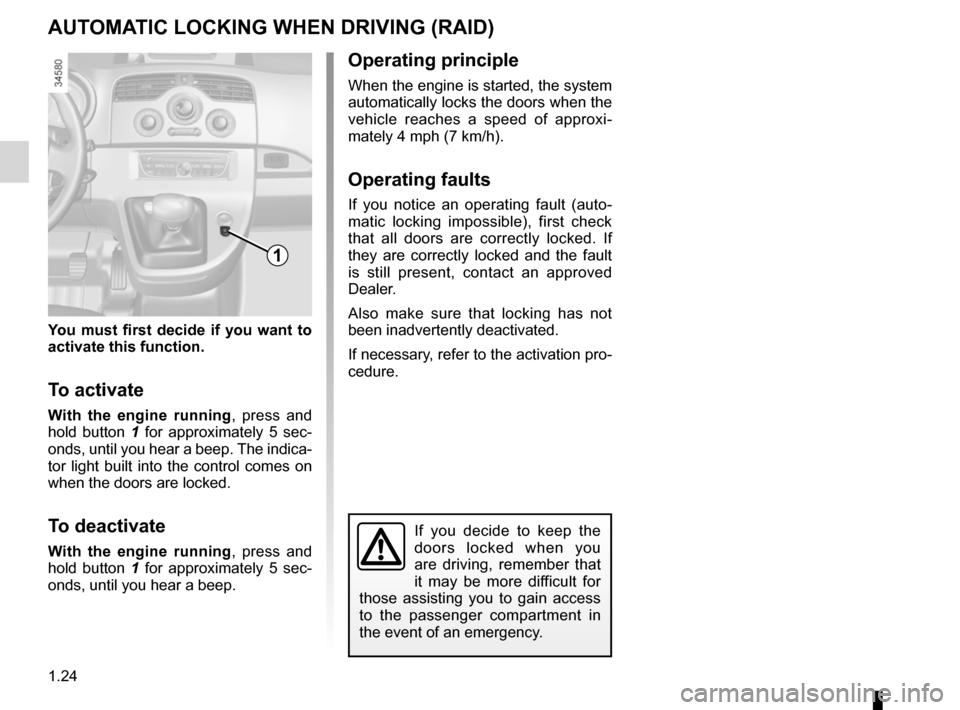
You must first decide if you want to
activate this function.
t o activate
With the engine running , press and
hold button 1 for approximately 5 sec -
onds, until you hear a beep. The indica -
tor light built into the control comes on
when the doors are locked.
t o deactivate
With the engine running , press and
hold button 1 for approximately 5 sec -
onds, until you hear a beep.
Automatic locking of opening elements when driving
If you decide to keep the
doors locked when you
are driving, remember that
it may be more difficult for
those assisting you to gain access
to the passenger compartment in
the event of an emergency.
AUt OmA tic lOcKiNg WheN DriviNg (rAiD)
Operating principle
When the engine is started, the system
automatically locks the doors when the
vehicle reaches a speed of approxi -
mately 4 mph (7 km/h).
Operating faults
If you notice an operating fault (auto -
matic locking impossible), first check
that all doors are correctly locked. If
they are correctly locked and the fault
is still present, contact an approved
Dealer.
Also make sure that locking has not
been inadvertently deactivated.
If necessary, refer to the activation pro-
cedure.
1
Page 39 of 213
1.34
ENG_UD26174_4
Ceintures de sécurité (X61 - F61 - Renault)
ENG_NU_911-4_F61e_Renault_1
Jaune NoirNoir texte
SeAt BeltS (2/4)
™Front seat belt reminder
warning light
It remains on when the engine
is started if your seat belt is not fas -
tened. When the vehicle reaches a
speed of 12 mph (20 km/h), the warn-
ing light flashes and a buzzer sounds.
Then, the beep sounds at a low volume
for 30 seconds, then at a high volume
for 90 seconds.
Unfastening
Press button 4 and the seat belt will be
rewound by the inertia reel. Guide the
belt.
NB: an object placed on the passen -
ger seat base may activate the warning
light in some cases.
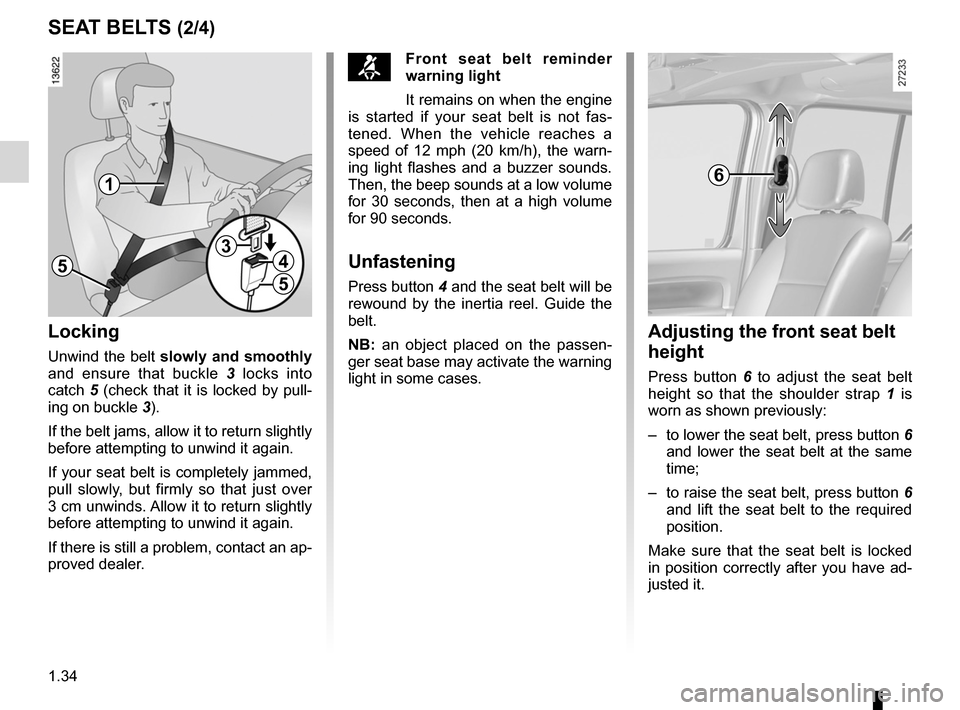
6
Adjusting the front seat belt
height
Press button 6 to adjust the seat belt
height so that the shoulder strap 1 is
worn as shown previously:
– to lower the seat belt, press button 6
and lower the seat belt at the same
time;
– to raise the seat belt, press button 6
and lift the seat belt to the required
position.
Make sure that the seat belt is locked
in position correctly after you have ad-
justed it.
locking
Unwind the belt slowly and smoothly
and ensure that buckle 3 locks into
catch 5 (check that it is locked by pull -
ing on buckle 3).
If the belt jams, allow it to return slightly
before attempting to unwind it again.
If your seat belt is completely jammed,
pull slowly, but firmly so that just over
3 cm unwinds. Allow it to return slightly
before attempting to unwind it again.
If there is still a problem, contact an ap-
proved dealer.
1
5
34
5
Page 46 of 213
air bag................................................... (up to the end of the DU)
seat belts .............................................. (up to the end of the DU)
air bag ................................................... (up to the end of the DU)
additional methods of restraint ............. (up to the end of the DU)
methods of restraint in addition to the seat belts
(up to the end of the DU)
1.41
ENG_UD23686_2
Dispositifs de retenue complémentaires (X61 - F61 - Renault)
ENG_NU_911-4_F61e_Renault_1
Additional methods of restraint
The air bag is designed to complement the action of the seat belt. Both
the air bags and seat belts are integral parts of the same protection
system. It is therefore essential to wear seat belts at all times. If seat belts
are not worn, the occupants are exposed to the risk of serious injury in
the event of an accident. It may also increase the risk of minor superficial injuries
occurring when the air bag is deployed, although such minor injuries are always
possible with air bags.
If the vehicle should overturn or suffer a rear impact, however severe, the pre-
tensioners and air bags are not always triggered. Impacts to the underside of the
vehicle, eg. from pavements, potholes or stones, can all trigger these s\
ystems.
– No work or modification whatsoever may be carried out on any part of the air
bag system (air bags, pretensioners, computer, wiring harness, etc.), except
by qualified personnel from an approved Dealer.
– To ensure that the system is in good working order and to avoid accidental trig-
gering of the system which may cause injury, only qualified Network personnel
may work on the air bag system.
– As a safety precaution, have the airbag system checked if your vehicle has
been involved in an accident, or is stolen or broken into.
– When selling or lending the vehicle, inform the user of these points and hand
over this handbook with the vehicle.
– When scrapping your vehicle, contact your approved Dealer for disposal of the
gas generator(s).
ADDitiONAl methODS OF reStrAiNt
All of the warnings below are given so that the air bag is not obstructed in any
way when it is inflated and also to prevent the risk of serious injuries caused
by items which may be dislodged when the air bag inflates.
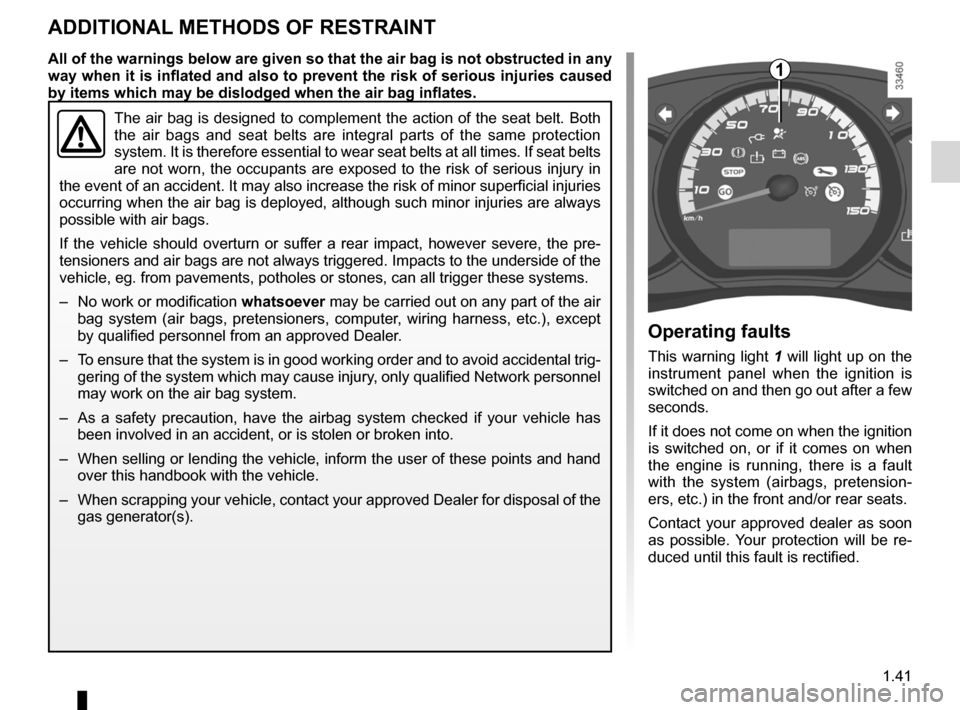
Operating faults
This warning light 1 will light up on the
instrument panel when the ignition is
switched on and then go out after a few
seconds.
If it does not come on when the ignition
is switched on, or if it comes on when
the engine is running, there is a fault
with the system (airbags, pretension -
ers, etc.) in the front and/or rear seats.
Contact your approved dealer as soon
as possible. Your protection will be re-
duced until this fault is rectified.
1
Page 84 of 213
signals and lights .................................. (up to the end of the DU)
lights: side lights ......................................................... (current page)
lights: dipped beam headlights ................................... (current page)
lights: main beam headlights ...................................... (current page)
1.79
ENG_UD19079_1
Eclairage et signalisation extérieure (X61 - F61 - Renault)
ENG_NU_911-4_F61e_Renault_1
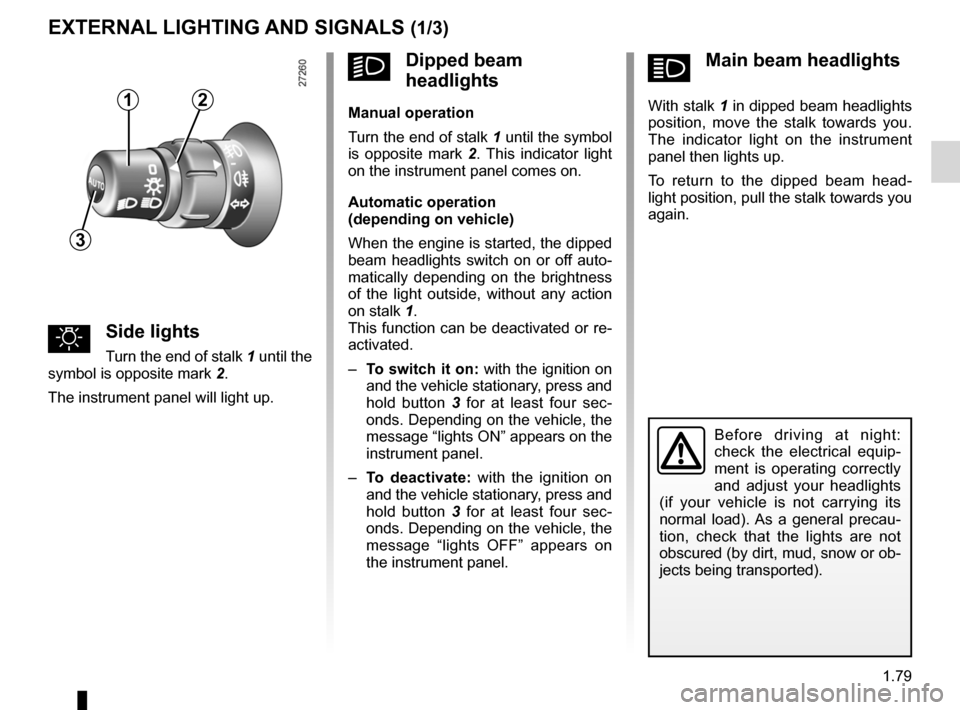
ámain beam headlights
With stalk 1 in dipped beam headlights
position, move the stalk towards you.
The indicator light on the instrument
panel then lights up.
To return to the dipped beam head -
light position, pull the stalk towards you
again.
External lighting and signals
uSide lights
Turn the end of stalk 1 until the
symbol is opposite mark 2.
The instrument panel will light up.
eXterNAl lightiNg AND SigNAlS (1/3)
Before driving at night:
check the electrical equip -
ment is operating correctly
and adjust your headlights
(if your vehicle is not carrying its
normal load). As a general precau -
tion, check that the lights are not
obscured (by dirt, mud, snow or ob-
jects being transported).
kDipped beam
headlights
manual operation
Turn the end of stalk 1 until the symbol
is opposite mark 2 . This indicator light
on the instrument panel comes on.
Automatic operation
(depending on vehicle)
When the engine is started, the dipped
beam headlights switch on or off auto-
matically depending on the brightness
of the light outside, without any action
on stalk 1.
This function can be deactivated or re-
activated.
– to switch it on: with the ignition on
and the vehicle stationary, press and
hold button 3 for at least four sec -
onds. Depending on the vehicle, the
message “lights ON” appears on the
instrument panel.
– to deactivate: with the ignition on
and the vehicle stationary, press and
hold button 3 for at least four sec -
onds. Depending on the vehicle, the
message “lights OFF” appears on
the instrument panel.12
3
Page 139 of 213
bonnet................................................... (up to the end of the DU)
maintenance: mechanical ...................................... (up to the end of the DU)
4.2
ENG_UD20963_2
Capot moteur (X61 - F61 - Renault)
ENG_NU_911-4_F61e_Renault_4
Jaune NoirNoir texte
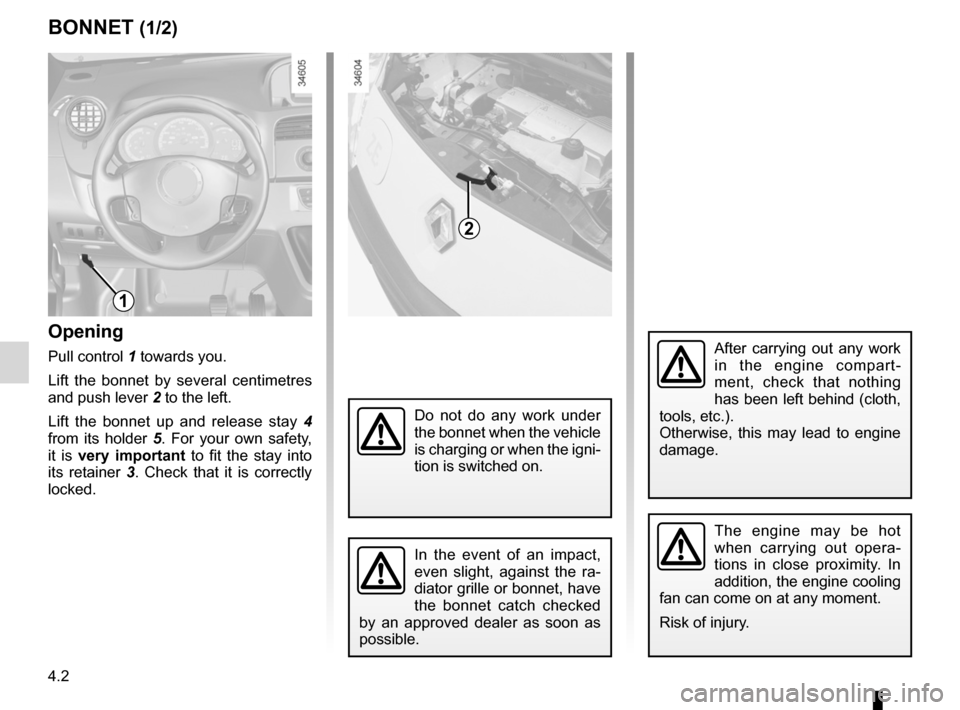
Bonnet
Opening
Pull control 1 towards you.
Lift the bonnet by several centimetres
and push lever 2 to the left.
Lift the bonnet up and release stay 4
from its holder 5. For your own safety,
it is very important to fit the stay into
its retainer 3. Check that it is correctly
locked.
BOnnet (1/2)
The engine may be hot
when carrying out opera -
tions in close proximity. In
addition, the engine cooling
fan can come on at any moment.
Risk of injury.
1
2
In the event of an impact,
even slight, against the ra -
diator grille or bonnet, have
the bonnet catch checked
by an approved dealer as soon as
possible.
After carrying out any work
in the engine compart -
ment, check that nothing
has been left behind (cloth,
tools, etc.).
Otherwise, this may lead to engine
damage.
Do not do any work under
the bonnet when the vehicle
is charging or when the igni -
tion is switched on.
Page 142 of 213
brake fluid .............................................................. (current page)
levels: brake fluid ........................................................ (current page)
tanks and reservoirs brake fluid ........................................................ (current page)
tanks and reservoirs: windscreen washer .......................................... (current page)
windscreen washer ................................................ (current page)
levels: windscreen washer reservoir ........................... (current page)
JauneNoirNoir texte
4.5
ENG_UD26206_3
Niveaux (X61 électrique - Renault)
ENG_NU_911-4_F61e_Renault_4
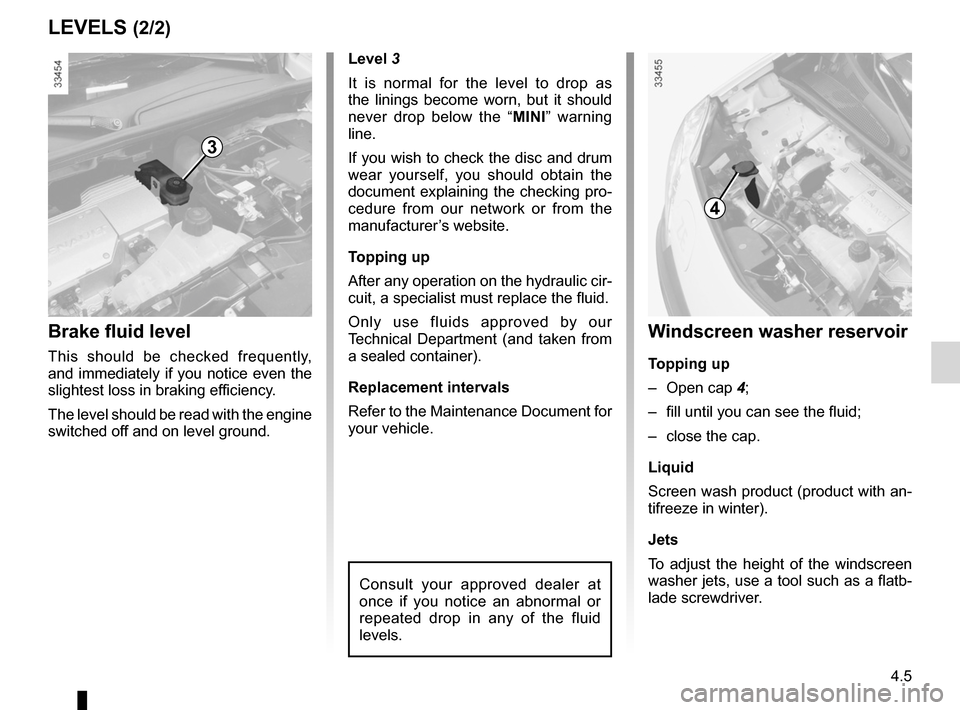
brake fluid
windscreen washer reservoir
Windscreen washer reservoir
t opping up
– Open cap 4;
– fill until you can see the fluid;
– close the cap.
Liquid
Screen wash product (product with an-
tifreeze in winter).
Jets
To adjust the height of the windscreen
washer jets, use a tool such as a flatb-
lade screwdriver.
4
Level 3
It is normal for the level to drop as
the linings become worn, but it should
never drop below the “ MInI” warning
line.
If you wish to check the disc and drum
wear yourself, you should obtain the
document explaining the checking pro-
cedure from our network or from the
manufacturer’s website.
t opping up
After any operation on the hydraulic cir-
cuit, a specialist must replace the fluid.
Only use fluids approved by our
Technical Department (and taken from
a sealed container).
Replacement intervals
Refer to the Maintenance Document for
your vehicle.
Consult your approved dealer at
once if you notice an abnormal or
repeated drop in any of the fluid
levels.
Brake fluid level
This should be checked frequently,
and immediately if you notice even the
slightest loss in braking efficiency.
The level should be read with the engine
switched off and on level ground.
3
LeveLs (2/2)
Page 147 of 213
4.10
ENG_UD26559_3
Entretien de la carosserie (X61 - X38 - X61 électrique - L38 électrique - X10 - Renault)
ENG_NU_911-4_F61e_Renault_4
using a roller type car wash
Return the windscreen wiper stalk to
the Park position (refer to the informa-
tion on the “Windscreen washer, wiper”
in Section 1). Check the mounting of
external accessories, additional lights
and mirrors, and ensure that the wiper
blades are secured with adhesive tape.
Remove the radio aerial mast if your
vehicle is fitted with this equipment.
Remember to remove the tape and refit
the antenna after washing.
Observe the vehicle stopping distances
when driving on gravelled surfaces to
prevent paint damage.
Repair, or have repaired quickly, areas
where the paint has been damaged, to
prevent corrosion spreading.
Remember to visit the body shop pe
-
riodically in order to maintain your
anti-corrosion warranty. Refer to the
Maintenance Document.
Respect local regulations about wash -
ing vehicles (e.g. do not wash your ve-
hicle on a public highway).
If it is necessary to clean mechani -
cal components, hinges, etc., spray
them with products approved by our
Technical Department to protect them
after they have been cleaned.
BODyWORk MaIntenanCe (2/2)
Cleaning the headlights
As the headlights are made of plastic
“glass”, use a soft cloth or cotton wool
to clean them. If this does not clean
them properly, moisten the cloth with
soapy water, then wipe clean with a soft
damp cloth or cotton wool.
Finally, carefully dry off with a soft dry
cloth.
Cleaning products containing alco -
hol must not be used.
vehicles with a matte paint
finish
This type of paint requires certain pre-
cautions.
Do not do the following
– use wax-based products (polishing);
– rub too hard;
– wash the vehicle in a roller-type car
wash;
– wash the vehicle using a high-pres-
sure device;
– attach stickers to the paintwork (risk
of leaving marks).
y ou should do the following
Wash the vehicle by hand using plenty
of water, using a soft cloth or a gentle
sponge.
We have selected special products
to care for your vehicle and you can
obtain these from the manufactur -
er’s accessory outlets.
Washing the vehicle
Never wash the engine
compartment, the charging
connection or the traction
battery with a high-pressure jet.
This risks damaging the electric cir-
cuit.
Never wash the vehicle while it is
charging.
Risk of electric shock and a risk to
life.
Page 173 of 213
batterytroubleshooting ............................... (up to the end of the DU)
12 volt battery ....................................... (up to the end of the DU)
12 volt battery breakdown recovery ....................... (up to the end of the DU)
5.24
ENG_UD26209_3
Batterie : dépannage (X61 - F61 - Renault)
ENG_NU_911-4_F61e_Renault_5
Jaune NoirNoir texte
12 volt battery: breakdown
12 VOlt Battery: breakdown recovery (1/2)
to avoid all risk of sparks:
– Switch off the vehicle ignition.
– Ensure that any electrical consumers
(courtesy lights, etc.) are switched
off before disconnecting or recon -
necting the battery.
– When charging, stop the charger
before connecting or disconnecting
the battery.
– Do not place metal objects on the
battery to avoid creating a short cir-
cuit between the terminals.
– Make sure that you reconnect the
battery terminals after refitting.
connecting a battery charger
the battery charger must be com -
patible with a battery with nominal
voltage of 12 volts.
Before disconnecting the battery, check
that:
– the ignition is switched off;
– the gear control is in position P
(please see the information on “Gear
control”;
– the charging cable is disconnected.
Special procedures may be
required to charge some
batteries. Contact your ap -
proved dealer.
Avoid all risk of sparks which may
cause an immediate explosion, and
charge the battery in a well-venti -
lated area. Risk of serious injury.
Handle the battery with care
as it contains sulphuric acid,
which must not come into
contact with eyes or skin. If
it does, wash the affected area with
plenty of cold water. If necessary,
consult a doctor.
Ensure that naked flames, red hot
objects and sparks do not come into
contact with the battery as there is a
risk of explosion.
The engine may be hot when car -
rying out operations in close prox -
imity. In addition, the engine cooling
fan can come on at any moment.
Risk of injury.
Disconnect the leads connected to both
battery terminals, starting with the
negative terminal.
Follow the instructions given by the
manufacturer of the battery charger
you are using.
Do not work on the 12 volt
battery (charging, replac -
ing, etc.):
– without switching off the
ignition;
– if your traction battery is charg -
ing.
Please refer to the information
on “Electric vehicle: charging” in
Section 1.
Risk of serious injury.