check engine RENAULT KOLEOS 2012 1.G Owner's Manual
[x] Cancel search | Manufacturer: RENAULT, Model Year: 2012, Model line: KOLEOS, Model: RENAULT KOLEOS 2012 1.GPages: 233, PDF Size: 7.81 MB
Page 165 of 233

tanks and reservoirscoolant ............................................................. (current page)
levels: coolant ............................................................. (current page)
coolant ................................................................... (current page)
4.7
ENG_UD20999_4
Niveaux / filtres (X45 - H45 - Renault)
ENG_NU_977-2_H45_Ph2_Renault_4
Levels:
coolant
LeVeLS (1/3)
1
Coolant
With the engine switched off and on
level ground, the level when cold must
be between the “ MIn” and “ MAX”
marks on coolant reservoir 1.
Top this level up when cold before the
“MIn” mark is reached. Checking intervals
Check the coolant level regularly
(very severe damage is likely to be
caused to the engine if it runs out of
coolant).
If the level needs to be topped up, only
use products approved by our Technical
Department which ensure:
–
protection against freezing;
– anticorrosion protection of the cool -
ing system. Replacement intervals
Refer to the Maintenance Service
Booklet for your vehicle.
No operations should be
carried out on the cooling
circuit when the engine is
hot.
Risk of burns.
Consult your approved dealer at
once if you notice an abnormal or
repeated drop in any of the fluid
levels.
Page 166 of 233
brake fluid .............................................................. (current page)
levels: brake fluid ........................................................ (current page)
tanks and reservoirs brake fluid ........................................................ (current page)
4.8
ENG_UD20999_4
Niveaux / filtres (X45 - H45 - Renault)
ENG_NU_977-2_H45_Ph2_Renault_4
Jaune NoirNoir texte
brake fluid
LeVeLS (2/3)
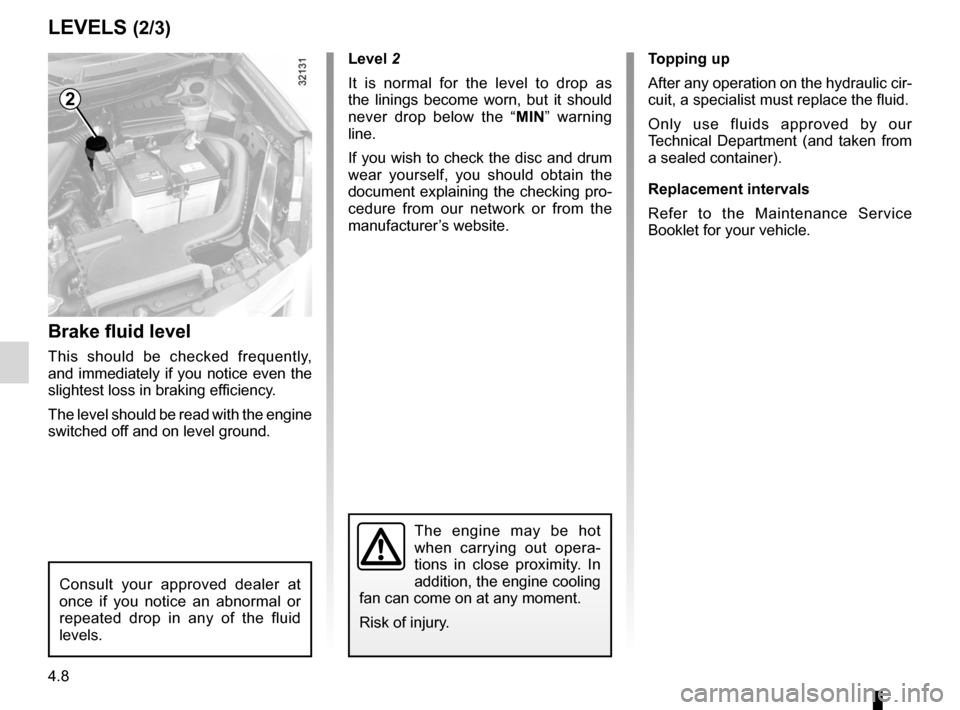
2
Brake fluid level
This should be checked frequently,
and immediately if you notice even the
slightest loss in braking efficiency.
The level should be read with the engine
switched off and on level ground. Level 2
It is normal for the level to drop as
the linings become worn, but it should
never drop below the “
MIn” warning
line.
If you wish to check the disc and drum
wear yourself, you should obtain the
document explaining the checking pro-
cedure from our network or from the
manufacturer’s website. t
opping up
After any operation on the hydraulic cir-
cuit, a specialist must replace the fluid.
Only use fluids approved by our
Technical Department (and taken from
a sealed container).
Replacement intervals
Refer to the Maintenance Service
Booklet for your vehicle.
The engine may be hot
when carrying out opera -
tions in close proximity. In
addition, the engine cooling
fan can come on at any moment.
Risk of injury.
Consult your approved dealer at
once if you notice an abnormal or
repeated drop in any of the fluid
levels.
Page 171 of 233
JauneNoirNoir texte
4.13
ENG_UD22865_9
Entretien de la carrosserie (X45 - H45 - J77 - X81 - X85 - B85 - C85 - S85 - X91 - B91 - K91 - D91 - X83 - X61 - X77 ph2 - K85 - X95 - B95 - D95 - K95 - J95 - R95 - L38 -
ENG_NU_977-2_H45_Ph2_Renault_4
– Before going through a roller type car
wash, return the windscreen wiper
stalk to the Park position (refer to
the information on the “Windscreen
wash/wipe” in Section 1). Check the
mounting of external accessories,
additional lights and mirrors, and
ensure that the wiper blades are se-
cured with adhesive tape.
Remove the radio aerial mast if your
vehicle is fitted with this equipment.
Remember to remove the tape and
refit the antenna after washing.
– Spray mechanical components,
hinges, etc. with products approved
by our Technical Department to
protect them after they have been
cleaned.
BODyWORk MAIntenAnCe (2/2)
We have selected special products
to care for your vehicle and you can
obtain these from the manufactur -
er’s accessory outlets.
y ou should
– Observe the vehicle stopping dis -
tances when driving on gravelled
surfaces to prevent paint damage.
– Repair, or have repaired quickly,
areas where the paint has been
damaged, to prevent corrosion
spreading.
– Remember to visit the body shop
periodically if your vehicle has an
anti-corrosion warranty. Refer to the
Maintenance Service Booklet.
– Respect local regulations about
washing vehicles (e.g. do not wash
your vehicle on a public highway). –
Wash your car frequently, with the
engine off , with cleaning products
recommended by our Technical
Department (never use abrasive
products) and be sure to jet-rinse off:
– spots of tree resin and industrial
grime;
– bird droppings , which cause a
chemical reaction with the paint
that rapidly discolours paint -
work and may even cause the
paint to peel off;
Wash the vehicle immediately to
remove these marks since it is im-
possible to remove them by pol -
ishing;
– salt, particularly in the wheel
arches and underneath the body
after driving in areas where the
roads have been gritted;
– mud in the wheel arches and un-
derneath the body which forms
damp patches.
Page 195 of 233
JauneNoirNoir texte
5.21
ENG_UD23536_4
Batterie : dépannage (X45 - H45 - Renault)
ENG_NU_977-2_H45_Ph2_Renault_5
12
B
3
4
a
starting the vehicle using the
battery from another vehicle
If you have to use the battery from an-
other vehicle to start, obtain suitable
jump leads (with a large cross section)
from an approved dealer or, if you al -
ready have jump leads, ensure that
they are in perfect condition.
the two batteries must have an iden-
tical nominal voltage of 12 volts. The
battery supplying the current should
have a capacity (amp-hours, Ah) which
is at least the same as that of the dis-
charged battery.
Ensure that there is no risk of contact
between the two vehicles (risk of short
circuiting when the positive terminals
are connected) and that the discharged
battery is properly connected. Switch
off your vehicle ignition.
Start the engine of the vehicle supply -
ing the current and run it at an interme-
diate engine speed.
Battery: troubleshooting (2/2)
connecting a battery charger
t he battery charger must be com -
patible with a battery with nominal
voltage of 12 volts.
Switch the engine off and then discon-
nect both battery leads starting with
the negative terminal.
Do not disconnect the battery when the
engine is running. Follow the instruc-
tions given by the manufacturer of
the battery charger you are using.
Special procedures may be
required to charge some
batteries. Contact your ap -
proved dealer.
Avoid all risk of sparks which may
cause an immediate explosion, and
charge the battery in a well-venti -
lated area. Risk of serious injury.
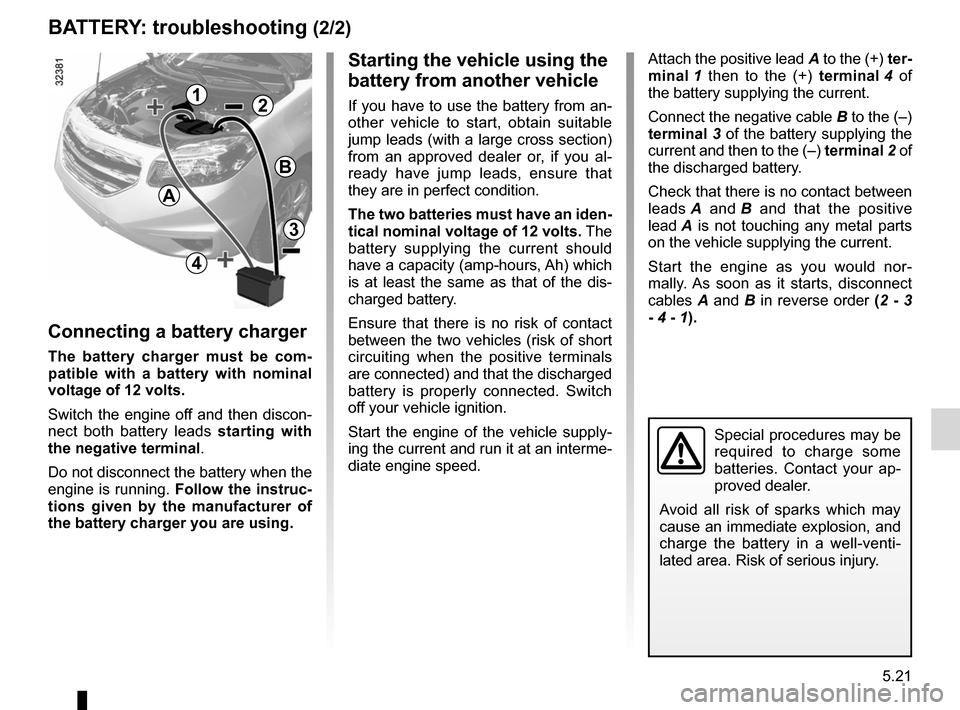
Attach the positive lead A to the (+) ter-
minal 1 then to the (+) terminal 4 of
the battery supplying the current.
Connect the negative cable B to the (–)
terminal 3 of the battery supplying the
current and then to the (–) terminal 2 of
the discharged battery.
Check that there is no contact between
leads A and B and that the positive
lead A is not touching any metal parts
on the vehicle supplying the current.
Start the engine as you would nor -
mally. As soon as it starts, disconnect
cables A and B in reverse order (2 - 3
- 4 - 1).
Page 198 of 233
wiper blades ......................................... (up to the end of the DU)
wipers blades ............................................. (up to the end of the DU)
5.24
ENG_UD20957_3
Balais d’essuie-vitre avant (X45 - H45 - Renault)
ENG_NU_977-2_H45_Ph2_Renault_5
Wipers (replacing blades)
wIPer BlaDes
Check the condition of the wiper
blades. You are responsible for their
service life:
– clean the blades, windscreen and
rear screen regularly with soapy
water;
– do not use them when the wind-
screen or rear screen are dry;
– free them from the windscreen or
rear screen when they have not
been used for a long time.
In frosty weather, make
sure that the wiper blades
are not stuck by ice (to
avoid the risk of the motor
overheating).
Check the condition of the wiper
blades.
Replace the wiper blades as soon
as they begin to lose efficiency (ap-
proximately once a year).
Whilst changing the blade, take care
not to drop the arm onto the window
after it has been removed as this
may break the window.
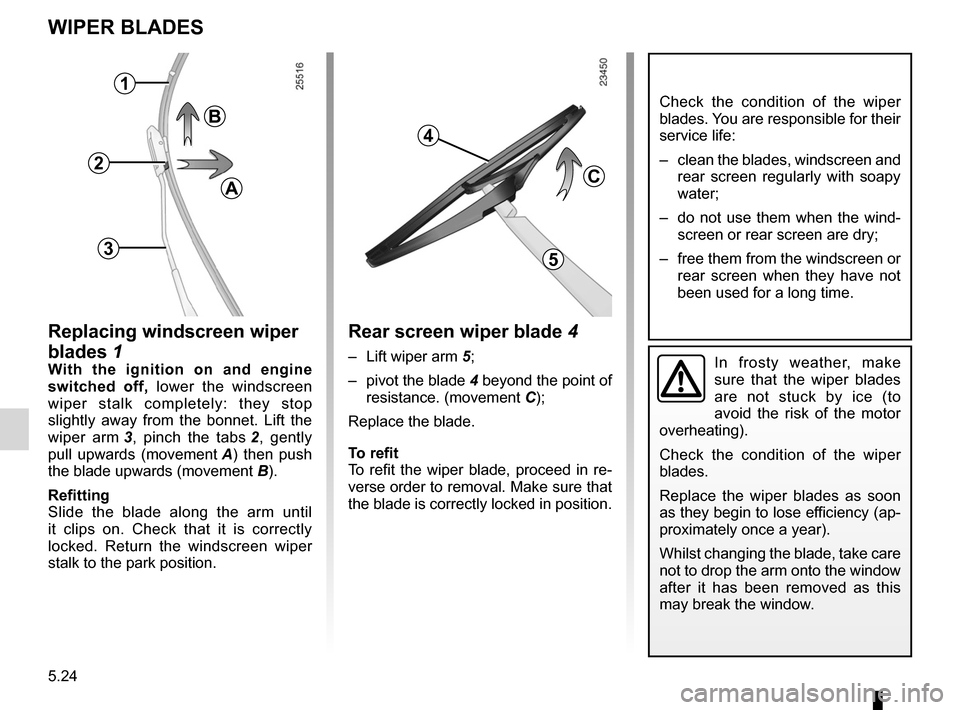
replacing windscreen wiper
blades 1
w ith the ignition on and engine
switched off, lower the windscreen
wiper stalk completely: they stop
slightly away from the bonnet. Lift the
wiper arm 3 , pinch the tabs 2 , gently
pull upwards (movement A ) then push
the blade upwards (movement B).
refitting
Slide the blade along the arm until
it clips on. Check that it is correctly
locked. Return the windscreen wiper
stalk to the park position.
1
2
3
a
rear screen wiper blade 4
– Lift wiper arm 5;
– pivot the blade 4 beyond the point of
resistance. (movement C);
Replace the blade.
t o refit
To refit the wiper blade, proceed in re-
verse order to removal. Make sure that
the blade is correctly locked in position.
4
c
5
B
Page 205 of 233
JauneNoirNoir texte
5.31
ENG_UD21017_3
Anomalies de fonctionnement (X45 - H45 - X95 - J95 - R95 - Renault)
ENG_NU_977-2_H45_Ph2_Renault_5
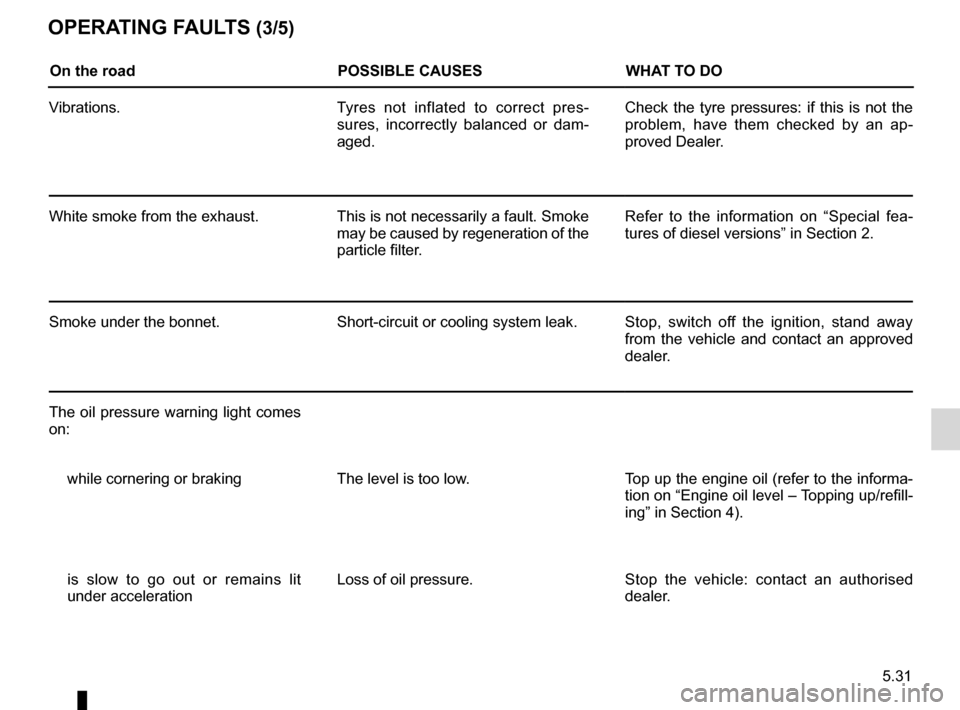
OPeratIng F aults (3/5)
On the road POssIBle causeswhat tO DO
Vibrations. Tyres not inflated to correct pres-
sures, incorrectly balanced or dam -
aged. Check the tyre pressures: if this is not the
problem, have them checked by an ap
-
proved Dealer.
White smoke from the exhaust. This is not necessarily a fault. Smoke
may be caused by regeneration of the
particle filter.Refer to the information on “Special fea
-
tures of diesel versions” in Section 2.
Smoke under the bonnet. Short-circuit or cooling system leak.Stop, switch off the ignition, stand away
from the vehicle and contact an approved
dealer.
The oil pressure warning light comes
on: while cornering or braking The level is too low. Top up the engine oil (refer to the informa-
tion on “Engine oil level – Topping up/refill-
ing” in Section 4).
is slow to go out or remains lit
under acceleration Loss of oil pressure.
Stop the vehicle: contact an authorised
dealer.
Page 206 of 233
5.32
ENG_UD21017_3
Anomalies de fonctionnement (X45 - H45 - X95 - J95 - R95 - Renault)
ENG_NU_977-2_H45_Ph2_Renault_5
Jaune NoirNoir texte
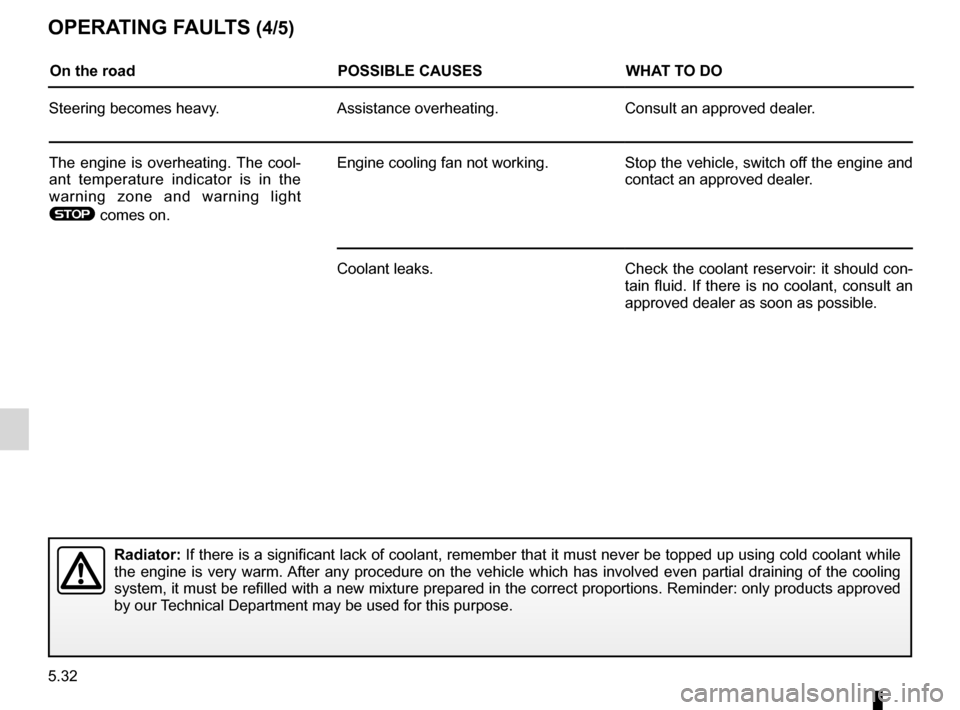
OPeratIng F aults (4/5)
On the road POssIBle causeswhat tO DO
Steering becomes heavy. Assistance overheating.Consult an approved dealer.
The engine is overheating. The cool-
ant temperature indicator is in the
warning zone and warning light
® comes on. Engine cooling fan not working.
Stop the vehicle, switch off the engine and
contact an approved dealer.
Coolant leaks. Check the coolant reservoir: it should con-
tain fluid. If there is no coolant, consult an
approved dealer as soon as possible.
radiator: If there is a significant lack of coolant, remember that it must never be topped up using cold coolant while
the engine is very warm. After any procedure on the vehicle which has involved even partial draining of the cooling
system, it must be refilled with a new mixture prepared in the correct proportions. Reminder: only products approved
by our Technical Department may be used for this purpose.
Page 209 of 233
6.1
ENG_UD27168_2
Contents 6 (X45 - H45 - Renault)
ENG_NU_977-2_H45_Ph2_Renault_6
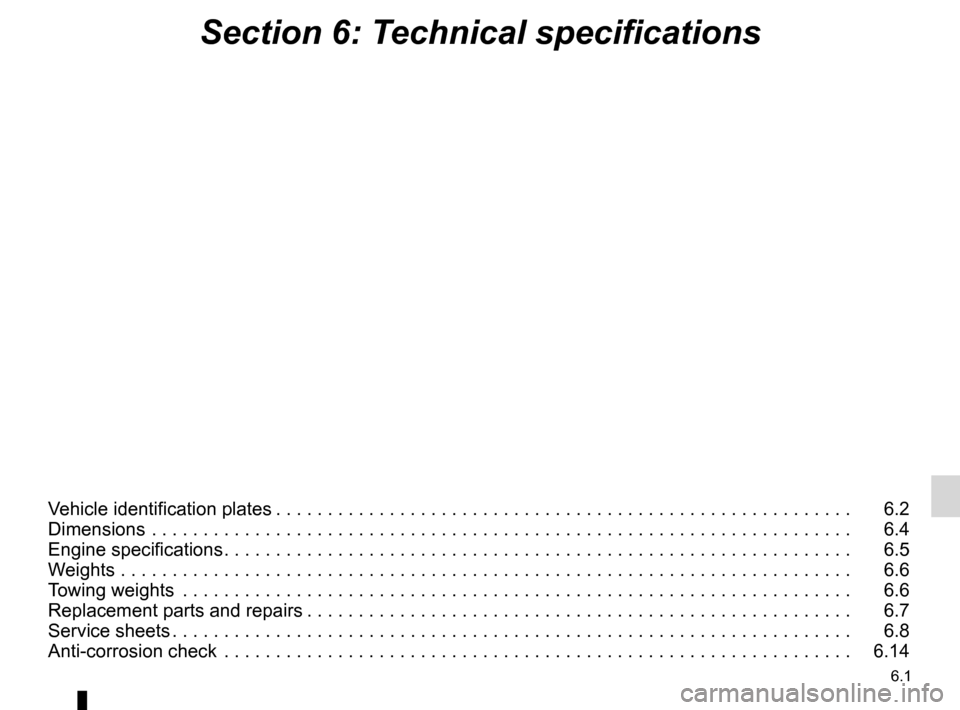
Section 6: Technical specifications
Vehicle identification plates . . . . . . . . . . . . . . . . . . . . . . . . . . . . . . . . . . . . . . . . . . . . . . . . . . . . . . . . 6.2
Dimensions . . . . . . . . . . . . . . . . . . . . . . . . . . . . . . . . . . . . . . . . . . . . . . . . . . . . . . . . . . . . . . . . . . . . 6.4
Engine specifications . . . . . . . . . . . . . . . . . . . . . . . . . . . . . . . . . . . . . . . . . . . . . . . . . . . . . . . . . . . . . 6.5
Weights . . . . . . . . . . . . . . . . . . . . . . . . . . . . . . . . . . . . . . . . . . . . . . . . . . . . . . . . . . . . . . . . . . . . . . . 6.6
Towing weights . . . . . . . . . . . . . . . . . . . . . . . . . . . . . . . . . . . . . . . . . . . . . . . . . . . . . . . . . . . . . . . . . 6.6
Replacement parts and repairs . . . . . . . . . . . . . . . . . . . . . . . . . . . . . . . . . . . . . . . . . . . . . . . . . . . . . 6.7
Service sheets . . . . . . . . . . . . . . . . . . . . . . . . . . . . . . . . . . . . . . . . . . . . . . . . . . . . . . . . . . . . . . . . . . 6.8
Anti-corrosion check . . . . . . . . . . . . . . . . . . . . . . . . . . . . . . . . . . . . . . . . . . . . . . . . . . . . . . . . . . . . . 6.14