bulb RENAULT KOLEOS 2018 Owners Manual
[x] Cancel search | Manufacturer: RENAULT, Model Year: 2018, Model line: KOLEOS, Model: RENAULT KOLEOS 2018Pages: 332, PDF Size: 8.91 MB
Page 265 of 332
5.1
Section 5: Practical advice
Puncture, emergency spare wheel . . . . . . . . . . . . . . . . . . . . . . . . . . . . . . . . . . . .\
. . . . . . . . . . . . . . 5.2
Tyre inflation kit . . . . . . . . . . . . . . . . . . . . . . . . . . . . . . . . . . . .\
. . . . . . . . . . . . . . . . . . . . . . . . . . . . . 5.4
Tools . . . . . . . . . . . . . . . . . . . . . . . . . . . . . . . . . . . .\
. . . . . . . . . . . . . . . . . . . . . . . . . . . . . . . . . . . . . 5.7
Changing a wheel . . . . . . . . . . . . . . . . . . . . . . . . . . . . . . . . . . . .\
. . . . . . . . . . . . . . . . . . . . . . . . . . . 5.8
Tyres (tyre and wheel safety, use in winter) . . . . . . . . . . . . . . . . . . . . . . . . . . . . . . . . . . . .\
. . . . . . . 5.10
Headlights (changing bulbs) . . . . . . . . . . . . . . . . . . . . . . . . . . . . . . . . . . . .\
. . . . . . . . . . . . . . . . . . . 5.13
Rear lights and side lights (changing bulbs) . . . . . . . . . . . . . . . . . . . . . . . . . . . . . . . . . . . .\
. . . . . . . 5.16
Interior lighting (changing bulbs) . . . . . . . . . . . . . . . . . . . . . . . . . . . . . . . . . . . . \
. . . . . . . . . . . . . . . . 5.19
RENAULT card: battery . . . . . . . . . . . . . . . . . . . . . . . . . . . . . . . . . . . . \
. . . . . . . . . . . . . . . . . . . . . . . 5.21
Radio frequency remote control unit: batteries . . . . . . . . . . . . . . . . . . . . . . . . . . . . . . . . . . . .\
. . . . . 5.22
Fuses . . . . . . . . . . . . . . . . . . . . . . . . . . . . . . . . . . . . \
. . . . . . . . . . . . . . . . . . . . . . . . . . . . . . . . . . . . . 5.23
Battery . . . . . . . . . . . . . . . . . . . . . . . . . . . . . . . . . . . . \
. . . . . . . . . . . . . . . . . . . . . . . . . . . . . . . . . . . . 5.26
Accessories . . . . . . . . . . . . . . . . . . . . . . . . . . . . . . . . . . . . \
. . . . . . . . . . . . . . . . . . . . . . . . . . . . . . . . 5.28
Wipers (replacing blades) . . . . . . . . . . . . . . . . . . . . . . . . . . . . . . . . . . . .\
. . . . . . . . . . . . . . . . . . . . . 5.29
Towing . . . . . . . . . . . . . . . . . . . . . . . . . . . . . . . . . . . . \
. . . . . . . . . . . . . . . . . . . . . . . . . . . . . . . . . . . . 5.31
Operating faults . . . . . . . . . . . . . . . . . . . . . . . . . . . . . . . . . . . . \
. . . . . . . . . . . . . . . . . . . . . . . . . . . . . 5.35
Page 277 of 332
5.13
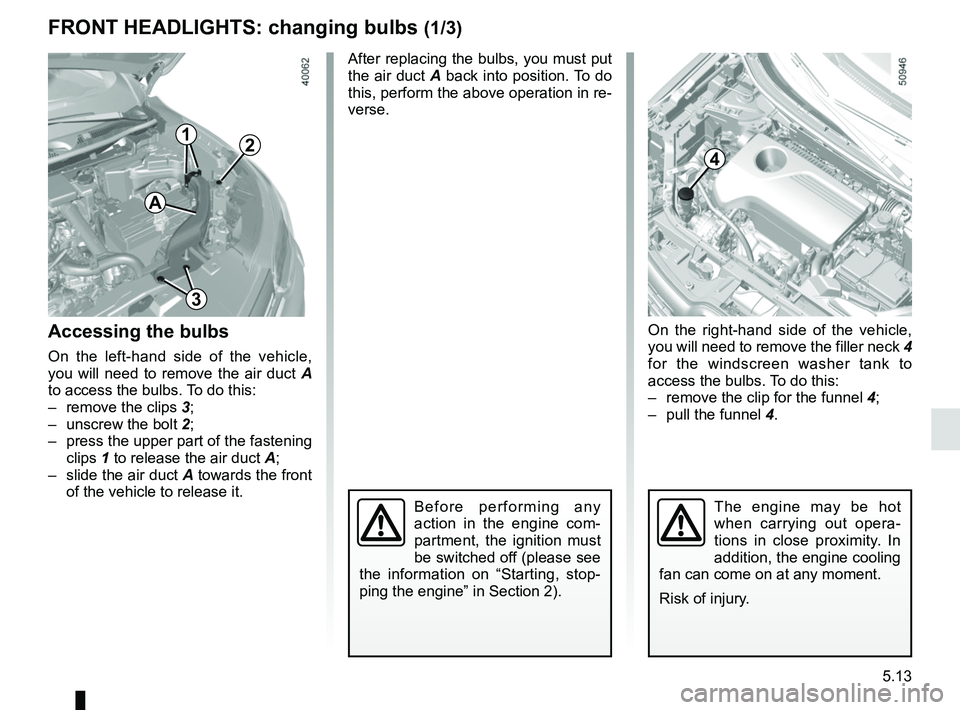
On the right-hand side of the vehicle,
you will need to remove the filler neck 4
for the windscreen washer tank to
access the bulbs. To do this:
– remove the clip for the funnel 4;
– pull the funnel 4.
After replacing the bulbs, you must put
the air duct A back into position. To do
this, perform the above operation in re-
verse.
FRONT HEADLIGHTS: changing bulbs (1/3)
The engine may be hot
when carrying out opera-
tions in close proximity. In
addition, the engine cooling
fan can come on at any moment.
Risk of injury.Before performing any
action in the engine com-
partment, the ignition must
be switched off (please see
the information on “Starting, stop-
ping the engine” in Section 2).
Accessing the bulbs
On the left-hand side of the vehicle,
you will need to remove the air duct A
to access the bulbs. To do this:
– remove the clips 3;
– unscrew the bolt 2;
– press the upper part of the fastening clips 1 to release the air duct A;
– slide the air duct A towards the front of the vehicle to release it.
4
3
2
A
1
Page 278 of 332
5.14
FRONT HEADLIGHTS: changing bulbs (2/3)
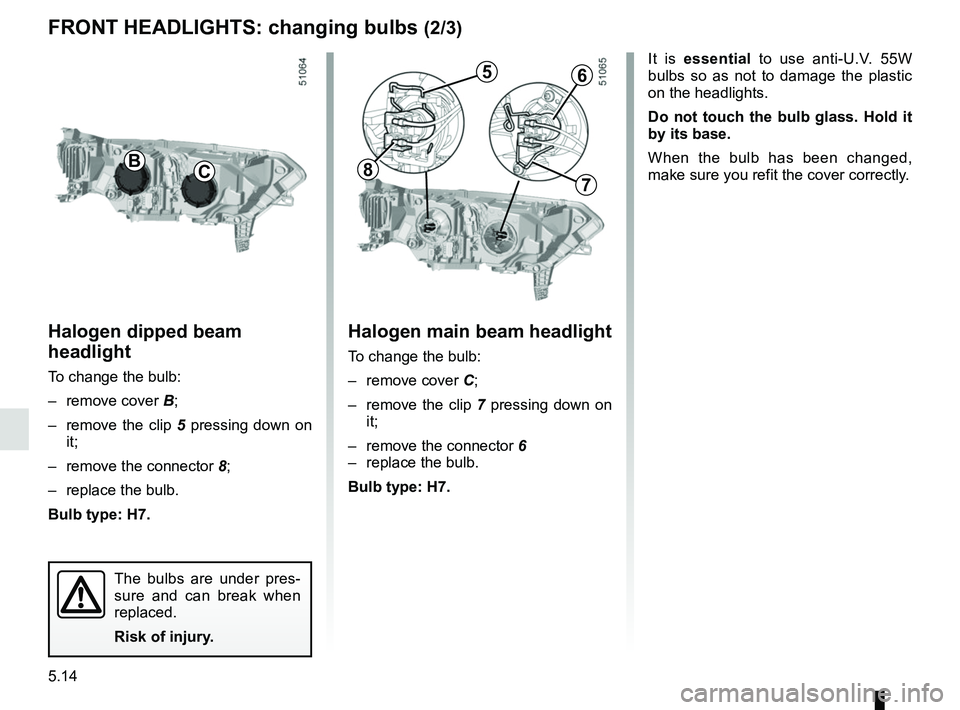
Halogen main beam headlight
To change the bulb:
– remove cover C;
– remove the clip 7 pressing down on
it;
– remove the connector 6
– replace the bulb.
Bulb type: H7.
56
Halogen dipped beam
headlight
To change the bulb:
– remove cover B;
– remove the clip 5 pressing down on
it;
– remove the connector 8;
– replace the bulb.
Bulb type: H7.
CB
The bulbs are under pres-
sure and can break when
replaced.
Risk of injury.
78
It is essential to use anti-U.V. 55W
bulbs so as not to damage the plastic
on the headlights.
Do not touch the bulb glass. Hold it
by its base.
When the bulb has been changed,
make sure you refit the cover correctly.
Page 279 of 332
5.15
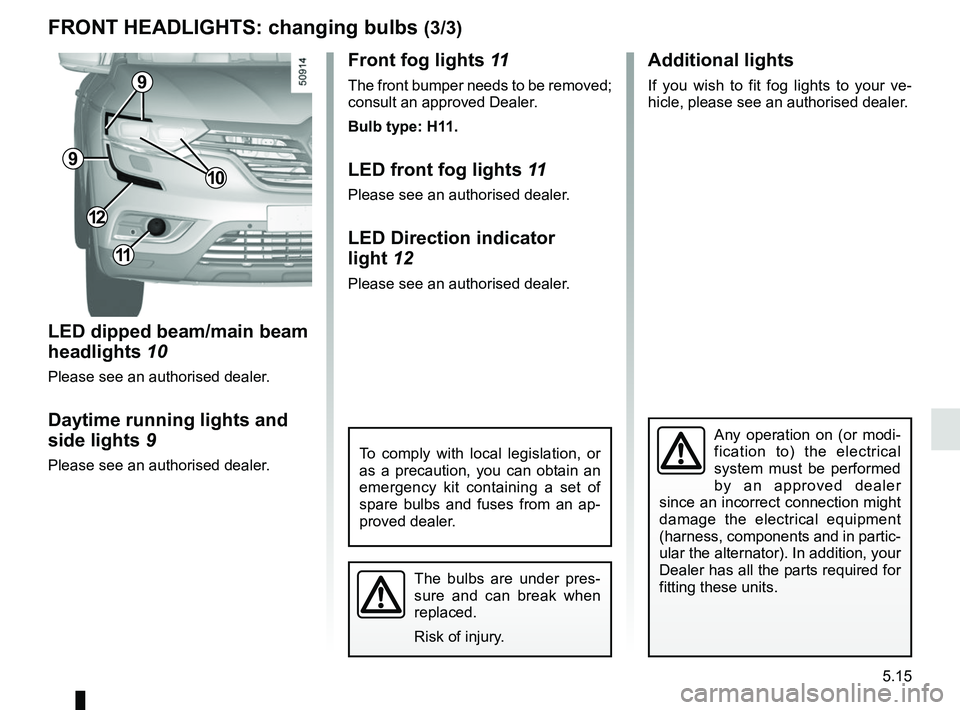
Front fog lights 11
The front bumper needs to be removed;
consult an approved Dealer.
Bulb type: H11.
LED front fog lights 11
Please see an authorised dealer.
LED Direction indicator
light 12
Please see an authorised dealer.
The bulbs are under pres-
sure and can break when
replaced.
Risk of injury.
FRONT HEADLIGHTS: changing bulbs (3/3)
To comply with local legislation, or
as a precaution, you can obtain an
emergency kit containing a set of
spare bulbs and fuses from an ap-
proved dealer.
Any operation on (or modi-
fication to) the electrical
system must be performed
by an approved dealer
since an incorrect connection might
damage the electrical equipment
(harness, components and in partic-
ular the alternator). In addition, your
Dealer has all the parts required for
fitting these units.
LED dipped beam/main beam
headlights 10
Please see an authorised dealer.
Daytime running lights and
side lights 9
Please see an authorised dealer.
11
Additional lights
If you wish to fit fog lights to your ve-
hicle, please see an authorised dealer.9
9
12
10
Page 280 of 332
5.16
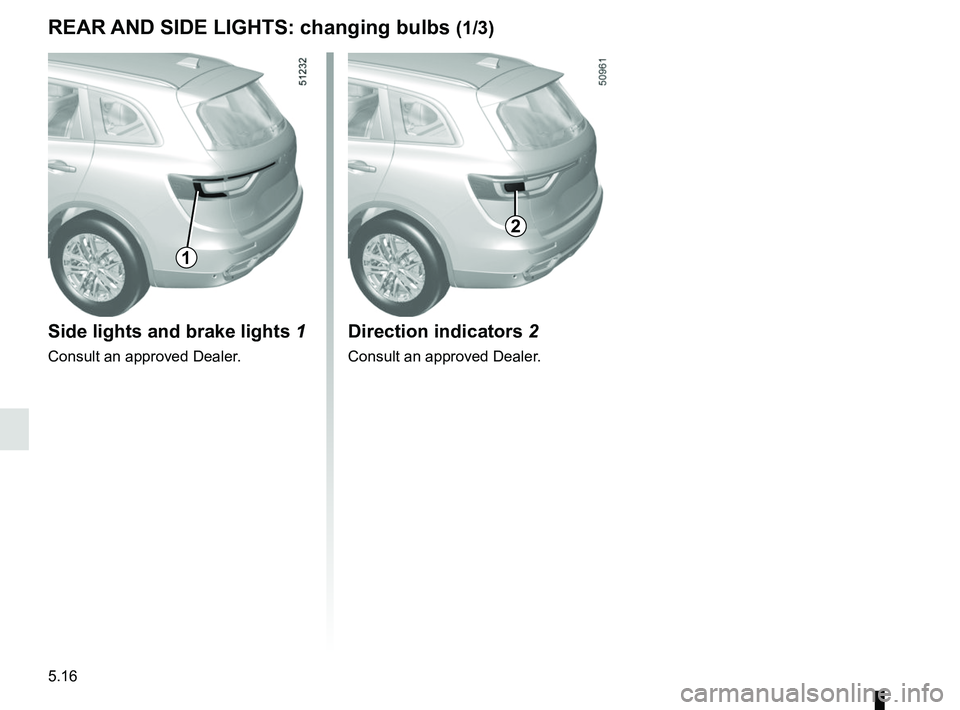
REAR AND SIDE LIGHTS: changing bulbs (1/3)
Side lights and brake lights 1
Consult an approved Dealer.
1
Direction indicators 2
Consult an approved Dealer.
2
Page 281 of 332
5.17
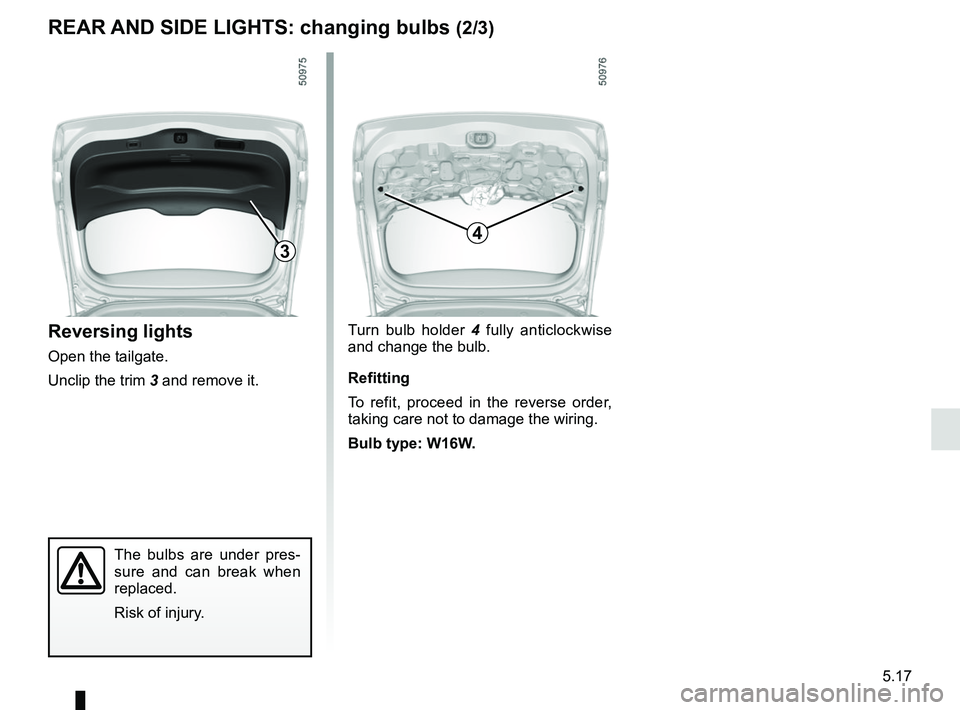
Turn bulb holder 4 fully anticlockwise
and change the bulb.
Refitting
To refit, proceed in the reverse order,
taking care not to damage the wiring.
Bulb type: W16W.
The bulbs are under pres-
sure and can break when
replaced.
Risk of injury.
Reversing lights
Open the tailgate.
Unclip the trim 3 and remove it.
REAR AND SIDE LIGHTS: changing bulbs (2/3)
3
4
Page 282 of 332
5.18
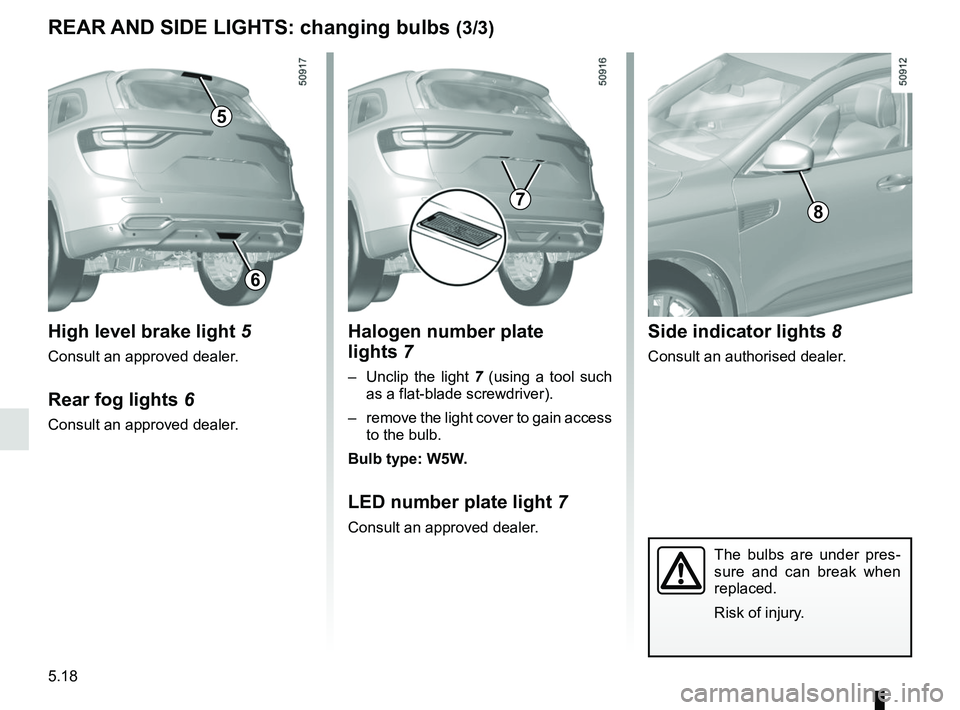
Halogen number plate
lights 7
– Unclip the light 7 (using a tool such
as a flat-blade screwdriver).
– remove the light cover to gain access to the bulb.
Bulb type: W5W.
LED number plate light 7
Consult an approved dealer.
REAR AND SIDE LIGHTS: changing bulbs (3/3)
The bulbs are under pres-
sure and can break when
replaced.
Risk of injury.
Side indicator lights 8
Consult an authorised dealer.
8
High level brake light 5
Consult an approved dealer.
Rear fog lights 6
Consult an approved dealer.
5
7
6
Page 283 of 332
5.19
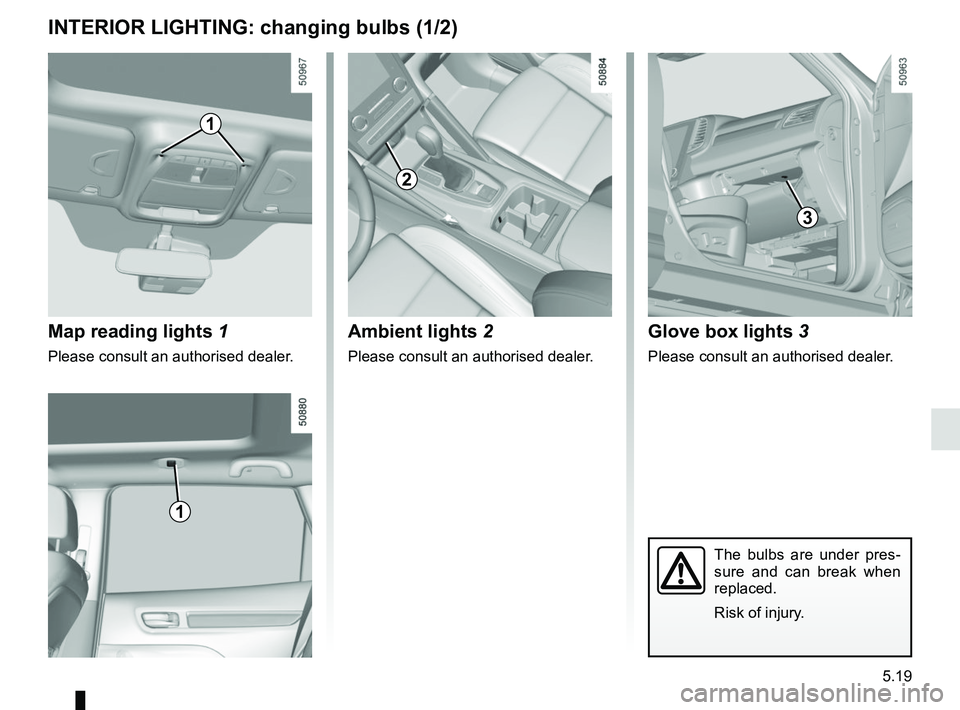
INTERIOR LIGHTING: changing bulbs (1/2)
Map reading lights 1
Please consult an authorised dealer.
1
The bulbs are under pres-
sure and can break when
replaced.
Risk of injury.
5
1
2
Ambient lights 2
Please consult an authorised dealer.
Glove box lights 3
Please consult an authorised dealer.
3
Page 284 of 332
5.20
INTERIOR LIGHTING: changing bulbs (2/2)
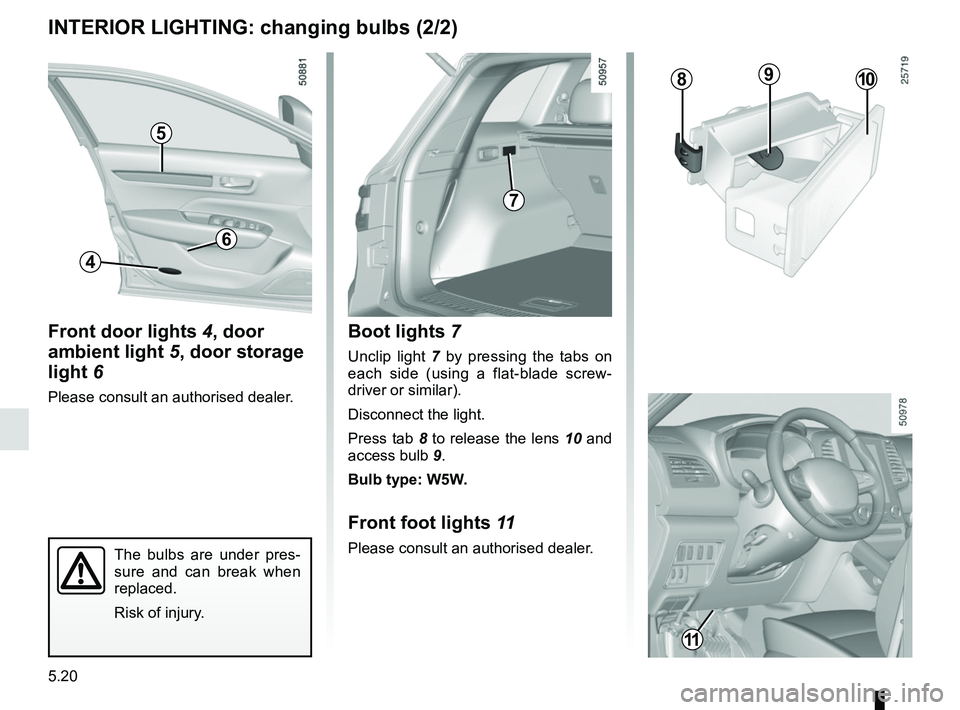
Boot lights 7
Unclip light 7 by pressing the tabs on
each side (using a flat-blade screw-
driver or similar).
Disconnect the light.
Press tab 8 to release the lens 10 and
access bulb 9.
Bulb type: W5W.
Front foot lights 11
Please consult an authorised dealer.The bulbs are under pres-
sure and can break when
replaced.
Risk of injury.
7
89
Front door lights 4, door
ambient light 5, door storage
light 6
Please consult an authorised dealer.
4
6
5
10
11
Page 287 of 332
5.23
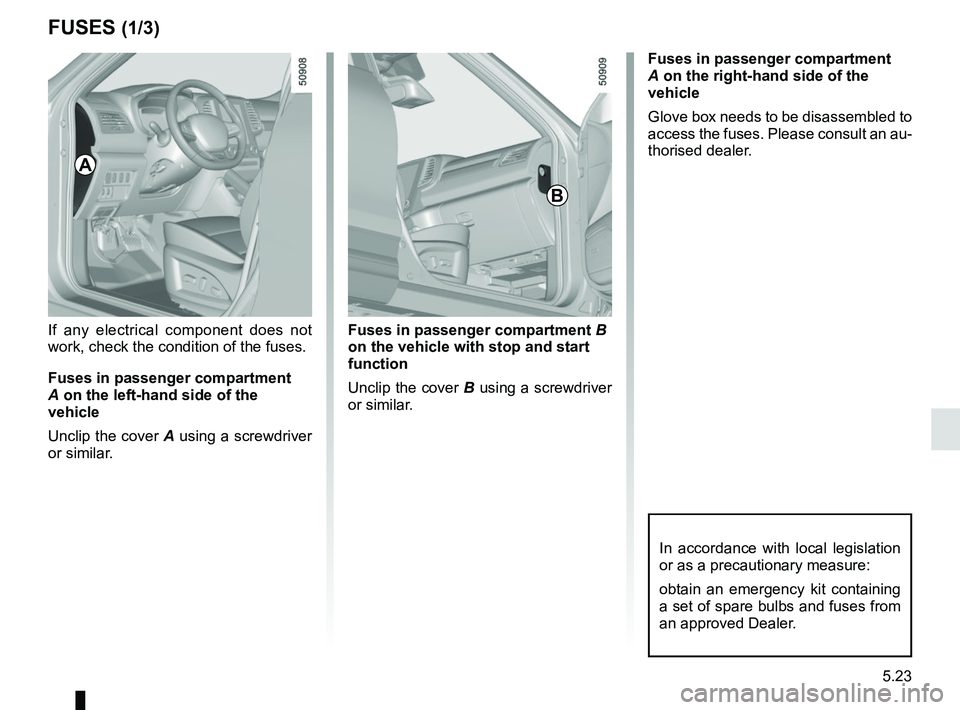
Fuses in passenger compartment B
on the vehicle with stop and start
function
Unclip the cover B using a screwdriver
or similar.
FUSES (1/3)
A
In accordance with local legislation
or as a precautionary measure:
obtain an emergency kit containing
a set of spare bulbs and fuses from
an approved Dealer.
If any electrical component does not
work, check the condition of the fuses.
Fuses in passenger compartment
A on the left-hand side of the
vehicle
Unclip the cover A using a screwdriver
or similar.
B
Fuses in passenger compartment
A on the right-hand side of the
vehicle
Glove box needs to be disassembled to
access the fuses. Please consult an au-
thorised dealer.