oil RENAULT KOLEOS 2018 Owners Manual
[x] Cancel search | Manufacturer: RENAULT, Model Year: 2018, Model line: KOLEOS, Model: RENAULT KOLEOS 2018Pages: 332, PDF Size: 8.91 MB
Page 2 of 332

A passion for performance
ELF, partner of
RENAULT recommends ELF
Partners in cutting-edge automotive technology, Elf and Renault combine their expertise on both
the racetrack and the city streets. This enduring partnership gives drivers a range of lubricants
perfectly suited to Renault cars. Lasting protection and optimum performance for your engine –
guaranteed. Whether changing the oil or simply topping up, to find the approved ELF lubricant
best suited to your vehicle, ask your Renault dealer for a recommendation or consult your vehi-
cle maintenance handbook.
www.lubricants.elf.com
A brand from
2016-Elf-ENG.indd 118/05/2016 14:20
Page 61 of 332
1.55
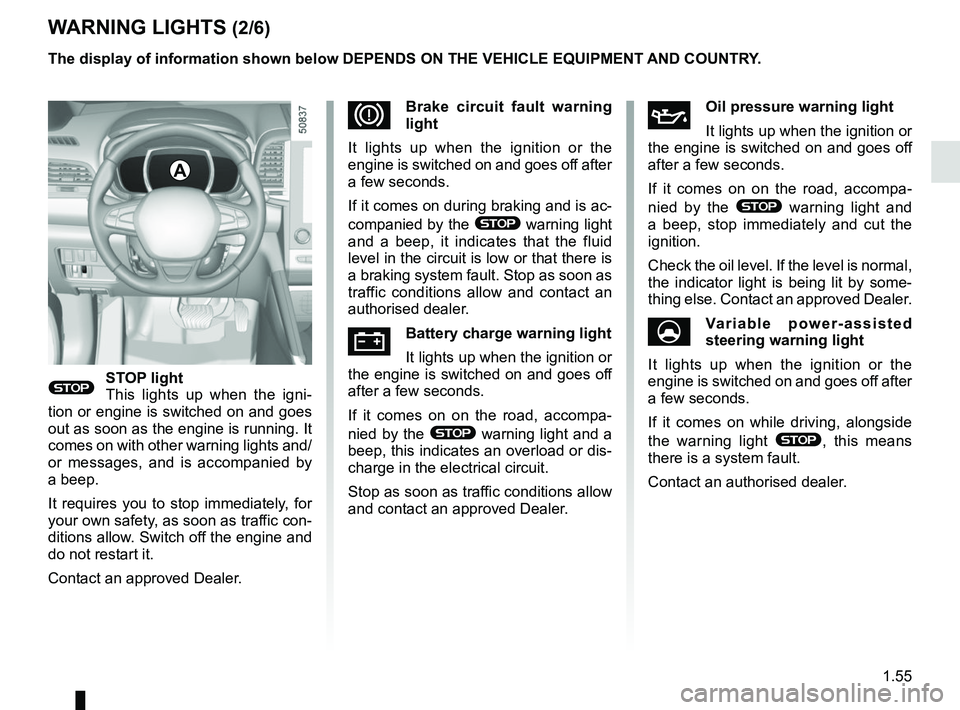
WARNING LIGHTS (2/6)
®STOP light
This lights up when the igni-
tion or engine is switched on and goes
out as soon as the engine is running. It
comes on with other warning lights and/
or messages, and is accompanied by
a beep.
It requires you to stop immediately, for
your own safety, as soon as traffic con-
ditions allow. Switch off the engine and
do not restart it.
Contact an approved Dealer.
ÀOil pressure warning light
It lights up when the ignition or
the engine is switched on and goes off
after a few seconds.
If it comes on on the road, accompa-
nied by the
® warning light and
a beep, stop immediately and cut the
ignition.
Check the oil level. If the level is normal,
the indicator light is being lit by some-
thing else. Contact an approved Dealer.
UVariable power-assisted
steering warning light
It lights up when the ignition or the
engine is switched on and goes off after
a few seconds.
If it comes on while driving, alongside
the warning light
®, this means
there is a system fault.
Contact an authorised dealer.
DBrake circuit fault warning
light
It lights up when the ignition or the
engine is switched on and goes off after
a few seconds.
If it comes on during braking and is ac-
companied by the
® warning light
and a beep, it indicates that the fluid
level in the circuit is low or that there is
a braking system fault. Stop as soon as
traffic conditions allow and contact an
authorised dealer.
ÚBattery charge warning light
It lights up when the ignition or
the engine is switched on and goes off
after a few seconds.
If it comes on on the road, accompa-
nied by the
® warning light and a
beep, this indicates an overload or dis-
charge in the electrical circuit.
Stop as soon as traffic conditions allow
and contact an approved Dealer.
A
The display of information shown below DEPENDS ON THE VEHICLE EQUIPMENT \
AND COUNTRY.
Page 67 of 332
1.61
DISPLAYS AND INDICATORS (2/2)
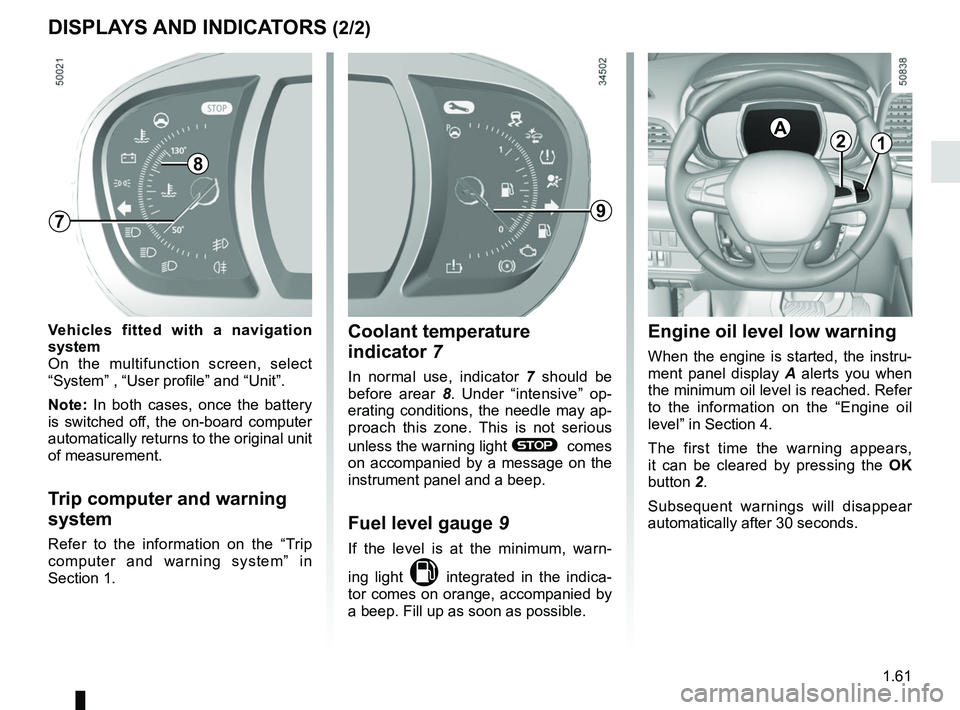
Engine oil level low warning
When the engine is started, the instru-
ment panel display A alerts you when
the minimum oil level is reached. Refer
to the information on the “Engine oil
level” in Section 4.
The first time the warning appears,
it can be cleared by pressing the OK
button 2.
Subsequent warnings will disappear
automatically after 30 seconds.
2A
Coolant temperature
indicator 7
In normal use, indicator 7 should be
before arear 8. Under “intensive” op-
erating conditions, the needle may ap-
proach this zone. This is not serious
unless the warning light
® comes
on accompanied by a message on the
instrument panel and a beep.
Fuel level gauge 9
If the level is at the minimum, warn-
ing light
M integrated in the indica-
tor comes on orange, accompanied by
a beep. Fill up as soon as possible.
9
Vehicles fitted with a navigation
system
On the multifunction screen, select
“System” , “User profile” and “Unit”.
Note: In both cases, once the battery
is switched off, the on-board computer
automatically returns to the original unit
of measurement.
Trip computer and warning
system
Refer to the information on the “Trip
computer and warning system” in
Section 1.
7
1
8
Page 72 of 332
1.66
ON-BOARD COMPUTER: trip settings (3/5)
The display of information shown below DEPENDS ON THE VEHICLE EQUIPMENT \
AND COUNTRY.
Examples of selectionsInterpreting the display selected
On-board computer with mileage-
before-service message
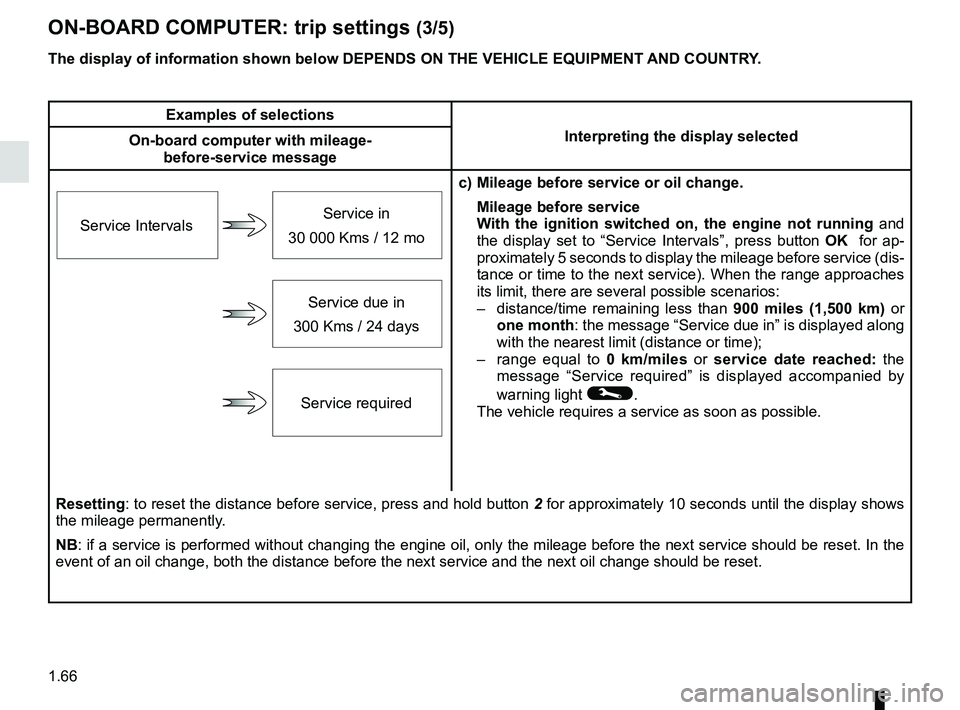
c) Mileage before service or oil change.Mileage before service
With the ignition switched on, the engine not running and
the display set to “Service Intervals”, press button OK for ap-
proximately 5 seconds to display the mileage before service (dis-
tance or time to the next service). When the range approaches
its limit, there are several possible scenarios:
– distance/time remaining less than 900 miles (1,500 km) or
one month : the message “Service due in” is displayed along
with the nearest limit (distance or time);
– range equal to 0 km/miles or service date reached: the
message “Service required” is displayed accompanied by
warning light
©.
The vehicle requires a service as soon as possible.
Service Intervals
Service in
30 000 Kms / 12 mo
Service due in
300 Kms / 24 days
Service required
Resetting: to reset the distance before service, press and hold button 2 for approximately 10 seconds until the display shows
the mileage permanently.
NB: if a service is performed without changing the engine oil, only the mi\
leage before the next service should be reset. In the
event of an oil change, both the distance before the next service and th\
e next oil change should be reset.
Page 73 of 332
1.67
The display of information shown below DEPENDS ON THE VEHICLE EQUIPMENT \
AND COUNTRY.
ON-BOARD COMPUTER: trip settings (4/5)
Examples of selectionsInterpreting the display selected
On-board computer with distance before
next service message (cntd.)
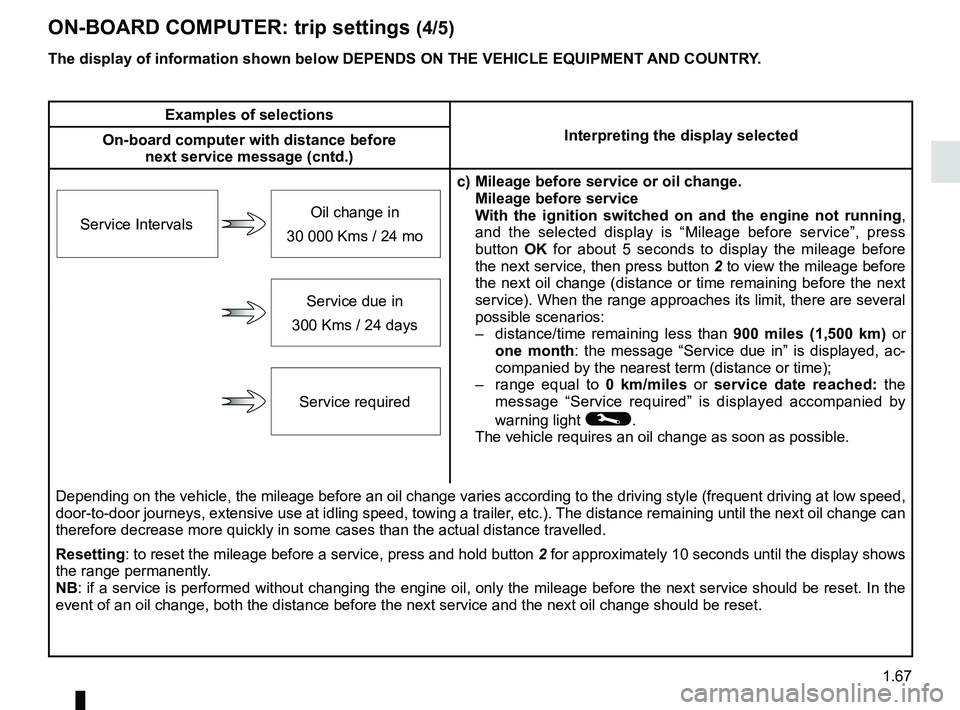
c) Mileage before service or oil change.Mileage before service
With the ignition switched on and the engine not running ,
and the selected display is “Mileage before service”, press
button OK for about 5 seconds to display the mileage before
the next service, then press button 2 to view the mileage before
the next oil change (distance or time remaining before the next
service). When the range approaches its limit, there are several
possible scenarios:
– distance/time remaining less than 900 miles (1,500 km) or
one month : the message “Service due in” is displayed, ac-
companied by the nearest term (distance or time);
– range equal to 0 km/miles or service date reached: the
message “Service required” is displayed accompanied by
warning light
©.
The vehicle requires an oil change as soon as possible.
Service Intervals
Oil change in
30 000 Kms / 24 mo
Service due in
300 Kms / 24 days
Service required
Depending on the vehicle, the mileage before an oil change varies accord\
ing to the driving style (frequent driving at low speed ,
door-to-door journeys, extensive use at idling speed, towing a trailer, etc.). The distance remaining until the next oil change can
therefore decrease more quickly in some cases than the actual distance t\
ravelled.
Resetting: to reset the mileage before a service, press and hold button 2 for approximately 10 seconds until the display shows
the range permanently.
NB: if a service is performed without changing the engine oil, only the mi\
leage before the next service should be reset. In the
event of an oil change, both the distance before the next service and th\
e next oil change should be reset.
Page 76 of 332
1.70
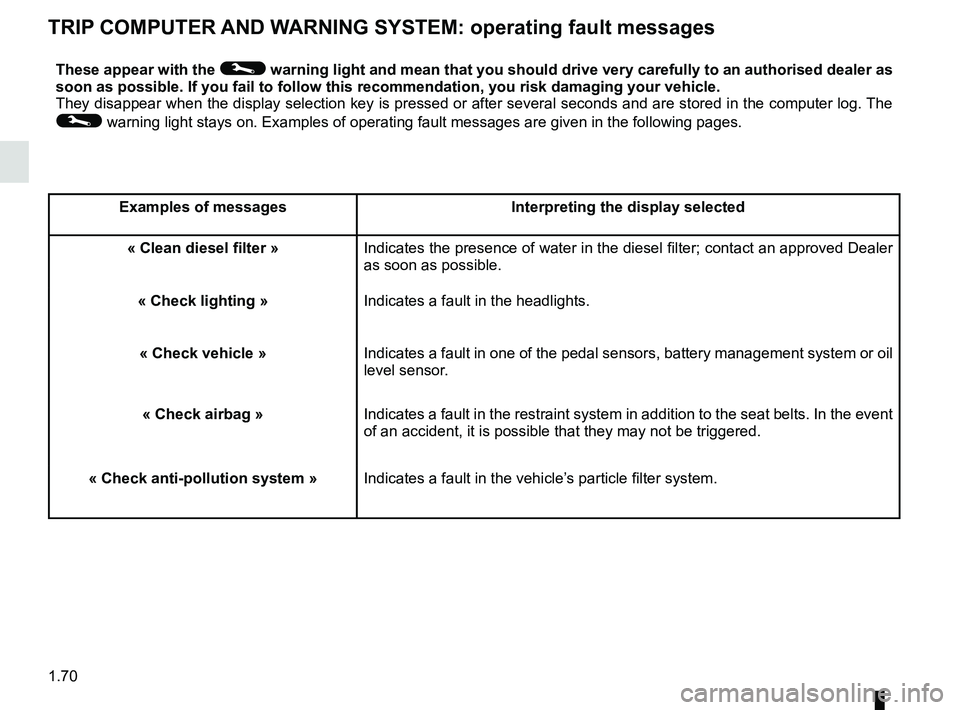
TRIP COMPUTER AND WARNING SYSTEM: operating fault messages
These appear with the © warning light and mean that you should drive very carefully to an author\
ised dealer as
soon as possible. If you fail to follow this recommendation, you risk da\
maging your vehicle.
They disappear when the display selection key is pressed or after severa\
l seconds and are stored in the computer log. The
© warning light stays on. Examples of operating fault messages are given \
in the following pages.
Examples of messages Interpreting the display selected« Clean diesel filter » Indicates the presence of water in the diesel filter; contact an approve\
d Dealer
as soon as possible.
« Check lighting » Indicates a fault in the headlights.
« Check vehicle » Indicates a fault in one of the pedal sensors, battery management system\
or oil
level sensor.
« Check airbag » Indicates a fault in the restraint system in addition to the seat belts.\
In the event
of an accident, it is possible that they may not be triggered.
« Check anti-pollution system » Indicates a fault in the vehicle’s particle filter system.
Page 113 of 332
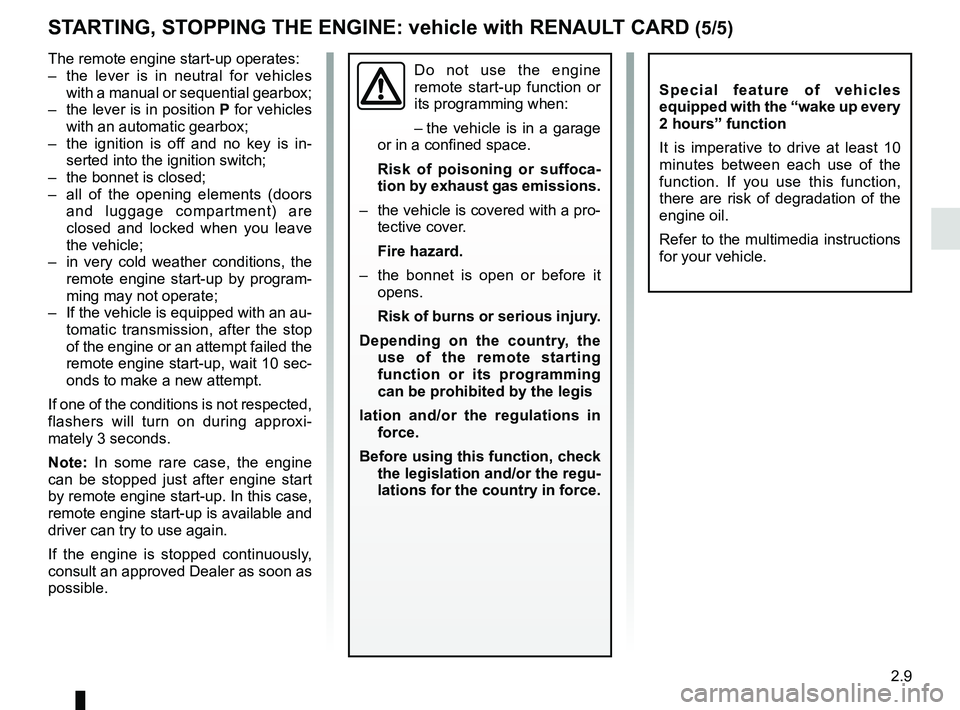
2.9
Do not use the engine
remote start-up function or
its programming when:
– the vehicle is in a garage
or in a confined space.
Risk of poisoning or suffoca-
tion by exhaust gas emissions.
– the vehicle is covered with a pro- tective cover.
Fire hazard.
– the bonnet is open or before it opens.
Risk of burns or serious injury.
Depending on the country, the use of the remote starting
function or its programming
can be prohibited by the legis
lation and/or the regulations in force.
Before using this function, check the legislation and/or the regu-
lations for the country in force.The remote engine start-up operates:
– the lever is in neutral for vehicles with a manual or sequential gearbox;
– the lever is in position P for vehicles
with an automatic gearbox;
– the ignition is off and no key is in- serted into the ignition switch;
– the bonnet is closed;
– all of the opening elements (doors and luggage compartment) are
closed and locked when you leave
the vehicle;
– in very cold weather conditions, the remote engine start-up by program-
ming may not operate;
– If the vehicle is equipped with an au- tomatic transmission, after the stop
of the engine or an attempt failed the
remote engine start-up, wait 10 sec-
onds to make a new attempt.
If one of the conditions is not respected,
flashers will turn on during approxi-
mately 3 seconds.
Note: In some rare case, the engine
can be stopped just after engine start
by remote engine start-up. In this case,
remote engine start-up is available and
driver can try to use again.
If the engine is stopped continuously,
consult an approved Dealer as soon as
possible.
STARTING, STOPPING THE ENGINE: vehicle with RENAULT CARD (5/5)
Special feature of vehicles
equipped with the “wake up every
2 hours” function
It is imperative to drive at least 10
minutes between each use of the
function. If you use this function,
there are risk of degradation of the
engine oil.
Refer to the multimedia instructions
for your vehicle.
Page 131 of 332
2.27
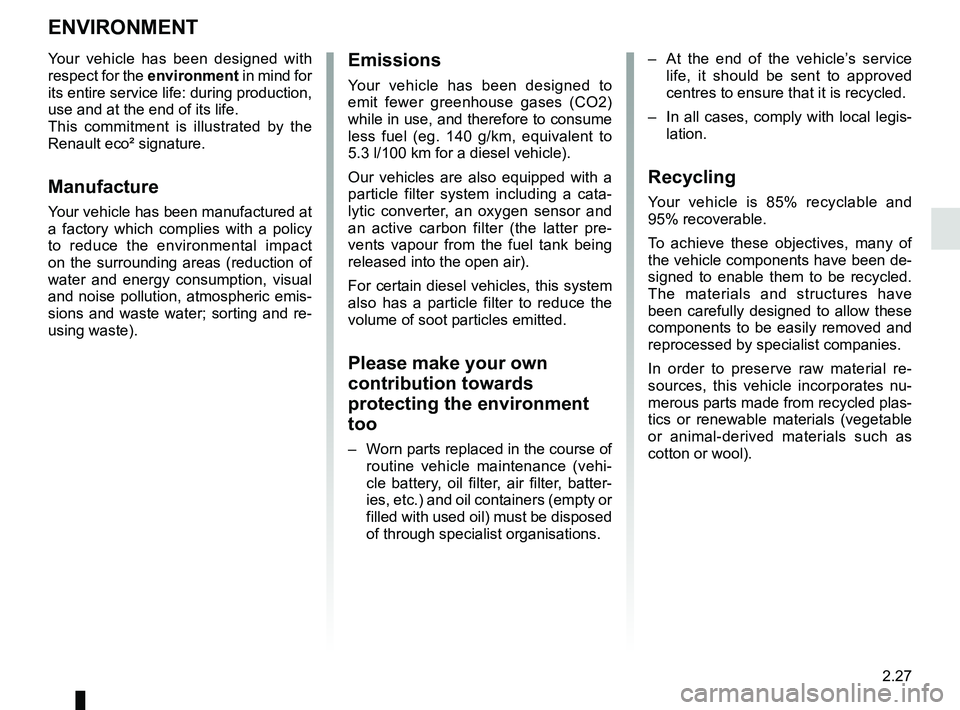
ENVIRONMENT
Emissions
Your vehicle has been designed to
emit fewer greenhouse gases (CO2)
while in use, and therefore to consume
less fuel (eg. 140 g/km, equivalent to
5.3 l/100 km for a diesel vehicle).
Our vehicles are also equipped with a
particle filter system including a cata-
lytic converter, an oxygen sensor and
an active carbon filter (the latter pre-
vents vapour from the fuel tank being
released into the open air).
For certain diesel vehicles, this system
also has a particle filter to reduce the
volume of soot particles emitted.
Please make your own
contribution towards
protecting the environment
too
– Worn parts replaced in the course of routine vehicle maintenance (vehi-
cle battery, oil filter, air filter, batter-
ies, etc.) and oil containers (empty or
filled with used oil) must be disposed
of through specialist organisations. – At the end of the vehicle’s service
life, it should be sent to approved
centres to ensure that it is recycled.
– In all cases, comply with local legis- lation.
Recycling
Your vehicle is 85% recyclable and
95% recoverable.
To achieve these objectives, many of
the vehicle components have been de-
signed to enable them to be recycled.
The materials and structures have
been carefully designed to allow these
components to be easily removed and
reprocessed by specialist companies.
In order to preserve raw material re-
sources, this vehicle incorporates nu-
merous parts made from recycled plas-
tics or renewable materials (vegetable
or animal-derived materials such as
cotton or wool).
Your vehicle has been designed with
respect for the environment in mind for
its entire service life: during production,
use and at the end of its life.
This commitment is illustrated by the
Renault eco² signature.Manufacture
Your vehicle has been manufactured at
a factory which complies with a policy
to reduce the environmental impact
on the surrounding areas (reduction of
water and energy consumption, visual
and noise pollution, atmospheric emis-
sions and waste water; sorting and re-
using waste).
Page 197 of 332
3.1
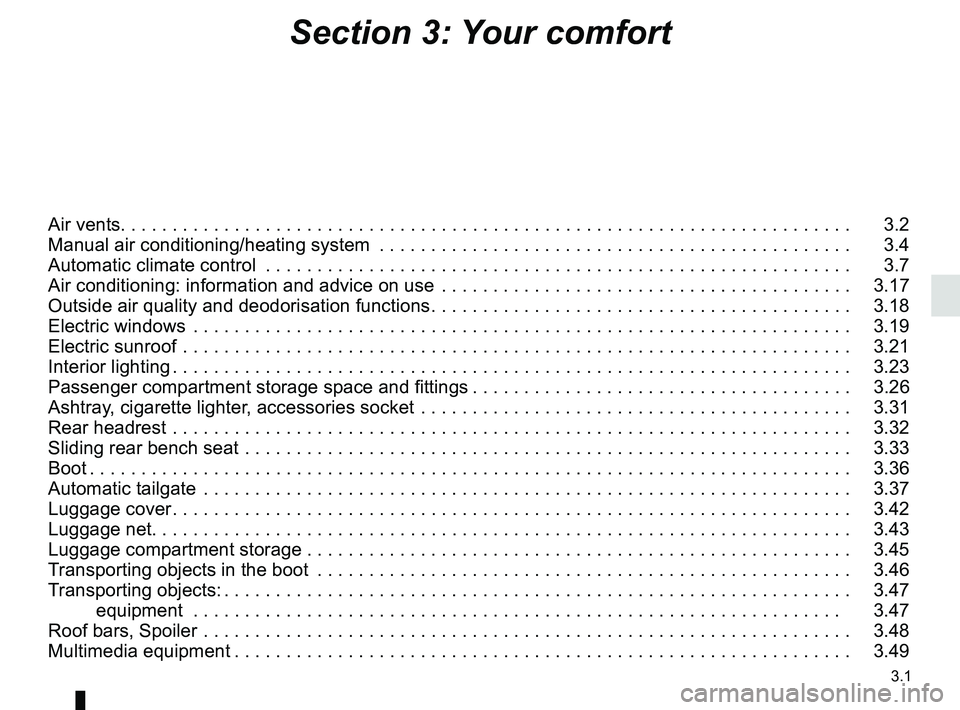
Section 3: Your comfort
Air vents. . . . . . . . . . . . . . . . . . . . . . . . . . . . . . . .\
. . . . . . . . . . . . . . . . . . . . . . . . . . . . . . . . . . . . . . . 3.2
Manual air conditioning/heating system . . . . . . . . . . . . . . . . . . . . . . . . . . . . . . . . . . . .\
. . . . . . . . . . 3.4
Automatic climate control . . . . . . . . . . . . . . . . . . . . . . . . . . . . . . . . . . . .\
. . . . . . . . . . . . . . . . . . . . . 3.7
Air conditioning: information and advice on use . . . . . . . . . . . . . . . . . . . . . . . . . . . . . . . . . . . .\
. . . . 3.17
Outside air quality and deodorisation functions . . . . . . . . . . . . . . . . . . . . . . . . . . . . . . . . . . . . \
. . . . . 3.18
Electric windows . . . . . . . . . . . . . . . . . . . . . . . . . . . . . . . . . . . .\
. . . . . . . . . . . . . . . . . . . . . . . . . . . . 3.19
Electric sunroof . . . . . . . . . . . . . . . . . . . . . . . . . . . . . . . . . . . .\
. . . . . . . . . . . . . . . . . . . . . . . . . . . . . 3.21
Interior lighting . . . . . . . . . . . . . . . . . . . . . . . . . . . . . . . . . . . . \
. . . . . . . . . . . . . . . . . . . . . . . . . . . . . . 3.23
Passenger compartment storage space and fittings . . . . . . . . . . . . . . . . . . . . . . . . . . . . . . . . . . . . \
. 3.26
Ashtray, cigarette lighter, accessories socket . . . . . . . . . . . . . . . . . . . . . . . . . . . . . . . . . . . .\
. . . . . . 3.31
Rear headrest . . . . . . . . . . . . . . . . . . . . . . . . . . . . . . . . . . . .\
. . . . . . . . . . . . . . . . . . . . . . . . . . . . . . 3.32
Sliding rear bench seat . . . . . . . . . . . . . . . . . . . . . . . . . . . . . . . . . . . .\
. . . . . . . . . . . . . . . . . . . . . . . 3.33
Boot . . . . . . . . . . . . . . . . . . . . . . . . . . . . . . . . . . . . \
. . . . . . . . . . . . . . . . . . . . . . . . . . . . . . . . . . . . . . 3.36
Automatic tailgate . . . . . . . . . . . . . . . . . . . . . . . . . . . . . . . . . . . .\
. . . . . . . . . . . . . . . . . . . . . . . . . . . 3.37
Luggage cover . . . . . . . . . . . . . . . . . . . . . . . . . . . . . . . . . . . . \
. . . . . . . . . . . . . . . . . . . . . . . . . . . . . . 3.42
Luggage net. . . . . . . . . . . . . . . . . . . . . . . . . . . . . . . . . . . . \
. . . . . . . . . . . . . . . . . . . . . . . . . . . . . . . . 3.43
Luggage compartment storage . . . . . . . . . . . . . . . . . . . . . . . . . . . . . . . . . . . .\
. . . . . . . . . . . . . . . . . 3.45
Transporting objects in the boot . . . . . . . . . . . . . . . . . . . . . . . . . . . . . . . . . . . .\
. . . . . . . . . . . . . . . . 3.46
Transporting objects: . . . . . . . . . . . . . . . . . . . . . . . . . . . . . . . . . . . . \
. . . . . . . . . . . . . . . . . . . . . . . . . 3.47 equipment . . . . . . . . . . . . . . . . . . . . . . . . . . . . . . . . . . . .\
. . . . . . . . . . . . . . . . . . . . . . . . . . . 3.47
Roof bars, Spoiler . . . . . . . . . . . . . . . . . . . . . . . . . . . . . . . . . . . .\
. . . . . . . . . . . . . . . . . . . . . . . . . . . 3.48
Multimedia equipment . . . . . . . . . . . . . . . . . . . . . . . . . . . . . . . . . . . . \
. . . . . . . . . . . . . . . . . . . . . . . . 3.49
Page 244 of 332
3.48
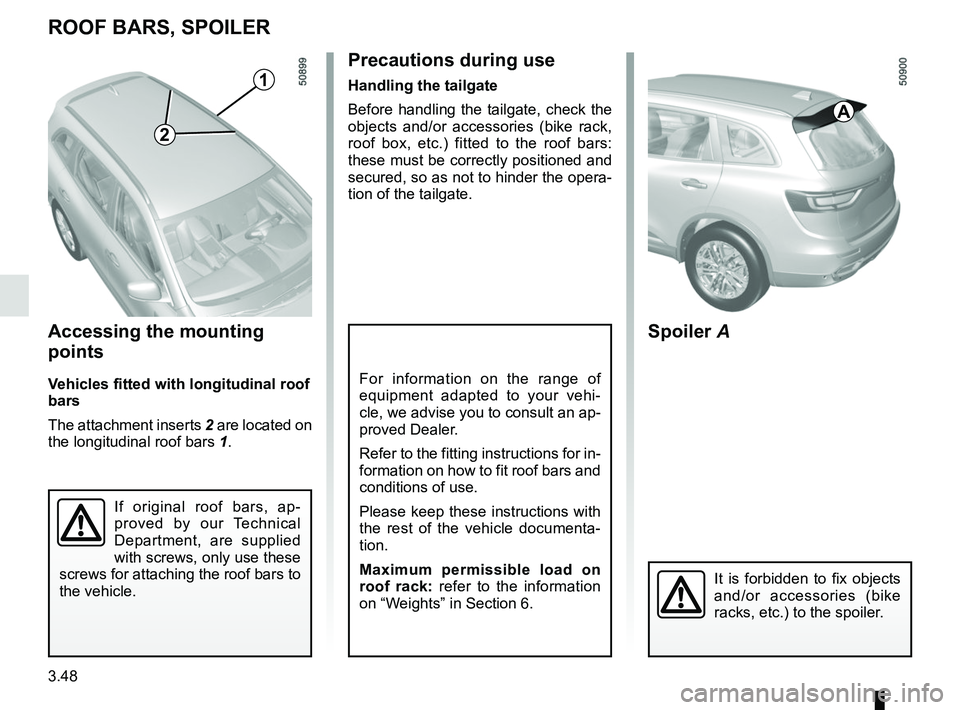
Accessing the mounting
points
Vehicles fitted with longitudinal roof
bars
The attachment inserts 2 are located on
the longitudinal roof bars 1.
ROOF BARS, SPOILER
If original roof bars, ap-
proved by our Technical
Department, are supplied
with screws, only use these
screws for attaching the roof bars to
the vehicle.
1
2
A
Spoiler A
It is forbidden to fix objects
and/or accessories (bike
racks, etc.) to the spoiler.
For information on the range of
equipment adapted to your vehi-
cle, we advise you to consult an ap-
proved Dealer.
Refer to the fitting instructions for in-
formation on how to fit roof bars and
conditions of use.
Please keep these instructions with
the rest of the vehicle documenta-
tion.
Maximum permissible load on
roof rack: refer to the information
on “Weights” in Section 6.
Precautions during use
Handling the tailgate
Before handling the tailgate, check the
objects and/or accessories (bike rack,
roof box, etc.) fitted to the roof bars:
these must be correctly positioned and
secured, so as not to hinder the opera-
tion of the tailgate.