engine RENAULT LAGUNA TOURER 2012 X91 / 3.G Manual PDF
[x] Cancel search | Manufacturer: RENAULT, Model Year: 2012, Model line: LAGUNA TOURER, Model: RENAULT LAGUNA TOURER 2012 X91 / 3.GPages: 241, PDF Size: 7.82 MB
Page 190 of 241
lightsfront ................................................. (up to the end of the DU)
lights changing bulbs ................................ (up to the end of the DU)
changing a bulb .................................... (up to the end of the DU)
indicators .............................................. (up to the end of the DU)
bulbs changing ......................................... (up to the end of the DU)
lights: dipped beam headlights .................. (up to the end of the DU)
lights: direction indicators .......................... (up to the end of the DU)
lights: main beam headlights ..................... (up to the end of the DU)
bulbs changing ......................................... (up to the end of the DU)
5.14
ENG_UD29072_3
Projecteurs avant avec lampes halogènes : remplacement des lampes (X\
91 - B91 - K91 - Renault)
ENG_NU_936-5_BK91_Renault_5
Front side light
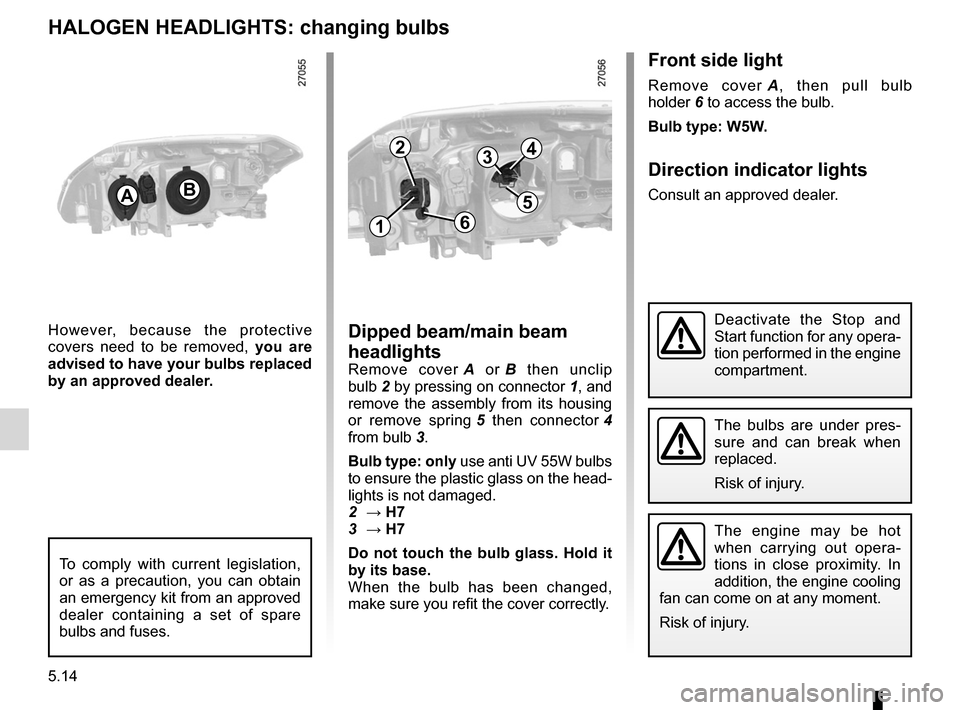
Remove cover A , then pull bulb
holder 6 to access the bulb.
Bulb type: W5W.
Direction indicator lights
Consult an approved dealer.
Headlights (changing bulbs)
HALOGen HeADLIGHtS: changing bulbs
The engine may be hot
when carrying out opera -
tions in close proximity. In
addition, the engine cooling
fan can come on at any moment.
Risk of injury.
The bulbs are under pres -
sure and can break when
replaced.
Risk of injury.
However, because the protective
covers need to be removed, you are
advised to have your bulbs replaced
by an approved dealer.Dipped beam/main beam
headlights
Remove cover A or B then unclip
bulb 2 by pressing on connector 1, and
remove the assembly from its housing
or remove spring 5 then connector 4
from bulb 3.
Bulb type: only use anti UV 55W bulbs
to ensure the plastic glass on the head -
lights is not damaged.
2 → H7
3 → H7
Do not touch the bulb glass. Hold it
by its base.
When the bulb has been changed,
make sure you refit the cover correctly.
AB
1
234
6
5
To comply with current legislation,
or as a precaution, you can obtain
an emergency kit from an approved
dealer containing a set of spare
bulbs and fuses.
Deactivate the Stop and
Start function for any opera -
tion performed in the engine
compartment.
Page 191 of 241
bulbschanging ......................................... (up to the end of the DU)
lights: dipped beam headlights .................. (up to the end of the DU)
changing a bulb .................................... (up to the end of the DU)
lights: direction indicators .......................... (up to the end of the DU)
lights: side lights ........................................ (up to the end of the DU)
bulbs changing ......................................... (up to the end of the DU)
lights front ................................................. (up to the end of the DU)
5.15
ENG_UD29073_3
Projecteurs lampes xénon : remplacement des lampes (X91 - B91 - K91 \
- Renault)
ENG_NU_936-5_BK91_Renault_5
XenOn HeADLIGHtS: changing bulbs
Because some components (the bat -
tery, its mounting) need to be removed,
you are advised to have your bulbs
replaced by an approved dealer.
Dipped beam headlights with
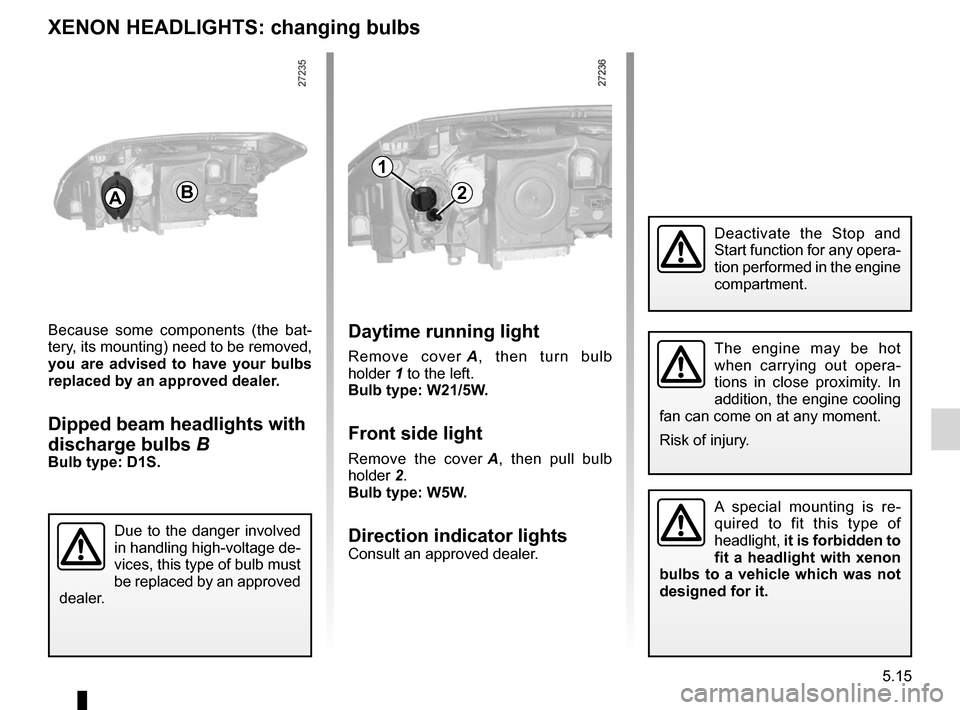
discharge bulbs B
Bulb type: D1S.
A special mounting is re -
quired to fit this type of
headlight, it is forbidden to
fit a headlight with xenon
bulbs to a vehicle which was not
designed for it.
Daytime running light
Remove cover A , then turn bulb
holder 1 to the left.
Bulb type: W21/5W.
Front side light
Remove the cover A , then pull bulb
holder 2.
Bulb type: W5W.
Direction indicator lightsConsult an approved dealer.
Due to the danger involved
in handling high-voltage de-
vices, this type of bulb must
be replaced by an approved
dealer.
The engine may be hot
when carrying out opera -
tions in close proximity. In
addition, the engine cooling
fan can come on at any moment.
Risk of injury.
AB
1
2
Deactivate the Stop and
Start function for any opera -
tion performed in the engine
compartment.
Page 201 of 241
JauneNoirNoir texte
5.25
ENG_UD23676_2
Fusibles (X91 - B91 - K91 - Renault)
ENG_NU_936-5_BK91_Renault_5
FuSeS (2/2)
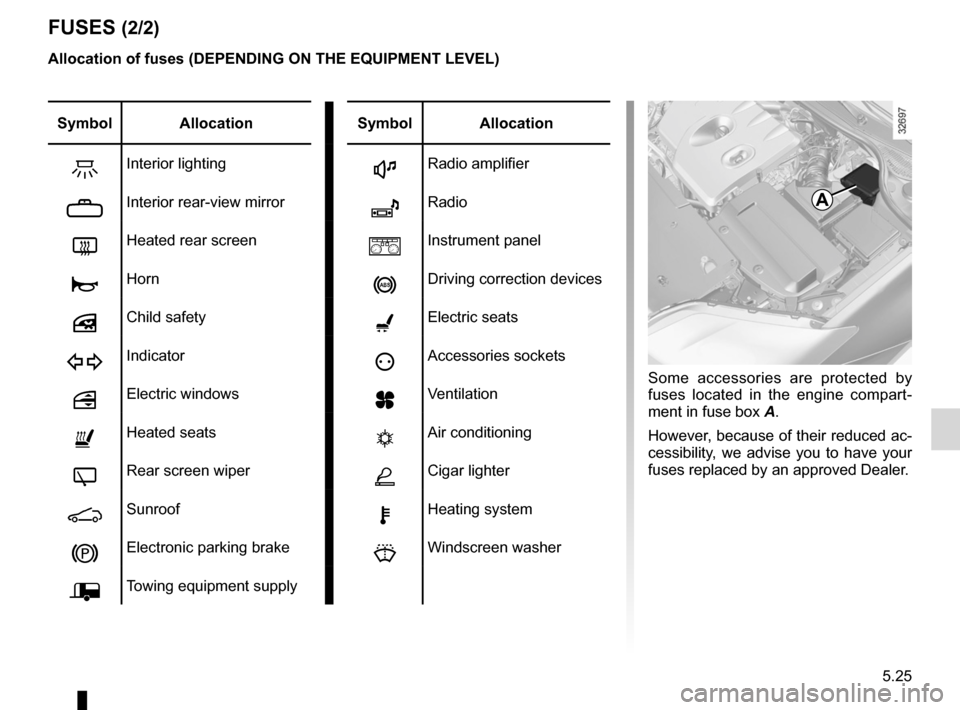
Some accessories are protected by
fuses located in the engine compart -
ment in fuse box A.
However, because of their reduced ac-
cessibility, we advise you to have your
fuses replaced by an approved Dealer.
Allocation of fuses (DePenDInG On tHe eQuIPMent LeVeL)
A
Symbol
Allocation SymbolAllocation
ZInterior lightingRadio amplifier
Interior rear-view mirrorîRadio
CHeated rear screenaInstrument panel
ÌHornnDriving correction devices
Child safetyElectric seats
DIndicatorëAccessories sockets
Electric windowsyVentilation
ñHeated seatstAir conditioning
ERear screen wiperÆCigar lighter
[SunroofHeating system
Electronic parking brakeHWindscreen washer
ÝTowing equipment supply
Page 202 of 241
batterytroubleshooting ............................... (up to the end of the DU)
5.26
ENG_UD29075_3
Batterie : dépannage (X91 - B91 - K91 - Renault)
ENG_NU_936-5_BK91_Renault_5
Jaune NoirNoir texte
Battery
connecting a battery charger
the battery charger must be com -
patible with a battery with nominal
voltage of 12 volts.
Follow the instructions given by the
manufacturer of the battery charger
you are using.
t o avoid all risk of sparks:
Do not place metal objects on the bat-
tery as this could create a short circuit
between the terminals.
Battery
Never disconnect it.
BA tter Y: troubleshooting (1/2)
Starting the vehicle using the
battery from another vehicle
If you have to use the battery from an-
other vehicle to start, obtain suitable
jump leads (with a large cross section)
from an approved dealer or, if you al -
ready have jump leads, ensure that
they are in perfect condition.
the two batteries must have an iden-
tical nominal voltage of 12 volts. The
battery supplying the current should
have a capacity (amp-hours, Ah) which
is at least the same as that of the dis-
charged battery.
Special procedures may be
required to charge some
batteries. Contact an ap -
proved Dealer.
Avoid all risk of sparks which may
cause an immediate explosion, and
charge the battery in a well-venti -
lated area.
Risk of serious injury.
Handle the battery with care
as it contains sulphuric acid,
which must not come into
contact with eyes or skin. If
it does, wash the affected area with
plenty of cold water. If necessary,
consult a doctor.
Ensure that naked flames, red hot
objects and sparks do not come into
contact with the battery as there is a
risk of explosion.
The engine may be hot when car -
rying out operations in close prox -
imity. In addition, the engine cooling
fan can come on at any moment.
Risk of injury.
Deactivate the Stop and
Start function for any opera -
tion performed in the engine
compartment.
Page 203 of 241
JauneNoirNoir texte
5.27
ENG_UD29075_3
Batterie : dépannage (X91 - B91 - K91 - Renault)
ENG_NU_936-5_BK91_Renault_5
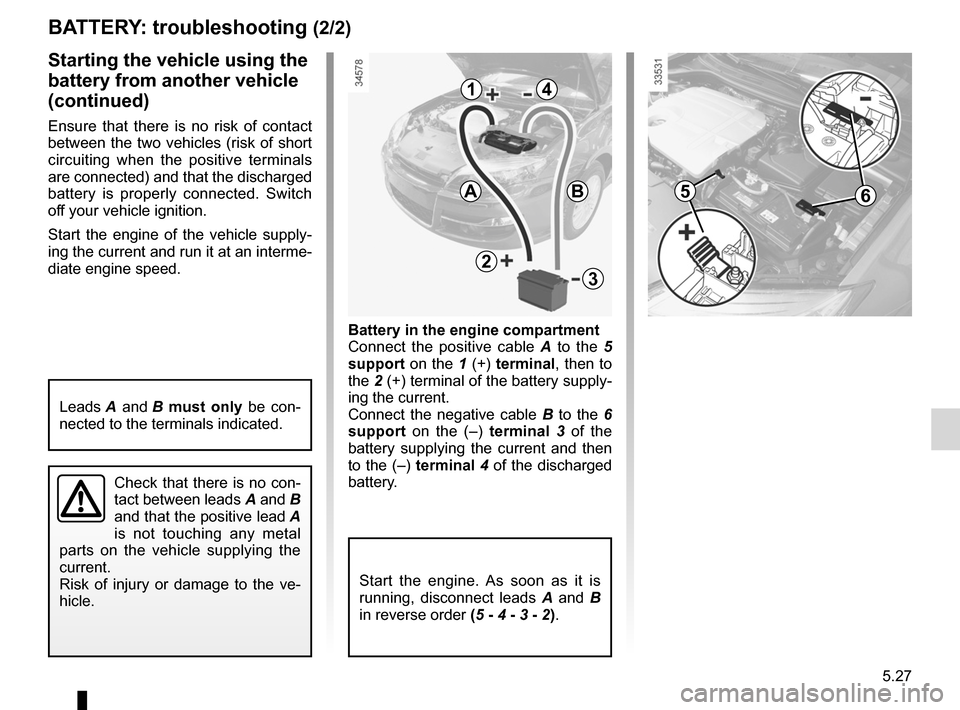
Battery in the engine compartment
Connect the positive cable A to the 5
support on the 1 (+) terminal, then to
the 2 (+) terminal of the battery supply -
ing the current.
Connect the negative cable B to the 6
support on the (–) terminal 3 of the
battery supplying the current and then
to the (–) terminal 4 of the discharged
battery.
BA tter Y: troubleshooting (2/2)
Starting the vehicle using the
battery from another vehicle
(continued)
Ensure that there is no risk of contact
between the two vehicles (risk of short
circuiting when the positive terminals
are connected) and that the discharged
battery is properly connected. Switch
off your vehicle ignition.
Start the engine of the vehicle supply -
ing the current and run it at an interme-
diate engine speed.
Start the engine. As soon as it is
running, disconnect leads A and B
in reverse order (5 - 4 - 3 - 2).
Check that there is no con-
tact between leads A and B
and that the positive lead A
is not touching any metal
parts on the vehicle supplying the
current.
Risk of injury or damage to the ve-
hicle.
Leads A and B must only be con-
nected to the terminals indicated.
56
14
AB
2
3
Page 206 of 241
wiper blades ......................................... (up to the end of the DU)
wipers blades ............................................. (up to the end of the DU)
5.30
ENG_UD20530_1
Balais d’essuie-vitres (X91 - B91 - K91 - Renault)
ENG_NU_936-5_BK91_Renault_5
Wipers (replacing blades)
WInDScreen WIPer BLADeS
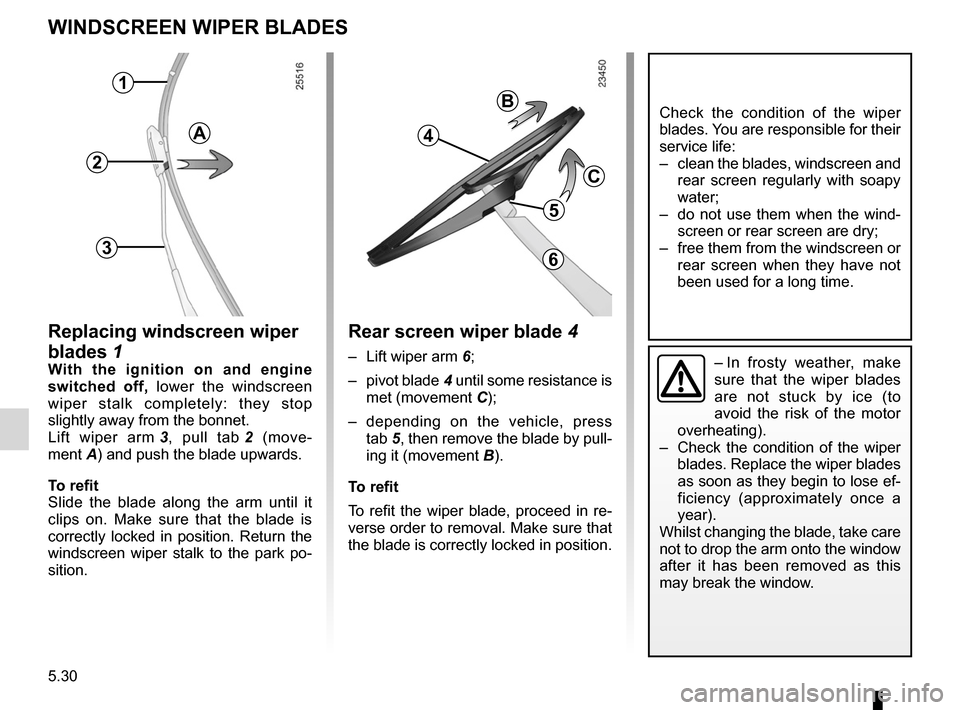
replacing windscreen wiper
blades 1
With the ignition on and engine
switched off, lower the windscreen
wiper stalk completely: they stop
slightly away from the bonnet.
Lift wiper arm 3 , pull tab 2 (move -
ment A) and push the blade upwards.
t o refit
Slide the blade along the arm until it
clips on. Make sure that the blade is
correctly locked in position. Return the
windscreen wiper stalk to the park po-
sition.– In frosty weather, make
sure that the wiper blades
are not stuck by ice (to
avoid the risk of the motor
overheating).
– Check the condition of the wiper
blades. Replace the wiper blades
as soon as they begin to lose ef-
ficiency (approximately once a
year).
Whilst changing the blade, take care
not to drop the arm onto the window
after it has been removed as this
may break the window.
Check the condition of the wiper
blades. You are responsible for their
service life:
– clean the blades, windscreen and
rear screen regularly with soapy
water;
– do not use them when the wind-
screen or rear screen are dry;
– free them from the windscreen or
rear screen when they have not
been used for a long time.
rear screen wiper blade 4
– Lift wiper arm 6;
– pivot blade 4 until some resistance is
met (movement C);
– depending on the vehicle, press
tab 5, then remove the blade by pull -
ing it (movement B).
t o refit
To refit the wiper blade, proceed in re-
verse order to removal. Make sure that
the blade is correctly locked in position.
A
1
2
3
B
4
c
5
6
Page 207 of 241
towingbreakdown ...................................... (up to the end of the DU)
towing hitch ........................................... (up to the end of the DU)
5.31
ENG_UD20531_1
Remorquage : dépannage (X91 - B91 - K91 - Renault)
ENG_NU_936-5_BK91_Renault_5
Towing
tOWInG : breakdown
Before towing, unlock the steering
column: with the clutch depressed,
engage first gear (lever in position n
or r for vehicles with automatic trans -
missions), insert the RENAULT card in
the card reader then press the engine
start button for two seconds.
The column is unlocked, the acces -
sory functions are supplied: the vehi -
cle lights can be used (indicators, brake
lights etc.). At night the vehicle must
have its lights on.
Once you have finished towing, press
the engine start button twice (risk of
running down the battery).
The speed specified by current legis -
lation for towing must always be ob -
served. If your vehicle is the towing
vehicle, do not exceed the maximum
towing weight for your vehicle (refer to
the information on “Weights” in Section
6).t owing a vehicle with an
automatic gearbox
With the engine switched off, the trans-
mission is no longer lubricated. It is
preferable to tow this type of vehicle on
a trailer or tow it with the front wheels
off the ground.
u nder exceptional circumstances ,
you may tow the vehicle with all four
wheels on the ground, only going for -
ward, with the gear lever in the n posi-
tion, and for a distance not exceeding
30 miles (50 km).
D o n o t r e m o v e t h e
RENAULT card from the
reader when the vehicle is
being towed.
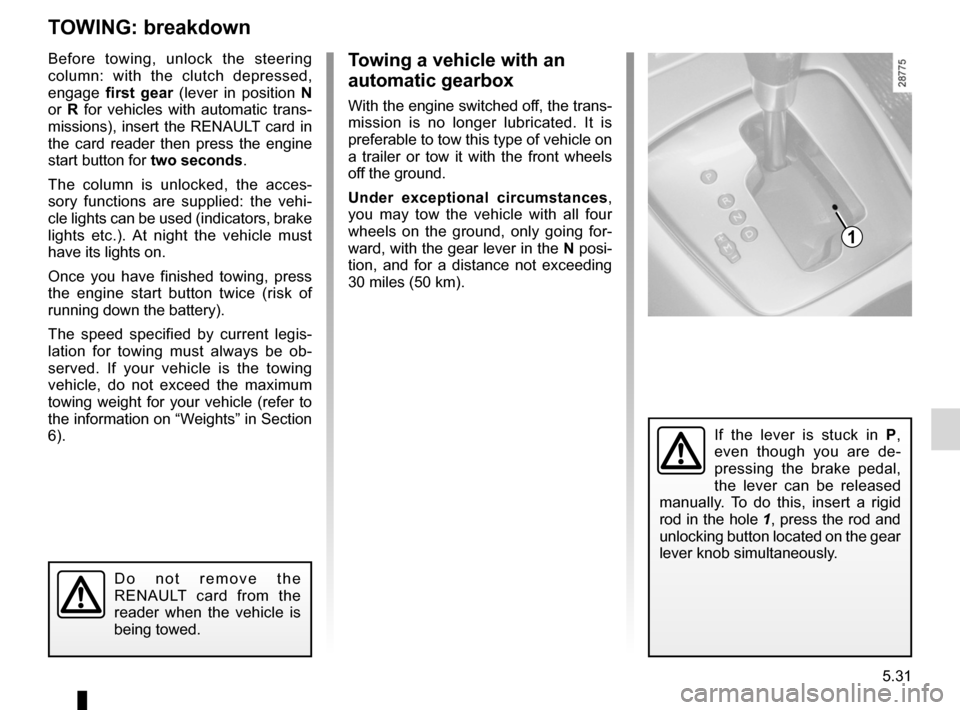
If the lever is stuck in P,
even though you are de -
pressing the brake pedal,
the lever can be released
manually. To do this, insert a rigid
rod in the hole 1, press the rod and
unlocking button located on the gear
lever knob simultaneously.
1
Page 209 of 241
operating faults ..................................... (up to the end of the DU)
faults operating faults ............................... (up to the end of the DU)
5.33
ENG_UD28899_2
Anomalies de fonctionnement (X91 - B91 - K91 - D91 - X95 - B95 - D95 - \
K95 - J95 - R95 - X98 - Renault)
ENG_NU_936-5_BK91_Renault_5
Operating faults
OPerA tInG FAuL tS (1/5)
the following advice will enable you to carry out quick, temporary repairs. For safety reasons you should always contact
an approved Dealer as soon as possible.
using the renAuL t card POSSIBLe cAuSeS WHAt tO DO
The RENAULT card does not lock or
unlock the doors. Card battery is flat.
Replace the battery. You can still lock/
unlock and start your vehicle (refer to the
information on “Locking/unlocking the
doors” in Section 1 and “Starting/Stopping
the engine” in Section 2).
Use of appliances operating on the
same frequency as the card (mobile
phone, etc.). Stop using the equipment or use the
emergency key (refer to the informa
-
tion on “Locking/unlocking the doors” in
Section 1).
Vehicle located in a high electromag -
netic radiation zone.
Vehicle battery flat. Use the emergency key integrated in the
card (refer to the information on “Locking/
unlocking the doors” in Section 1).
Page 210 of 241

5.34
ENG_UD28899_2
Anomalies de fonctionnement (X91 - B91 - K91 - D91 - X95 - B95 - D95 - \
K95 - J95 - R95 - X98 - Renault)
ENG_NU_936-5_BK91_Renault_5
Jaune NoirNoir texte
OPerA tInG FAuL tS (2/5)
the starter is activated POSSIBLe cAuSeSWHAt tO DO
The instrument panel indicator lights are
weak or fail to light up and the starter
does not turn. Battery terminals not tight,
battery terminals discon
-
nected or oxidised. Retighten or reconnect the terminals, or clean them if
they are oxidised.
Discharged battery or not
operational. Connect another battery to the faulty battery. Refer to
information on “Battery: troubleshooting” in Section 5
or replace the battery if necessary.
Do not push the vehicle if the steering column is
locked.
The engine will not start. Starting conditions are not
fulfilled.Refer to the information on “Starting/stopping the
engine” in Section 2.
The RENAULT “hands-free”
card does not work. Insert the card in the card reader in order to start the
engine.
Refer to the information on “Starting/stopping the
engine” in Section 2.
The engine cannot be switched off. Card not detected.Insert the card in card reader.
Electronic fault. Press the starter button quickly five times. The engine
can be restarted by pressing on the clutch pedal if the
Stop and Start function is activated.
The steering column remains locked. Steering wheel locked.Move the steering wheel while pressing the engine
start button (refer to the information on “Starting the
engine” in Section 2).
Page 211 of 241
JauneNoirNoir texte
5.35
ENG_UD28899_2
Anomalies de fonctionnement (X91 - B91 - K91 - D91 - X95 - B95 - D95 - \
K95 - J95 - R95 - X98 - Renault)
ENG_NU_936-5_BK91_Renault_5
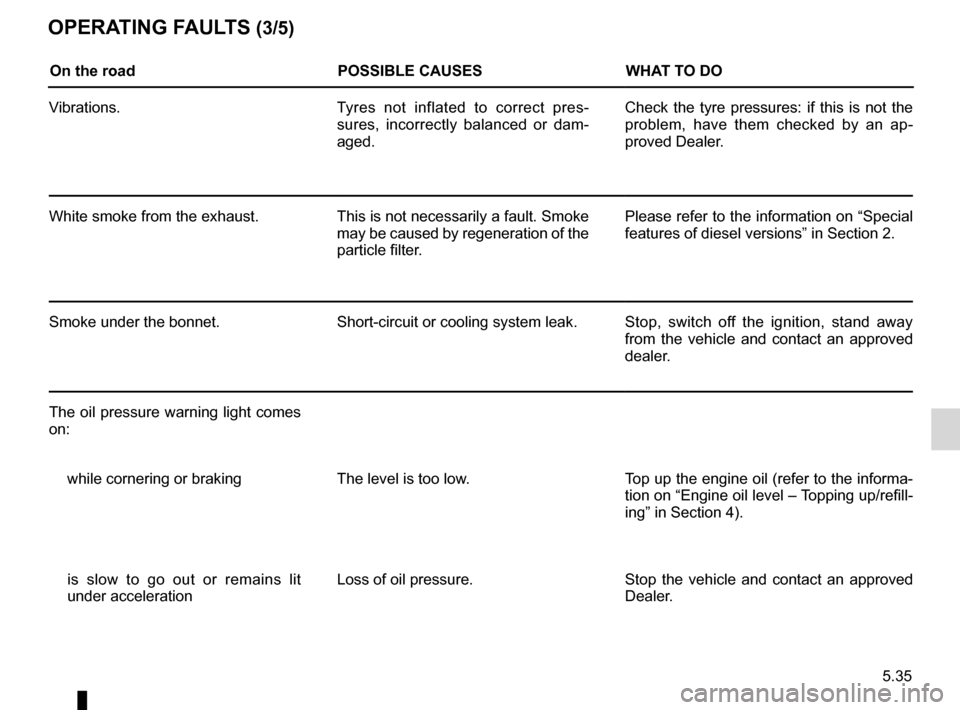
OPerA tInG FAuL tS (3/5)
On the road POSSIBLe cAuSeSWHAt tO DO
Vibrations. Tyres not inflated to correct pres-
sures, incorrectly balanced or dam -
aged. Check the tyre pressures: if this is not the
problem, have them checked by an ap
-
proved Dealer.
White smoke from the exhaust. This is not necessarily a fault. Smoke
may be caused by regeneration of the
particle filter.Please refer to the information on “Special
features of diesel versions” in Section 2.
Smoke under the bonnet. Short-circuit or cooling system leak.Stop, switch off the ignition, stand away
from the vehicle and contact an approved
dealer.
The oil pressure warning light comes
on: while cornering or braking The level is too low. Top up the engine oil (refer to the informa-
tion on “Engine oil level – Topping up/refill-
ing” in Section 4).
is slow to go out or remains lit
under acceleration Loss of oil pressure.
Stop the vehicle and contact an approved
Dealer.