RENAULT MASTER 2017 X62 / 2.G Owners Manual
Manufacturer: RENAULT, Model Year: 2017, Model line: MASTER, Model: RENAULT MASTER 2017 X62 / 2.GPages: 286, PDF Size: 6.97 MB
Page 161 of 286
2.47
SEQUENTIAL GEARBOX (6/6)Bleep
– If you hold the vehicle on a slope for too long without applying the
brakes or handbrake, you will strain
the system (risk of overheating the
clutch).
In this case, an intermittent beep-
ing sound will remind you that you
should put your foot on the brake
pedal or apply the handbrake.
– Never leave the vehicle with the engine running when in gear. For
safety reasons you will hear an in-
termittent beeping sound when you
open the door if you have not shifted
into neutral or you have not switched
off the ignition or depressed the
brake pedal.
Operating faults
i
If this warning light comes on
when the vehicle is in motion , it
indicates a fault in the system. In most
cases, you may still drive the vehicle,
although it will not function perfectly.
Contact an approved dealer as soon as
possible.
Towing a vehicle with a sequential
gearbox
If the gearbox is stuck in a gear:
– switch on the ignition;
– select neutral with the brake pedal
depressed;
– check that the gearbox is in neutral (by pushing the vehicle, for exam-
ple).
If you cannot find neutral you must tow
the vehicle with the front wheels raised.
The vehicle should always be towed
with the ignition switched off.
Accelerating and overtaking
– Slowly depress the accelerator pedal to accelerate gradually;
– to obtain maximum vehicle per-
formance regardless of the mode
selected (automatic or manual),
quickly depress the accelerator
pedal beyond the kickdown point.
The speed with which you depress the
pedal will allow you to downshift ac-
cording to the vehicle’s capabilities.
Parking
It is possible to park in gear (for exam-
ple, on a slope):
– with the ignition on, select a gear with your foot on the brake ;
– check that a gear other than N is dis- played on the instrument panel, then
remove the ignition key;
– apply the handbrake.
To disengage the gear, switch on the
ignition without starting the engine and
shift the selector lever to neutral with
the brake pedal depressed . Check
that N is displayed on the instrument
panel.
Page 162 of 286

2.48
Page 163 of 286

3.1
Section 3: Your comfort
Air Vents . . . . . . . . . . . . . . . . . . . . . . . . . . . . . . . . . . . .\
. . . . . . . . . . . . . . . . . . . . . . . . . . . . . . . . . . 3.2
Manual air conditioning/heating system . . . . . . . . . . . . . . . . . . . . . . . . . . . . . . . . . . . .\
. . . . . . . . . . 3.4
Automatic climate control . . . . . . . . . . . . . . . . . . . . . . . . . . . . . . . . . . . .\
. . . . . . . . . . . . . . . . . . . . . 3.7
Air conditioning: information and advice on use . . . . . . . . . . . . . . . . . . . . . . . . . . . . . . . . . . . .\
. . . . 3.13
Windows . . . . . . . . . . . . . . . . . . . . . . . . . . . . . . . . . . . .\
. . . . . . . . . . . . . . . . . . . . . . . . . . . . . . . . . . 3.15
Interior lighting . . . . . . . . . . . . . . . . . . . . . . . . . . . . . . . . . . . . \
. . . . . . . . . . . . . . . . . . . . . . . . . . . . . . 3.17
Sun visor, grab handle . . . . . . . . . . . . . . . . . . . . . . . . . . . . . . . . . . . . \
. . . . . . . . . . . . . . . . . . . . . . . . 3.18
Ashtrays, Cigarette lighter, Accessories socket . . . . . . . . . . . . . . . . . . . . . . . . . . . . . . . . . . . . \
. . . . . 3.19
Passenger compartment storage, fittings . . . . . . . . . . . . . . . . . . . . . . . . . . . . . . . . . . . .\
. . . . . . . . . 3.20
Rear bench seats . . . . . . . . . . . . . . . . . . . . . . . . . . . . . . . . . . . .\
. . . . . . . . . . . . . . . . . . . . . . . . . . . 3.26
Multimedia equipment . . . . . . . . . . . . . . . . . . . . . . . . . . . . . . . . . . . . \
. . . . . . . . . . . . . . . . . . . . . . . . 3.28
Transporting objects . . . . . . . . . . . . . . . . . . . . . . . . . . . . . . . . . . . .\
. . . . . . . . . . . . . . . . . . . . . . . . . 3.29
Page 164 of 286
3.2
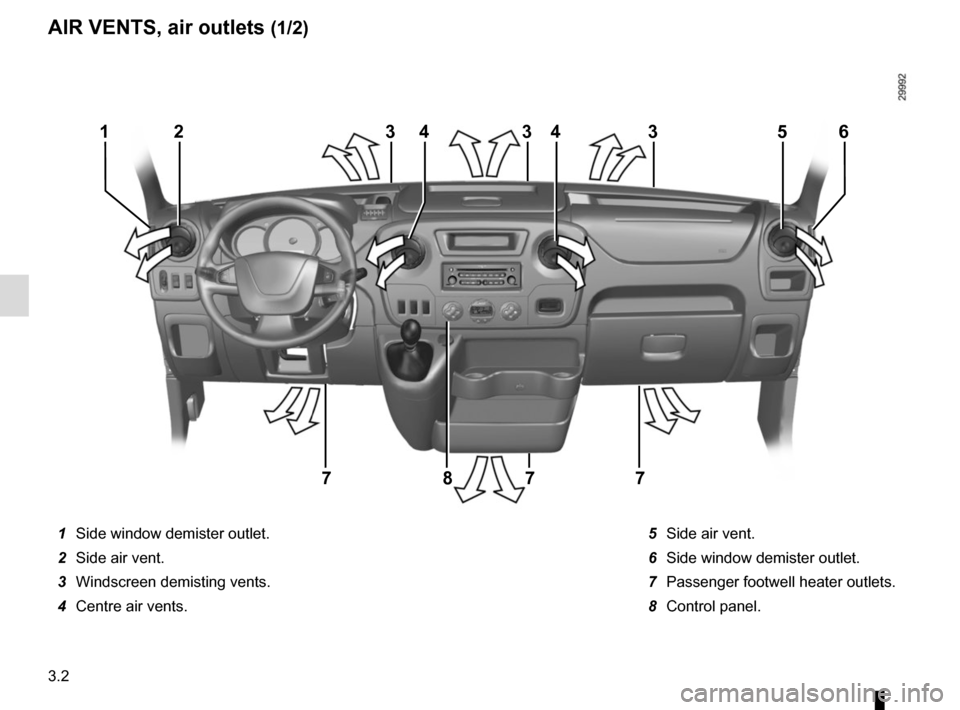
1 Side window demister outlet.
2 Side air vent.
3 Windscreen demisting vents.
4 Centre air vents. 5 Side air vent.
6 Side window demister outlet.
7 Passenger footwell heater outlets.
8 Control panel.
233354
7778
164
AIR VENTS, air outlets (1/2)
Page 165 of 286
3.3
AIR VENTS, air outlets (2/2)
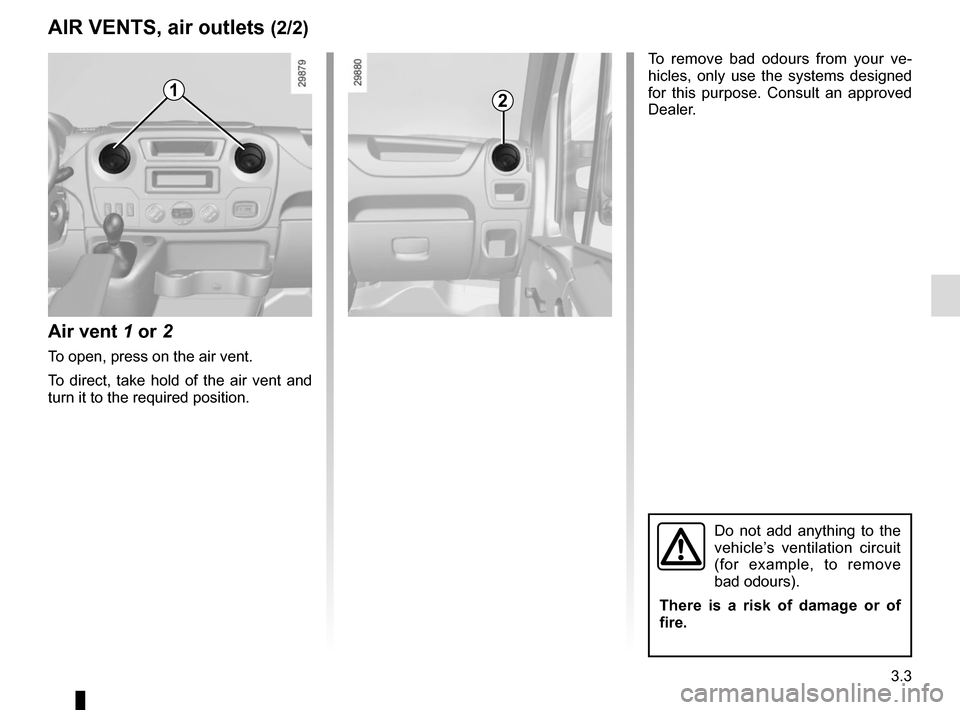
Air vent 1 or 2
To open, press on the air vent.
To direct, take hold of the air vent and
turn it to the required position.
12
To remove bad odours from your ve-
hicles, only use the systems designed
for this purpose. Consult an approved
Dealer.
Do not add anything to the
vehicle’s ventilation circuit
(for example, to remove
bad odours).
There is a risk of damage or of
fire.
Page 166 of 286
3.4
MANUAL AIR CONDITIONING/HEATING SYSTEM (1/3)
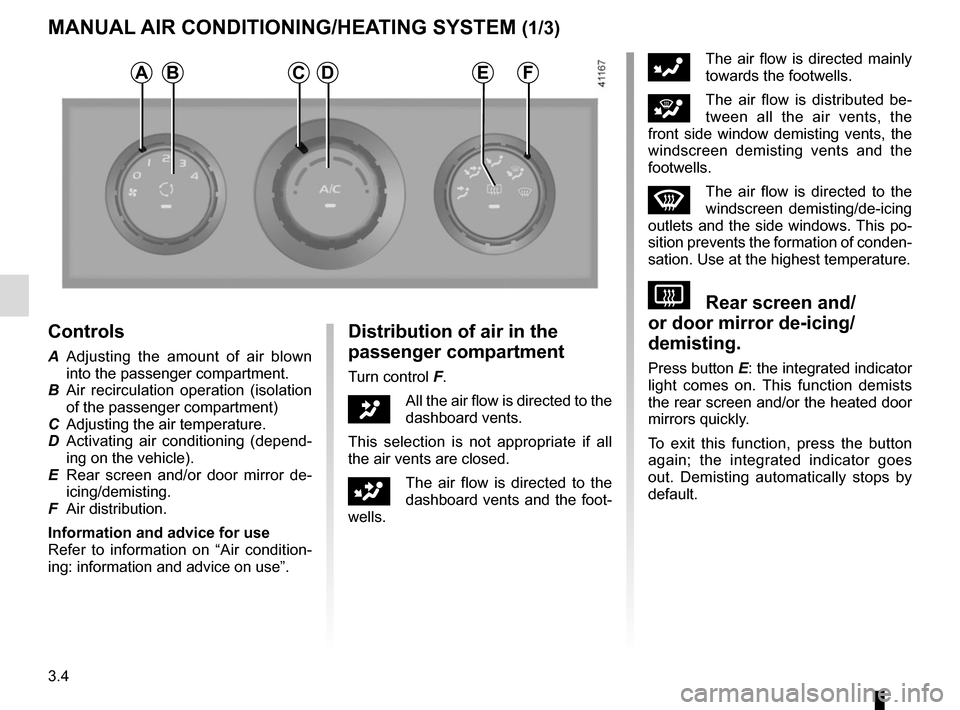
Controls
A Adjusting the amount of air blown into the passenger compartment.
B Air recirculation operation (isolation of the passenger compartment)
C Adjusting the air temperature.
D Activating air conditioning (depend- ing on the vehicle).
E Rear screen and/or door mirror de- icing/demisting.
F Air distribution.
Information and advice for use
Refer to information on “Air condition-
ing: information and advice on use”.
Distribution of air in the
passenger compartment
Turn control F.
JAll the air flow is directed to the
dashboard vents.
This selection is not appropriate if all
the air vents are closed.
GThe air flow is directed to the
dashboard vents and the foot-
wells.
FThe air flow is directed mainly
towards the footwells.
iThe air flow is distributed be-
tween all the air vents, the
front side window demisting vents, the
windscreen demisting vents and the
footwells.
WThe air flow is directed to the
windscreen demisting/de-icing
outlets and the side windows. This po-
sition prevents the formation of conden-
sation. Use at the highest temperature.
VRear screen and/
or door mirror de-icing/
demisting.
Press button E: the integrated indicator
light comes on. This function demists
the rear screen and/or the heated door
mirrors quickly.
To exit this function, press the button
again; the integrated indicator goes
out. Demisting automatically stops by
default.
ABDFCE
Page 167 of 286
3.5
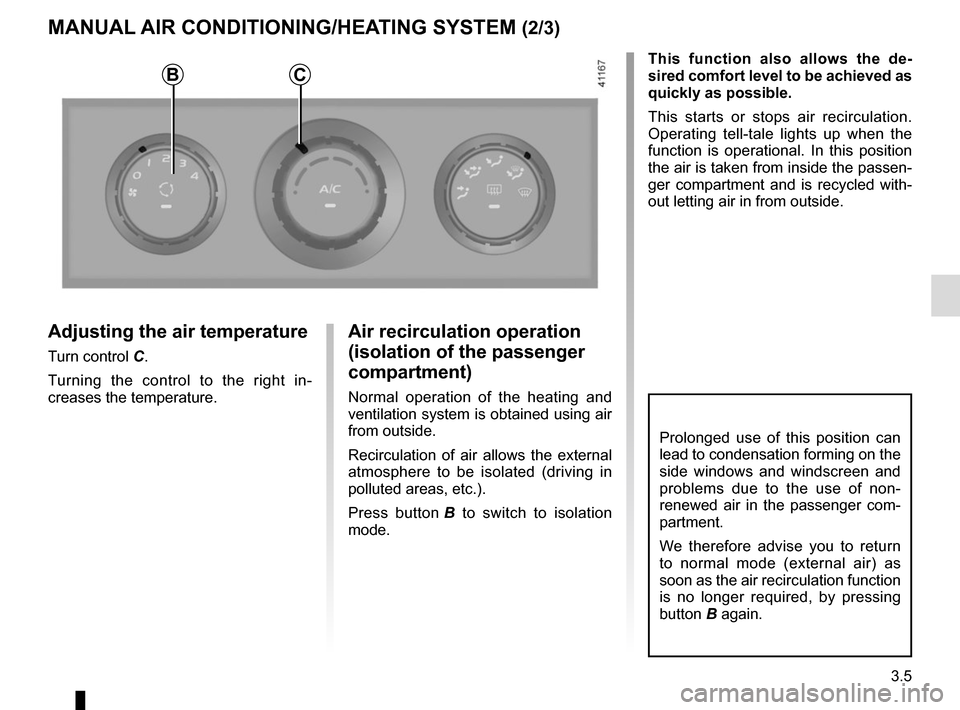
Adjusting the air temperature
Turn control C.Turning the control to the right in-
creases the temperature.
MANUAL AIR CONDITIONING/HEATING SYSTEM (2/3)
Air recirculation operation
(isolation of the passenger
compartment)
Normal operation of the heating and
ventilation system is obtained using air
from outside.
Recirculation of air allows the external
atmosphere to be isolated (driving in
polluted areas, etc.).
Press button B to switch to isolation
mode. This function also allows the de-
sired comfort level to be achieved as
quickly as possible.
This starts or stops air recirculation.
Operating tell-tale lights up when the
function is operational. In this position
the air is taken from inside the passen-
ger compartment and is recycled with-
out letting air in from outside.
Prolonged use of this position can
lead to condensation forming on the
side windows and windscreen and
problems due to the use of non-
renewed air in the passenger com-
partment.
We therefore advise you to return
to normal mode (external air) as
soon as the air recirculation function
is no longer required, by pressing
button B again.
BC
Page 168 of 286

3.6
MANUAL AIR CONDITIONING/HEATING SYSTEM (3/3)
Adjusting the amount of air
blown into the passenger
compartment
Turn control A from 0 to 4. The passenger compartment is venti-
lated by blown air.
The blower determines how much air
enters but vehicle speed also has some
influence on this.
The further the control is positioned to
the right, the greater the amount of air
blown into the passenger compartment.
Switching air conditioning on
or off
(depending on the vehicle)
The air conditioning is switched on (in-
dicator light lit) or off (indicator light off)
using button D.
The air conditioning system is used
for:
– lowering the temperature inside the
passenger compartment;
– eliminating condensation more quickly.
Note: the air conditioning does not op-
erate if the exterior temperature is low
or the ventilation speed is less than 1.DA
Page 169 of 286
3.7
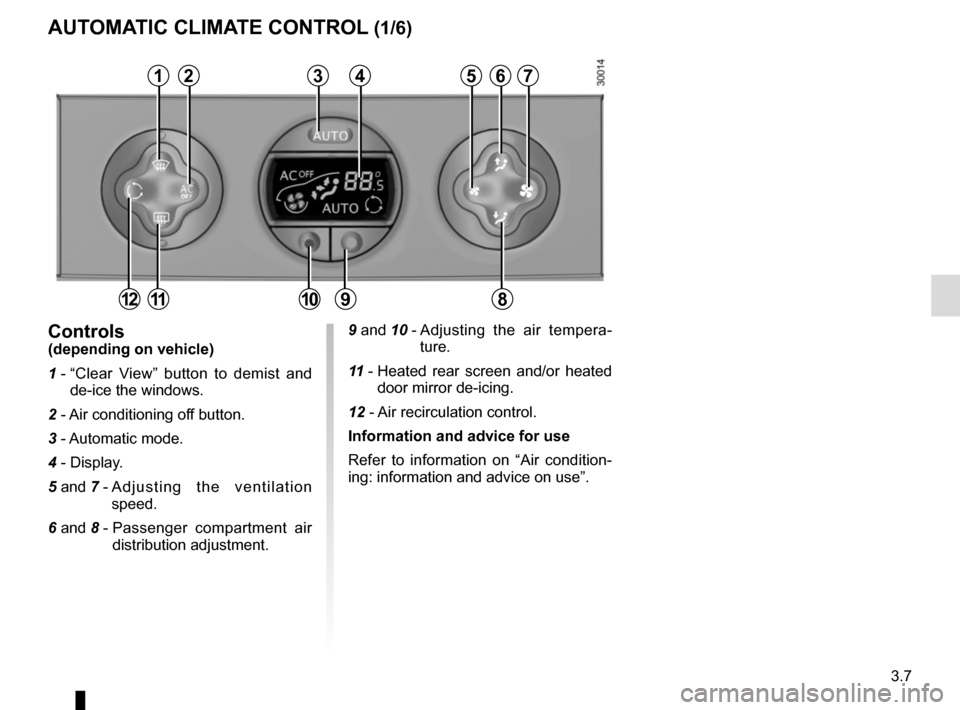
9 and 10 - Adjusting the air tempera-
ture.
11 - Heated rear screen and/or heated
door mirror de-icing.
12 - Air recirculation control.
Information and advice for use
Refer to information on “Air condition-
ing: information and advice on use”.Controls(depending on vehicle)
1 - “Clear View” button to demist and
de-ice the windows.
2 - Air conditioning off button.
3 - Automatic mode.
4 - Display.
5 and 7 - Adjusting the ventilation
speed.
6 and 8 - Passenger compartment air
distribution adjustment.
AUTOMATIC CLIMATE CONTROL (1/6)
23456
891112
17
10
Page 170 of 286
3.8
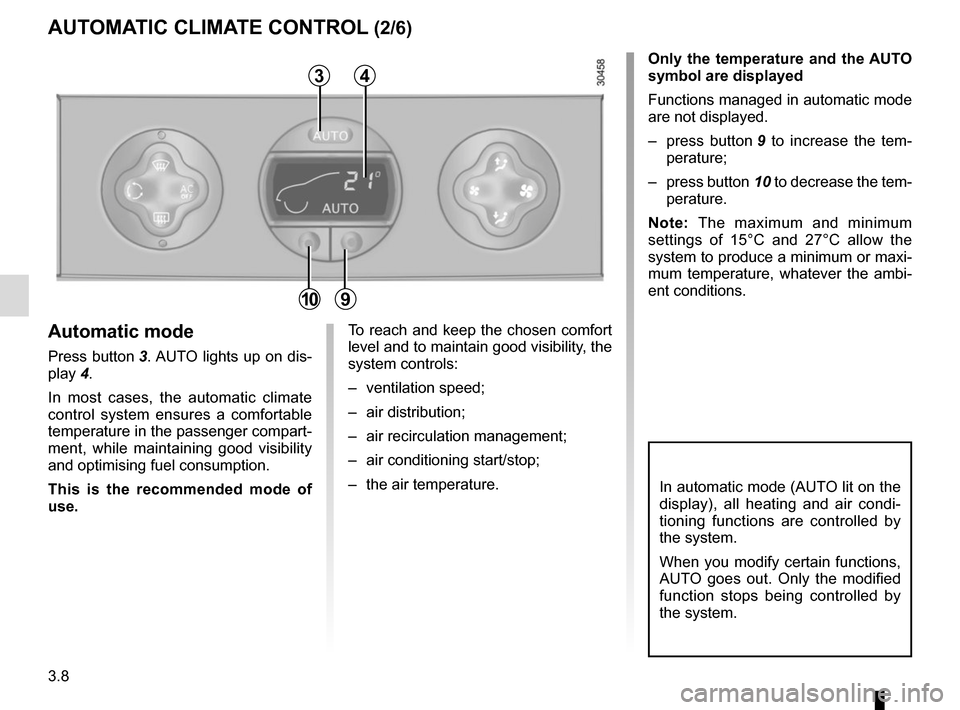
Only the temperature and the AUTO
symbol are displayed
Functions managed in automatic mode
are not displayed.
– press button 9 to increase the tem-
perature;
– press button 10 to decrease the tem-
perature.
Note: The maximum and minimum
settings of 15°C and 27°C allow the
system to produce a minimum or maxi-
mum temperature, whatever the ambi-
ent conditions.
In automatic mode (AUTO lit on the
display), all heating and air condi-
tioning functions are controlled by
the system.
When you modify certain functions,
AUTO goes out. Only the modified
function stops being controlled by
the system.
To reach and keep the chosen comfort
level and to maintain good visibility, the
system controls:
– ventilation speed;
– air distribution;
– air recirculation management;
– air conditioning start/stop;
– the air temperature.Automatic mode
Press button 3. AUTO lights up on dis-
play 4.
In most cases, the automatic climate
control system ensures a comfortable
temperature in the passenger compart-
ment, while maintaining good visibility
and optimising fuel consumption.
This is the recommended mode of
use.
AUTOMATIC CLIMATE CONTROL (2/6)
3
910
4