check engine light RENAULT MASTER 2017 X62 / 2.G Owners Manual
[x] Cancel search | Manufacturer: RENAULT, Model Year: 2017, Model line: MASTER, Model: RENAULT MASTER 2017 X62 / 2.GPages: 286, PDF Size: 6.97 MB
Page 17 of 286
1.11
RAID (AUTOMATIC LOCKING WHEN DRIVING)
You can decide whether you want to
activate this function.
To activate
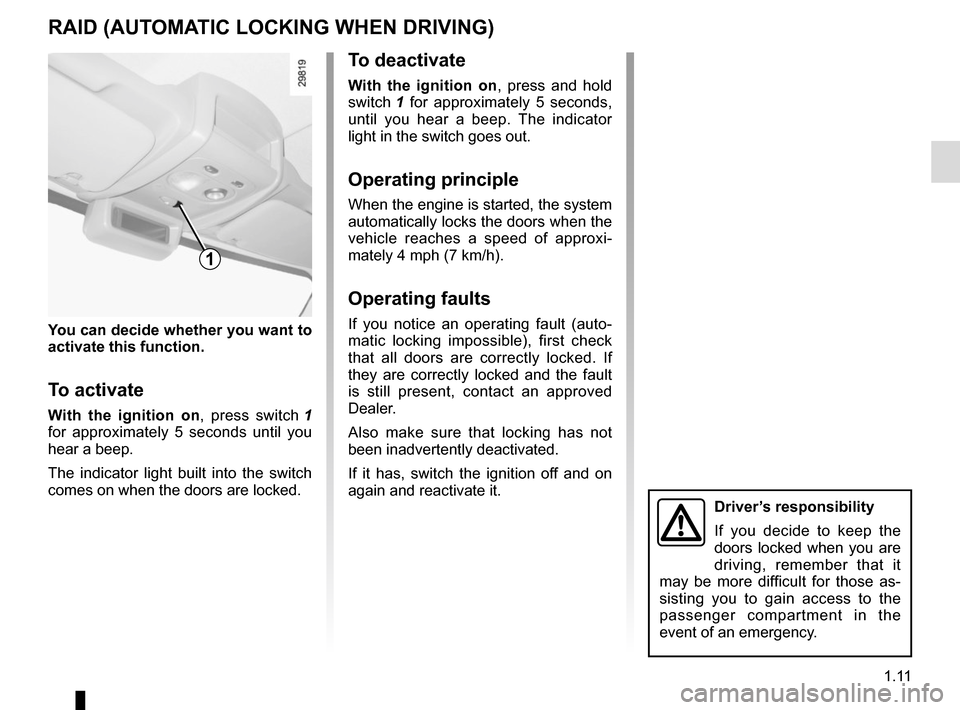
With the ignition on, press switch 1
for approximately 5 seconds until you
hear a beep.
The indicator light built into the switch
comes on when the doors are locked.
To deactivate
With the ignition on , press and hold
switch 1 for approximately 5 seconds,
until you hear a beep. The indicator
light in the switch goes out.
Operating principle
When the engine is started, the system
automatically locks the doors when the
vehicle reaches a speed of approxi-
mately 4 mph (7 km/h).
Operating faults
If you notice an operating fault (auto-
matic locking impossible), first check
that all doors are correctly locked. If
they are correctly locked and the fault
is still present, contact an approved
Dealer.
Also make sure that locking has not
been inadvertently deactivated.
If it has, switch the ignition off and on
again and reactivate it.
1
Driver’s responsibility
If you decide to keep the
doors locked when you are
driving, remember that it
may be more difficult for those as-
sisting you to gain access to the
passenger compartment in the
event of an emergency.
Page 22 of 286
1.16
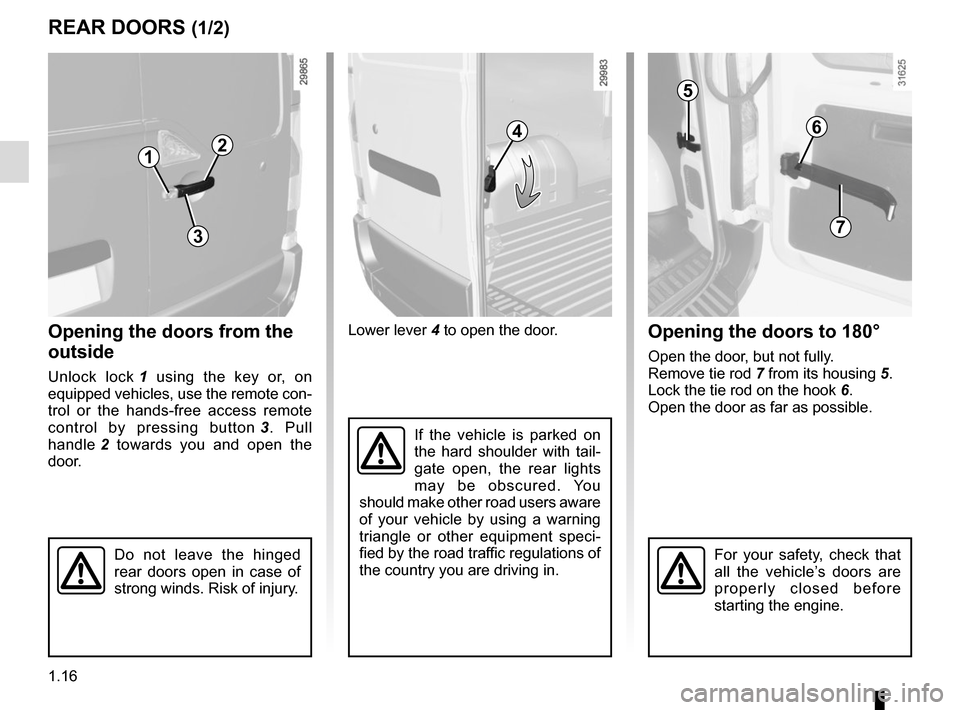
Lower lever 4 to open the door.
If the vehicle is parked on
the hard shoulder with tail-
gate open, the rear lights
may be obscured. You
should make other road users aware
of your vehicle by using a warning
triangle or other equipment speci-
fied by the road traffic regulations of
the country you are driving in.
REAR DOORS (1/2)
Opening the doors from the
outside
Unlock lock 1 using the key or, on
equipped vehicles, use the remote con-
trol or the hands-free access remote
control by pressing button 3. Pull
handle 2 towards you and open the
door.
Opening the doors to 180°
Open the door, but not fully.
Remove tie rod 7 from its housing 5.
Lock the tie rod on the hook 6.
Open the door as far as possible.
1
24
1
Do not leave the hinged
rear doors open in case of
strong winds. Risk of injury.For your safety, check that
all the vehicle’s doors are
properly closed before
starting the engine.
3
5
6
7
Page 36 of 286
1.30
ADDITIONAL METHODS OF RESTRAINT
Operating faults
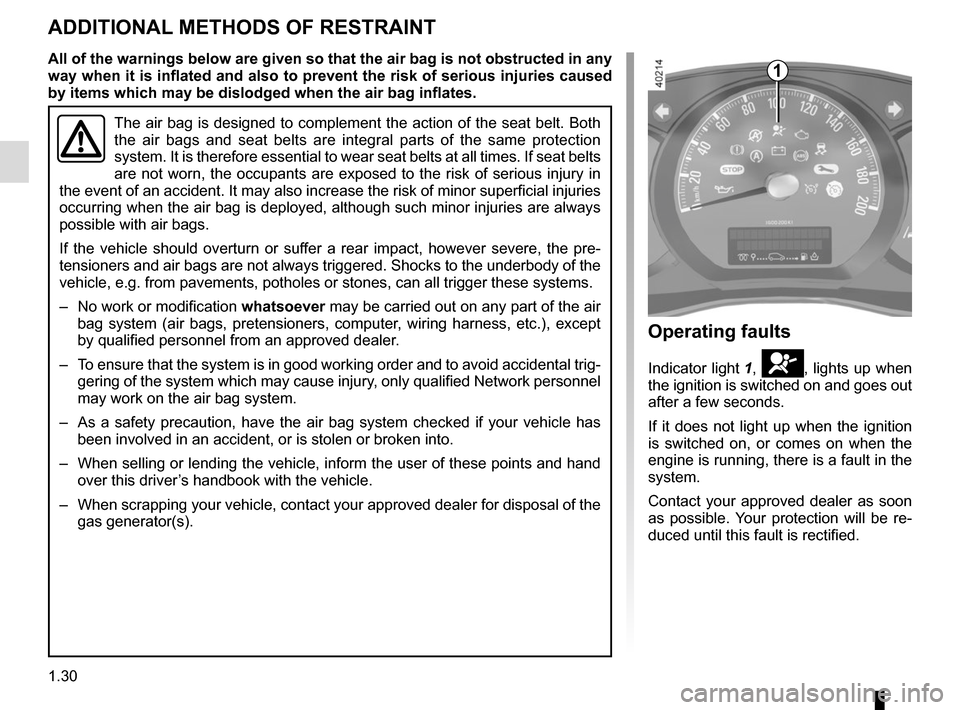
Indicator light 1, å, lights up when
the ignition is switched on and goes out
after a few seconds.
If it does not light up when the ignition
is switched on, or comes on when the
engine is running, there is a fault in the
system.
Contact your approved dealer as soon
as possible. Your protection will be re-
duced until this fault is rectified.
1
The air bag is designed to complement the action of the seat belt. Both \
the air bags and seat belts are integral parts of the same protection
system. It is therefore essential to wear seat belts at all times. If se\
at belts
are not worn, the occupants are exposed to the risk of serious injury in\
the event of an accident. It may also increase the risk of minor superfi\
cial injuries
occurring when the air bag is deployed, although such minor injuries are\
always
possible with air bags.
If the vehicle should overturn or suffer a rear impact, however severe, the pre-
tensioners and air bags are not always triggered. Shocks to the underbod\
y of the
vehicle, e.g. from pavements, potholes or stones, can all trigger these \
systems.
– No work or modification whatsoever may be carried out on any part of the air
bag system (air bags, pretensioners, computer, wiring harness, etc.), except
by qualified personnel from an approved dealer.
– To ensure that the system is in good working order and to avoid accidenta\
l trig- gering of the system which may cause injury, only qualified Network personnel
may work on the air bag system.
– As a safety precaution, have the air bag system checked if your vehicle \
has been involved in an accident, or is stolen or broken into.
– When selling or lending the vehicle, inform the user of these points and\
hand over this driver’s handbook with the vehicle.
– When scrapping your vehicle, contact your approved dealer for disposal o\
f the gas generator(s).
All of the warnings below are given so that the air bag is not obstructed in any
way when it is inflated and also to prevent the risk of serious injuries caused
by items which may be dislodged when the air bag inflates.
Page 83 of 286
1.77
Warning lights (2/4)
The presence and operation of the warning lights DEPEND ON THE EQUIPMENT\
AND COUNTRY.
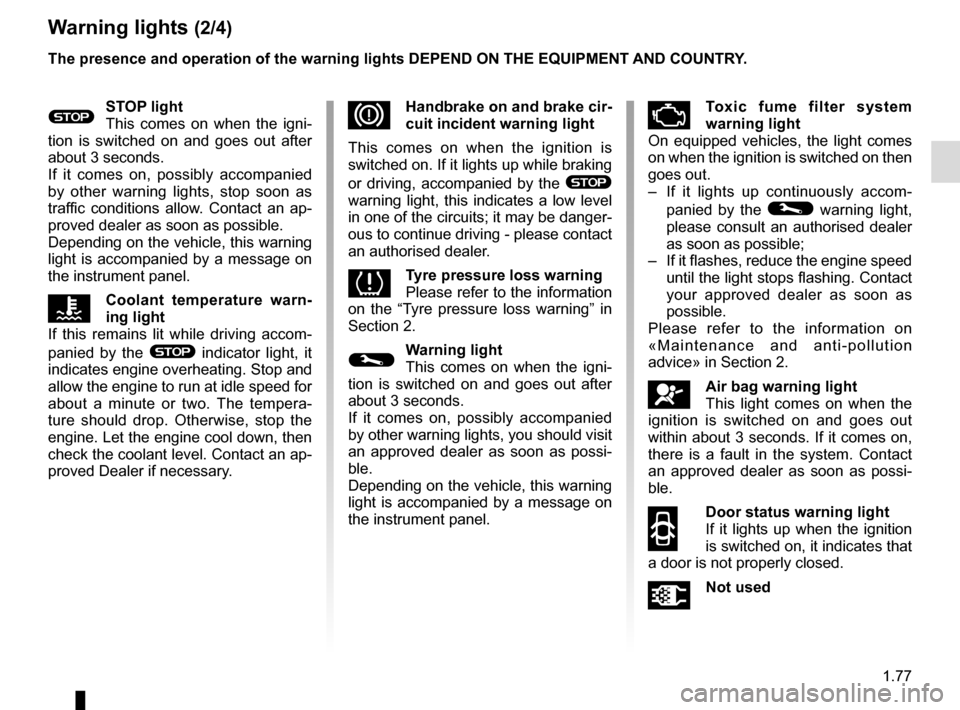
DHandbrake on and brake cir-
cuit incident warning light
This comes on when the ignition is
switched on. If it lights up while braking
or driving, accompanied by the
®
warning light, this indicates a low level
in one of the circuits; it may be danger-
ous to continue driving - please contact
an authorised dealer.
Tyre pressure loss warning
Please refer to the information
on the “Tyre pressure loss warning” in
Section 2.
©Warning light
This comes on when the igni-
tion is switched on and goes out after
about 3 seconds.
If it comes on, possibly accompanied
by other warning lights, you should visit
an approved dealer as soon as possi-
ble.
Depending on the vehicle, this warning
light is accompanied by a message on
the instrument panel.
ÄToxic fume filter system
warning light
On equipped vehicles, the light comes
on when the ignition is switched on then
goes out.
– If it lights up continuously accom-
panied by the
© warning light,
please consult an authorised dealer
as soon as possible;
– If it flashes, reduce the engine speed until the light stops flashing. Contact
your approved dealer as soon as
possible.
Please refer to the information on
«Maintenance and anti-pollution
advice» in Section 2.
åAir bag warning light
This light comes on when the
ignition is switched on and goes out
within about 3 seconds. If it comes on,
there is a fault in the system. Contact
an approved dealer as soon as possi-
ble.
2
Door status warning light
If it lights up when the ignition
is switched on, it indicates that
a door is not properly closed.
ÜNot used
®STOP light
This comes on when the igni-
tion is switched on and goes out after
about 3 seconds.
If it comes on, possibly accompanied
by other warning lights, stop soon as
traffic conditions allow. Contact an ap-
proved dealer as soon as possible.
Depending on the vehicle, this warning
light is accompanied by a message on
the instrument panel.
ÔCoolant temperature warn-
ing light
If this remains lit while driving accom-
panied by the
® indicator light, it
indicates engine overheating. Stop and
allow the engine to run at idle speed for
about a minute or two. The tempera-
ture should drop. Otherwise, stop the
engine. Let the engine cool down, then
check the coolant level. Contact an ap-
proved Dealer if necessary.
Page 84 of 286
1.78
Warning lights (3/4)
The presence and operation of the warning lights DEPEND ON THE EQUIPMENT\
AND COUNTRY.
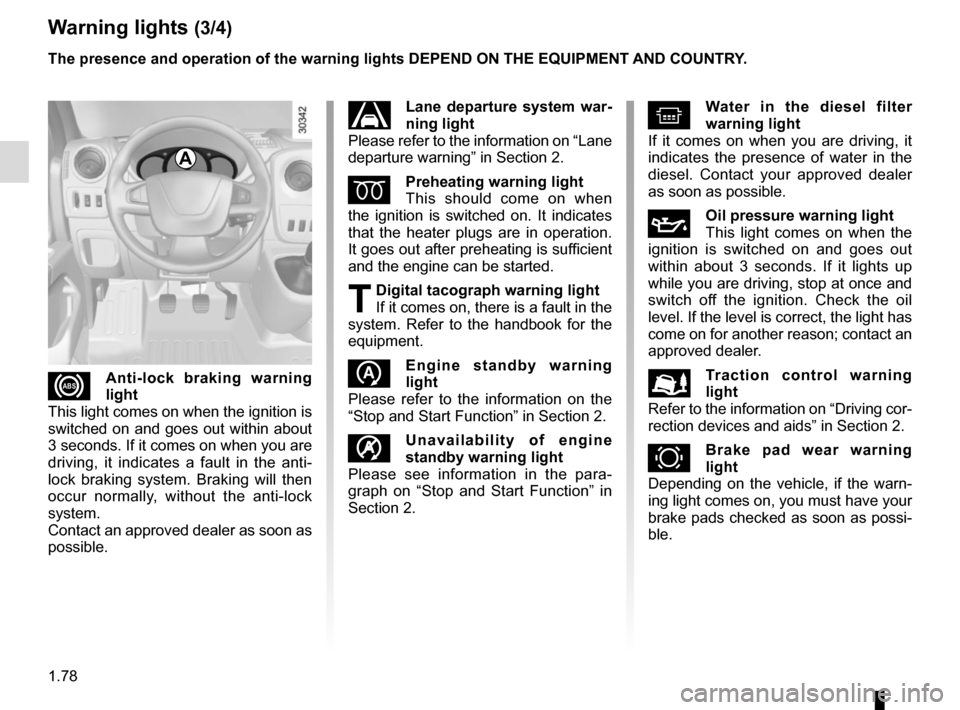
xAnti-lock braking warning
light
This light comes on when the ignition is
switched on and goes out within about
3 seconds. If it comes on when you are
driving, it indicates a fault in the anti-
lock braking system. Braking will then
occur normally, without the anti-lock
system.
Contact an approved dealer as soon as
possible.
^Water in the diesel filter
warning light
If it comes on when you are driving, it
indicates the presence of water in the
diesel. Contact your approved dealer
as soon as possible.
ÀOil pressure warning light
This light comes on when the
ignition is switched on and goes out
within about 3 seconds. If it lights up
while you are driving, stop at once and
switch off the ignition. Check the oil
level. If the level is correct, the light has
come on for another reason; contact an
approved dealer.
Traction control warning
light
Refer to the information on “Driving cor-
rection devices and aids” in Section 2.
zBrake pad wear warning
light
Depending on the vehicle, if the warn-
ing light comes on, you must have your
brake pads checked as soon as possi-
ble.
Lane departure system war-
ning light
Please refer to the information on “Lane
departure warning” in Section 2.
ÉPreheating warning light
This should come on when
the ignition is switched on. It indicates
that the heater plugs are in operation.
It goes out after preheating is sufficient
and the engine can be started.
T Digital tacograph warning light
If it comes on, there is a fault in the
system. Refer to the handbook for the
equipment.
Engine standby warning
light
Please refer to the information on the
“Stop and Start Function” in Section 2.
\bUnavailability of engine
standby warning light
Please see information in the para-
graph on “Stop and Start Function” in
Section 2.
A
Page 101 of 286
1.95
EXTERIOR LIGHTING AND SIGNALS (1/5)
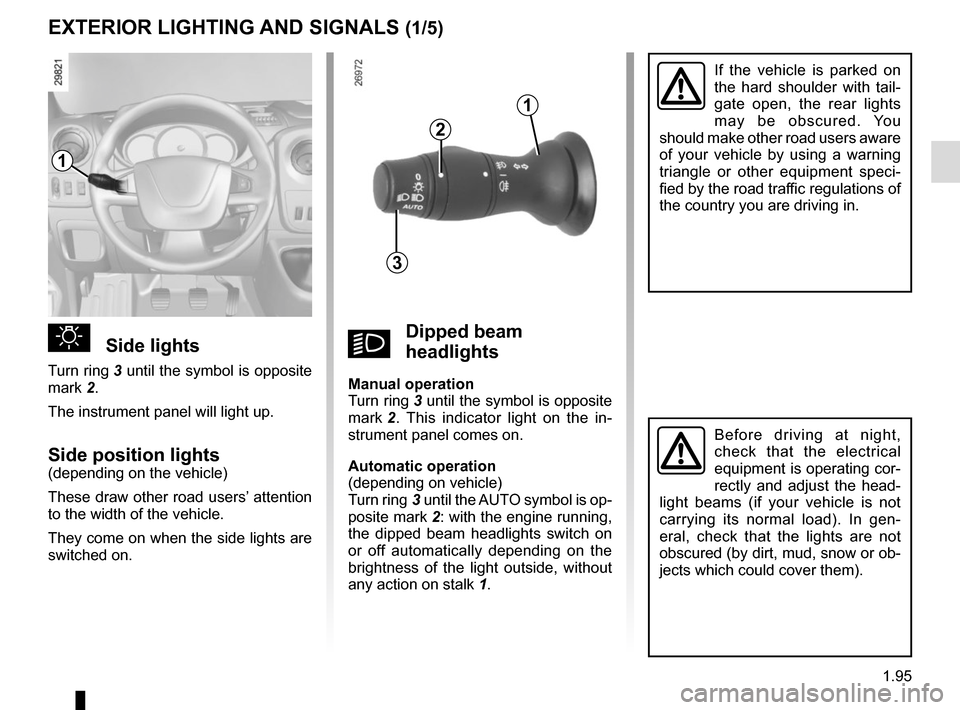
uSide lights
Turn ring 3 until the symbol is opposite
mark 2.
The instrument panel will light up.
Side position lights(depending on the vehicle)
These draw other road users’ attention
to the width of the vehicle.
They come on when the side lights are
switched on.
Before driving at night,
check that the electrical
equipment is operating cor-
rectly and adjust the head-
light beams (if your vehicle is not
carrying its normal load). In gen-
eral, check that the lights are not
obscured (by dirt, mud, snow or ob-
jects which could cover them).
1
2
3
kDipped beam
headlights
Manual operation
Turn ring 3 until the symbol is opposite
mark 2 . This indicator light on the in-
strument panel comes on.
Automatic operation
(depending on vehicle)
Turn ring 3 until the AUTO symbol is op-
posite mark 2: with the engine running,
the dipped beam headlights switch on
or off automatically depending on the
brightness of the light outside, without
any action on stalk 1.
If the vehicle is parked on
the hard shoulder with tail-
gate open, the rear lights
may be obscured. You
should make other road users aware
of your vehicle by using a warning
triangle or other equipment speci-
fied by the road traffic regulations of
the country you are driving in.
1
Page 109 of 286
1.103
Please ensure that you comply with the
legislation of your country.
It is important to remember that failure
to respect regulations in force could
lead to legal action being taken against
the vehicle owner.
Operating principleThe use of additives reduces exhaust
emissions by transforming the pollu-
tants into water vapour and nitrogen.
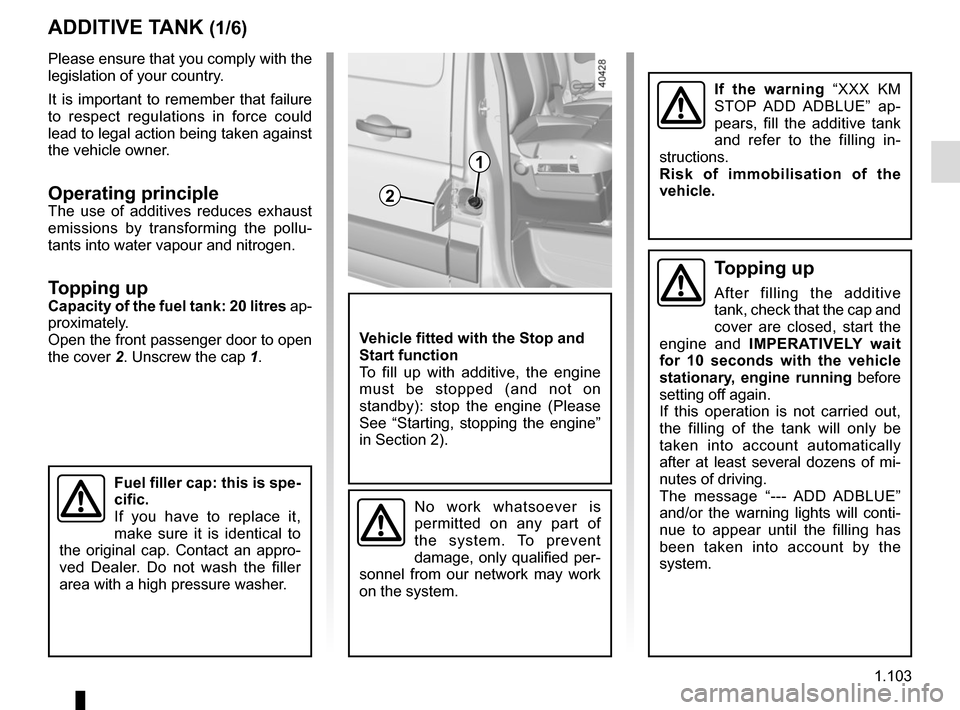
Topping upCapacity of the fuel tank: 20 litres ap-
proximately.
Open the front passenger door to open
the cover 2. Unscrew the cap 1.
ADDITIVE TANK (1/6)
Fuel filler cap: this is spe-
cific.
If you have to replace it,
make sure it is identical to
the original cap. Contact an appro-
ved Dealer. Do not wash the filler
area with a high pressure washer.
2
1
Vehicle fitted with the Stop and
Start function
To fill up with additive, the engine
must be stopped (and not on
standby): stop the engine (Please
See “Starting, stopping the engine”
in Section 2).
No work whatsoever is
permitted on any part of
the system. To prevent
damage, only qualified per-
sonnel from our network may work
on the system.
If the warning “XXX KM
STOP ADD ADBLUE” ap-
pears, fill the additive tank
and refer to the filling in-
structions.
Risk of immobilisation of the
vehicle.
Topping up
After filling the additive
tank, check that the cap and
cover are closed, start the
engine and IMPERATIVELY wait
for 10 seconds with the vehicle
stationary, engine running before
setting off again.
If this operation is not carried out,
the filling of the tank will only be
taken into account automatically
after at least several dozens of mi-
nutes of driving.
The message “--- ADD ADBLUE”
and/or the warning lights will conti-
nue to appear until the filling has
been taken into account by the
system.
Page 124 of 286
2.10
Driving advice, Eco-driving
Behaviour
– Drive carefully for the first few miles until the engine reaches its normal
operating temperature, rather than
let it warm up while the vehicle is sta-
tionary.
– Speed is expensive.
– Sporty driving uses a lot of fuel: drive with a light right foot.
– Do not overrev the engine in the in- termediate gears.
You should always use the highest gear possible.
DRIVING ADVICE, ECO-DRIVING (3/4)
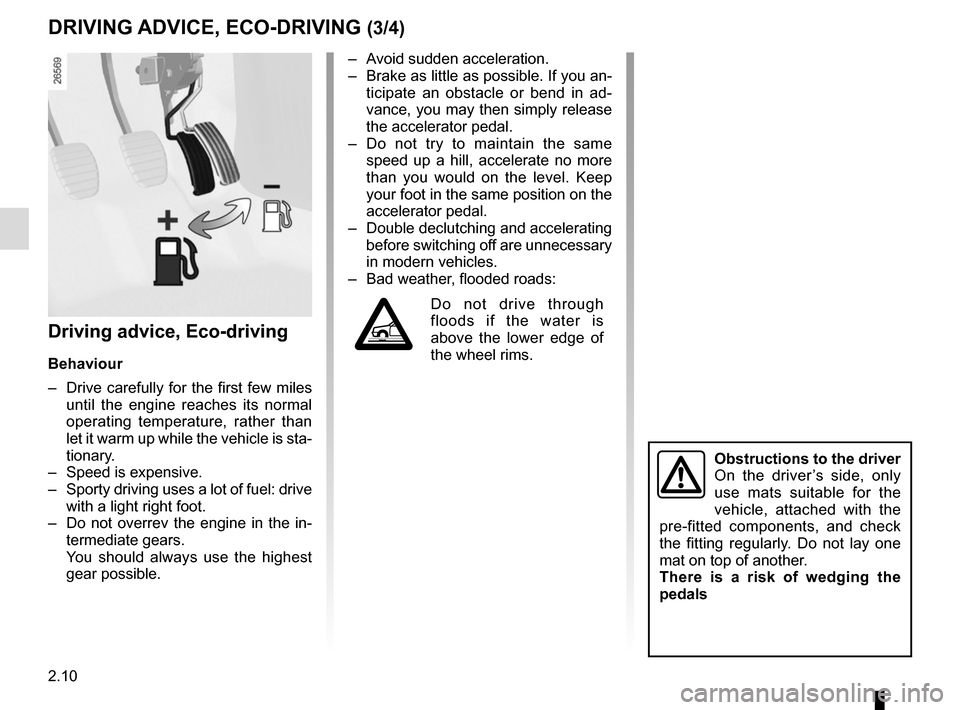
Obstructions to the driver
On the driver’s side, only
use mats suitable for the
vehicle, attached with the
pre-fitted components, and check
the fitting regularly. Do not lay one
mat on top of another.
There is a risk of wedging the
pedals
– Avoid sudden acceleration.
– Brake as little as possible. If you an- ticipate an obstacle or bend in ad-
vance, you may then simply release
the accelerator pedal.
– Do not try to maintain the same speed up a hill, accelerate no more
than you would on the level. Keep
your foot in the same position on the
accelerator pedal.
– Double declutching and accelerating before switching off are unnecessary
in modern vehicles.
– Bad weather, flooded roads:
Do not drive through
floods if the water is
above the lower edge of
the wheel rims.
Page 131 of 286

2.17
Operating faults
When the system detects an operating
fault the message “CHECK ESC” and
warning light
© and appear
on the instrument panel. In this case,
the ESC and traction control system
are deactivated.
Consult an approved dealer.
Electronic stability program
(ESC) with understeer control
and traction control
Electronic stability control ESC
This system helps you to keep control
of the vehicle in critical driving condi-
tions (avoiding an obstacle, loss of grip
on a bend, etc.).
Operating principle
A sensor in the steering wheel detects
the direction selected by the driver.
Other sensors throughout the vehicle
measure the actual direction.
The system compares driver input to
the actual trajectory of the vehicle and
corrects the trajectory if necessary by
controlling the braking of certain wheels
and/or engine power. In the event that
the system is engaged, indicator light
flashes on the instrument panel.
DRIVING CORRECTION DEVICES AND AIDS (2/5)
Understeer control
This system optimises the action of the
ESC in the case of pronounced under-
steer (loss of front axle road holding).
Traction control
This system helps to limit wheelspin of
the drive wheels and to control the ve-
hicle when pulling away accelerating or
decelerating.
Operating principle
Using the wheel sensors, the system
measures and compares the speed of
the drive wheels at all times and slows
down their over-rotation. If a wheel is
starting to slip, the system brakes au-
tomatically until the drive supplied be-
comes compatible with the level of grip
under the wheel again.
The system also adjusts the engine
speed to the grip available under the
wheels, independently of the pressure
exerted on the accelerator pedal.
These functions are an ad-
ditional aid in the event of
critical driving conditions,
enabling the vehicle behav-
iour to be adapted to suit the driving
conditions.
The functions do not take the place
of the driver. They do not increase
the vehicle’s limits and should
not encourage you to drive more
quickly. Therefore, they can under
no circumstances replace the vigi-
lance or responsibility of the driver
when manoeuvring the vehicle (the
driver must always be ready for
sudden incidents which may occur
when driving).
Page 132 of 286
2.18
DRIVING CORRECTION DEVICES AND AIDS (3/5)
Emergency brake assist
This system supplements the ABS
and helps reduce vehicle stopping dis-
tances.
Operating principle
The system is for detecting an emer-
gency braking situation. In this case,
the braking assistance immediately de-
velops maximum power and may trig-
ger ABS regulation.
ABS braking is maintained as long as
the brake pedal is applied.
Hazard warning lights switching on
Depending on the vehicle, these may
light up in the event of sudden decel-
eration. Operating faults
When the system detects an operating
fault the message “CHECK ABS” ap-
pears on the instrument panel along
with the
© warning light.
Consult an approved dealer.
Driver assistance with a
trailer
This system helps to maintain control
over the vehicle while using a trailer.
It detects shaking caused by towing a
trailer under certain driving conditions.
Operating conditions
– the towbar must be approved by an authorised dealer;
– the harness must be approved by an authorised dealer;
– the towbar must be connected to the vehicle.
Operating principle
The function stabilises the vehicle by:
– asymmetric braking of the front wheels to reduce shaking caused by
the trailer;
– braking of all four wheels and limita- tion on engine torque to reduce the
vehicle speed until the shaking has
stopped.
Warning light
flashes on the in-
strument panel to inform the driver.