fuel cap RENAULT MASTER 2018 Owners Manual
[x] Cancel search | Manufacturer: RENAULT, Model Year: 2018, Model line: MASTER, Model: RENAULT MASTER 2018Pages: 290, PDF Size: 7.1 MB
Page 8 of 290
1.2
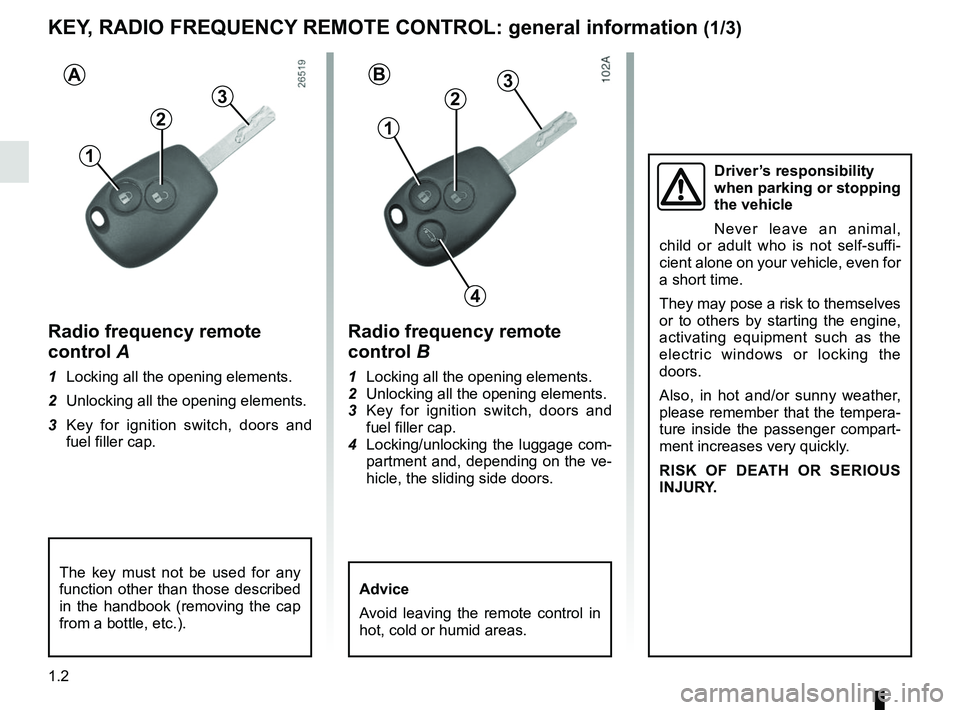
KEY, RADIO FREQUENCY REMOTE CONTROL: general information (1/3)
Radio frequency remote
control B
1 Locking all the opening elements.
2 Unlocking all the opening elements.
3 Key for ignition switch, doors and
fuel filler cap.
4 Locking/unlocking the luggage com- partment and, depending on the ve-
hicle, the sliding side doors.
Radio frequency remote
control A
1 Locking all the opening elements.
2 Unlocking all the opening elements.
3 Key for ignition switch, doors and
fuel filler cap.
1
2
3
The key must not be used for any
function other than those described
in the handbook (removing the cap
from a bottle, etc.).Advice
Avoid leaving the remote control in
hot, cold or humid areas.
A
1
2
3
4
B
Driver’s responsibility
when parking or stopping
the vehicle
Never leave an animal,
child or adult who is not self-suffi-
cient alone on your vehicle, even for
a short time.
They may pose a risk to themselves
or to others by starting the engine,
activating equipment such as the
electric windows or locking the
doors.
Also, in hot and/or sunny weather,
please remember that the tempera-
ture inside the passenger compart-
ment increases very quickly.
RISK OF DEATH OR SERIOUS
INJURY.
Page 9 of 290
1.3
Radio frequency remote
control operating range
This varies according to the environ-
ment: take care not to lock or unlock
the doors by inadvertently pressing the
buttons on the remote control.
Note: on certain vehicles, if a door is
not opened within approximately 2 min-
utes of the door being unlocked by
remote control, the doors will lock again
automatically.
Interference
Interference by factors in the imme-
diate vicinity (external installations or
the use of equipment operating on the
same frequency as the remote control)
may affect the operation of the remote
control.
KEY, RADIO FREQUENCY REMOTE CONTROL: general information (2/3)
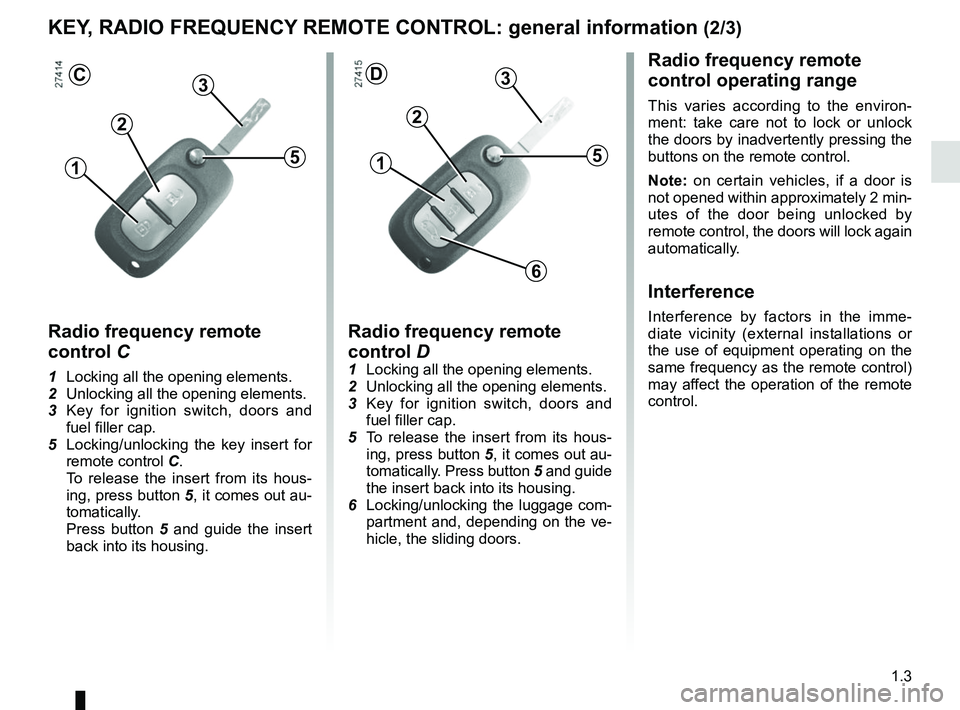
Radio frequency remote
control D
1 Locking all the opening elements.
2 Unlocking all the opening elements.
3 Key for ignition switch, doors and
fuel filler cap.
5 To release the insert from its hous- ing, press button 5, it comes out au-
tomatically. Press button 5 and guide
the insert back into its housing.
6 Locking/unlocking the luggage com- partment and, depending on the ve-
hicle, the sliding doors.
D
1
2
3
5
6
Radio frequency remote
control C
1 Locking all the opening elements.
2 Unlocking all the opening elements.
3 Key for ignition switch, doors and
fuel filler cap.
5 Locking/unlocking the key insert for remote control C.
To release the insert from its hous- ing, press button 5, it comes out au-
tomatically.
Press button 5 and guide the insert
back into its housing.
1
2
C
5
3
Page 108 of 290
1.102
FUEL TANK (1/2)
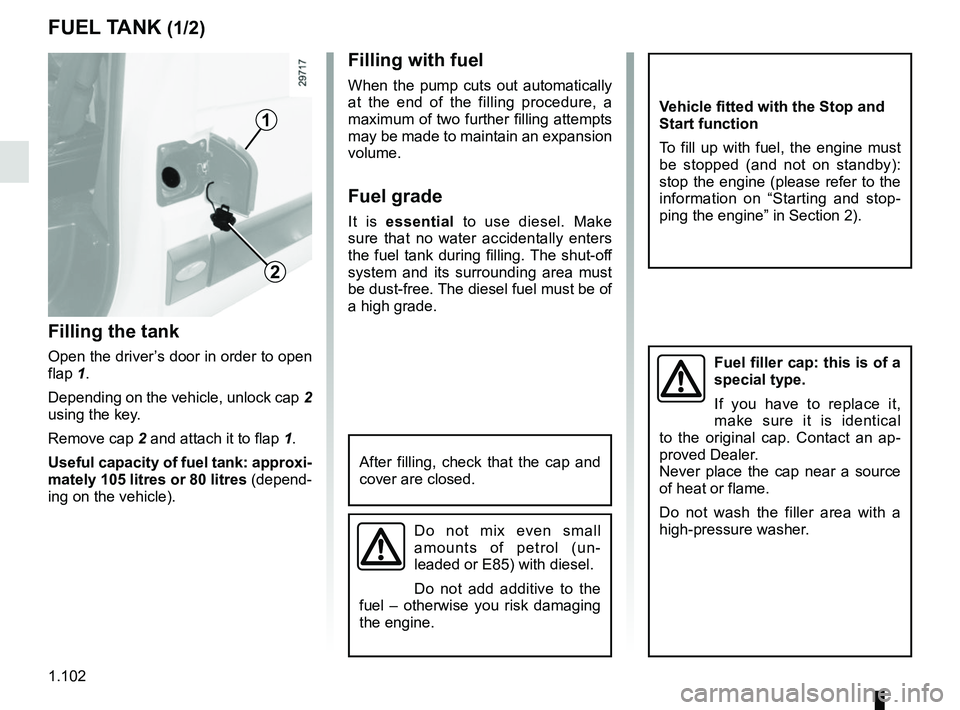
Filling the tank
Open the driver’s door in order to open
flap 1.
Depending on the vehicle, unlock cap 2
using the key.
Remove cap 2 and attach it to flap 1.
Useful capacity of fuel tank: approxi-
mately 105 litres or 80 litres (depend-
ing on the vehicle).
Filling with fuel
When the pump cuts out automatically
at the end of the filling procedure, a
maximum of two further filling attempts
may be made to maintain an expansion
volume.
Fuel grade
It is essential to use diesel. Make
sure that no water accidentally enters
the fuel tank during filling. The shut-off
system and its surrounding area must
be dust-free. The diesel fuel must be of
a high grade.
2
1
After filling, check that the cap and
cover are closed.
Fuel filler cap: this is of a
special type.
If you have to replace it,
make sure it is identical
to the original cap. Contact an ap-
proved Dealer.
Never place the cap near a source
of heat or flame.
Do not wash the filler area with a
high-pressure washer.
Do not mix even small
amounts of petrol (un-
leaded or E85) with diesel.
Do not add additive to the
fuel – otherwise you risk damaging
the engine.
Vehicle fitted with the Stop and
Start function
To fill up with fuel, the engine must
be stopped (and not on standby):
stop the engine (please refer to the
information on “Starting and stop-
ping the engine” in Section 2).
Page 110 of 290
1.104
Please ensure that you comply with the
legislation of your country.
It is important to remember that failure
to respect regulations in force could
lead to legal action being taken against
the vehicle owner.
Operating principleThe use of additives reduces exhaust
emissions by transforming the pollu-
tants into water vapour and nitrogen.
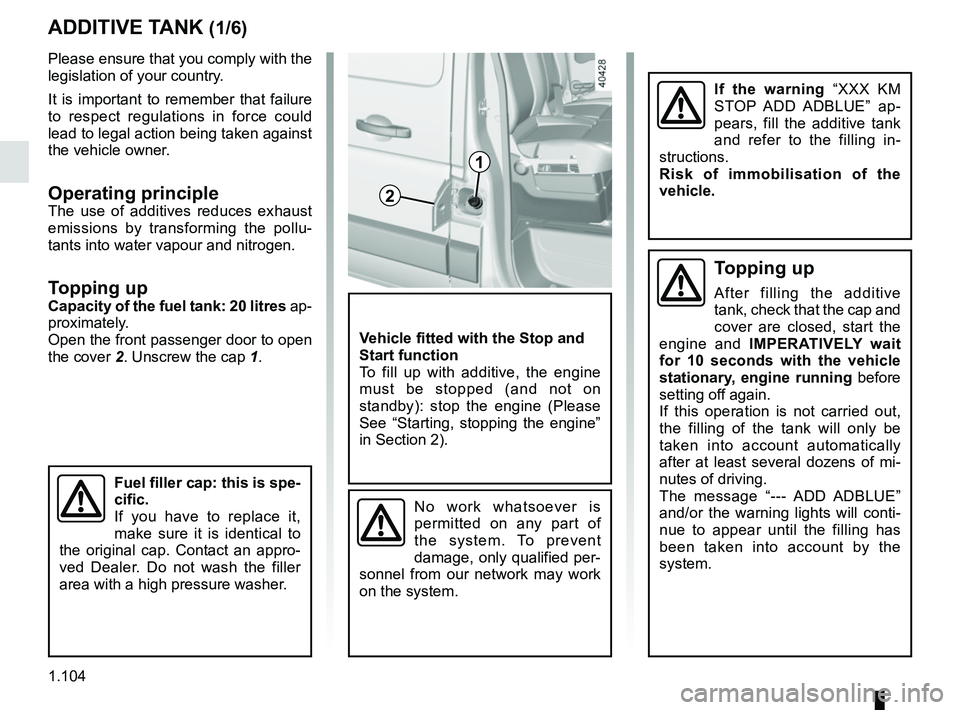
Topping upCapacity of the fuel tank: 20 litres ap-
proximately.
Open the front passenger door to open
the cover 2. Unscrew the cap 1.
ADDITIVE TANK (1/6)
Fuel filler cap: this is spe-
cific.
If you have to replace it,
make sure it is identical to
the original cap. Contact an appro-
ved Dealer. Do not wash the filler
area with a high pressure washer.
2
1
Vehicle fitted with the Stop and
Start function
To fill up with additive, the engine
must be stopped (and not on
standby): stop the engine (Please
See “Starting, stopping the engine”
in Section 2).
No work whatsoever is
permitted on any part of
the system. To prevent
damage, only qualified per-
sonnel from our network may work
on the system.
If the warning “XXX KM
STOP ADD ADBLUE” ap-
pears, fill the additive tank
and refer to the filling in-
structions.
Risk of immobilisation of the
vehicle.
Topping up
After filling the additive
tank, check that the cap and
cover are closed, start the
engine and IMPERATIVELY wait
for 10 seconds with the vehicle
stationary, engine running before
setting off again.
If this operation is not carried out,
the filling of the tank will only be
taken into account automatically
after at least several dozens of mi-
nutes of driving.
The message “--- ADD ADBLUE”
and/or the warning lights will conti-
nue to appear until the filling has
been taken into account by the
system.
Page 127 of 290
2.11
DRIVING ADVICE, ECO-DRIVING (4/4)
Advice on use
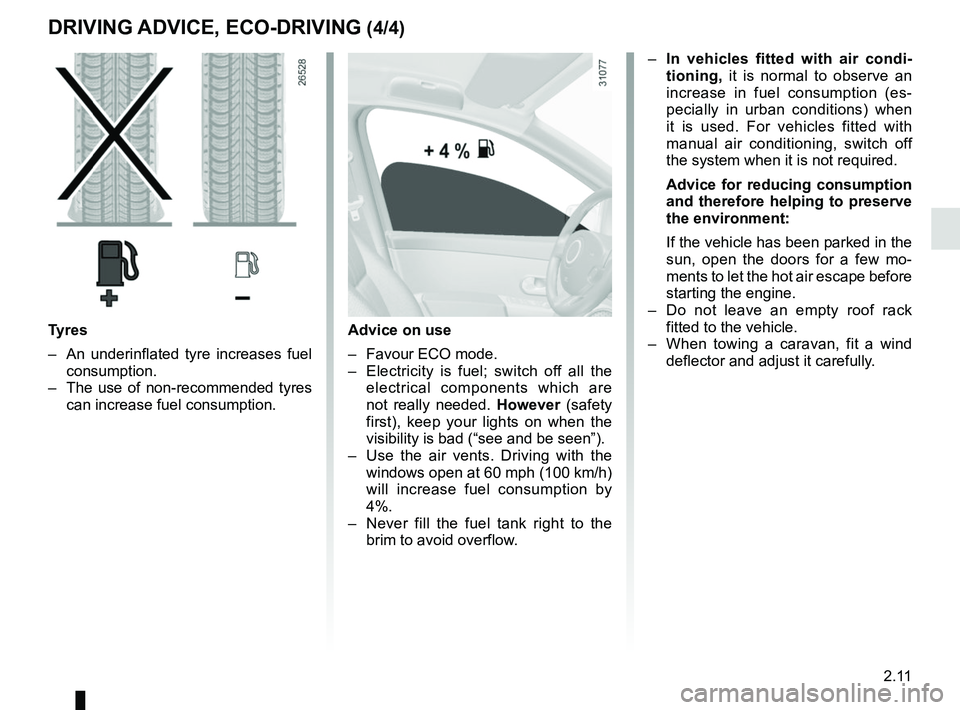
– Favour ECO mode.
– Electricity is fuel; switch off all the electrical components which are
not really needed. However (safety
first), keep your lights on when the
visibility is bad (“see and be seen”).
– Use the air vents. Driving with the windows open at 60 mph (100 km/h)
will increase fuel consumption by
4%.
– Never fill the fuel tank right to the brim to avoid overflow.
– In vehicles fitted with air condi-
tioning, it is normal to observe an
increase in fuel consumption (es-
pecially in urban conditions) when
it is used. For vehicles fitted with
manual air conditioning, switch off
the system when it is not required.
Advice for reducing consumption
and therefore helping to preserve
the environment:
If the vehicle has been parked in the
sun, open the doors for a few mo-
ments to let the hot air escape before
starting the engine.
– Do not leave an empty roof rack fitted to the vehicle.
– When towing a caravan, fit a wind deflector and adjust it carefully.
Tyres
– An underinflated tyre increases fuel consumption.
– The use of non-recommended tyres can increase fuel consumption.
Page 179 of 290
3.13
Operating faults
As a general rule, contact your ap-
proved dealer in the event of an oper-
ating fault.
– Reduction in de-icing, demisting or air conditioning performance.
This may be caused by the passen-
ger compartment filter cartridge be-
coming clogged.
– No cold air is being produced .
Check that the controls are set cor-
rectly and that the fuses are sound.
Otherwise, switch off the system.
Presence of water under the
vehicle
After prolonged use of the air condi-
tioning system, it is normal for water
to be present under the vehicle. This is
caused by condensation.
AIR CONDITIONING: information and operating instructions (1/2)
Do not open the refriger-
ant fluid circuit. The fluid
may damage eyes or skin.
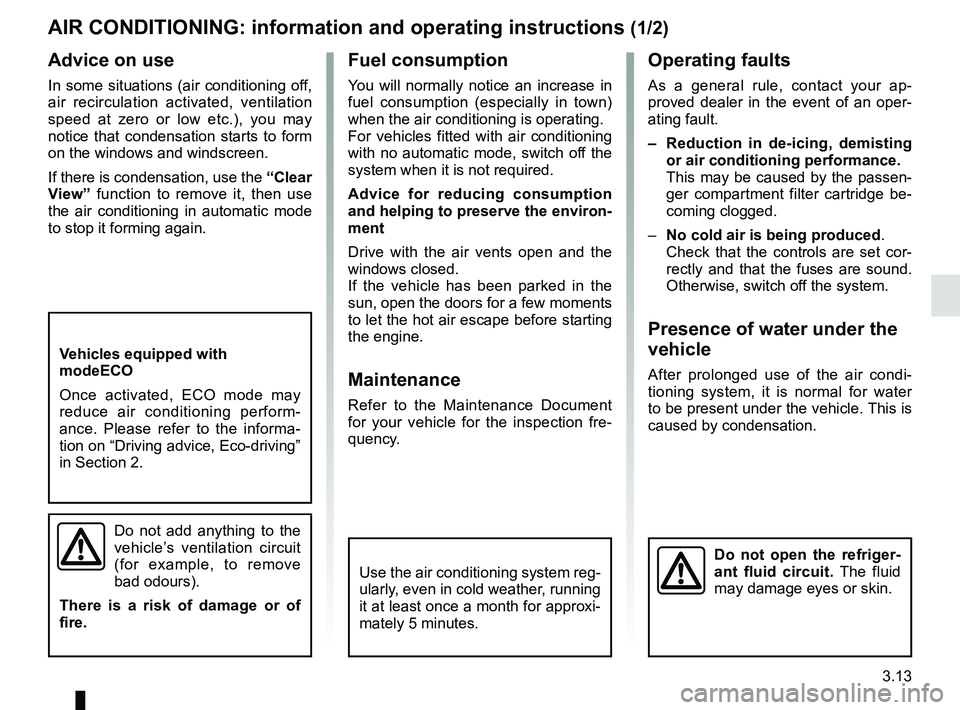
Fuel consumption
You will normally notice an increase in
fuel consumption (especially in town)
when the air conditioning is operating.
For vehicles fitted with air conditioning
with no automatic mode, switch off the
system when it is not required.
Advice for reducing consumption
and helping to preserve the environ-
ment
Drive with the air vents open and the
windows closed.
If the vehicle has been parked in the
sun, open the doors for a few moments
to let the hot air escape before starting
the engine.
Maintenance
Refer to the Maintenance Document
for your vehicle for the inspection fre-
quency.
Advice on use
In some situations (air conditioning off,
air recirculation activated, ventilation
speed at zero or low etc.), you may
notice that condensation starts to form
on the windows and windscreen.
If there is condensation, use the “Clear
View” function to remove it, then use
the air conditioning in automatic mode
to stop it forming again.
Do not add anything to the
vehicle’s ventilation circuit
(for example, to remove
bad odours).
There is a risk of damage or of
fire.
Use the air conditioning system reg-
ularly, even in cold weather, running
it at least once a month for approxi-
mately 5 minutes.
Vehicles equipped with
modeECO
Once activated, ECO mode may
reduce air conditioning perform-
ance. Please refer to the informa-
tion on “Driving advice, Eco-driving”
in Section 2.
Page 265 of 290
6.5
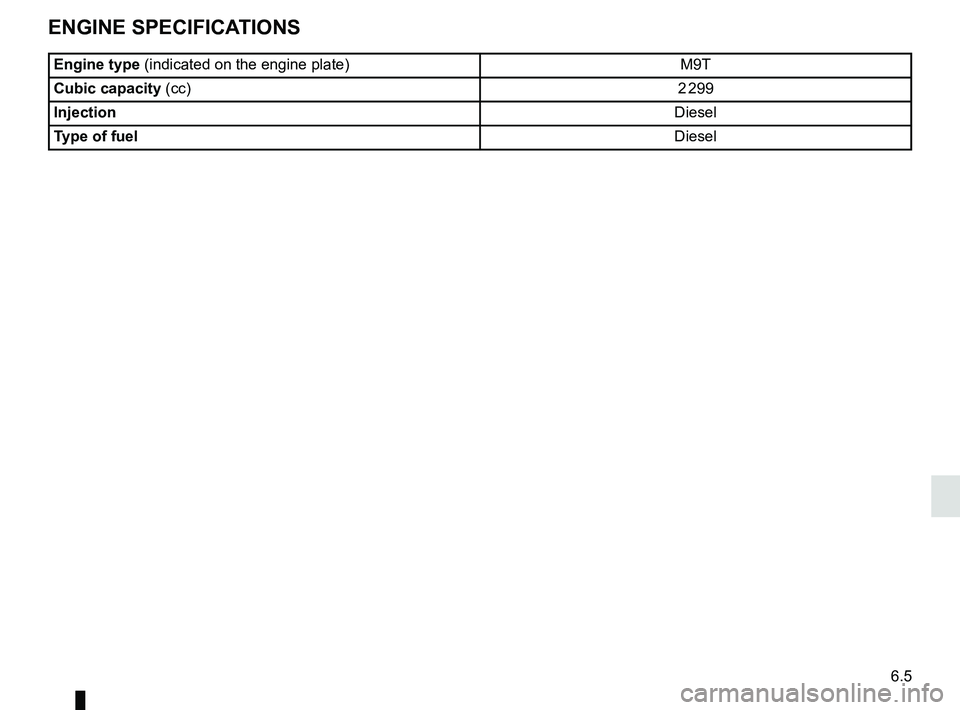
ENGINE SPECIFICATIONS
Engine type (indicated on the engine plate) M9T
Cubic capacity (cc) 2 299
Injection Diesel
Type of fuel Diesel
Page 284 of 290
7.2
ALPHABETICAL INDEX (2/4)
emergency active braking......................................2.16 → 2.23
emergency brake assist.........................................2.16 → 2.23
emergency braking ................................................2.16 → 2.23
emergency spare wheel ............................................. 5.2 – 5.3
engine technical specifications .................................................. 6.5
engine coolant ..................................................................... 4.9
engine oil ...................................................................4.4 → 4.7
engine oil level ..................................................1.83, 4.4 → 4.7
engine specifications ........................................................... 6.5
environment ............................................................\
........... 2.13
ESC: electronic stability control .............................2.16 → 2.23
external lights and signals ...................................1.96 → 1.100
external temperature ......................................................... 1.93
F
filter .................................................................\
................... 4.10
fitting a radio ...................................................................... 5.40
foot panel ........................................................................\
... 5.37
front passenger air bag deactivation .....................1.70 → 1.72
front seat adjustment ......................................................... 1.21
front seats ........................................................................\
.. 1.21
fuel advice on fuel economy ..................................... 2.8 → 2.11
consumption ...................................................... 2.8 → 2.11
filling .............................................................. 1.102 – 1.103
grade ..................................................................\
........ 1.102
fuel consumption ..................................................... 2.8 → 2.11
fuel filler cap ....................................................... 1.102 – 1.103
fuel grade........................................................................\
. 1.103
fuel level ........................................................................\
.... 1.83
fuel repriming ...................................................... 1.102 – 1.103
fuel tank .............................................................. 1.102 – 1.103
fuel tank capacity ............................................................. 1.102
fuses ..................................................................\
....5.28 → 5.32G
gear lever......................................................2.14, 2.45
→ 2.49
grab handle........................................................................\
3.18
grip control ........................................................................\
. 2.22
ground clearance ........................................................ 6.6 – 6.7
H
handbrake........................................................................\
.. 2.15
handsfree.................................................................... 1.8 – 1.9
hazard warning lights signal ............................................ 1.101
headrest........................................................................\
..... 1.20
heated seats ...................................................................... 1.21
heating and air conditioning system ........3.2 – 3.3, 3.7 → 3.13
heating system ......................................3.2 → 3.6, 3.13 – 3.14
Hill Start Assist.......................................................2.16 → 2.23
HSA: Hill Start Assistance ................................................ 2.23
hubcap tool ...................................................... 5.4, 5.11 – 5.12
I
idle speed ........................................................................\
.. 2.43
indicators .............................................................\
............ 1.101
indicators: direction indicators ..................................................... 1.101
instrument panel ..............................................1.78 → 1.83
instrument panel ....................................................1.78 → 1.85
interior lighting: changing bulbs ............................................................. 5.27
interior trim maintenance ..................................................... 4.17 – 4.18
J
jack ...................................................................\
................... 5.4
K
keys ...................................................................\
........1.2 → 1.6