warning light RENAULT MEGANE 2005 X84 / 2.G Workshop Manual
[x] Cancel search | Manufacturer: RENAULT, Model Year: 2005, Model line: MEGANE, Model: RENAULT MEGANE 2005 X84 / 2.GPages: 250, PDF Size: 5.72 MB
Page 134 of 250
Downloaded from www.Manualslib.com manuals search engine
1
1
NU761_2_G2-FRA.qxd 4/11/05 10:48 Page 2.34
2.34
AUTOMATIC GEARBOX
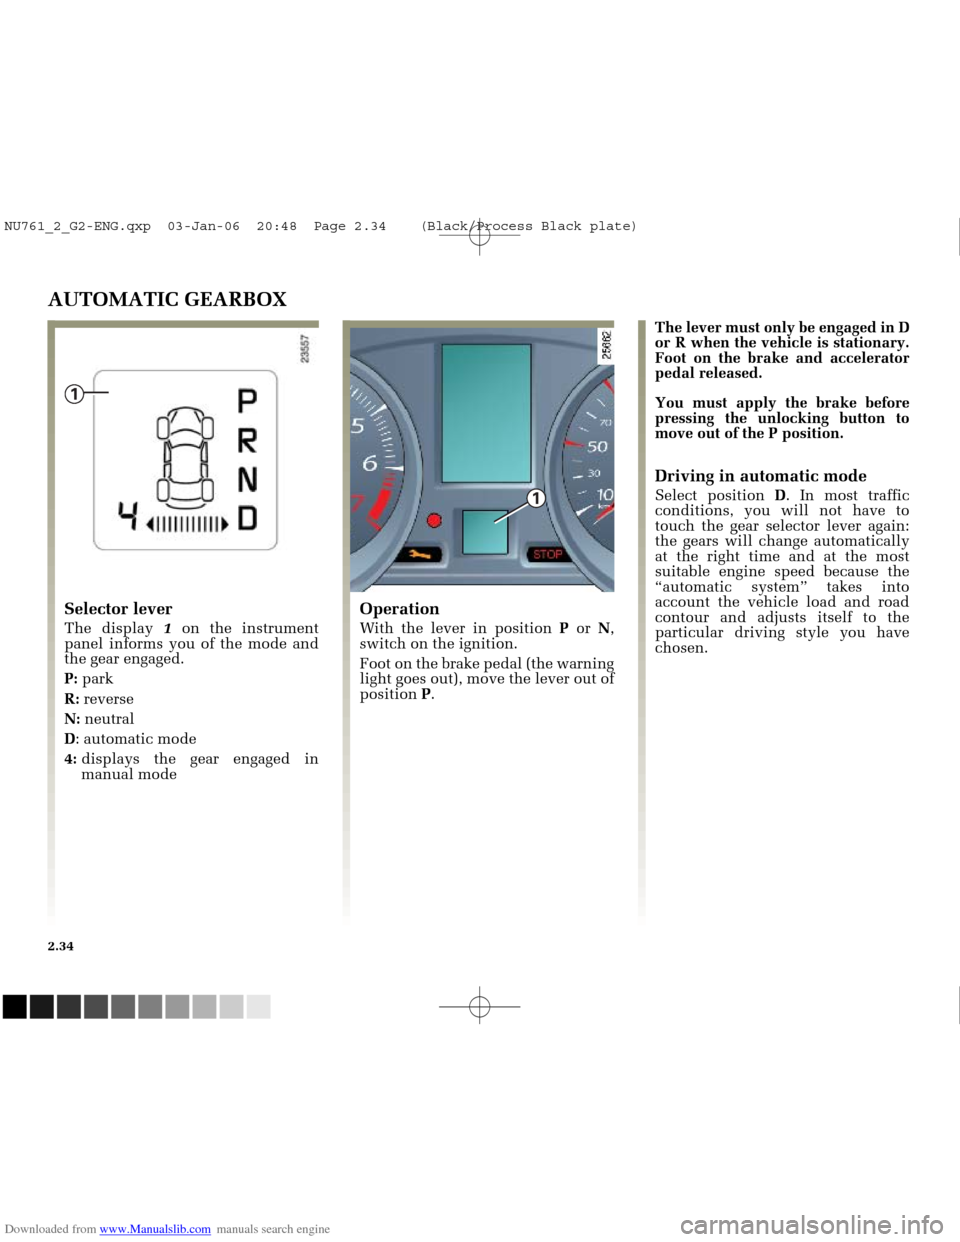
Operation
With the lever in position Por N,
switch on the ignition.
Foot on the brake pedal (the warning
light goes out), move the lever out of
position P.
Selector lever
The display 1on the instrument
panel informs you of the mode and
the gear engaged.
P: park
R: reverse
N: neutral
D : automatic mode
4: displays the gear engaged in
manual mode The lever must only be engaged in D
or R when the vehicle is stationary.
Foot on the brake and accelerator
pedal released.
You must apply the brake before
pressing the unlocking button to
move out of the P position.
Driving in automatic mode
Select position
D. In most traffic
conditions, you will not have to
touch the gear selector lever again:
the gears will change automatically
at the right time and at the most
suitable engine speed because the
“automatic system” takes into
account the vehicle load and road
contour and adjusts itself to the
particular driving style you have
chosen.
NU761_2_G2-ENG.qxp 03-Jan-06 20:48 Page 2.34 (Black/Process Black\
plate)
Page 135 of 250
Downloaded from www.Manualslib.com manuals search engine
NU761_2_G2-FRA.qxd 4/11/05 10:48 Page 2.35
AUTOMATIC TRANSMISSION (continued)Driving in manual mode
With the selector lever in position D,
move the lever to the left.
Pushing the lever repeatedly allows
you to change gears manually.
- to move down through the gears, push the lever backwards.
- to move up through the gears, push the lever forwards.
The gear selected is displayed on the
instrument panel. Special cases
Under certain driving conditions
(e.g.: engine protection, with
electronic stability program (ESP)
operational: etc.) the “automatic
system” may change gear
automatically.
Likewise, to prevent “incorrect
manoeuvres”, a gear change may be
refused by the “automatic system”:
in this case the gear display flashes
for a few seconds as a warning.
How to drive as economically as
possible
Leave the selector in position
Don
the open road, depress the
accelerator pedal slightly to ensure
automatic gear changes at
comparatively low engine speeds.
Accelerating and overtaking
Depress the accelerator pedal
briskly and fully (so that it goes
beyond the kickdown point).
This will enable you to change
down to the optimal gear within the
engine range.
2.35
NU761_2_G2-ENG.qxp 03-Jan-06 20:48 Page 2.35 (Black/Process Black\
plate)
Page 137 of 250
Downloaded from www.Manualslib.com manuals search engine
NU761_2_G2-FRA.qxd 4/11/05 10:49 Page 2.37
AUTOMATIC TRANSMISSION (continued)
Operating faults
- when driving , if the message
“Check gearbox” along with the
warning light appears on the
instrument panel, this indicates a
fault.
Consult your RENAULT Dealer as
soon as possible.
- when driving , if the message
“Gearbox overheating” along with
the warning light appears on
the instrument panel, avoid leaving
the lever in position D(or R), traffic
permitting: systematically return to
position Nwhile stopping.
Consult your RENAULT Dealer as
soon as possible.
- Recovering a vehicle with an
automatic transmission : refer to
the information on Towing in
Section 5.
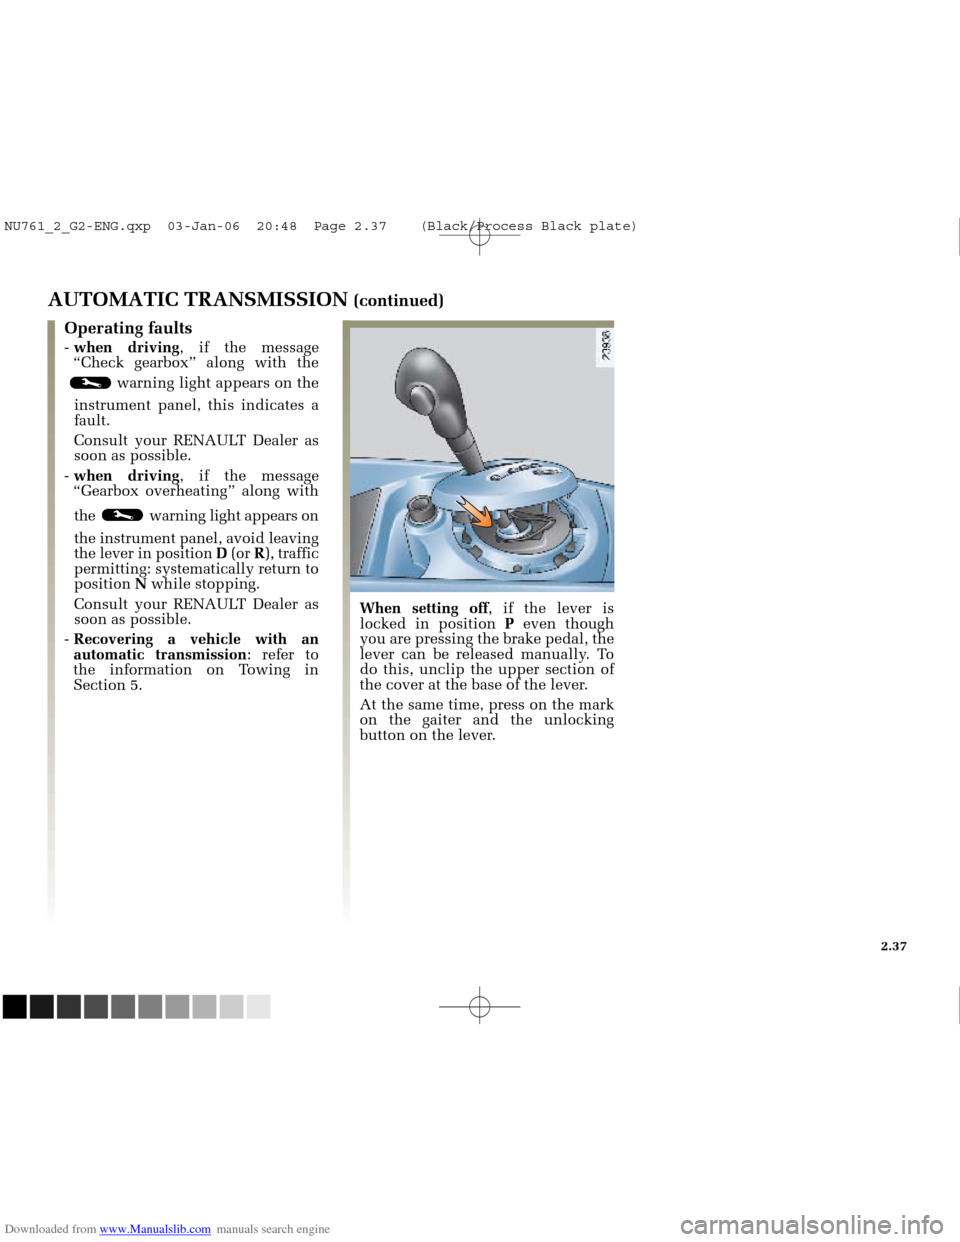
When setting off , if the lever is
locked in position Peven though
you are pressing the brake pedal, the
lever can be released manually. To
do this, unclip the upper section of
the cover at the base of the lever.
At the same time, press on the mark
on the gaiter and the unlocking
button on the lever.
2.37
NU761_2_G2-ENG.qxp 03-Jan-06 20:48 Page 2.37 (Black/Process Black\
plate)
Page 142 of 250
Downloaded from www.Manualslib.com manuals search engine
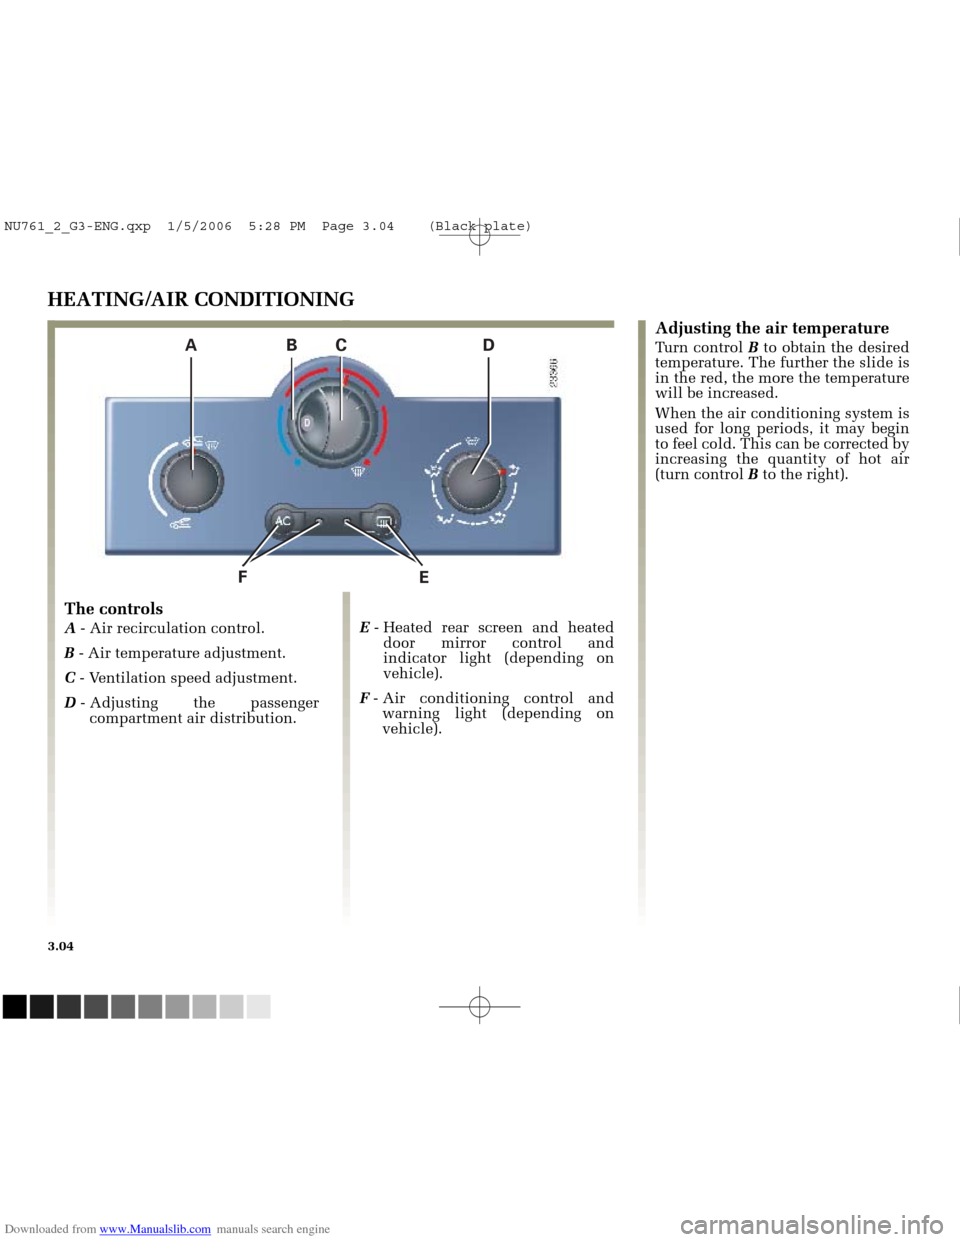
ABC D
FE
NU761_2_G3-FRA.qxd 4/11/05 10:51 Page 3.04
3.04
HEATING/AIR CONDITIONING
The controls
A - Air recirculation control.
B - Air temperature adjustment.
C - Ventilation speed adjustment.
D - Adjusting the passenger
compartment air distribution. E
- Heated rear screen and heated
door mirror control and
indicator light (depending on
vehicle).
F - Air conditioning control and
warning light (depending on
vehicle).
Adjusting the air temperature
Turn control Bto obtain the desired
temperature. The further the slide is
in the red, the more the temperature
will be increased.
When the air conditioning system is
used for long periods, it may begin
to feel cold. This can be corrected by
increasing the quantity of hot air
(turn control Bto the right).
NU761_2_G3-ENG.qxp 1/5/2006 5:28 PM Page 3.04 (Black plate)
Page 146 of 250
Downloaded from www.Manualslib.com manuals search engine
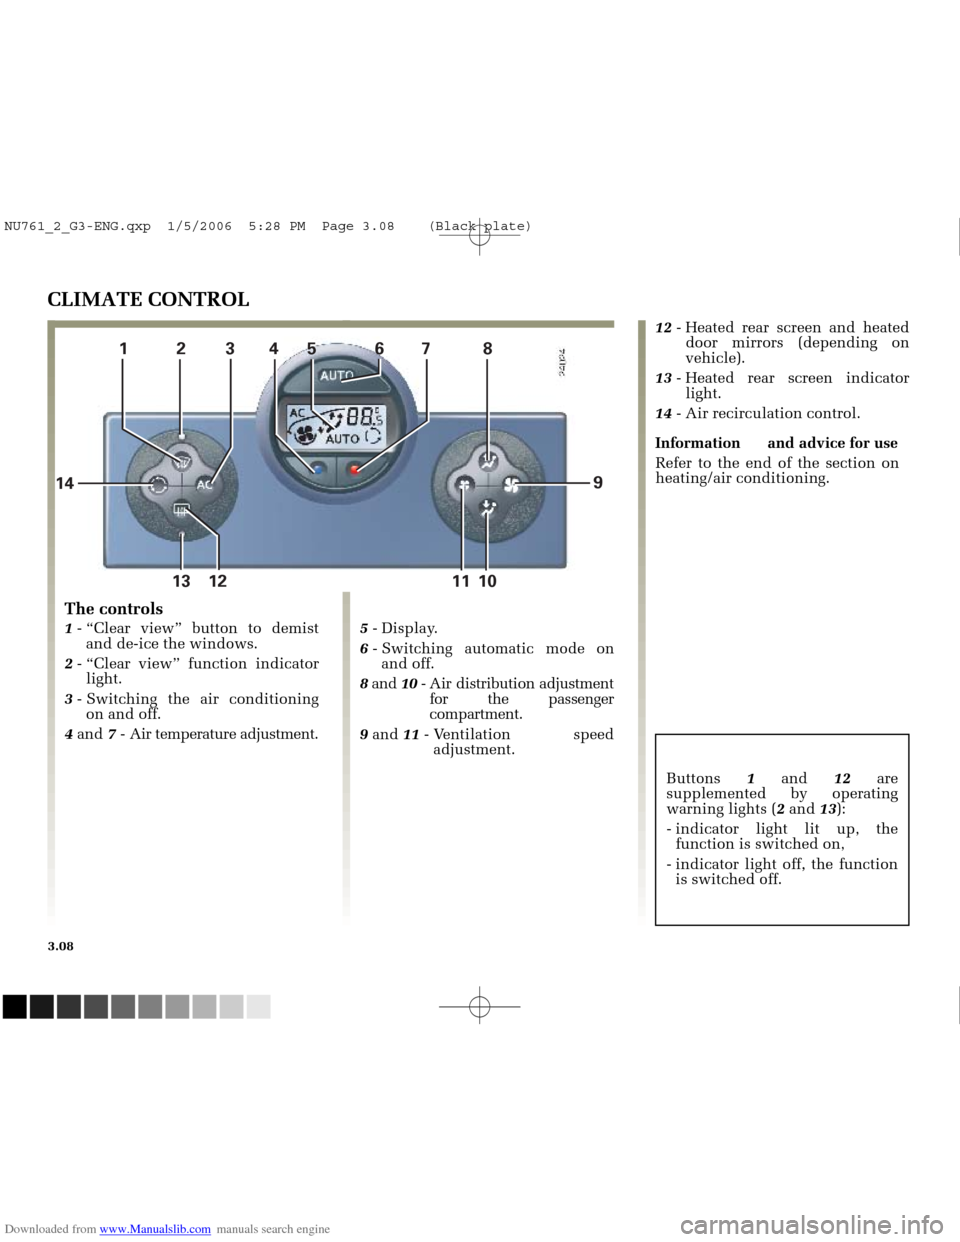
12345 67 813 12 11 10
14 9
NU761_2_G3-FRA.qxd 4/11/05 10:51 Page 3.08
3.08
CLIMATE CONTROL
The controls
1
- “Clear view” button to demist
and de-ice the windows.
2 - “Clear view” function indicator
light.
3 - Switching the air conditioning
on and off.
4 and 7- Air temperature adjustment. 5
- Display.
6 - Switching automatic mode on
and off.
8 and 10- Air distribution adjustment
for the passenger
compartment.
9 and 11- Ventilation speed
adjustment. 12
- Heated rear screen and heated
door mirrors (depending on
vehicle).
13 - Heated rear screen indicator
light.
14 - Air recirculation control.
Information and advice for use Refer to the end of the section on
heating/air conditioning.
Buttons 1and 12are
supplemented by operating
warning lights ( 2and 13):
- indicator light lit up, the function is switched on,
- indicator light off, the function is switched off.
NU761_2_G3-ENG.qxp 1/5/2006 5:28 PM Page 3.08 (Black plate)
Page 151 of 250
Downloaded from www.Manualslib.com manuals search engine
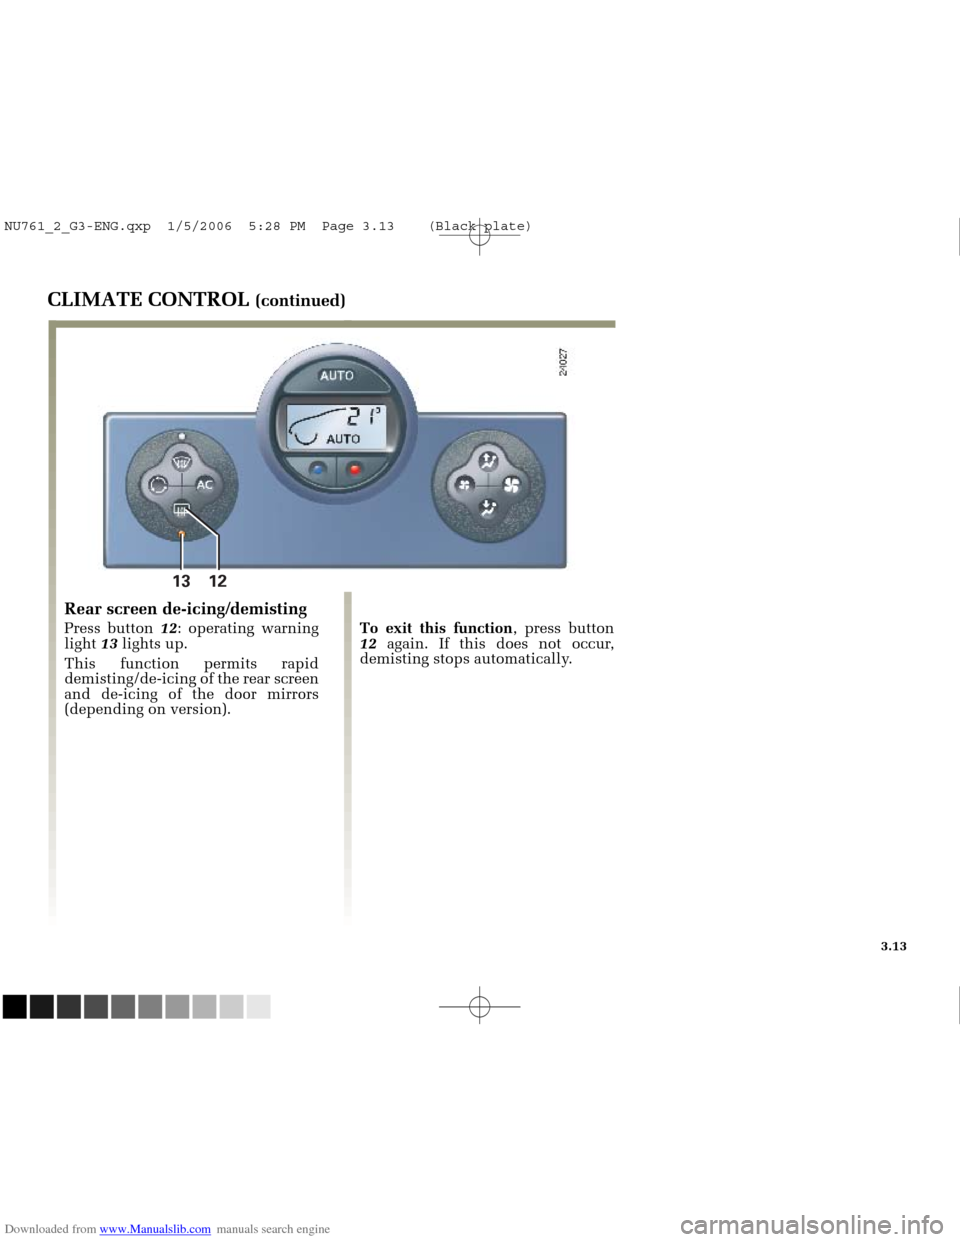
13 12
NU761_2_G3-FRA.qxd 4/11/05 10:51 Page 3.13
3.13
CLIMATE CONTROL (continued)
Rear screen de-icing/demisting
Press button 12: operating warning
light 13lights up.
This function permits rapid
demisting/de-icing of the rear screen
and de-icing of the door mirrors
(depending on version). To exit this function
, press button
12 again. If this does not occur,
demisting stops automatically.
NU761_2_G3-ENG.qxp 1/5/2006 5:28 PM Page 3.13 (Black plate)
Page 152 of 250
Downloaded from www.Manualslib.com manuals search engine
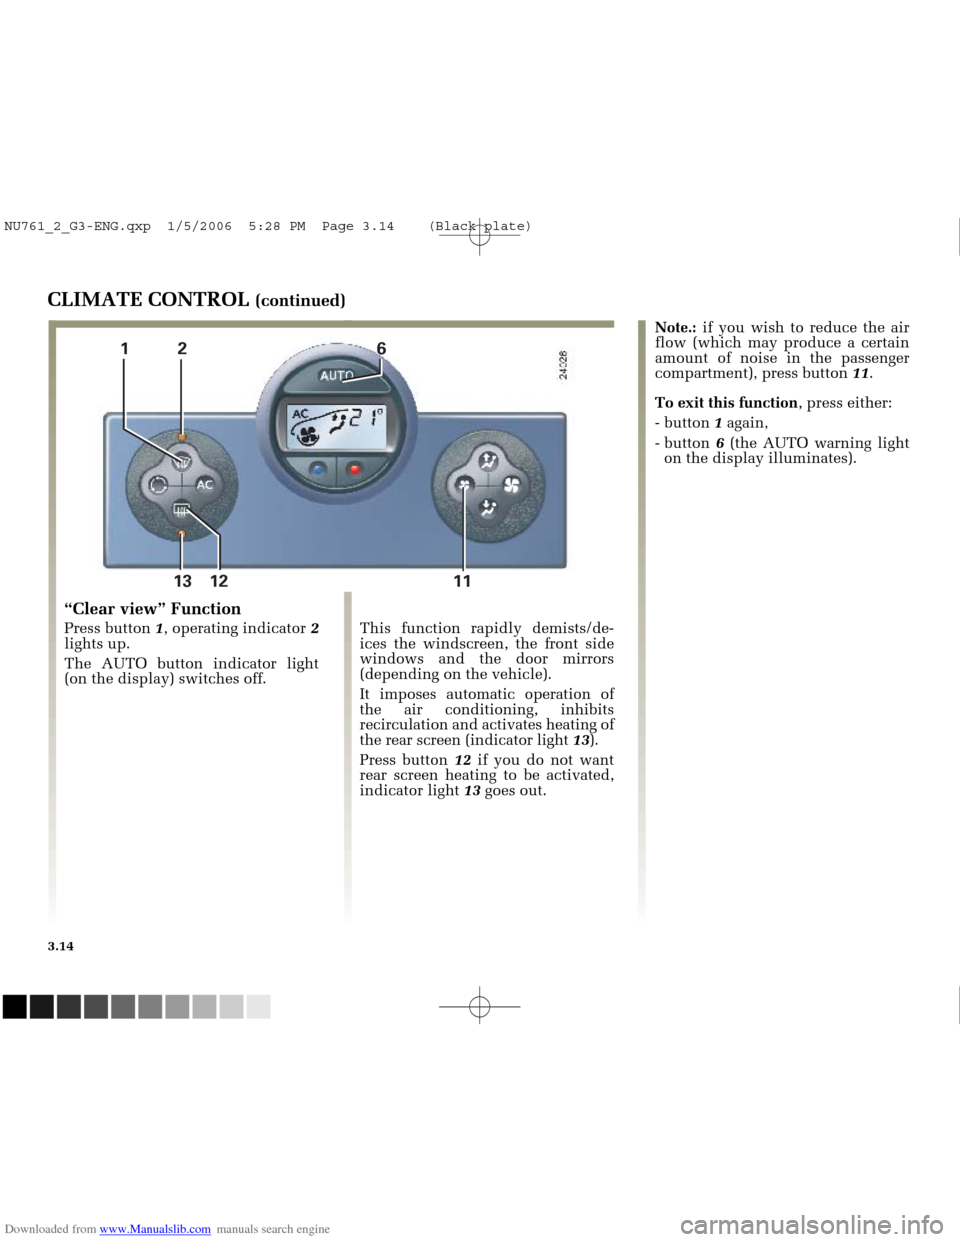
12 613 12 11
NU761_2_G3-FRA.qxd 4/11/05 10:51 Page 3.14
3.14
CLIMATE CONTROL (continued)
This function rapidly demists/de-
ices the windscreen, the front side
windows and the door mirrors
(depending on the vehicle).
It imposes automatic operation of
the air conditioning, inhibits
recirculation and activates heating of
the rear screen (indicator light 13).
Press button 12if you do not want
rear screen heating to be activated,
indicator light 13goes out.
“Clear view” Function
Press button 1, operating indicator 2
lights up.
The AUTO button indicator light
(on the display) switches off. Note.:
if you wish to reduce the air
flow (which may produce a certain
amount of noise in the passenger
compartment), press button 11.
To exit this function , press either:
- button 1again,
- button 6 (the AUTO warning light
on the display illuminates).
NU761_2_G3-ENG.qxp 1/5/2006 5:28 PM Page 3.14 (Black plate)
Page 178 of 250
Downloaded from www.Manualslib.com manuals search engine
23532
23507
NU761_2_G4-FRA.qxd 14/11/05 10:10 Page 4.04
4.04
ENGINE OIL LEVEL
It is normal for an engine to use oil
for lubrication and cooling of
moving parts and it is normal to top
up the level between oil changes.
However, contact your RENAULT
Dealer if more than 0.5 litres is being
consumed every 600 miles (1,000
km) after the running in period.
Oil change frequency: check the oil
level from time to time and
certainly before any long journey to
avoid the risk of damaging your
engine.
Reading the oil level
The vehicle must be parked on level
ground and the engine should have
been switched off for some time
beforehand to obtain an accurate
reading.
To be able to read the exact oil level
and make sure that the maximum
level has not been exceeded (risk of
engine damage), the dipstick must
be used.
In the following pages, see Engine
oil level: topping up/filling.
The instrument panel display only
shows a warning when the
minimum oil level has been reached.Minimum oil level warning on the
instrument panel
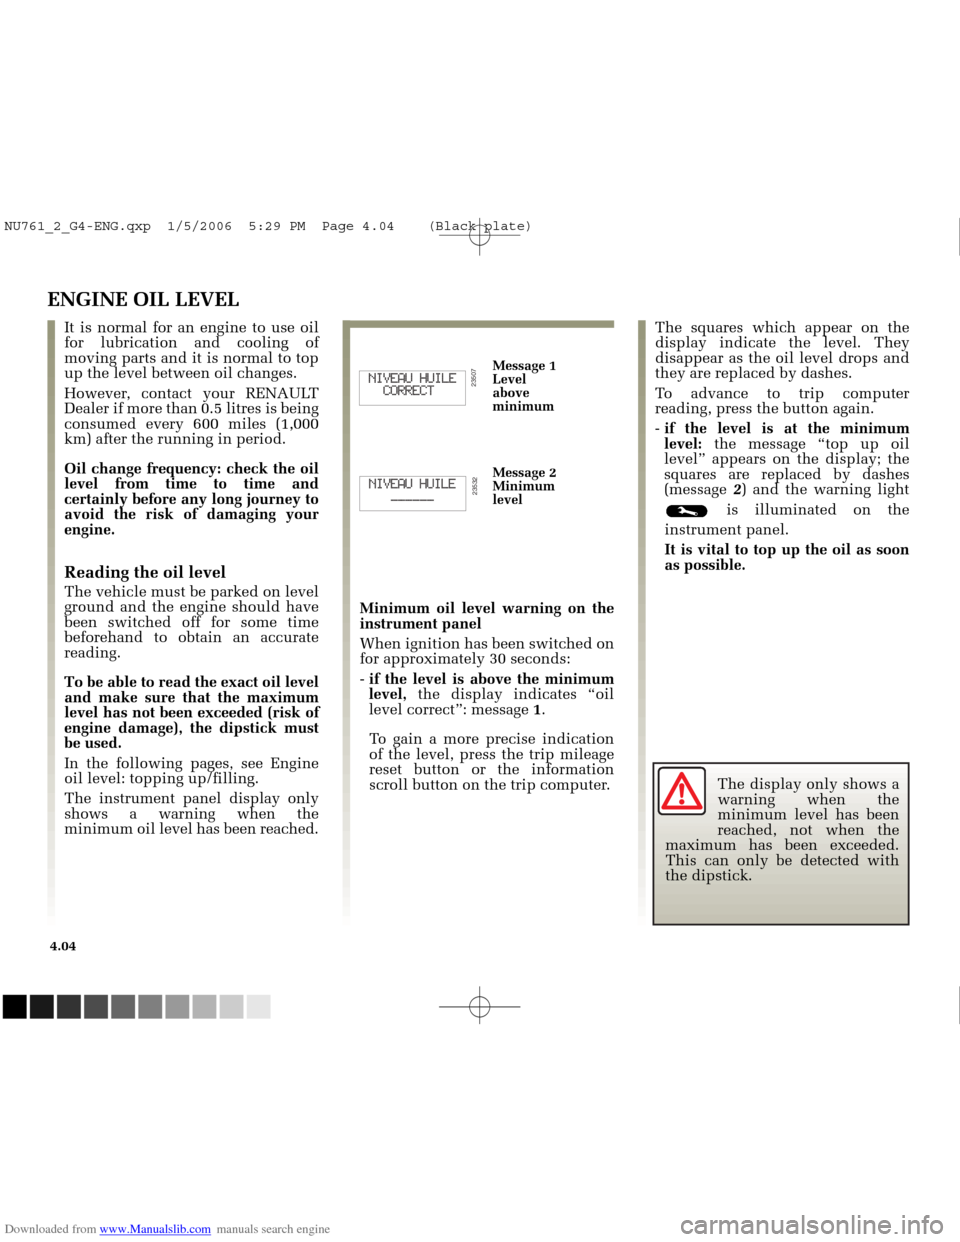
When ignition has been switched on
for approximately 30 seconds:
-
if the level is above the minimum
level, the display indicates “oil
level correct”: message 1.
To gain a more precise indication
of the level, press the trip mileage
reset button or the information
scroll button on the trip computer. The squares which appear on the
display indicate the level. They
disappear as the oil level drops and
they are replaced by dashes.
To advance to trip computer
reading, press the button again.
-
if the level is at the minimum
level: the message “top up oil
level” appears on the display; the
squares are replaced by dashes
(message 2) and the warning light
is illuminated on the
instrument panel.
It is vital to top up the oil as soon
as possible.
Message 1
Level
above
minimum
Message 2
Minimum
level
The display only shows a
warning when the
minimum level has been
reached, not when the
maximum has been exceeded.
This can only be detected with
the dipstick.
NU761_2_G4-ENG.qxp 1/5/2006 5:29 PM Page 4.04 (Black plate)
Page 183 of 250
Downloaded from www.Manualslib.com manuals search engine
1
NU761_2_G4-FRA.qxd 14/11/05 10:11 Page 4.09
4.09
LEVELS (continued)
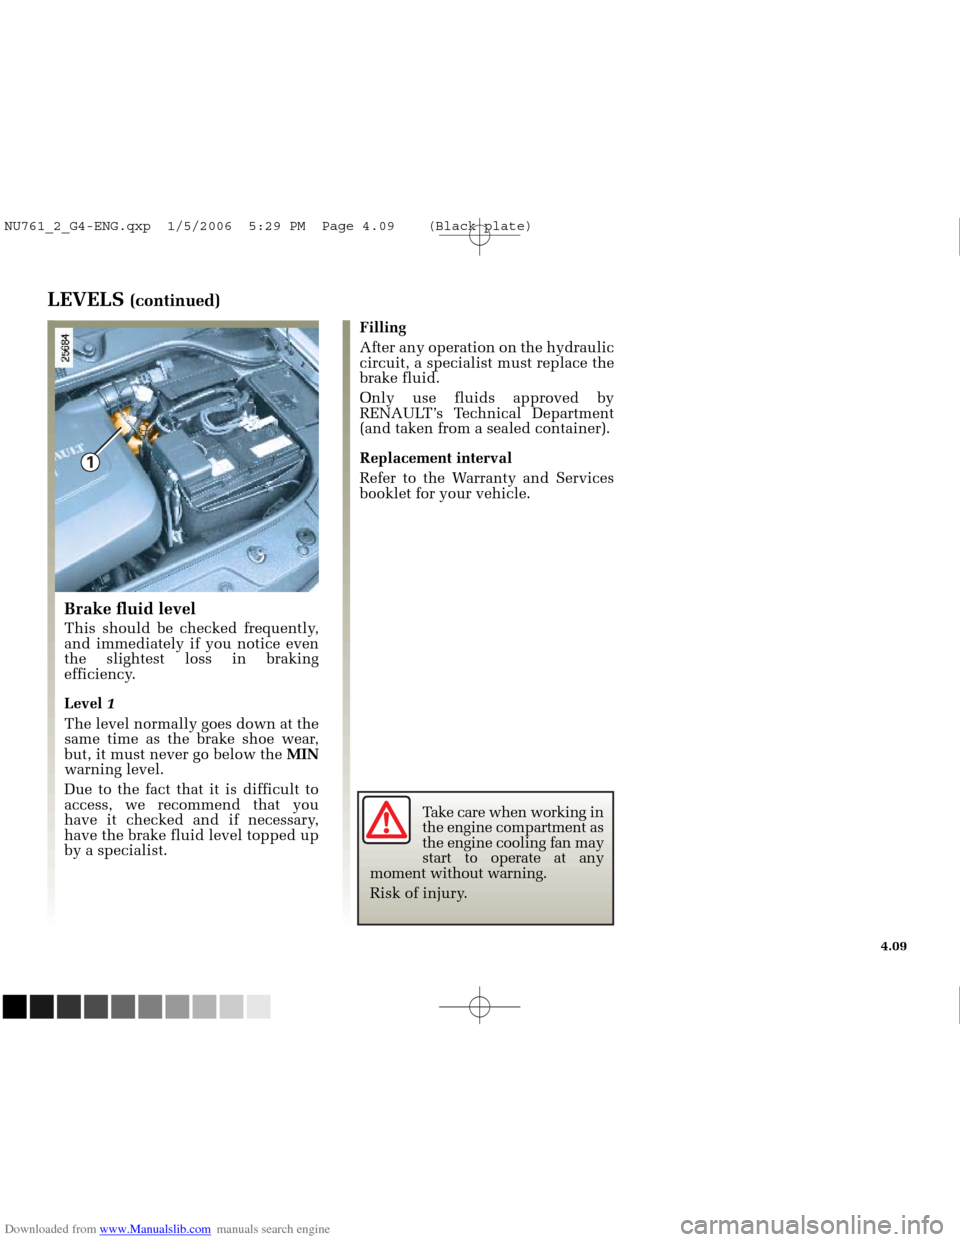
Brake fluid level
This should be checked frequently,
and immediately if you notice even
the slightest loss in braking
efficiency.
Level 1
The level normally goes down at the
same time as the brake shoe wear,
but, it must never go below the MIN
warning level.
Due to the fact that it is difficult to
access, we recommend that you
have it checked and if necessary,
have the brake fluid level topped up
by a specialist. Filling
After any operation on the hydraulic
circuit, a specialist must replace the
brake fluid.
Only use fluids approved by
RENAULT’s Technical Department
(and taken from a sealed container).
Replacement interval
Refer to the Warranty and Services
booklet for your vehicle.
Take care when working in
the engine compartment as
the engine cooling fan may
start to operate at any
moment without warning.
Risk of injury.
NU761_2_G4-ENG.qxp 1/5/2006 5:29 PM Page 4.09 (Black plate)
Page 184 of 250
Downloaded from www.Manualslib.com manuals search engine
1
NU761_2_G4-FRA.qxd 14/11/05 10:11 Page 4.10
4.10
LEVELS (continued)FILTERS
The replacement of filter elements
(air filter, passenger compartment
filter, diesel filter, etc.) is scheduled
in the servicing and maintenance
operations for your vehicle.
Frequency for replacing filter
elements: refer to the Warranty and
Services booklet for your vehicle.
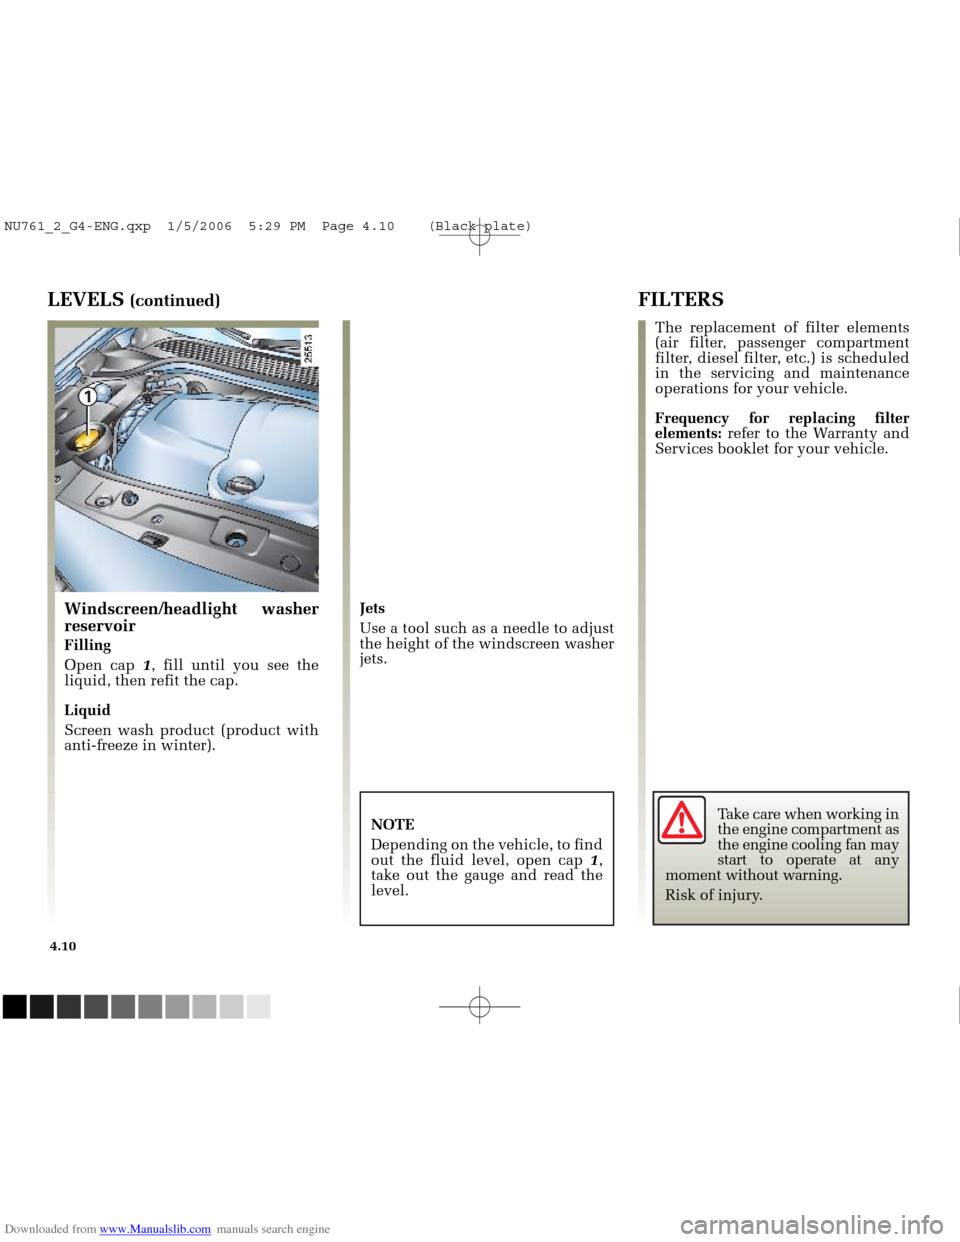
Windscreen/headlight washer
reservoir
Filling
Open cap 1, fill until you see the
liquid, then refit the cap.
Liquid
Screen wash product (product with
anti-freeze in winter). Jets
Use a tool such as a needle to adjust
the height of the windscreen washer
jets.
NOTE
Depending on the vehicle, to find
out the fluid level, open cap 1,
take out the gauge and read the
level.
Take care when working in
the engine compartment as
the engine cooling fan may
start to operate at any
moment without warning.
Risk of injury.
NU761_2_G4-ENG.qxp 1/5/2006 5:29 PM Page 4.10 (Black plate)