RENAULT MEGANE 2017 4.G Owners Manual
MEGANE 2017 4.G
RENAULT
RENAULT
https://www.carmanualsonline.info/img/7/1635/w960_1635-0.png
RENAULT MEGANE 2017 4.G Owners Manual
Trending: sat nav, deactivate passenger airbag, oil change, Transmission, oil dipstick, Esc mode on, Close
Page 291 of 346
5.21
REAR LIGHTS AND SIDE LIGHTS: replacing the bulbs (6/9)
The bulbs are under pres-
sure and can break when
replaced.
Risk of injury.
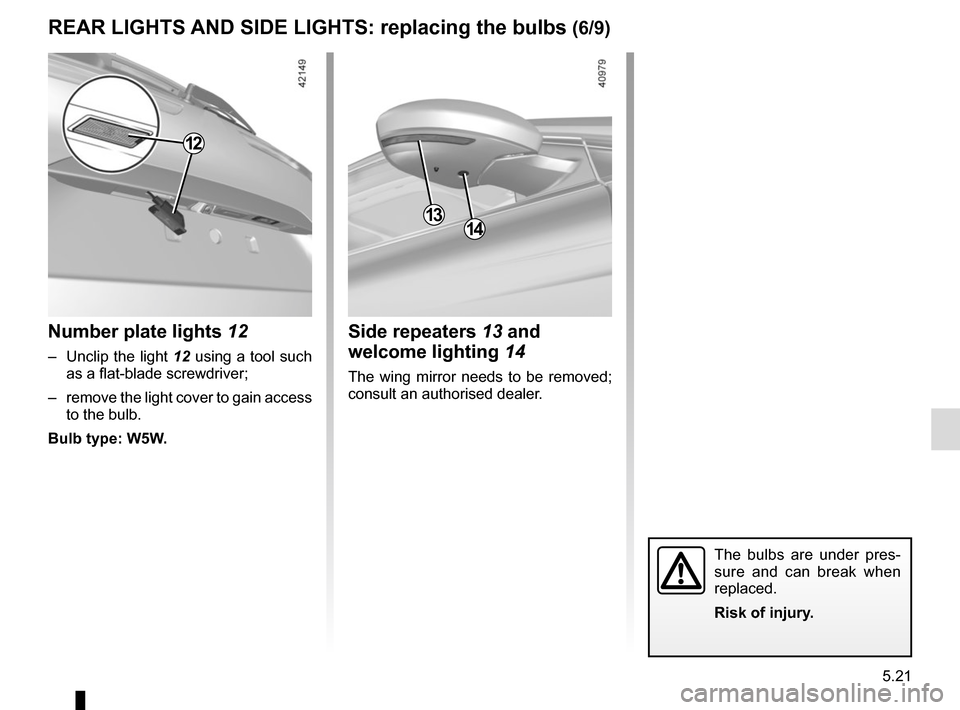
Side repeaters 13 and welcome lighting 14
The wing mirror needs to be removed;
consult an authorised dealer.
13
Number plate lights 12
– Unclip the light 12 using a tool such
as a flat-blade screwdriver;
– remove the light cover to gain access to the bulb.
Bulb type: W5W.
14
12
Page 292 of 346
5.22
REAR LIGHTS AND SIDE LIGHTS: replacing the bulbs (7/9)
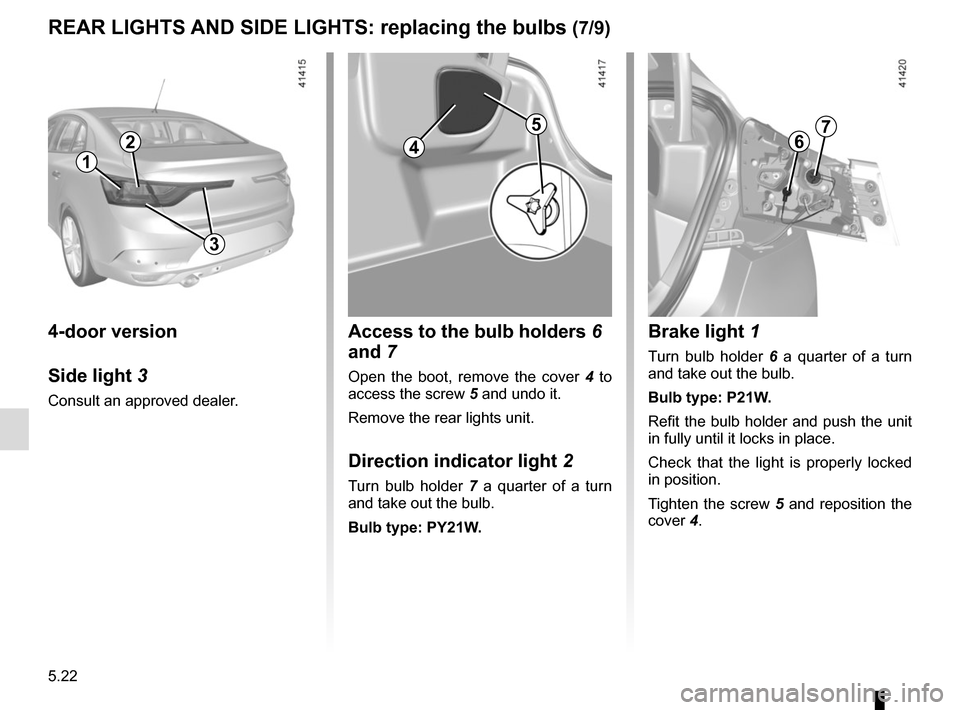
4-door version
Side light 3
Consult an approved dealer.
Access to the bulb holders 6
and 7
Open the boot, remove the cover 4 to
access the screw 5 and undo it.
Remove the rear lights unit.
Direction indicator light 2
Turn bulb holder 7 a quarter of a turn
and take out the bulb.
Bulb type: PY21W.
4
5
Brake light 1
Turn bulb holder 6 a quarter of a turn
and take out the bulb.
Bulb type: P21W.
Refit the bulb holder and push the unit
in fully until it locks in place.
Check that the light is properly locked
in position.
Tighten the screw 5 and reposition the
cover 4.
67
1
2
3
Page 293 of 346
5.23
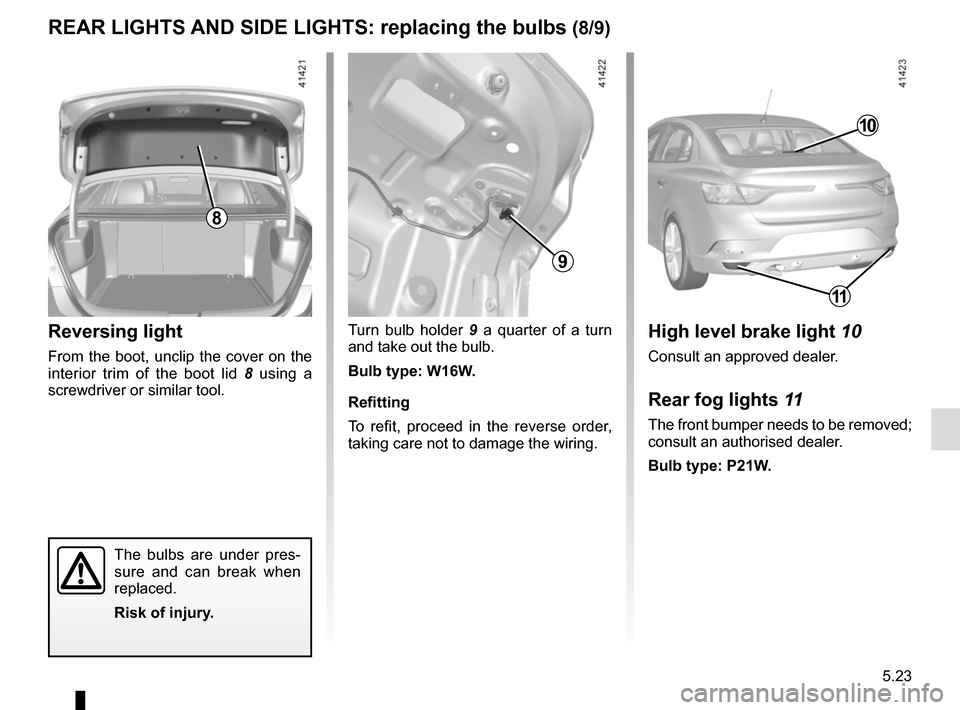
Turn bulb holder 9 a quarter of a turn
and take out the bulb.
Bulb type: W16W.
Refitting
To refit, proceed in the reverse order,
taking care not to damage the wiring.Reversing light
From the boot, unclip the cover on the
interior trim of the boot lid 8 using a
screwdriver or similar tool.
REAR LIGHTS AND SIDE LIGHTS: replacing the bulbs (8/9)
9
8
High level brake light 10
Consult an approved dealer.
Rear fog lights 11
The front bumper needs to be removed;
consult an authorised dealer.
Bulb type: P21W.
11
10
The bulbs are under pres-
sure and can break when
replaced.
Risk of injury.
Page 294 of 346
5.24
REAR LIGHTS AND SIDE LIGHTS: replacing the bulbs (9/9)
The bulbs are under pres-
sure and can break when
replaced.
Risk of injury.
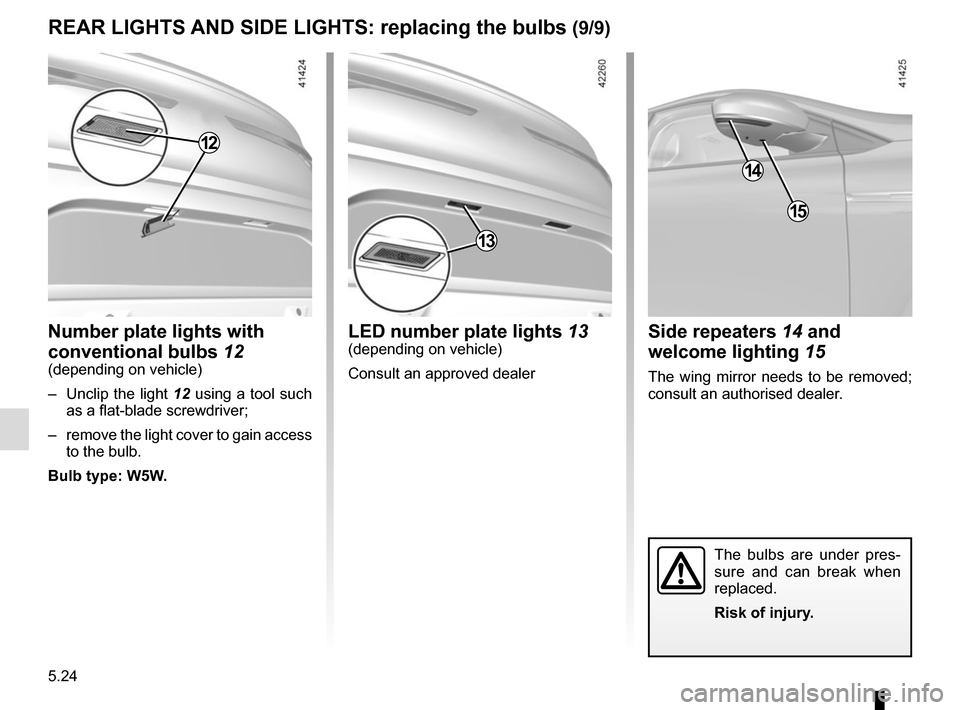
Side repeaters 14 and welcome lighting 15
The wing mirror needs to be removed;
consult an authorised dealer.
14
Number plate lights with
conventional bulbs 12
(depending on vehicle)
– Unclip the light 12 using a tool such
as a flat-blade screwdriver;
– remove the light cover to gain access to the bulb.
Bulb type: W5W.
12
15
LED number plate lights 13(depending on vehicle)
Consult an approved dealer
13
Page 295 of 346
5.25
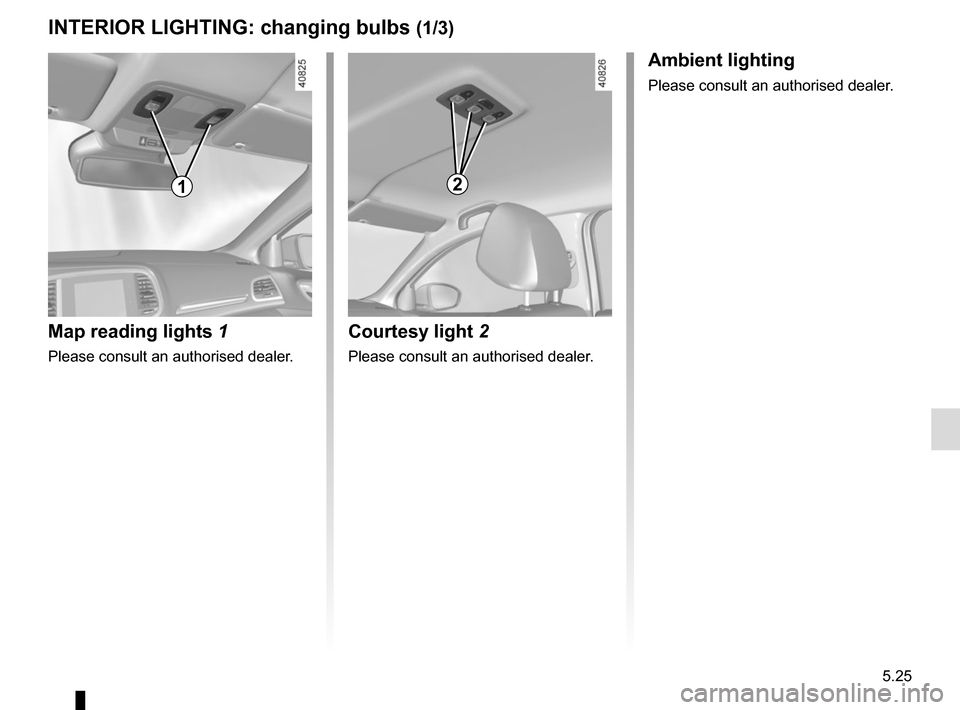
INTERIOR LIGHTING: changing bulbs (1/3)
Map reading lights 1
Please consult an authorised dealer.
1
Courtesy light 2
Please consult an authorised dealer.
Ambient lighting
Please consult an authorised dealer.
2
Page 296 of 346
5.26
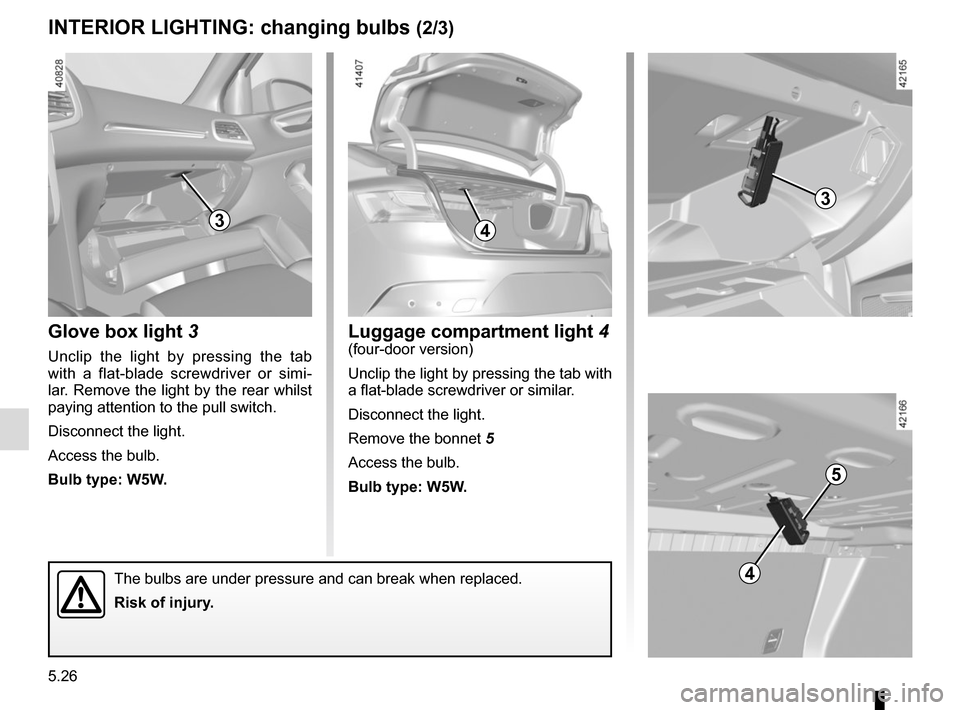
Glove box light 3
Unclip the light by pressing the tab
with a flat-blade screwdriver or simi-
lar. Remove the light by the rear whilst
paying attention to the pull switch.
Disconnect the light.
Access the bulb.
Bulb type: W5W.
INTERIOR LIGHTING: changing bulbs (2/3)
4
Luggage compartment light 4(four-door version)
Unclip the light by pressing the tab with
a flat-blade screwdriver or similar.
Disconnect the light.
Remove the bonnet 5
Access the bulb.
Bulb type: W5W.
The bulbs are under pressure and can break when replaced.
Risk of injury.
5
3
3
4
Page 297 of 346
5.27
INTERIOR LIGHTING: changing bulbs (3/3)
6
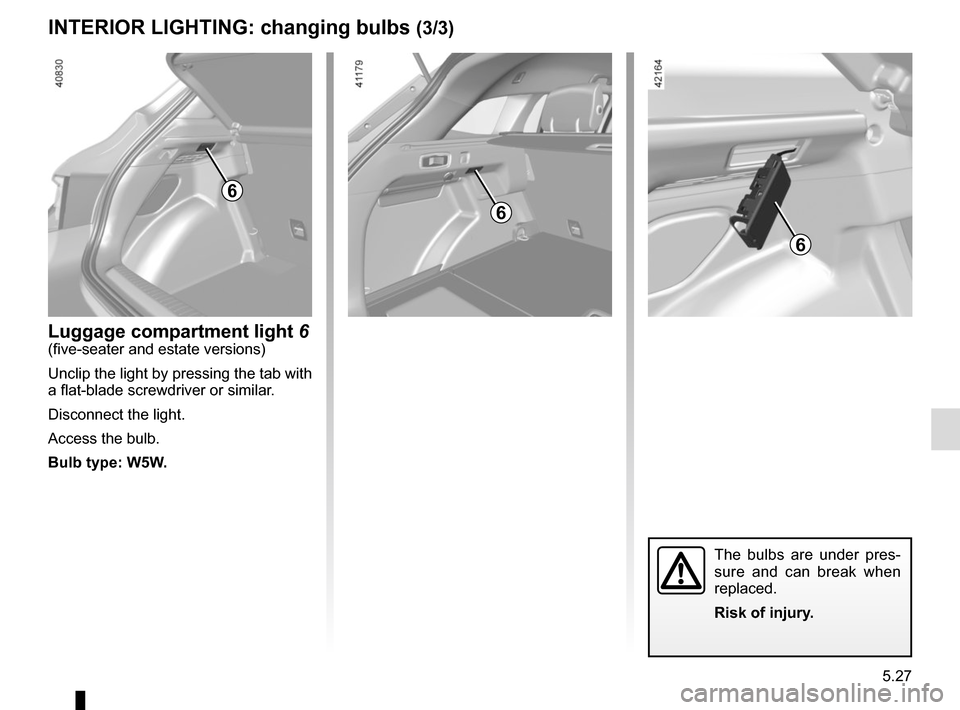
Luggage compartment light 6(five-seater and estate versions)
Unclip the light by pressing the tab with
a flat-blade screwdriver or similar.
Disconnect the light.
Access the bulb.
Bulb type: W5W.
The bulbs are under pres-
sure and can break when
replaced.
Risk of injury.
6
6
Page 298 of 346
5.28
FUSES (1/2)
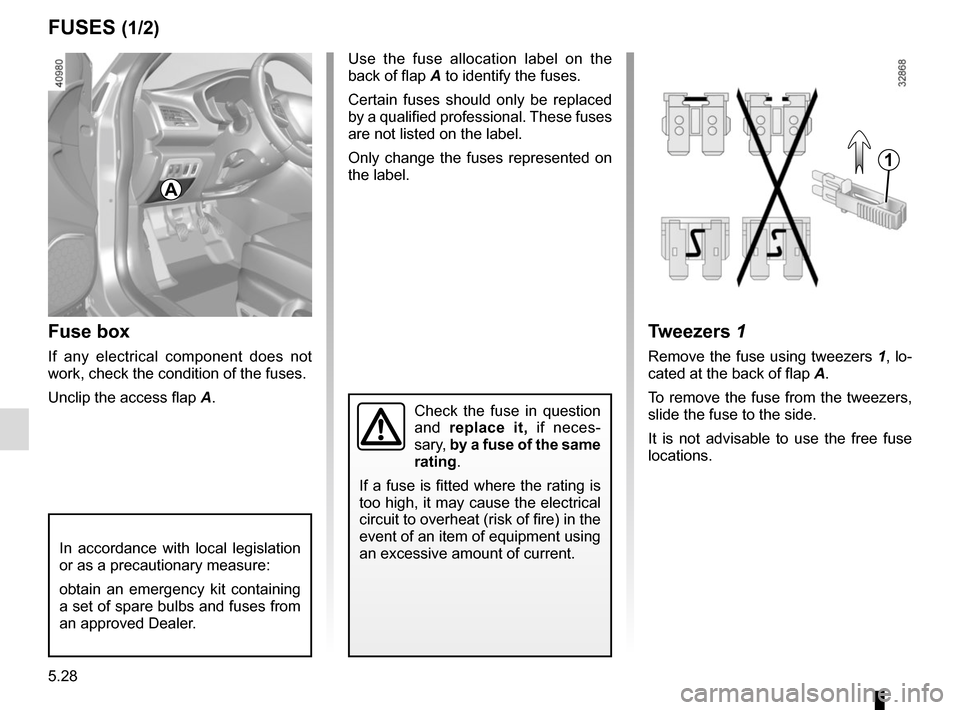
Fuse box
If any electrical component does not
work, check the condition of the fuses.
Unclip the access flap A.
Tweezers 1
Remove the fuse using tweezers 1, lo-
cated at the back of flap A.
To remove the fuse from the tweezers,
slide the fuse to the side.
It is not advisable to use the free fuse
locations.
Check the fuse in question
and replace it, if neces-
sary, by a fuse of the same
rating.
If a fuse is fitted where the rating is
too high, it may cause the electrical
circuit to overheat (risk of fire) in the
event of an item of equipment using
an excessive amount of current.
In accordance with local legislation
or as a precautionary measure:
obtain an emergency kit containing
a set of spare bulbs and fuses from
an approved Dealer.
A
1
Use the fuse allocation label on the
back of flap A to identify the fuses.
Certain fuses should only be replaced
by a qualified professional. These fuses
are not listed on the label.
Only change the fuses represented on
the label.
Page 299 of 346
5.29
FUSES (2/2)
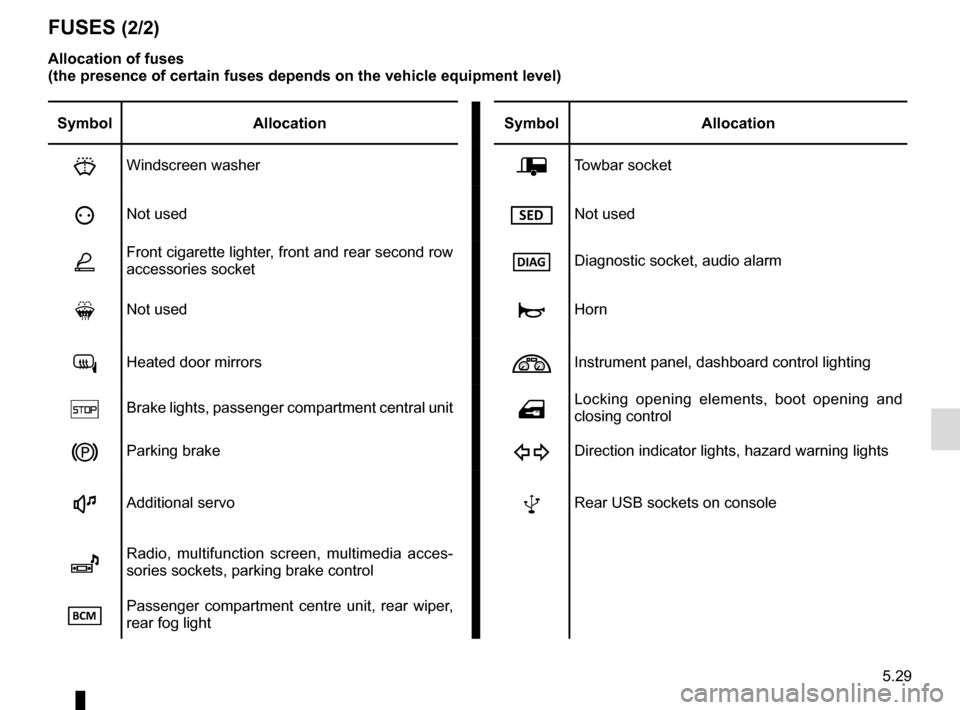
Allocation of fuses
(the presence of certain fuses depends on the vehicle equipment level)\
Symbol Allocation SymbolAllocation
HWindscreen washerÝTowbar socket
ëNot usedNot used
ÆFront cigarette lighter, front and rear second row
accessories socketDiagnostic socket, audio alarm
Not usedÌHorn
Heated door mirrorsInstrument panel, dashboard control lighting
×Brake lights, passenger compartment central unitOLocking opening elements, boot opening and
closing control
Parking brakeDDirection indicator lights, hazard warning lights
\bAdditional servoRear USB sockets on console
îRadio, multifunction screen, multimedia acces-
sories sockets, parking brake control
Passenger compartment centre unit, rear wiper,
rear fog light
Page 300 of 346
5.30
BATTERY: troubleshooting (1/2)
To avoid all risk of sparks:
– Ensure that any consumers (cour-tesy lights, etc.) are switched off
before disconnecting or reconnect-
ing the battery;
– when charging, stop the charger before connecting or disconnecting
the battery;
– to avoid creating a short circuit be- tween the terminals, do not place
metal objects on the battery;
– always wait at least one minute after the engine has been switched off
before disconnecting a battery;
– make sure that you reconnect the battery terminals after refitting.
Connecting a battery charger
The battery charger must be com-
patible with a battery with nominal
voltage of 12 volts.
Do not disconnect the battery when the
engine is running. Follow the instruc-
tions given by the manufacturer of
the battery charger you are using.
Special procedures may be
required to charge some
batteries. Contact your au-
thorised dealer.
Avoid all risk of sparks which may
cause an immediate explosion, and
charge the battery in a well-venti-
lated area. Risk of serious injury.
Handle the battery with care
as it contains sulphuric acid,
which must not come into
contact with eyes or skin. If
it does, wash the affected area with
plenty of cold water. If necessary,
consult a doctor.
Ensure that naked flames, red hot
objects and sparks do not come into
contact with the battery as there is a
risk of explosion. There is a risk of
explosion.
The engine may be hot when car-
rying out operations in close prox-
imity. In addition, the engine cooling
fan can come on at any moment.
Risk of injury.
Before performing any
action in the engine com-
partment, the ignition must
be switched off (please see
the information on “Starting, stop-
ping the engine” in Section 2).
Trending: shock, Fuel, start stop button, heated seats, roof rack, console, Radiator fan
