Automatic RENAULT MEGANE 2017 4.G Service Manual
[x] Cancel search | Manufacturer: RENAULT, Model Year: 2017, Model line: MEGANE, Model: RENAULT MEGANE 2017 4.GPages: 346, PDF Size: 7.04 MB
Page 134 of 346
2.22
DRIVING ADVICE, ECO-DRIVING (3/5)
ECO mode
ECO mode is a function which opti-
mises fuel consumption. It acts upon
certain power consuming systems in
the vehicle (heating, air conditioning,
power-assisted steering, etc.) and on
certain driving actions (acceleration,
gear changing, cruise control, decele-
ration, etc.).
Limiting acceleration enables low fuel
consumption in urban and surrounding
areas. Reduced usage of the air condi-
tioning reduces fuel consumption with-
out affecting heating comfort.
Free wheel in ECO mode
Depending on the vehicle, for vehi-
cles fitted with an automatic gearbox,
switching to “free wheel” is favoured to
slow down the vehicle without using the
engine brake. By releasing the acceler-
ator pedal completely to anticipate de-
celeration, you will save fuel.Activating the function
The function can be activated:
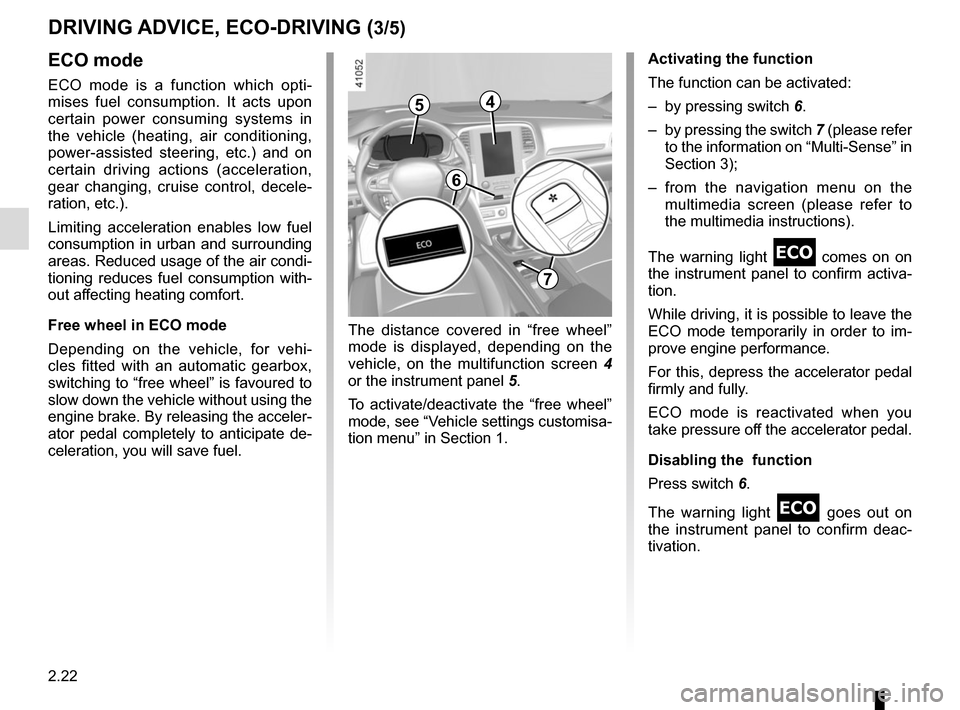
– by pressing switch
6.
– by pressing the switch 7 (please refer
to the information on “Multi-Sense” in
Section 3);
– from the navigation menu on the multimedia screen (please refer to
the multimedia instructions).
The warning light
comes on on
the instrument panel to confirm activa-
tion.
While driving, it is possible to leave the
ECO mode temporarily in order to im-
prove engine performance.
For this, depress the accelerator pedal
firmly and fully.
ECO mode is reactivated when you
take pressure off the accelerator pedal.
Disabling the function
Press switch 6.
The warning light
goes out on
the instrument panel to confirm deac-
tivation.
The distance covered in “free wheel”
mode is displayed, depending on the
vehicle, on the multifunction screen 4
or the instrument panel 5.
To activate/deactivate the “free wheel”
mode, see “Vehicle settings customisa-
tion menu” in Section 1.
6
7
45
Page 150 of 346
2.38
DRIVER CORRECTION DEVICES AND AIDS (9/10)
Hill start assistance
Depending on the gradient of the in-
cline, this system assists the driver
when starting on a hill. It prevents the
vehicle from rolling backwards by au-
tomatically applying the brakes when
the driver lifts his/her foot off the brake
pedal to depress the accelerator pedal.
System operation
It only operates when the gear lever is
in a position other than neutral (other
than N or P for automatic transmis-
sions) and the vehicle is completely
stationary (brake pedal depressed)
The system holds the vehicle for ap-
proximately 2 seconds. The brakes are
then released (the vehicle will move ac-
cording to the slope).
The hill start assistance
system cannot completely
prevent the vehicle from
rolling backwards in all sit-
uations (extremely steep gradients,
etc.).
In all cases, the driver may depress
the brake pedal to prevent the vehi-
cle from rolling backwards.
The hill start assistance function
should not be used for prolonged
stops: use the brake pedal.
This function is not designed to im-
mobilise the vehicle permanently.
If necessary, use the brake pedal to
stop the vehicle.
The driver must remain particularly
vigilant when driving on slippery or
low-grip surfaces and/or on hills.
Risk of serious injury.
Page 176 of 346
2.64
ADAPTIVE CRUISE CONTROL (4/7)
Exceeding the cruising speed
The cruising speed may be exceeded
at any time by depressing the accelera-
tor pedal.
When exceeding this speed, the crui-
sing speed and the following bars are
shown in red, and the cruising speed
flashes on the instrument panel: the
distance control function is no longer
active.
Then, release the accelerator: cruise
and distance control will automatically
reactivate unless the function has been
set to standby.
Putting the function on
standby
The function is set to standby if:
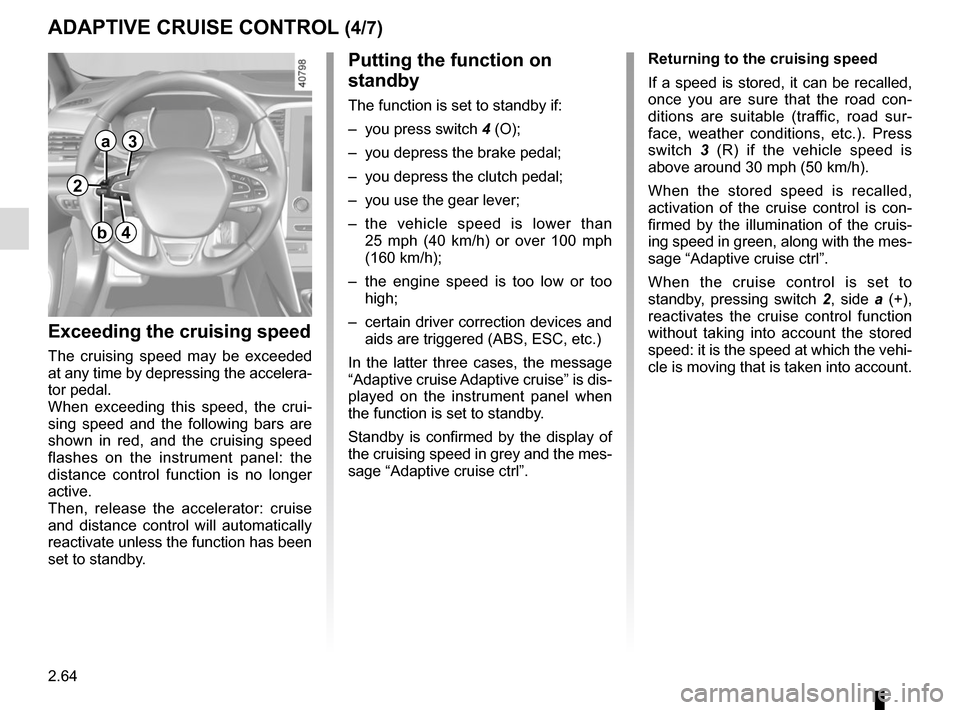
– you press switch 4 (O);
– you depress the brake pedal;
– you depress the clutch pedal;
– you use the gear lever;
– the vehicle speed is lower than 25 mph (40 km/h) or over 100 mph
(160 km/h);
– the engine speed is too low or too high;
– certain driver correction devices and aids are triggered (ABS, ESC, etc.)
In the latter three cases, the message
“Adaptive cruise Adaptive cruise” is dis-
played on the instrument panel when
the function is set to standby.
Standby is confirmed by the display of
the cruising speed in grey and the mes-
sage “Adaptive cruise ctrl”. Returning to the cruising speed
If a speed is stored, it can be recalled,
once you are sure that the road con-
ditions are suitable (traffic, road sur-
face, weather conditions, etc.). Press
switch
3 (R) if the vehicle speed is
above around 30 mph (50 km/h).
When the stored speed is recalled,
activation of the cruise control is con-
firmed by the illumination of the cruis-
ing speed in green, along with the mes-
sage “Adaptive cruise ctrl”.
When the cruise control is set to
standby, pressing switch 2, side a (+),
reactivates the cruise control function
without taking into account the stored
speed: it is the speed at which the vehi-
cle is moving that is taken into account.
2
a
b
3
4
Page 184 of 346
2.72
Automatic deactivation of the
parking distance control
The system deactivates:
– when the vehicle speed is above ap-proximately 6 mph (10 km/h);
– depending on the model, when the vehicle is stationary for more than
approximately 5 seconds and an ob-
stacle is detected (such as when in a
traffic jam, etc.);
– when the vehicle is in neutral for manual gearboxes, or in position N
or P for automatic gearboxes.
PARKING DISTANCE CONTROL (5/5)
Operating faults
When the system detects an operating
fault, a beep sounds for approximately
3 seconds each time reverse gear is se-
lected and is accompanied by the mes-
sage “Check parking sensor” shown on
the instrument panel. Please consult an
authorised dealer.
Page 191 of 346
2.79
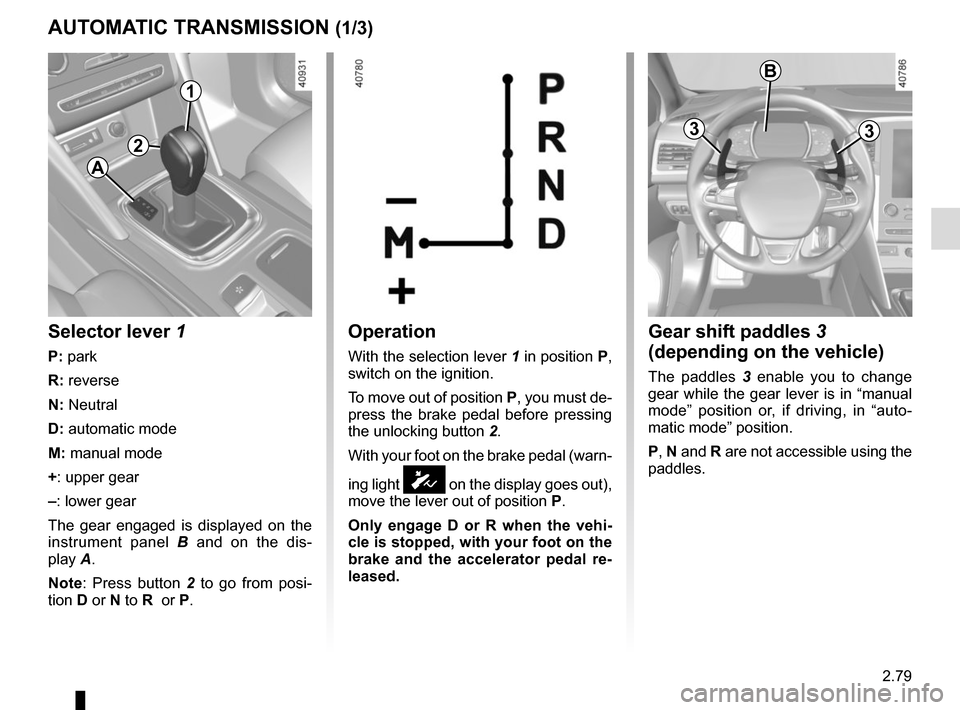
Operation
With the selection lever 1 in position P,
switch on the ignition.
To move out of position P, you must de-
press the brake pedal before pressing
the unlocking button 2.
With your foot on the brake pedal (warn-
ing light
Ó on the display goes out),
move the lever out of position P.
Only engage D or R when the vehi-
cle is stopped, with your foot on the
brake and the accelerator pedal re-
leased.
Selector lever 1
P: park
R: reverse
N: Neutral
D: automatic mode
M: manual mode
+: upper gear
–: lower gear
The gear engaged is displayed on the
instrument panel B and on the dis-
play A.
Note: Press button 2 to go from posi-
tion D or N to R or P.
AUTOMATIC TRANSMISSION (1/3)
A
Gear shift paddles 3
(depending on the vehicle)
The paddles 3 enable you to change
gear while the gear lever is in “manual
mode” position or, if driving, in “auto-
matic mode” position.
P, N and R are not accessible using the
paddles.
33
1
2
B
Page 192 of 346
2.80
AUTOMATIC TRANSMISSION (2/3)
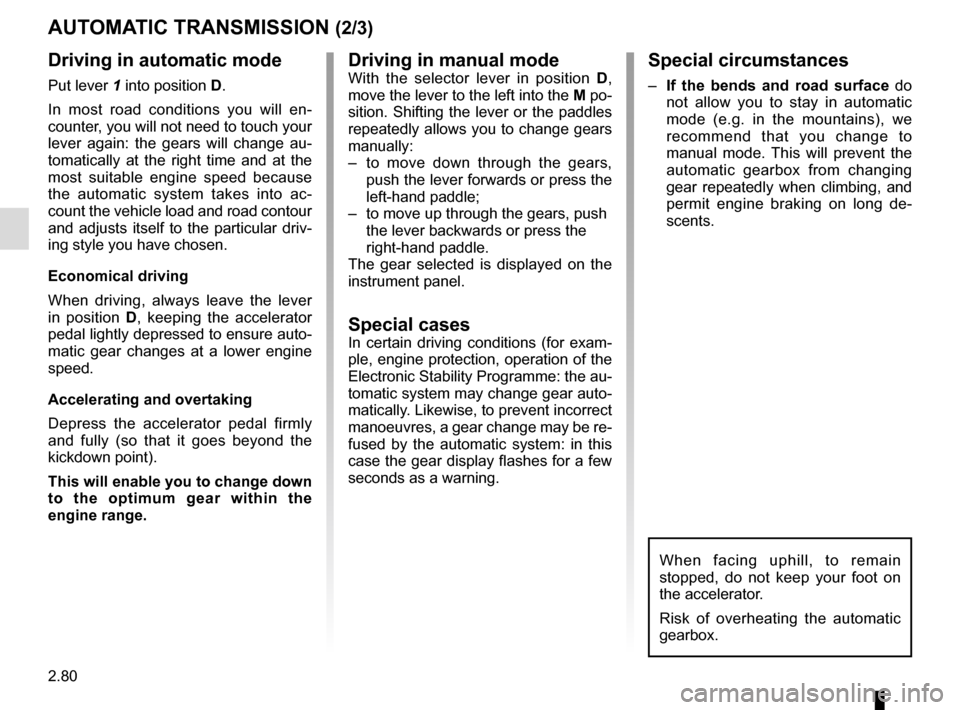
Driving in manual modeWith the selector lever in position D,
move the lever to the left into the M po-
sition. Shifting the lever or the paddles
repeatedly allows you to change gears
manually:
– to move down through the gears, push the lever forwards or press the
left-hand paddle;
– to move up through the gears, push the lever backwards or press the
right-hand paddle.
The gear selected is displayed on the
instrument panel.
Special casesIn certain driving conditions (for exam-
ple, engine protection, operation of the
Electronic Stability Programme: the au-
tomatic system may change gear auto-
matically. Likewise, to prevent incorrect
manoeuvres, a gear change may be re-
fused by the automatic system: in this
case the gear display flashes for a few
seconds as a warning.
Special circumstances
– If the bends and road surface do
not allow you to stay in automatic
mode (e.g. in the mountains), we
recommend that you change to
manual mode. This will prevent the
automatic gearbox from changing
gear repeatedly when climbing, and
permit engine braking on long de-
scents.
Driving in automatic mode
Put lever 1 into position D.
In most road conditions you will en-
counter, you will not need to touch your
lever again: the gears will change au-
tomatically at the right time and at the
most suitable engine speed because
the automatic system takes into ac-
count the vehicle load and road contour
and adjusts itself to the particular driv-
ing style you have chosen.
Economical driving
When driving, always leave the lever
in position D, keeping the accelerator
pedal lightly depressed to ensure auto-
matic gear changes at a lower engine
speed.
Accelerating and overtaking
Depress the accelerator pedal firmly
and fully (so that it goes beyond the
kickdown point).
This will enable you to change down
to the optimum gear within the
engine range.
When facing uphill, to remain
stopped, do not keep your foot on
the accelerator.
Risk of overheating the automatic
gearbox.
Page 193 of 346
2.81
AUTOMATIC TRANSMISSION (3/3)
Parking the vehicle
When the vehicle is stopped, move the
lever to position P while keeping your
foot on the brake pedal: the gearbox is
in neutral and the drive wheels are me-
chanically locked by the driveshaft.
Apply the handbrake or, depending
on the vehicle, ensure that the elec-
tronic parking brake is applied.
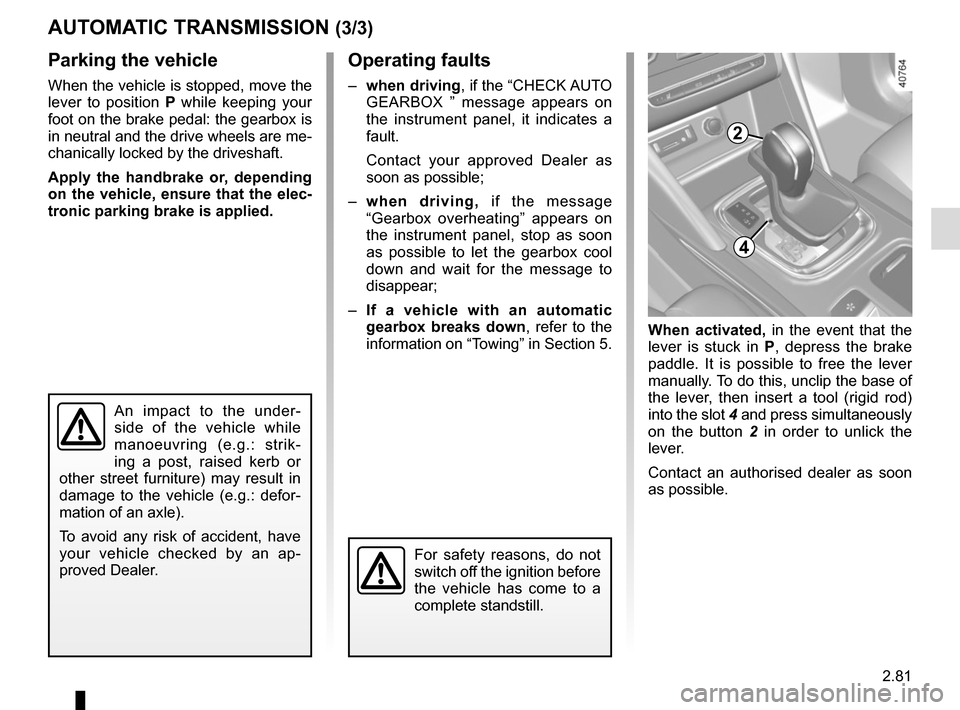
When activated, in the event that the
lever is stuck in P, depress the brake
paddle. It is possible to free the lever
manually. To do this, unclip the base of
the lever, then insert a tool (rigid rod)
into the slot 4 and press simultaneously
on the button 2 in order to unlick the
lever.
Contact an authorised dealer as soon
as possible.
Operating faults
– when driving , if the “CHECK AUTO
GEARBOX ” message appears on
the instrument panel, it indicates a
fault.
Contact your approved Dealer as
soon as possible;
– when driving, if the message
“Gearbox overheating” appears on
the instrument panel, stop as soon
as possible to let the gearbox cool
down and wait for the message to
disappear;
– If a vehicle with an automatic
gearbox breaks down, refer to the
information on “Towing” in Section 5.
For safety reasons, do not
switch off the ignition before
the vehicle has come to a
complete standstill.
An impact to the under-
side of the vehicle while
manoeuvring (e.g.: strik-
ing a post, raised kerb or
other street furniture) may result in
damage to the vehicle (e.g.: defor-
mation of an axle).
To avoid any risk of accident, have
your vehicle checked by an ap-
proved Dealer.
4
2
Page 195 of 346
3.1
Section 3: Your comfort
multi-Sense . . . . . . . . . . . . . . . . . . . . . . . . . . . . . . . . . . . .\
. . . . . . . . . . . . . . . . . . . . . . . . . . . . . . . . 3.2
Air Vents . . . . . . . . . . . . . . . . . . . . . . . . . . . . . . . . . . . .\
. . . . . . . . . . . . . . . . . . . . . . . . . . . . . . . . . . 3.4
Manual air conditioning/heating system . . . . . . . . . . . . . . . . . . . . . . . . . . . . . . . . . . . .\
. . . . . . . . . . 3.6
Automatic climate control . . . . . . . . . . . . . . . . . . . . . . . . . . . . . . . . . . . .\
. . . . . . . . . . . . . . . . . . . . . 3.9
Air conditioning: information and advice on use . . . . . . . . . . . . . . . . . . . . . . . . . . . . . . . . . . . .\
. . . . 3.19
Outside air quality and deodorisation functions . . . . . . . . . . . . . . . . . . . . . . . . . . . . . . . . . . . . \
. . . . . 3.20
Electric windows . . . . . . . . . . . . . . . . . . . . . . . . . . . . . . . . . . . .\
. . . . . . . . . . . . . . . . . . . . . . . . . . . . 3.21
Electric sunroof . . . . . . . . . . . . . . . . . . . . . . . . . . . . . . . . . . . .\
. . . . . . . . . . . . . . . . . . . . . . . . . . . . . 3.23
Interior lighting . . . . . . . . . . . . . . . . . . . . . . . . . . . . . . . . . . . . \
. . . . . . . . . . . . . . . . . . . . . . . . . . . . . . 3.26
Sun visor/blinds . . . . . . . . . . . . . . . . . . . . . . . . . . . . . . . . . . . . \
. . . . . . . . . . . . . . . . . . . . . . . . . . . . . 3.28
Passenger compartment storage/fittings . . . . . . . . . . . . . . . . . . . . . . . . . . . . . . . . . . . . \
. . . . . . . . . . 3.29
Accessories socket . . . . . . . . . . . . . . . . . . . . . . . . . . . . . . . . . . . .\
. . . . . . . . . . . . . . . . . . . . . . . . . . 3.33
Ashtray . . . . . . . . . . . . . . . . . . . . . . . . . . . . . . . . . . . .\
. . . . . . . . . . . . . . . . . . . . . . . . . . . . . . . . . . . 3.33
Cigarette lighter . . . . . . . . . . . . . . . . . . . . . . . . . . . . . . . . . . . . \
. . . . . . . . . . . . . . . . . . . . . . . . . . . . . 3.33
Rear headrests . . . . . . . . . . . . . . . . . . . . . . . . . . . . . . . . . . . .\
. . . . . . . . . . . . . . . . . . . . . . . . . . . . . 3.35
Rear bench seat . . . . . . . . . . . . . . . . . . . . . . . . . . . . . . . . . . . .\
. . . . . . . . . . . . . . . . . . . . . . . . . . . . 3.37
Luggage compartment. . . . . . . . . . . . . . . . . . . . . . . . . . . . . . . . . . . . \
. . . . . . . . . . . . . . . . . . . . . . . . 3.39
Rear parcel shelf . . . . . . . . . . . . . . . . . . . . . . . . . . . . . . . . . . . . \
. . . . . . . . . . . . . . . . . . . . . . . . . . . . 3.43
Luggage cover . . . . . . . . . . . . . . . . . . . . . . . . . . . . . . . . . . . . \
. . . . . . . . . . . . . . . . . . . . . . . . . . . . . . 3.44
Luggage net. . . . . . . . . . . . . . . . . . . . . . . . . . . . . . . . . . . . \
. . . . . . . . . . . . . . . . . . . . . . . . . . . . . . . . 3.45
Luggage compartment storage space/fittings . . . . . . . . . . . . . . . . . . . . . . . . . . . . . . . . . . . .\
. . . . . . 3.47
Transporting objects in the luggage compartment . . . . . . . . . . . . . . . . . . . . . . . . . . . . . . . . . . . .\
. . 3.52
Transporting objects: towbar . . . . . . . . . . . . . . . . . . . . . . . . . . . . . . . . . . . . \
. . . . . . . . . . . . . . . . . . . 3.53
Roof bars . . . . . . . . . . . . . . . . . . . . . . . . . . . . . . . . . . . . \
. . . . . . . . . . . . . . . . . . . . . . . . . . . . . . . . . . 3.54
Multimedia equipment . . . . . . . . . . . . . . . . . . . . . . . . . . . . . . . . . . . . \
. . . . . . . . . . . . . . . . . . . . . . . . 3.56
Page 197 of 346
3.3
MULTI-SENSE (2/2)Accessing the menu
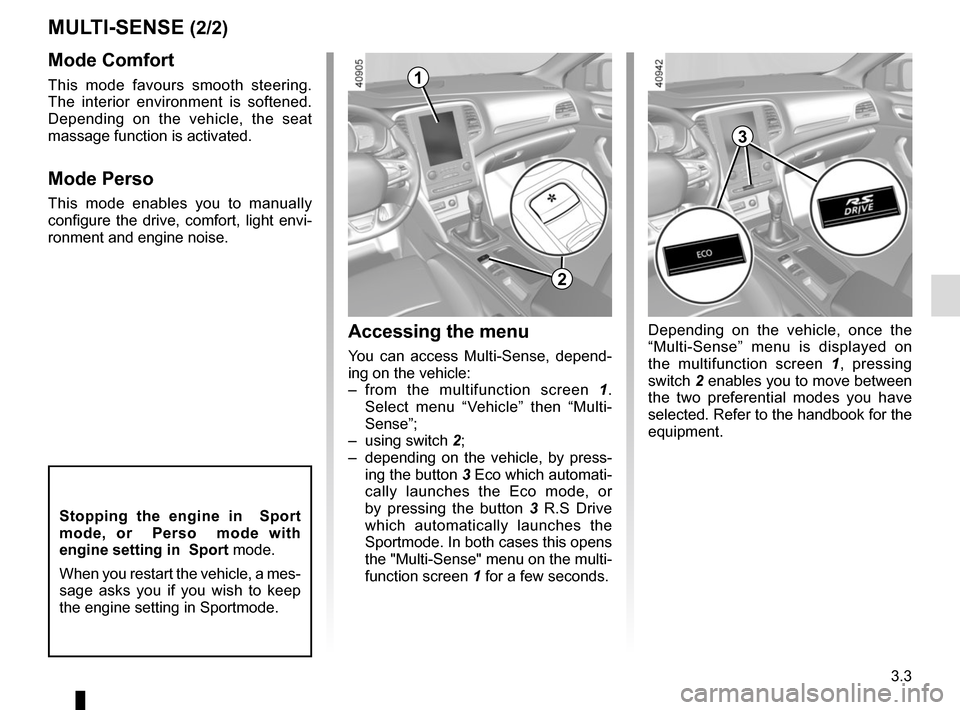
You can access Multi-Sense, depend-
ing on the vehicle:
– from the multifunction screen 1.
Select menu “Vehicle” then “Multi-
Sense”;
– using switch 2;
– depending on the vehicle, by press- ing the button 3 Eco which automati-
cally launches the Eco mode, or
by pressing the button 3 R.S Drive
which automatically launches the
Sportmode. In both cases this opens
the "Multi-Sense" menu on the multi-
function screen 1 for a few seconds.
Mode Comfort
This mode favours smooth steering.
The interior environment is softened.
Depending on the vehicle, the seat
massage function is activated.
Mode Perso
This mode enables you to manually
configure the drive, comfort, light envi-
ronment and engine noise.
1
2
3
Depending on the vehicle, once the
“Multi-Sense” menu is displayed on
the multifunction screen 1 , pressing
switch 2 enables you to move between
the two preferential modes you have
selected. Refer to the handbook for the
equipment.
Stopping the engine in Sport
mode, or Perso mode with
engine setting in Sport mode.
When you restart the vehicle, a mes-
sage asks you if you wish to keep
the engine setting in Sportmode.
Page 202 of 346
3.8
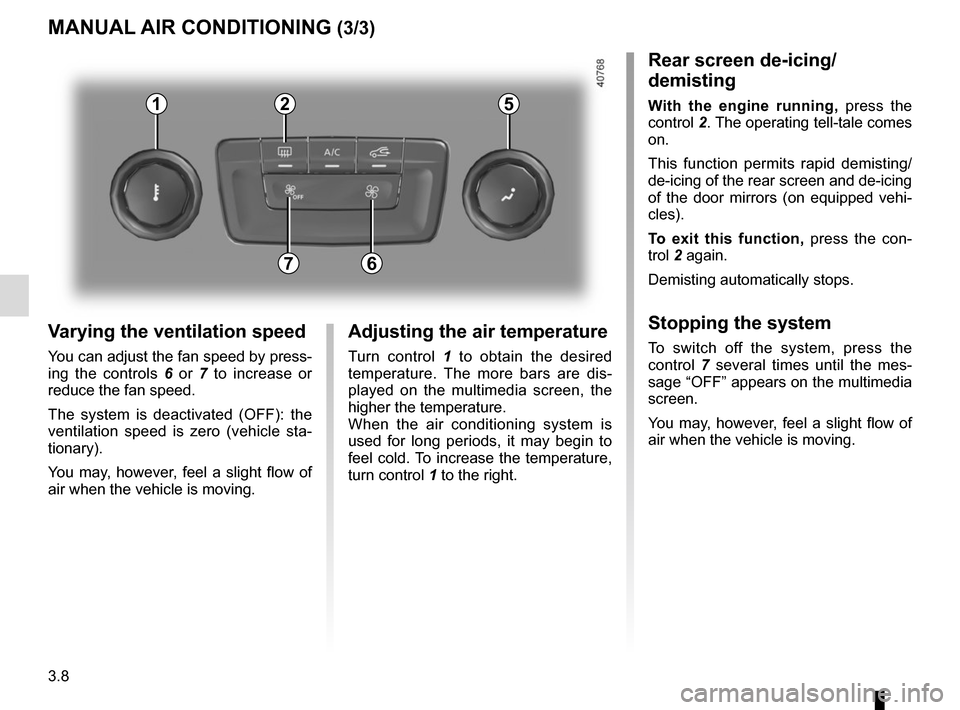
Varying the ventilation speed
You can adjust the fan speed by press-
ing the controls 6 or 7 to increase or
reduce the fan speed.
The system is deactivated (OFF): the
ventilation speed is zero (vehicle sta-
tionary).
You may, however, feel a slight flow of
air when the vehicle is moving.
MANUAL AIR CONDITIONING (3/3)
Adjusting the air temperature
Turn control 1 to obtain the desired
temperature. The more bars are dis-
played on the multimedia screen, the
higher the temperature.
When the air conditioning system is
used for long periods, it may begin to
feel cold. To increase the temperature,
turn control 1 to the right.
Rear screen de-icing/
demisting
With the engine running, press the
control 2. The operating tell-tale comes
on.
This function permits rapid demisting/
de-icing of the rear screen and de-icing
of the door mirrors (on equipped vehi-
cles).
To exit this function, press the con-
trol 2 again.
Demisting automatically stops.
Stopping the system
To switch off the system, press the
control 7 several times until the mes-
sage “OFF” appears on the multimedia
screen.
You may, however, feel a slight flow of
air when the vehicle is moving.
21
7
5
6