display RENAULT MEGANE 2017 4.G R Link 2 Owner's Manual
[x] Cancel search | Manufacturer: RENAULT, Model Year: 2017, Model line: MEGANE, Model: RENAULT MEGANE 2017 4.GPages: 130, PDF Size: 5.83 MB
Page 46 of 130
2.14
TRAFFIC (2/2)
Traffic display
The navigation system indicates traffic
incidents:
– with an alternate color on the map;
– by displaying traffic icons on the map.
A traffic icon is displayed on the naviga-
tion screen to show you whether traf-
fic incidents are announced. When an
incident occurs on your route, an icon
indicates the type of upcoming incident
on your route.
Precautions regarding
navigation
Use of the navigation
system does not in any way
replace the responsibility or vigi-
lance of the driver when driving the
vehicle.
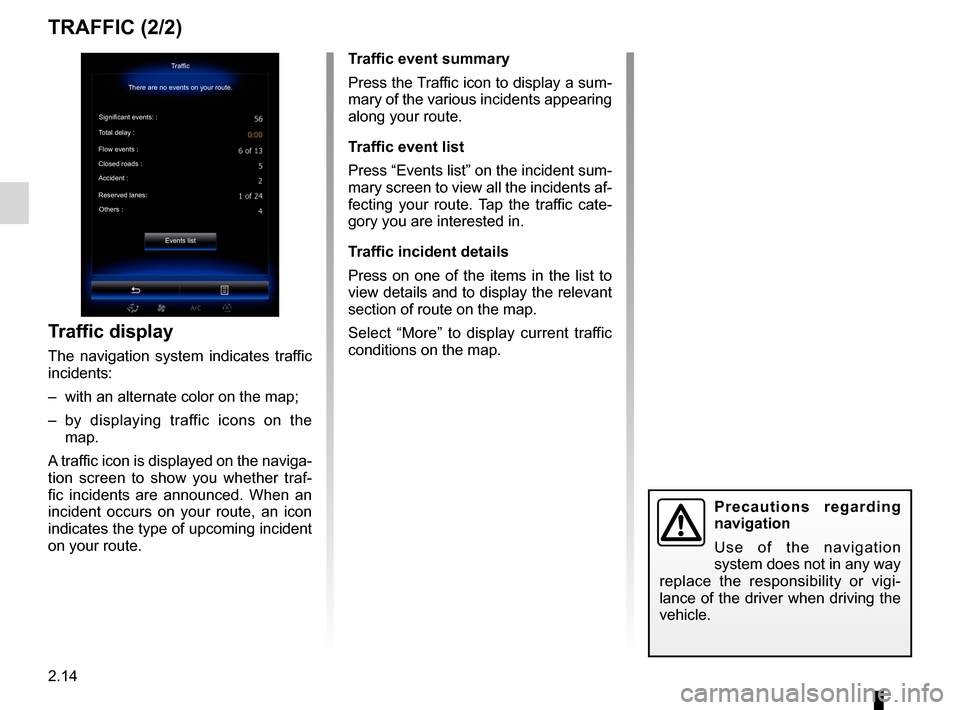
Traffic event summary
Press the Traffic icon to display a sum-
mary of the various incidents appearing
along your route.
Traffic event list
Press “Events list” on the incident sum-
mary screen to view all the incidents af-
fecting your route. Tap the traffic cate-
gory you are interested in.
Traffic incident details
Press on one of the items in the list to
view details and to display the relevant
section of route on the map.
Select “More” to display current traffic
conditions on the map.Traffic
There are no events on your route.
Significant events: :
Total delay :
Flow events :
Closed roads :
Accident :
Reserved lanes: Others :
Events list
Page 48 of 130
2.16
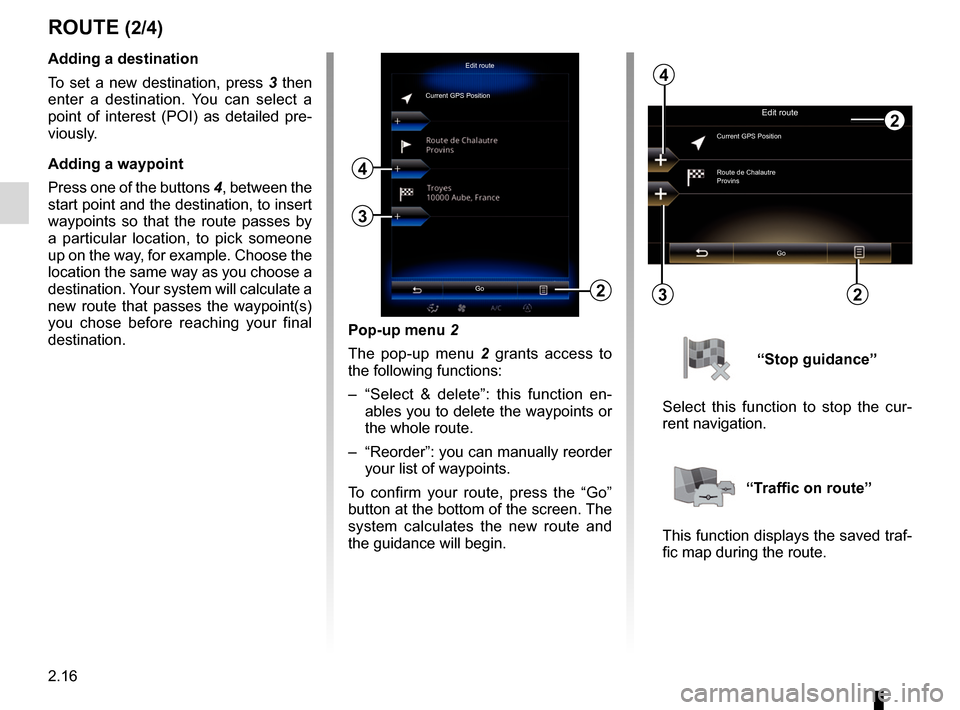
Pop-up menu 2
The pop-up menu 2 grants access to
the following functions:
– “Select & delete”: this function en- ables you to delete the waypoints or
the whole route.
– “Reorder”: you can manually reorder your list of waypoints.
To confirm your route, press the “Go”
button at the bottom of the screen. The
system calculates the new route and
the guidance will begin.
ROUTE (2/4)
2
Edit route
Current GPS PositionAdding a destination
To set a new destination, press 3 then
enter a destination. You can select a
point of interest (POI) as detailed pre-
viously.
Adding a waypoint
Press one of the buttons 4, between the
start point and the destination, to insert
waypoints so that the route passes by
a particular location, to pick someone
up on the way, for example. Choose the
location the same way as you choose a
destination. Your system will calculate a
new route that passes the waypoint(s)
you chose before reaching your final
destination.
3
4
Edit route
Current GPS Position
Route de Chalautre
Provins
Go
3
4
“Stop guidance”
Select this function to stop the cur-
rent navigation.
“Traffic on route”
This function displays the saved traf-
fic map during the route.
Go22
Page 49 of 130
2.17
– “Specific road”: to avoid a road on your route. For example, you can
skip a road where you expect heavy
traffic, but the Traffic system has not
warned you about it.
– “Restore original route”: to cancel detours you set previously.
In all cases you are presented with a
map screen, where you can see the
avoided section, the detour and the es-
timated change in length and duration
and the duration in relation to your ini-
tially calculated route.
To confirm your settings, press “Accept”.
ROUTE (3/4)
OverviewShort.
Go
“Avoidances”
To avoid certain sections of the route
in the event of a traffic jam not flagged
up by the system, select “Avoidances”
from the “Itinerary” menu.
You can choose to avoid the follow-
ing elements:
– “Specific sections”: to avoid a cer- tain type of road on the route. For
example, you can skip a section of
motorway or a ferry.
– “Guidance portion”: to indicate a preferred distance over which the
saved route should be avoided.
The screen displays the distance,
the avoided section of the route
and the detour on the map. You
can also see the estimated route
length and duration change com-
pared to the original route on the
top of the screen.
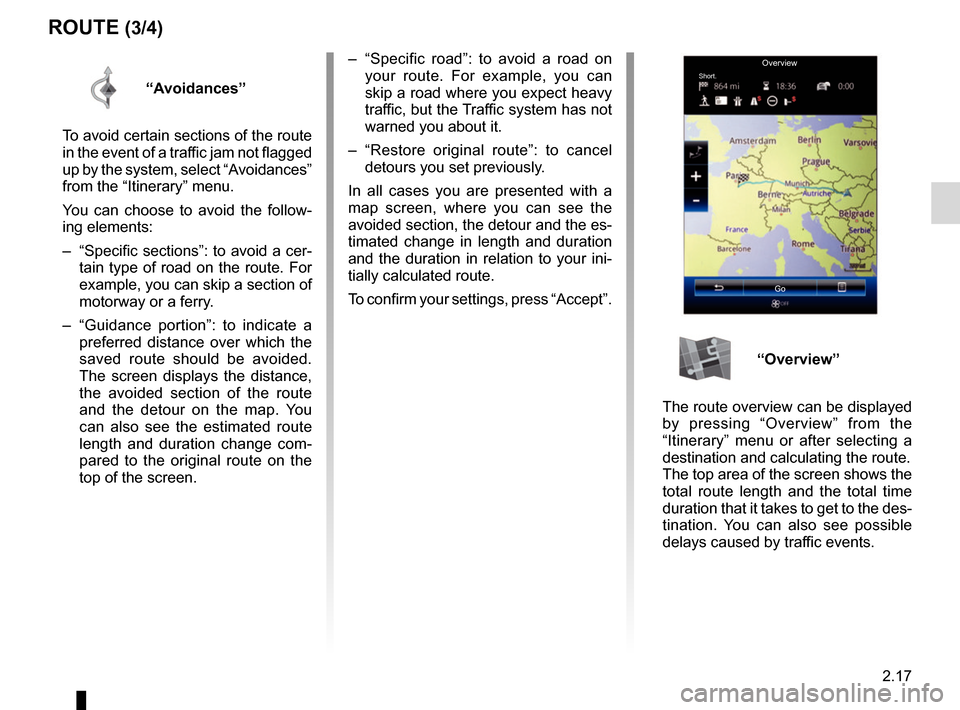
“Overview”
The route overview can be displayed
by pressing “Overview” from the
“Itinerary” menu or after selecting a
destination and calculating the route.
The top area of the screen shows the
total route length and the total time
duration that it takes to get to the des-
tination. You can also see possible
delays caused by traffic events.
Page 52 of 130
2.20
NAVIGATION SETTINGS (2/4)
“Speed warning”
Maps may contain information about
the speed limits of the road segments.
The navigation system is able to warn
you if you exceed the current limit. This
information may not be available for
your region, or may not be fully correct
for all roads on the map.
The following warning types are avail-
able:
– “Speed limit always visible”: acti-vate this function so that the speed
limit for the section of road taken is
always displayed on the navigation
screen.
– “Speed warning”: the current speed limit is displayed in red and flashes
on the map when you exceed it.
– “Overspeed warning sound”: a beep sounds when you exceed the speed
limit.“Safety warnings”
This function enables you to get a beep
and/or visual warning when you ap-
proach sensitive areas such as near
schools, level crossings, hazardous
areas, etc.
You can programme the navigation
system so that it displays these in-
creased vigilance points on the map,
and so that you can be warned by a
beep when you approach these areas.
For some of these areas, there is a
legal or recommended speed limit. The
beep may differ depending on whether
you are driving under or over the speed
limit.
Choose to be warned when approach-
ing these increased vigilance areas or
only when you are exceeding the speed
limit.
Precautions regarding
navigation
Use of the navigation
system does not in any way
replace the responsibility or vigi-
lance of the driver while driving the
vehicle.
In certain countries it is illegal to ac-
tivate the camera warning option
and this could lead to prosecution.
“Warning sign alerts”
Activate this function to be informed
when approaching specific sections of
road (obstacles, tight corners, cross-
ings, etc.) by road sign displays on
the map screen. For each category
of warning sign, set the warning type
(audio and/or visual) and the distance
from the hazard from which you want to
receive a warning.
Page 53 of 130
2.21
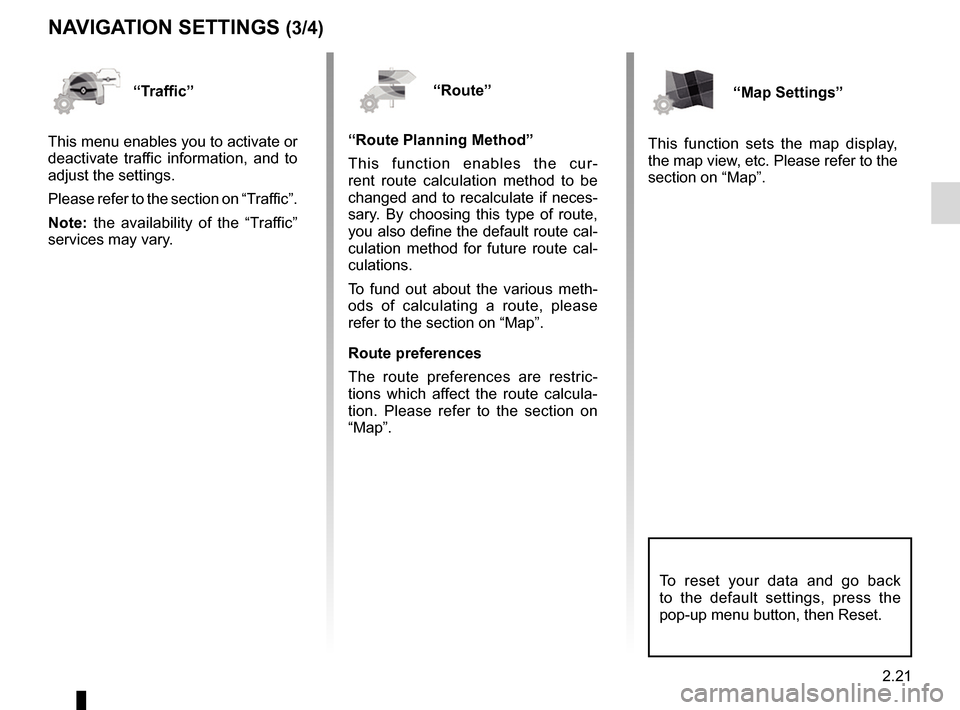
NAVIGATION SETTINGS (3/4)
“Route”
“Route Planning Method”
This function enables the cur-
rent route calculation method to be
changed and to recalculate if neces-
sary. By choosing this type of route,
you also define the default route cal-
culation method for future route cal-
culations.
To fund out about the various meth-
ods of calculating a route, please
refer to the section on “Map”.
Route preferences
The route preferences are restric-
tions which affect the route calcula-
tion. Please refer to the section on
“Map”.“Map Settings”
This function sets the map display,
the map view, etc. Please refer to the
section on “Map”.“Traffic”
This menu enables you to activate or
deactivate traffic information, and to
adjust the settings.
Please refer to the section on “Traffic”.
Note: the availability of the “Traffic”
services may vary.
To reset your data and go back
to the default settings, press the
pop-up menu button, then Reset.
Page 54 of 130
2.22
“Visual guidance”
This menu displays information relating
to your route on the navigation screen.
“Data fields”
The data fields in the corner of the
navigation screen can be custom-
ised. Select this option and choose the
values you want to see. The values
can differ depending on whether you
are following a route or whether you
are travelling without a set destination.
You can choose to display the remain-
ing distance to your destination/next
waypoint, the remaining time until you
reach your destination/next waypoint,
or the estimated arrival time for your
destination/next waypoint. “Signposts”
Whenever relevant information is avail-
able, such as information similar to that
displayed on road signs, it will be dis-
played in the upper section of the map.
You can turn this feature on or off.
“Junction view”
If you are approaching a motorway
junction or a complex crossroads and
the necessary information exists, the
map is replaced with a 3D view of the
junction. You can activate this function
or keep the standard display through-
out your route.
NAVIGATION SETTINGS (4/4)
For safety reasons, carry
out these operations when
the vehicle is stationary.
“Tunnel view”
When entering a tunnel, the surface
roads and buildings can count as a dis-
turbance. This feature shows a generic
image of a tunnel instead of the map.
A top-down overview of the tunnel and
the remaining distance to the tunnel
exit are also displayed.
To reset your data and go back
to the default settings, press the
pop-up menu button, then Reset.
Page 57 of 130
3.3
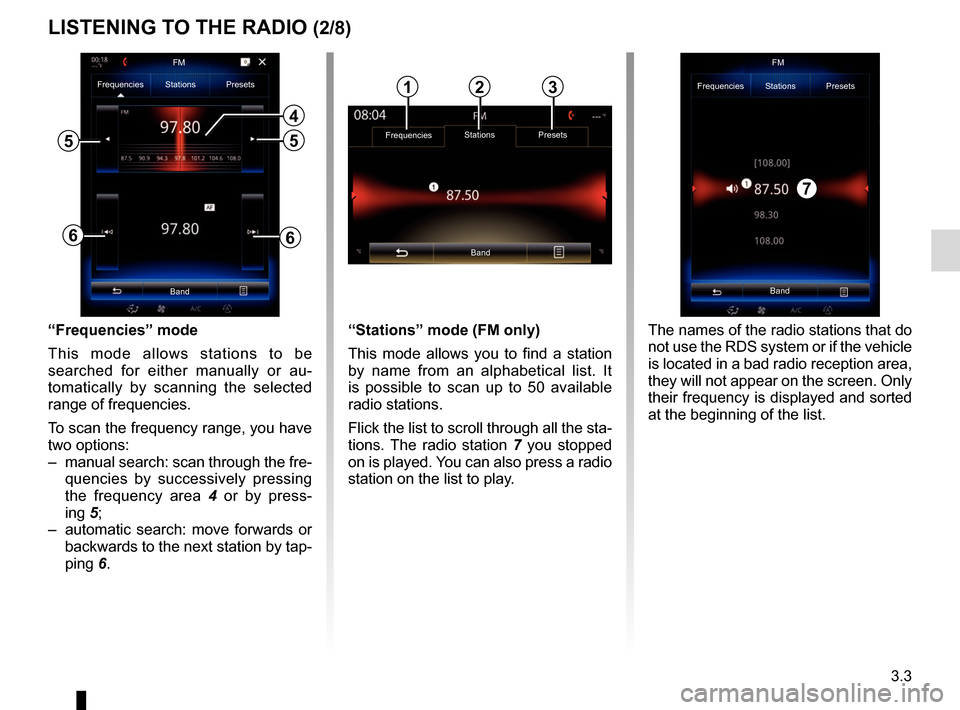
“Frequencies” mode
This mode allows stations to be
searched for either manually or au-
tomatically by scanning the selected
range of frequencies.
To scan the frequency range, you have
two options:
– manual search: scan through the fre-quencies by successively pressing
the frequency area 4 or by press-
ing 5;
– automatic search: move forwards or backwards to the next station by tap-
ping 6.
4
66
Frequencies Stations Presets
Band
55
“Stations” mode (FM only)
This mode allows you to find a station
by name from an alphabetical list. It
is possible to scan up to 50 available
radio stations.
Flick the list to scroll through all the sta-
tions. The radio station 7 you stopped
on is played. You can also press a radio
station on the list to play.
Band FM
Frequencies Stations Presets
The names of the radio stations that do
not use the RDS system or if the vehicle
is located in a bad radio reception area,
they will not appear on the screen. Only
their frequency is displayed and sorted
at the beginning of the list.
LISTENING TO THE RADIO (2/8)
Frequencies Stations Presets
Band
123
7
FM
Page 60 of 130
3.6
LISTENING TO THE RADIO (5/8)
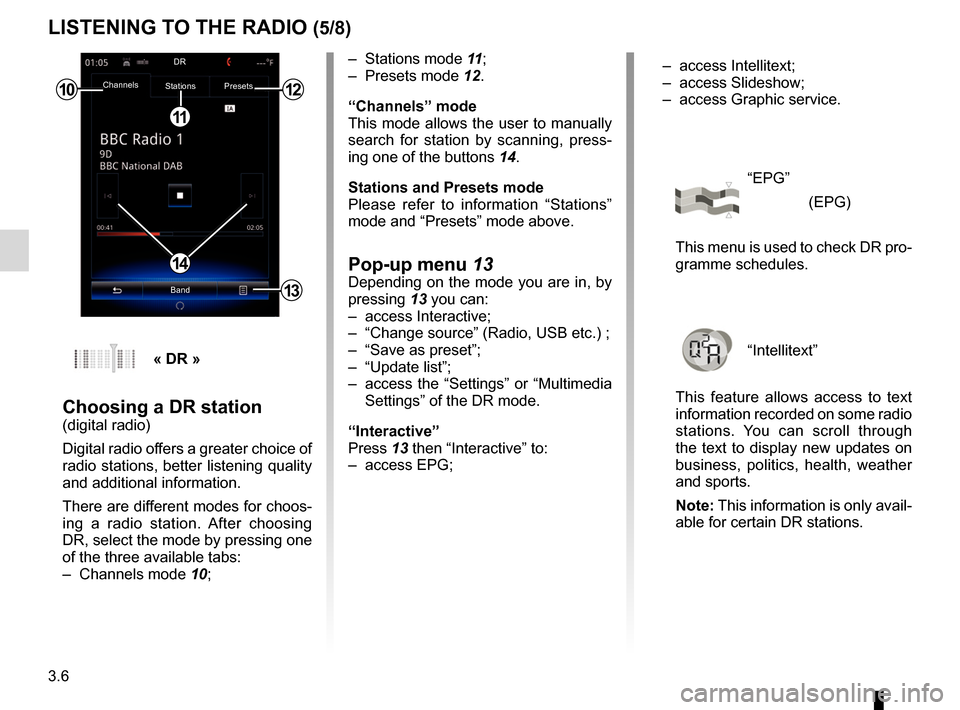
– Stations mode 11;
– Presets mode 12.
“Channels” mode
This mode allows the user to manually
search for station by scanning, press-
ing one of the buttons 14.
Stations and Presets mode
Please refer to information “Stations”
mode and “Presets” mode above.
Pop-up menu 13Depending on the mode you are in, by
pressing 13 you can:
– access Interactive;
– “Change source” (Radio, USB etc.) ;
– “Save as preset”;
– “Update list”;
– access the “Settings” or “Multimedia Settings” of the DR mode.
“Interactive”
Press 13 then “Interactive” to:
– access EPG;
10
11
12
14
13
Channels Stations Presets
BandDR
« DR »
Choosing a DR station(digital radio)
Digital radio offers a greater choice of
radio stations, better listening quality
and additional information.
There are different modes for choos-
ing a radio station. After choosing
DR, select the mode by pressing one
of the three available tabs:
– Channels mode
10; – access Intellitext;
– access Slideshow;
– access Graphic service.
“EPG”
(EPG)
This menu is used to check DR pro-
gramme schedules.
“Intellitext”
This feature allows access to text
information recorded on some radio
stations. You can scroll through
the text to display new updates on
business, politics, health, weather
and sports.
Note: This information is only avail-
able for certain DR stations.
Page 64 of 130
3.10
MEDIA (1/2)
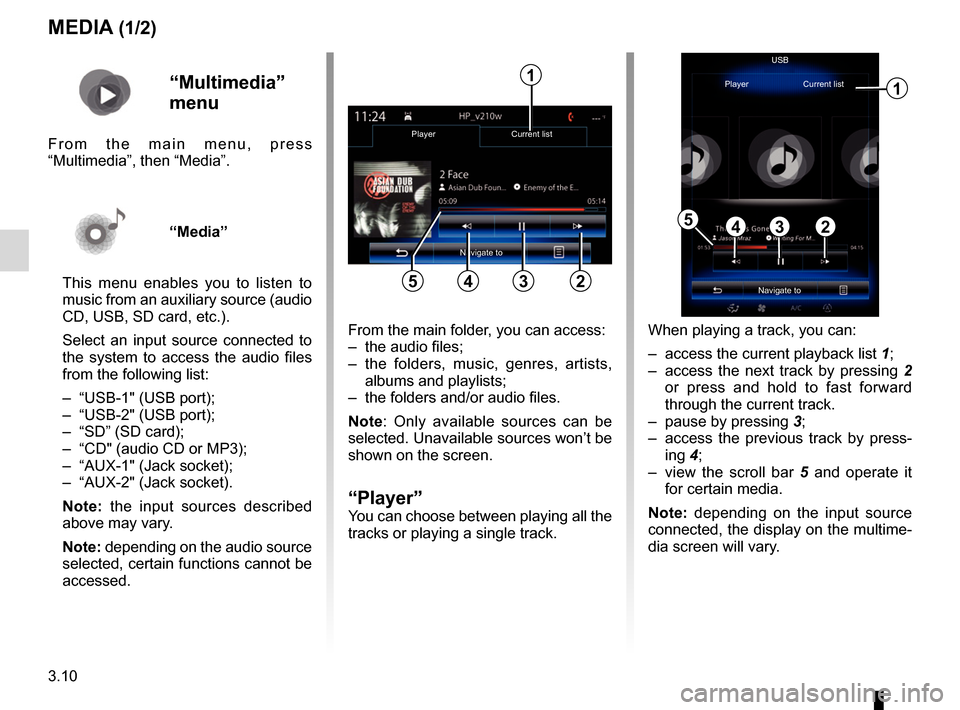
From the main folder, you can access:
– the audio files;
– the folders, music, genres, artists, albums and playlists;
– the folders and/or audio files.
Note: Only available sources can be
selected. Unavailable sources won’t be
shown on the screen.
“Player”You can choose between playing all the
tracks or playing a single track.
2
Player Current list
345
1
Navigate toUSB
“Multimedia”
menu
From the main menu, press
“Multimedia”, then “Media”.
“Media”
This menu enables you to listen to
music from an auxiliary source (audio
CD, USB, SD card, etc.).
Select an input source connected to
the system to access the audio files
from the following list:
– “USB-1" (USB port);
– “USB-2" (USB port);
– “SD” (SD card);
– “CD" (audio CD or MP3);
– “AUX-1" (Jack socket);
– “AUX-2" (Jack socket).
Note: the input sources described
above may vary.
Note: depending on the audio source
selected, certain functions cannot be
accessed. When playing a track, you can:
– access the current playback list
1;
– access the next track by pressing 2 or press and hold to fast forward
through the current track.
– pause by pressing 3;
– access the previous track by press- ing 4;
– view the scroll bar 5 and operate it
for certain media.
Note: depending on the input source
connected, the display on the multime-
dia screen will vary.
Navigate to
Player Current list
1
2345
Page 67 of 130
3.13
PHOTO (2/2)
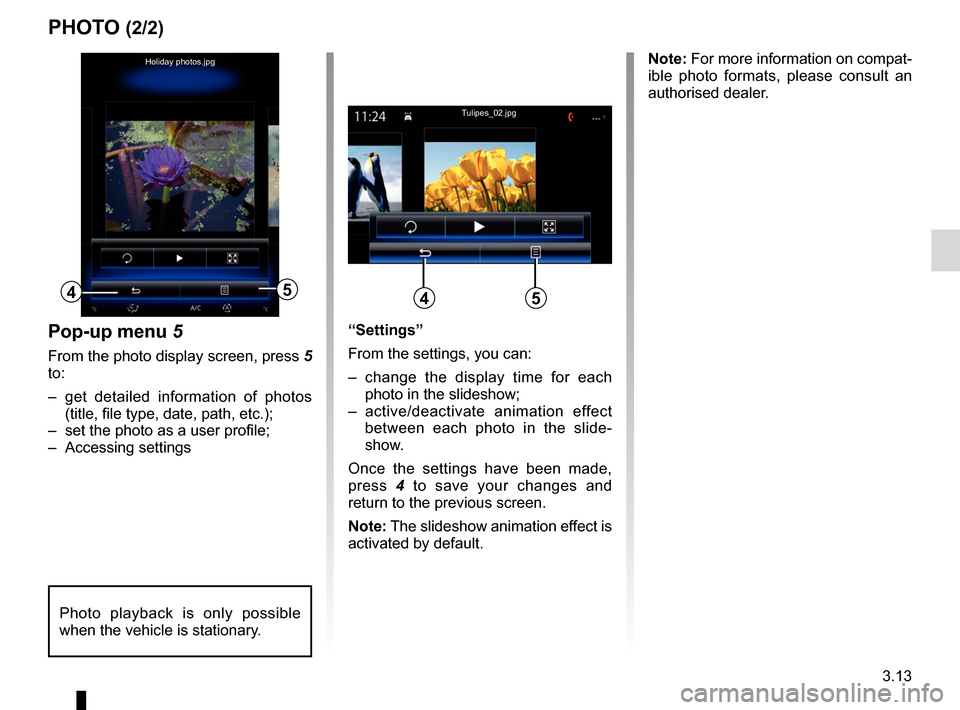
“Settings”
From the settings, you can:
– change the display time for each photo in the slideshow;
– active/deactivate animation effect between each photo in the slide-
show.
Once the settings have been made,
press 4 to save your changes and
return to the previous screen.
Note: The slideshow animation effect is
activated by default.Pop-up menu 5
From the photo display screen, press 5
to:
– get detailed information of photos (title, file type, date, path, etc.);
– set the photo as a user profile;
– Accessing settings
5
Holiday photos.jpg
4
Tulipes_02.jpg
54
Photo playback is only possible
when the vehicle is stationary.
Note: For more information on compat-
ible photo formats, please consult an
authorised dealer.