RENAULT MEGANE COUPE 2016 X95 / 3.G Workshop Manual
Manufacturer: RENAULT, Model Year: 2016, Model line: MEGANE COUPE, Model: RENAULT MEGANE COUPE 2016 X95 / 3.GPages: 274, PDF Size: 2.62 MB
Page 51 of 274
1.45
X = Seat not suitable for fitting child seats.
U = Seat which allows a child seat with “Universal” approval to be ins\
talled using a seat belt; check that it can be fitted.
IUF/IL = On equipped vehicles, seat which allows an approved “Universal”/“\
semi-universal” or “vehicle specific” child seat to be
attached using the ISOFIX system; check that it can be fitted.
(2) Raise the seat to the maximum and position it as far back as possible, t\
ilting the seatback slightly (approximately 25°).
(3) A carrycot can be installed across the vehicle and will take up at least \
two seats. Position the child with his or her feet nea rest
the door.
(4) Move the front seat as far forward as possible to install a rear-facing \
child seat, then move back the seat in front as far as it will
go, although without allowing it to come into contact with the child sea\
t.
(5) Forward-facing child seat; position the seatback of the child seat in co\
ntact with the seatback of the vehicle seat. Adjust the
headrest, or remove it if necessary. Do not push the front seat more than halfway back on its runners and d\
o not recline the
seatback more than 25°.
CHILD SAFETY: fitting a child seat (8/12)
Page 52 of 274
1.46
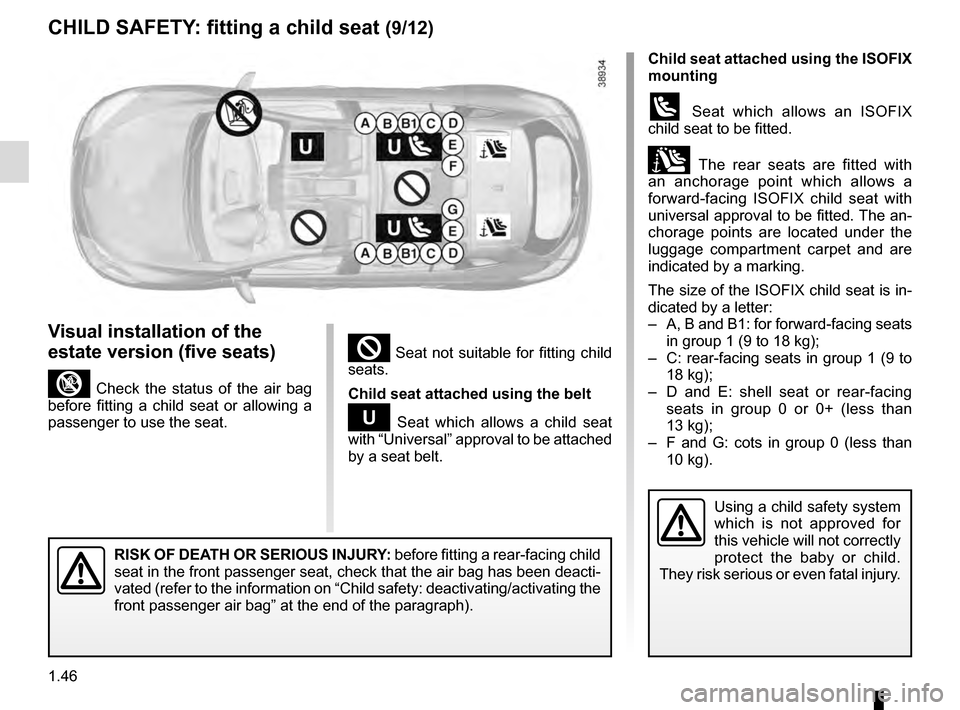
² Seat not suitable for fitting child
seats.
Child seat attached using the belt
¬ Seat which allows a child seat
with “Universal” approval to be attached
by a seat belt.
Child seat attached using the ISOFIX
mounting
ü Seat which allows an ISOFIX
child seat to be fitted.
± The rear seats are fitted with
an anchorage point which allows a
forward-facing ISOFIX child seat with
universal approval to be fitted. The an-
chorage points are located under the
luggage compartment carpet and are
indicated by a marking.
The size of the ISOFIX child seat is in-
dicated by a letter:
– A, B and B1: for forward-facing seats in group 1 (9 to 18 kg);
– C: rear-facing seats in group 1 (9 to 18 kg);
– D and E: shell seat or rear-facing seats in group 0 or 0+ (less than
13 kg);
– F and G: cots in group 0 (less than 10 kg).
CHILD SAFETY: fitting a child seat (9/12)
Using a child safety system
which is not approved for
this vehicle will not correctly
protect the baby or child.
They risk serious or even fatal injury.
Visual installation of the
estate version (five seats)
³ Check the status of the air bag
before fitting a child seat or allowing a
passenger to use the seat.
RISK OF DEATH OR SERIOUS INJURY: before fitting a rear-facing child
seat in the front passenger seat, check that the air bag has been deacti\
-
vated (refer to the information on “Child safety: deactivating/activ\
ating the
front passenger air bag” at the end of the paragraph).
Page 53 of 274

1.47
Type of child seat
estate version (five seats) Weight of
the child Seat size
ISOFIX Front passenger
seat (1) (5) Rear side seats Rear centre
seat
Carrycot fitted across the vehicle
Group 0 < 10 kg
F - GXU - IL (2) X
Shell seat/rear-facing seat
Group 0, or 0+ and 1 < 13 kg and 9 to
18 kg
E, D, C
UU - IL (3) X
Forward-facing seat
Group 1 9 to 18 kg
A, B, B1XU - IUF - IL (4) X
Booster seat
Group 2 and 3 15 to 25 kg and 22
to 36 kg
X
U (4) X
X = Seat not suitable for fitting child seats.
U = Seat which allows a child seat with “Universal” approval to be ins\
talled using a seat belt; check that it can be fitted.
IUF/IL = On equipped vehicles, seat which allows an approved “Universal”/“\
semi-universal” or “vehicle specific” child seat to be
attached using the ISOFIX system; check that it can be fitted.
(1) Raise the seat to the maximum and position it as far back as possible, t\
ilting the seatback slightly (approximately 25°).
(2) A carrycot can be installed across the vehicle and will take up at least \
two seats. Position the child with his or her feet nea rest
the door.
(3) Move the front seat as far forward as possible to install a rear-facing \
child seat, then move back the seat in front as far as it will
go, although without allowing it to come into contact with the child sea\
t.
(4) Forward-facing child seat; position the seatback of the child seat in co\
ntact with the seatback of the vehicle seat. Adjust the
headrest, or remove it if necessary. Do not push the front seat more than halfway back on its runners and d\
o not recline the
seatback more than 25°.
CHILD SAFETY: fitting a child seat (10/12)
(5) RISK OF DEATH OR SERIOUS INJURY: before installing a rear-facing child seat on the front passenger seat,\
check that the air bag has been deactivated (refer to the information o\
n “Child safety: deactivating/activating the front
passenger air bag” at the end of the section).
The table below summarises the information already shown on the diagram \
on the previous page, to ensure the regula-
tions in force are respected.
Page 54 of 274
1.48
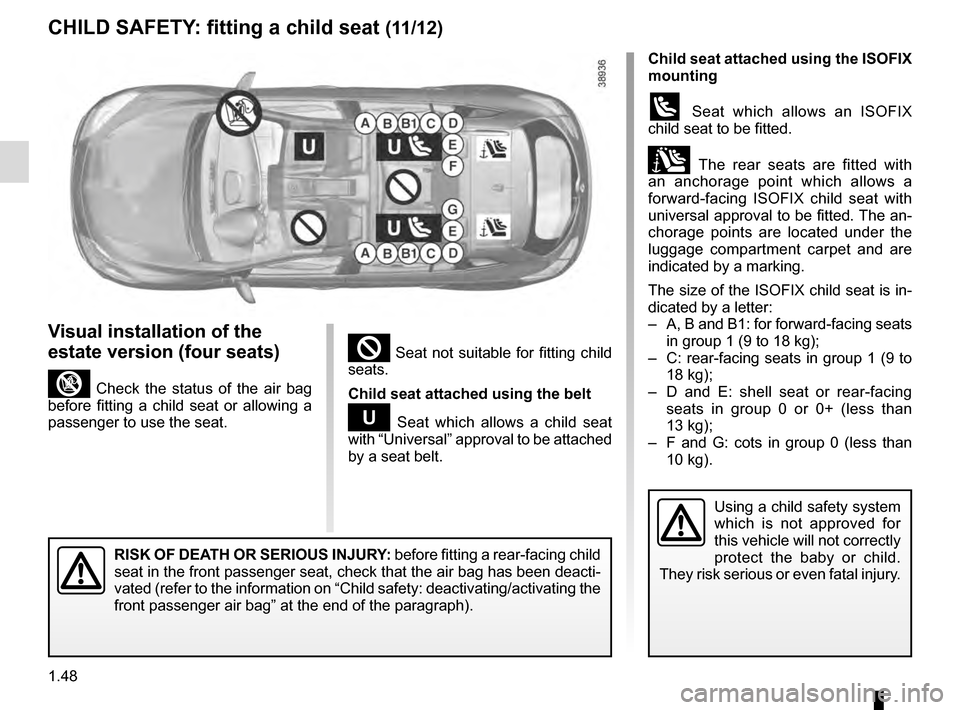
Child seat attached using the ISOFIX
mounting
ü Seat which allows an ISOFIX
child seat to be fitted.
± The rear seats are fitted with
an anchorage point which allows a
forward-facing ISOFIX child seat with
universal approval to be fitted. The an-
chorage points are located under the
luggage compartment carpet and are
indicated by a marking.
The size of the ISOFIX child seat is in-
dicated by a letter:
– A, B and B1: for forward-facing seats in group 1 (9 to 18 kg);
– C: rear-facing seats in group 1 (9 to 18 kg);
– D and E: shell seat or rear-facing seats in group 0 or 0+ (less than
13 kg);
– F and G: cots in group 0 (less than 10 kg).
² Seat not suitable for fitting child
seats.
Child seat attached using the belt
¬ Seat which allows a child seat
with “Universal” approval to be attached
by a seat belt.
CHILD SAFETY: fitting a child seat (11/12)
Using a child safety system
which is not approved for
this vehicle will not correctly
protect the baby or child.
They risk serious or even fatal injury.
Visual installation of the
estate version (four seats)
³ Check the status of the air bag
before fitting a child seat or allowing a
passenger to use the seat.
RISK OF DEATH OR SERIOUS INJURY: before fitting a rear-facing child
seat in the front passenger seat, check that the air bag has been deacti\
-
vated (refer to the information on “Child safety: deactivating/activ\
ating the
front passenger air bag” at the end of the paragraph).
Page 55 of 274
1.49
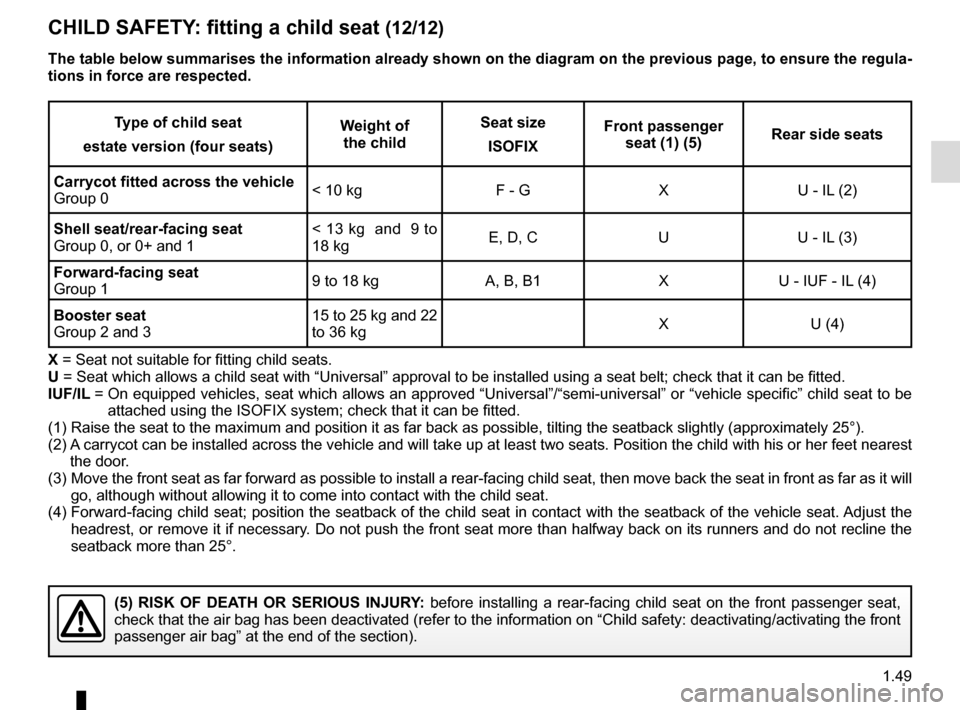
Type of child seat
estate version (four seats) Weight of
the child Seat size
ISOFIX Front passenger
seat (1) (5) Rear side seats
Carrycot fitted across the vehicle
Group 0 < 10 kg
F - GXU - IL (2)
Shell seat/rear-facing seat
Group 0, or 0+ and 1 < 13 kg and 9 to
18 kg
E, D, C
UU - IL (3)
Forward-facing seat
Group 1 9 to 18 kg
A, B, B1 XU - IUF - IL (4)
Booster seat
Group 2 and 3 15 to 25 kg and 22
to 36 kg
X
U (4)
X = Seat not suitable for fitting child seats.
U = Seat which allows a child seat with “Universal” approval to be ins\
talled using a seat belt; check that it can be fitted.
IUF/IL = On equipped vehicles, seat which allows an approved “Universal”/“\
semi-universal” or “vehicle specific” child seat to be
attached using the ISOFIX system; check that it can be fitted.
(1) Raise the seat to the maximum and position it as far back as possible, t\
ilting the seatback slightly (approximately 25°).
(2) A carrycot can be installed across the vehicle and will take up at least \
two seats. Position the child with his or her feet nea rest
the door.
(3) Move the front seat as far forward as possible to install a rear-facing \
child seat, then move back the seat in front as far as it will
go, although without allowing it to come into contact with the child sea\
t.
(4) Forward-facing child seat; position the seatback of the child seat in co\
ntact with the seatback of the vehicle seat. Adjust the
headrest, or remove it if necessary. Do not push the front seat more than halfway back on its runners and d\
o not recline the
seatback more than 25°.
The table below summarises the information already shown on the diagram \
on the previous page, to ensure the regula-
tions in force are respected.
CHILD SAFETY: fitting a child seat (12/12)
(5) RISK OF DEATH OR SERIOUS INJURY: before installing a rear-facing child seat on the front passenger seat,\
check that the air bag has been deactivated (refer to the information o\
n “Child safety: deactivating/activating the front
passenger air bag” at the end of the section).
Page 56 of 274
1.50
2
Deactivating the front
passenger airbags
(on equipped vehicles)
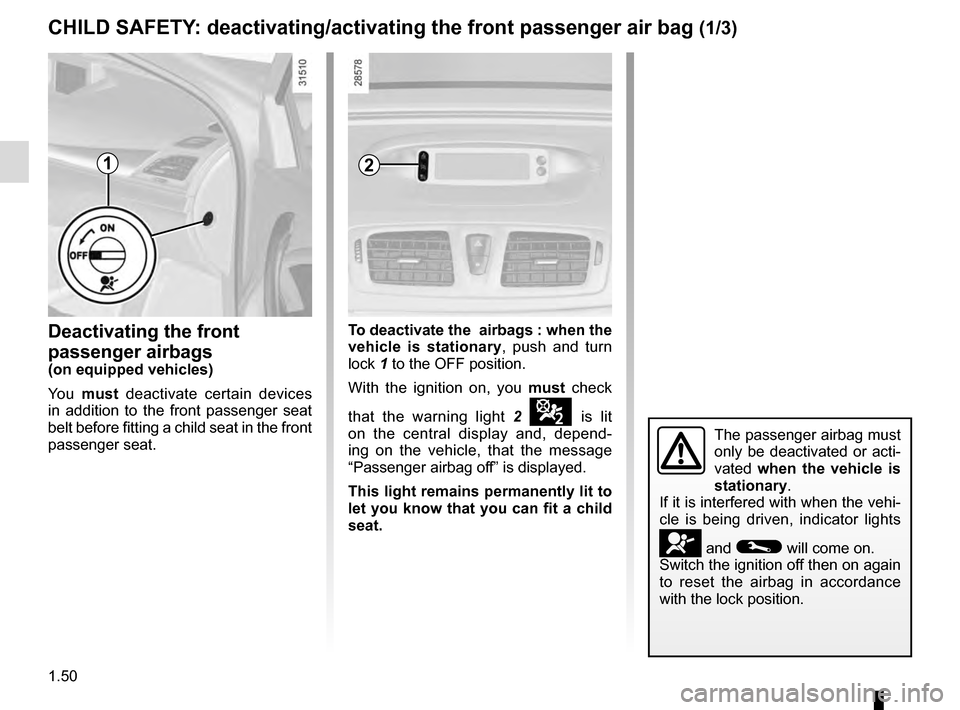
You must deactivate certain devices
in addition to the front passenger seat
belt before fitting a child seat in the front
passenger seat. To deactivate the
airbags : when the
vehicle is stationary, push and turn
lock 1 to the OFF position.
With the ignition on, you must check
that the warning light 2
¹ is lit
on the central display and, depend-
ing on the vehicle, that the message
“Passenger airbag off” is displayed.
This light remains permanently lit to
let you know that you can fit a child
seat.
The passenger airbag must
only be deactivated or acti-
vated when the vehicle is
stationary.
If it is interfered with when the vehi-
cle is being driven, indicator lights
å and © will come on.
Switch the ignition off then on again
to reset the airbag in accordance
with the lock position.
CHILD SAFETY: deactivating/activating the front passenger air bag (1/3)
1
Page 57 of 274
1.51
CHILD SAFETY: deactivating/activating the front passenger air bag (2/3)
3
B
A
C
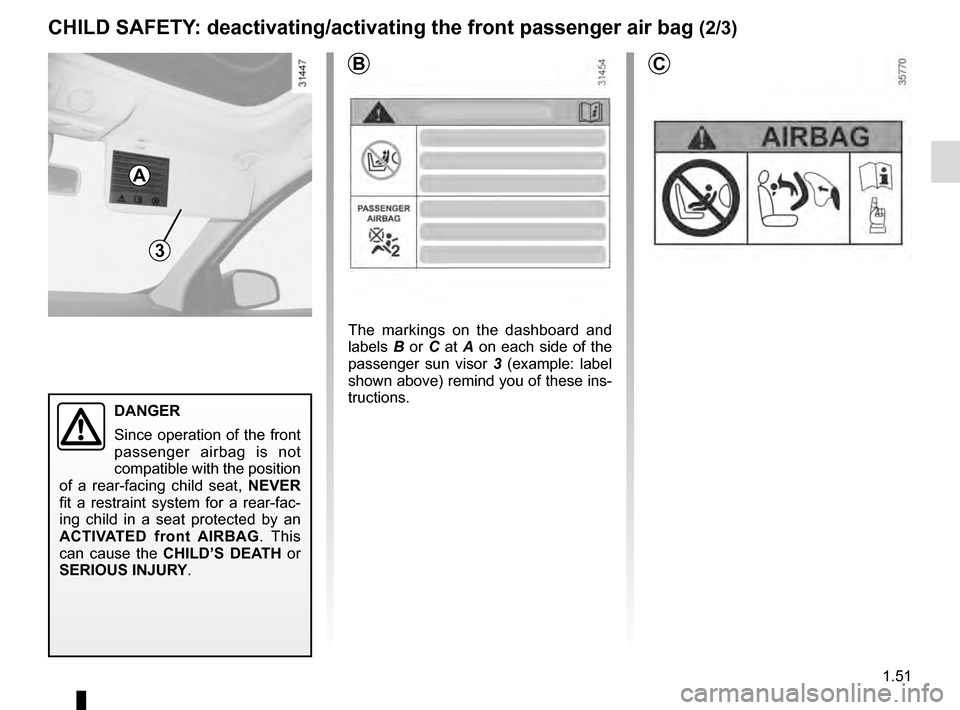
The markings on the dashboard and
labels B or C at A on each side of the
passenger sun visor 3 (example: label
shown above) remind you of these ins-
tructions.
DANGER
Since operation of the front
passenger airbag is not
compatible with the position
of a rear-facing child seat, NEVER
fit a restraint system for a rear-fac-
ing child in a seat protected by an
ACTIVATED front AIRBAG . This
can cause the CHILD’S DEATH or
SERIOUS INJURY.
Page 58 of 274
1.52
CHILD SAFETY: deactivating/activating the front passenger air bag (3/3)
4
Operating faults
It is prohibited to fit a rear-facing child
seat to the front passenger seat if the
front passenger airbags activation/
deactivation system shows a fault.
Allowing any other passenger to sit in
that seat is not recommended.
If warning lights
› and ¹ are
lit at the same time.
Contact your approved dealer as soon
as possible.
Activating the front
passenger airbags
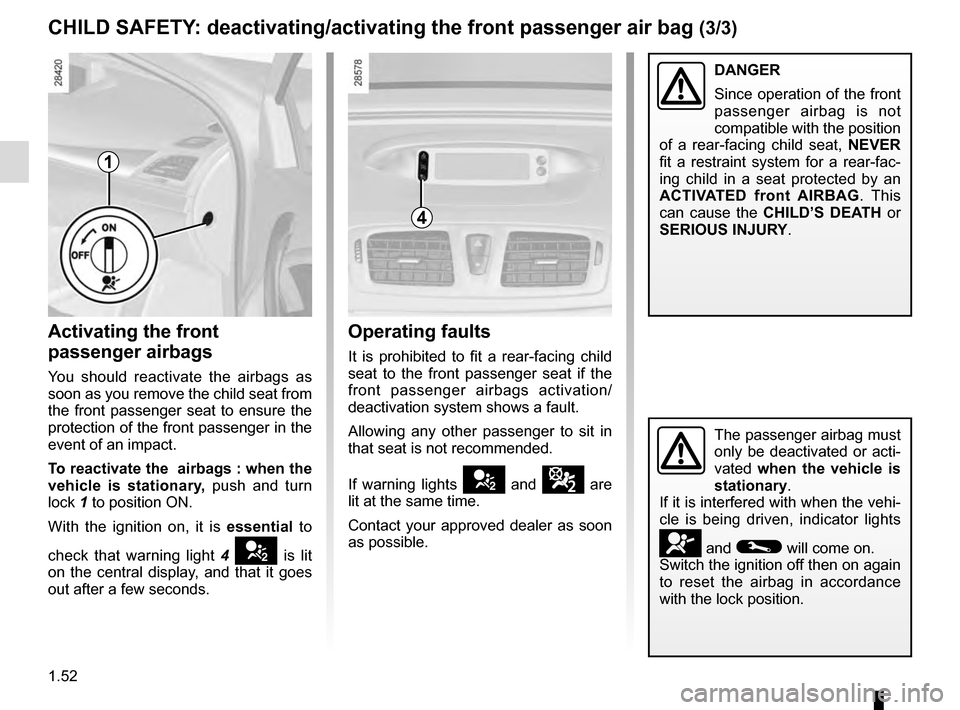
You should reactivate the airbags as
soon as you remove the child seat from
the front passenger seat to ensure the
protection of the front passenger in the
event of an impact.
To reactivate the airbags : when the
vehicle is stationary, push and turn
lock 1 to position ON.
With the ignition on, it is essential to
check that warning light 4
› is lit
on the central display, and that it goes
out after a few seconds.
1
The passenger airbag must
only be deactivated or acti-
vated when the vehicle is
stationary.
If it is interfered with when the vehi-
cle is being driven, indicator lights
å and © will come on.
Switch the ignition off then on again
to reset the airbag in accordance
with the lock position.
DANGER
Since operation of the front
passenger airbag is not
compatible with the position
of a rear-facing child seat, NEVER
fit a restraint system for a rear-fac-
ing child in a seat protected by an
ACTIVATED front AIRBAG . This
can cause the CHILD’S DEATH or
SERIOUS INJURY.
Page 59 of 274
1.53
Operating faults
The steering may become stiff when
driving or when the steering wheel is
turned repeatedly. This is due to the
power assistance overheating. In this
case, it must be allowed to cool down.Power-assisted steering
Variable power-assisted steering
The variable power-assisted steering
system is equipped with an electronic
control system which alters the level of
assistance to suit the vehicle speed.
Steering is made easier during parking
manoeuvres (for added comfort) whilst
the force needed to steer increases
progressively as the speed rises (for
enhanced safety at high speeds).
STEERING WHEEL/POWER-ASSISTED STEERING
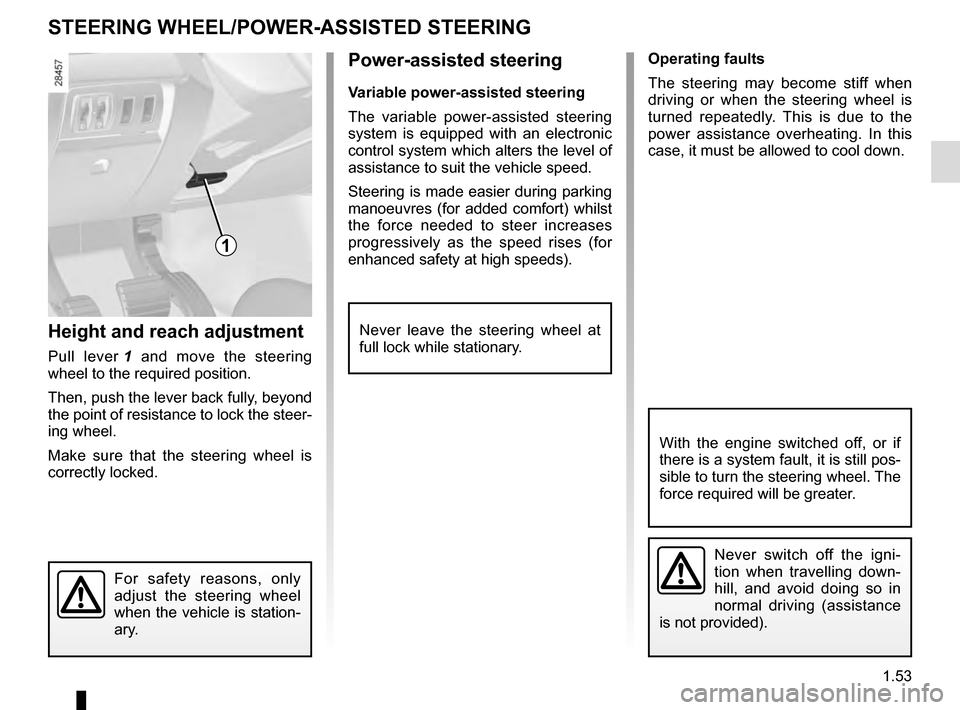
Height and reach adjustment
Pull lever 1 and move the steering
wheel to the required position.
Then, push the lever back fully, beyond
the point of resistance to lock the steer-
ing wheel.
Make sure that the steering wheel is
correctly locked.
For safety reasons, only
adjust the steering wheel
when the vehicle is station-
ary.
Never leave the steering wheel at
full lock while stationary.
1
Never switch off the igni-
tion when travelling down-
hill, and avoid doing so in
normal driving (assistance
is not provided).
With the engine switched off, or if
there is a system fault, it is still pos-
sible to turn the steering wheel. The
force required will be greater.
Page 60 of 274
1.54
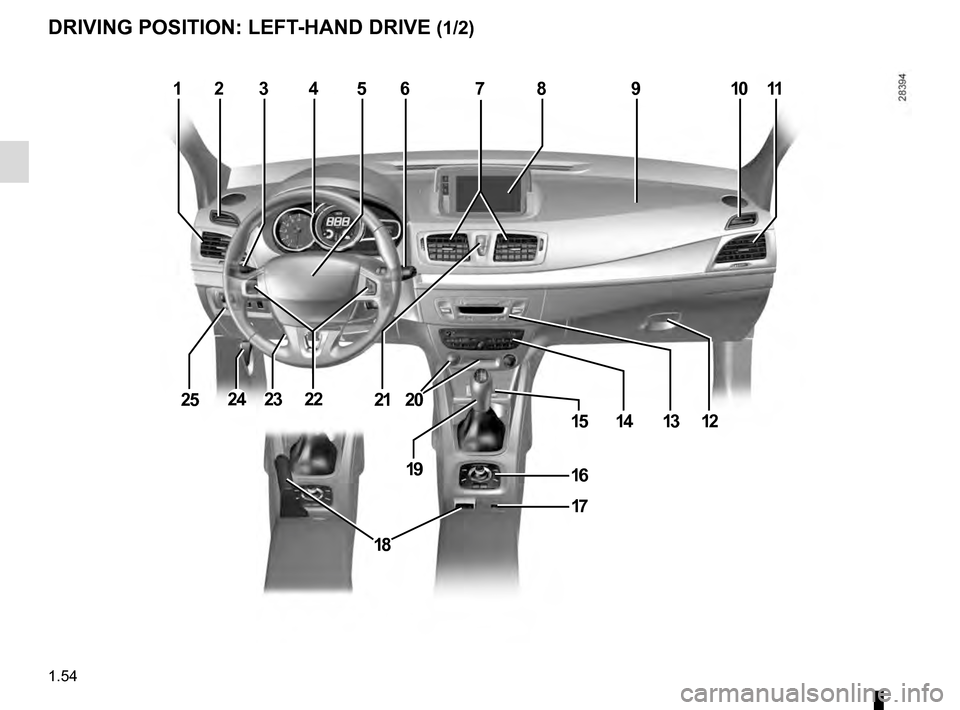
DRIVING POSITION: LEFT-HAND DRIVE (1/2)
1234567891011
12131415
16
17
18
19
202122242523