brake light RENAULT MEGANE RS 2012 X95 / 3.G User Guide
[x] Cancel search | Manufacturer: RENAULT, Model Year: 2012, Model line: MEGANE RS, Model: RENAULT MEGANE RS 2012 X95 / 3.GPages: 239, PDF Size: 9.2 MB
Page 99 of 239

JauneNoirNoir texte
2.13
ENG_UD18947_5
Conseils antipollution, économie de carburant, conduite (X45 - H45 -\
X85 - B85 - C85 - S85 - X83 - X61 - F61 - K61 - K85 - X95 - B95 - D95 -\
J95 - R95 - L38 - X61 BUp
ENG_NU_837-6_BDK95_Renault_2
ADVICE: antipollution, fuel economy and driving (2/3)
– Brake as little as possible. If you an-
ticipate an obstacle or bend in ad -
vance, you may then simply release
the accelerator pedal.
– Avoid sudden acceleration.
– Do not overrev the engine in the in-
termediate gears.
Always use the highest gear possi -
ble without labouring the engine.
On versions with an automatic gear-
box, it is preferable to keep the gear
lever in position D.
– Do not try to maintain the same
speed up a hill, accelerate no more
than you would on the level. Keep
your foot in the same position on the
accelerator pedal.
– Double declutching and accelerating
before switching off are unnecessary
in modern vehicles.
– Bad weather, flooded roads:
Do not drive through floods
if the water is above the
lower edge of the wheel
rims.
Driving
– Drive carefully for the first few miles
until the engine reaches its normal
operating temperature, rather than
let it warm up while the vehicle is sta-
tionary.
– Speed is expensive.
– Sporty driving uses a lot of fuel: drive
with a light right foot.
Exhaust gas monitoring
system
The exhaust gas monitoring system will
detect any operating faults in the vehi-
cle’s antipollution system.
If this system malfunctions, toxic sub -
stances may be released into the at -
mosphere or damage may occur.
ÄThis warning light on the in -
strument panel will indicate if
there are any faults in the system:
This lights up when the ignition is
switched on and goes out when the
engine is started.
– If it lights up continuously, consult an
approved Dealer as soon as possi -
ble;
– if it flashes, reduce the engine speed
until the light stops flashing. Contact
your approved dealer as soon as
possible.
Page 106 of 239
2.20
ENG_UD14885_2
Dispositifs de correction de conduite (X95 - B95 - D95 - Renault)
ENG_NU_837-6_BDK95_Renault_2
Jaune NoirNoir texte
DRIVER CORRECTION DEVICES/AIDS (2/4)
Electronic stability program
(E.S.P.) with understeer
control and traction control
(A.S.R.)
Electronic stability program (E.S.P.)
This system helps you to keep control
of the vehicle in critical driving condi -
tions (avoiding an obstacle, loss of grip
on a bend, etc.).
Operating principle
A sensor in the steering wheel detects
the direction selected by the driver.
Other sensors throughout the vehicle
measure the actual direction.
The system compares driver input to
the actual trajectory of the vehicle and
corrects the trajectory if necessary by
controlling the braking of certain wheels
and/or engine power. In the event that
the system is engaged, indicator light
ù flashes on the instrument panel. Understeer control
This system optimises the action of
the E.S.P. in the case of pronounced
understeering (loss of front axle road
holding).
Traction control (A.S.R.)
This system helps to limit wheelspin of
the drive wheels and to control the ve-
hicle when pulling away accelerating or
decelerating.
Operating principle
Using the wheel sensors, the system
measures and compares the speed of
the drive wheels at all times and slows
down their over-rotation. If a wheel is
starting to slip, the system brakes au
-
tomatically until the drive supplied be -
comes compatible with the level of grip
under the wheel again.
The system also adjusts the engine
speed to the grip available under the
wheels, independently of the pressure
exerted on the accelerator pedal. Operating faults
When the system detects an operating
fault the message “Check ESP” and the
indicator light
© appears on the in-
strument panel. In this case, the E.S.P.
and A.S.R. are deactivated.
Consult an approved dealer.
Page 107 of 239
JauneNoirNoir texte
2.21
ENG_UD14885_2
Dispositifs de correction de conduite (X95 - B95 - D95 - Renault)
ENG_NU_837-6_BDK95_Renault_2
Traction control (A.S.R.) offers addi -
tional safety; it is recommended that
you do not drive with the function disa-
bled. Correct this as soon as possible
by pressing switch 1 again.
Note: the function is reactivated auto -
matically when the ignition is switched
on or when a speed of approximately
24 mph (40 km/h) is exceeded.
Emergency brake assist
This system supplements the ABS
and helps reduce vehicle stopping dis-
tances.
Operating principle
The system is for detecting an emer -
gency braking situation. In this case,
the braking assistance immediately de-
velops maximum power and may trig -
ger ABS regulation.
ABS braking is maintained as long as
the brake pedal is applied.
Hazard warning lights switching on
Depending on the vehicle, these may
light up in the event of sudden decel -
eration.
Operating faults
When the system detects an operat -
ing fault the message “ Check brak-
ing system” appears on the instrument
panel along with the
© warning
light.
Consult an approved dealer.
braking anticipation
Depending on the vehicle, when you
rapidly release the accelerator, the
system anticipates the braking ma -
noeuvre in order to reduce stopping
distances.
Special cases
When using the cruise control:
– if you use the accelerator, when you
release it, the system may be trig -
gered;
– if you do not use the accelerator, the
system will not be triggered.
DRIVER CORRECTION DEVICES/AIDS (3/4)
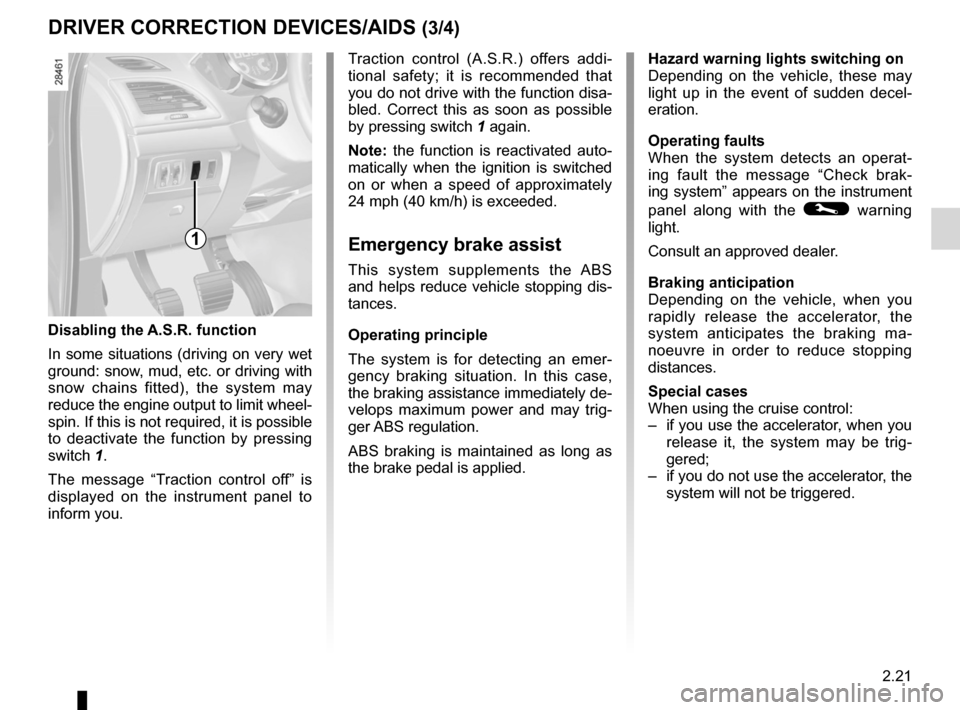
Disabling the A.S.R. function
In some situations (driving on very wet
ground: snow, mud, etc. or driving with
snow chains fitted), the system may
reduce the engine output to limit wheel -
spin. If this is not required, it is possible
to deactivate the function by pressing
switch 1.
The message “ Traction control off ” is
displayed on the instrument panel to
inform you.
1
Page 114 of 239

ENG_NU_837-6_BDK95_Renault_2
Jaune NoirNoir texte
Putting the function on
standby
The function")
2.28
ENG_UD18935_2
Régulateur-limiteur de vitesse : fonction régulateur (X95 - B95 -\
D95 - Renault)
ENG_NU_837-6_BDK95_Renault_2
Jaune NoirNoir texte
Putting the function on
standby
The function is suspended when you:
– press switch 4 (O);
– depress the brake pedal;
– depress the clutch pedal or shift into
neutral if the vehicle has an auto -
matic gearbox.
In all three cases, the cruising speed re-
mains stored, it is no longer displayed in
zone 6 and the message “ Memorised”
along with the stored speed will appear
on the instrument panel.
Standby is confirmed when zones A, B
and C go out.
Exceeding the cruising speed
The cruising speed may be exceeded
at any time by depressing the acceler-
ator pedal. The cruising speed flashes
on the instrument panel along with the
illumination of zone C in red.
Then, release the accelerator: after a
few seconds, the vehicle will automati-
cally return to its set cruising speed.
Cruising speed cannot be
maintained
If driving up or down a steep gradient,
the system is unable to maintain the
cruising speed: the stored speed on the
instrument panel will flash and zone C
will light up in red to inform you of this
situation.
CRUISE CONTROL/SPEED LIMITER: cruise control function (3/4)
Adjusting the cruising speed
The cruising speed may be changed by
pressing the following repeatedly:
– switch 2 (+) to increase the speed;
– switch 3 (-) to decrease the speed.
The cruise control function
is in no way linked to the
braking system.
A
bC6
2
3
5
4
Page 115 of 239

ENG_NU_837-6_BDK95_Renault_2
CRUISE CONTROL/SPEED LIMITER: cruise control f")
JauneNoirNoir texte
2.29
ENG_UD18935_2
Régulateur-limiteur de vitesse : fonction régulateur (X95 - B95 -\
D95 - Renault)
ENG_NU_837-6_BDK95_Renault_2
CRUISE CONTROL/SPEED LIMITER: cruise control function (4/4)
Note: if the speed previously stored is
much higher than the current speed,
the vehicle will accelerate more rapidly
to reach this threshold.
When the cruise control function is
put on standby, pressing switch 2 (+)
reactivates the cruise control func -
tion without taking into account the
stored speed: it is the speed at
which the vehicle is moving that is
taken into account.
Switching off the function
The cruise control function is deacti -
vated if you press switch 1: in this case
a speed is no longer stored. The instru-
ment panel green indicator light 7 and
zones A , B and C go out, confirming
that the function is deactivated.
Putting the cruise control
on standby or switching it
off does not cause a rapid
reduction in speed: you
must brake by depressing the brake
pedal.
1
Returning to the cruising speed
If a speed is stored, it can be recalled,
once you are sure that the road condi -
tions are suitable (traffic, road surface,
weather conditions, etc.).
Press switch 5 (R) if the vehicle speed
is above 20 mph (30 km/h).
When recalling the stored speed
zone A lights up to confirm activation.
Zone B lights up as soon as the cruis-
ing speed is reached.
A
bC
2
3
5
4
7
Page 119 of 239
automatic gearbox (use) ....................... (up to the end of the DU)
automatic gearbox selector lever ..........(up to the end of the DU)
changing gear ....................................... (up to the end of the DU)
reverse gear selecting .......................................... (up to the end of the DU)
driving ................................................... (up to the end of the DU)
2.33
ENG_UD14762_4
Boîte automatique (X95 - B95 - D95 - Renault)
ENG_NU_837-6_BDK95_Renault_2
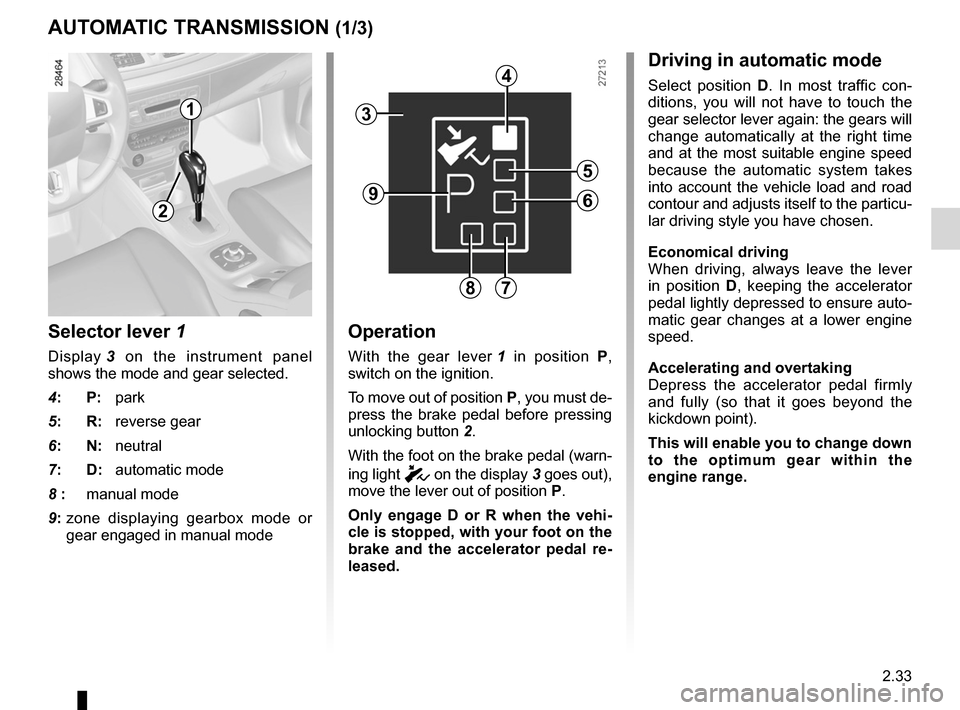
Selector lever 1
Display 3 on the instrument panel
shows the mode and gear selected.
4: P: park
5: R: reverse gear
6: N: neutral
7: D: automatic mode
8 : manual mode
9: zone displaying gearbox mode or
gear engaged in manual mode
Operation
With the gear lever 1 in position P,
switch on the ignition.
To move out of position P, you must de-
press the brake pedal before pressing
unlocking button 2.
With the foot on the brake pedal (warn-
ing light
c on the display 3 goes out),
move the lever out of position P.
Only engage D or R when the vehi -
cle is stopped, with your foot on the
brake and the accelerator pedal re -
leased.
Automatic gearbox
AUTOMATIC TRANSMISSION (1/3)
Driving in automatic mode
Select position D. In most traffic con -
ditions, you will not have to touch the
gear selector lever again: the gears will
change automatically at the right time
and at the most suitable engine speed
because the automatic system takes
into account the vehicle load and road
contour and adjusts itself to the particu-
lar driving style you have chosen.
Economical driving
When driving, always leave the lever
in position D, keeping the accelerator
pedal lightly depressed to ensure auto-
matic gear changes at a lower engine
speed.
Accelerating and overtaking
Depress the accelerator pedal firmly
and fully (so that it goes beyond the
kickdown point).
This will enable you to change down
to the optimum gear within the
engine range.
3
2
1
4
5
6
78
9
Page 148 of 239
rear parcel shelf .................................... (up to the end of the DU)
tailgate .................................................. (up to the end of the DU)
rear parcel shelf .................................... (up to the end of the DU)
3.26
ENG_UD11750_2
Tablette arrière (X95 - B95 - D95 - Renault)
ENG_NU_837-6_BDK95_Renault_3
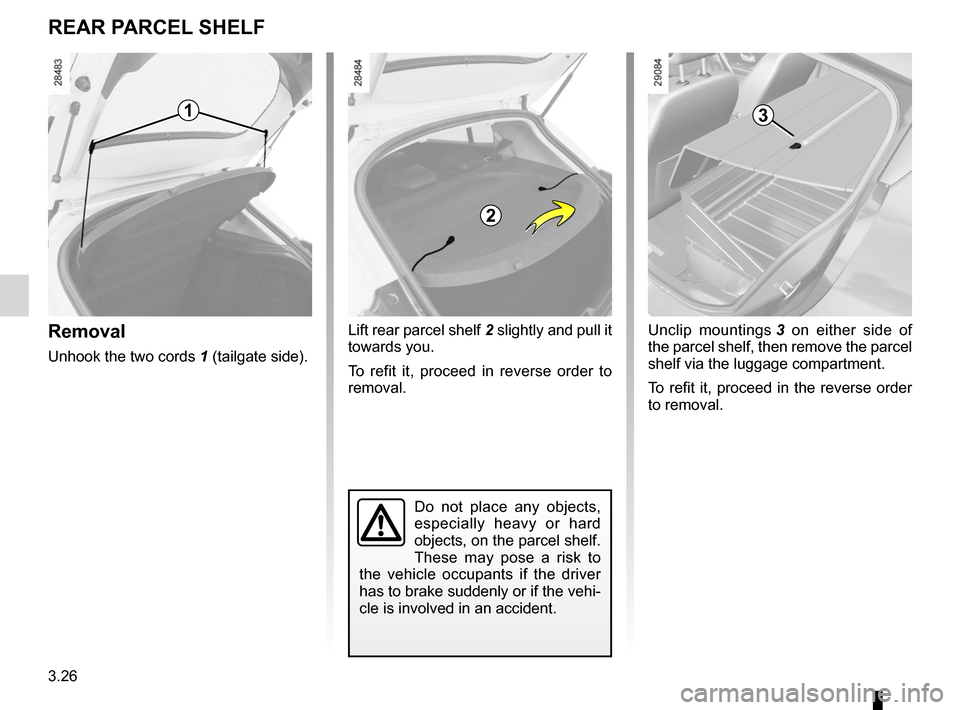
Removal
Unhook the two cords 1 (tailgate side).
Rear parcel shelf
Do not place any objects,
especially heavy or hard
objects, on the parcel shelf.
These may pose a risk to
the vehicle occupants if the driver
has to brake suddenly or if the vehi-
cle is involved in an accident.
Lift rear parcel shelf 2 slightly and pull it
towards you.
To refit it, proceed in reverse order to
removal.
REAR PARcEl ShElF
1
2
Unclip mountings 3 on either side of
the parcel shelf, then remove the parcel
shelf via the luggage compartment.
To refit it, proceed in the reverse order
to removal.
3
Page 159 of 239
4.1
ENG_UD19030_7
Sommaire 4 (X95 - B95 - D95 - Renault)
ENG_NU_837-6_BDK95_Renault_4
Section 4: Maintenance
Bonnet . . . . . . . . . . . . . . . . . . . . . . . . . . . . . . . . . . . . . . . . . . . . . . . . . . . . . . . . . . . . . . . . . . . . . . . . 4.2
Engine oil level: . . . . . . . . . . . . . . . . . . . . . . . . . . . . . . . . . . . . . . . . . . . . . . . . . . . . . . . . . . . . . . . . . 4.3
general information . . . . . . . . . . . . . . . . . . . . . . . . . . . . . . . . . . . . . . . . . . . . . . . . . . . . . . . . 4.3
topping up/filling . . . . . . . . . . . . . . . . . . . . . . . . . . . . . . . . . . . . . . . . . . . . . . . . . . . . . . . . . . . 4.5
Engine oil change . . . . . . . . . . . . . . . . . . . . . . . . . . . . . . . . . . . . . . . . . . . . . . . . . . . . . . . . . . . . . . . 4.6
Levels: . . . . . . . . . . . . . . . . . . . . . . . . . . . . . . . . . . . . . . . . . . . . . . . . . . . . . . . . . . . . . . . . . . . . . . . . 4.7
engine coolant . . . . . . . . . . . . . . . . . . . . . . . . . . . . . . . . . . . . . . . . . . . . . . . . . . . . . . . . . . . . 4.7
brake fluid . . . . . . . . . . . . . . . . . . . . . . . . . . . . . . . . . . . . . . . . . . . . . . . . . . . . . . . . . . . . . . . . 4.8
windscreen/headlight washer reservoir . . . . . . . . . . . . . . . . . . . . . . . . . . . . . . . . . . . . . . . . . 4.9
Filters . . . . . . . . . . . . . . . . . . . . . . . . . . . . . . . . . . . . . . . . . . . . . . . . . . . . . . . . . . . . . . . . . . . . . . . . . 4.9
Tyre pressure. . . . . . . . . . . . . . . . . . . . . . . . . . . . . . . . . . . . \
. . . . . . . . . . . . . . . . . . . . . . . . . . . . . . . 4.10
Battery . . . . . . . . . . . . . . . . . . . . . . . . . . . . . . . . . . . . . . . . . . . . . . . . . . . . . . . . . . . . . . . . . . . . . . . . 4.11
Bodywork maintenance . . . . . . . . . . . . . . . . . . . . . . . . . . . . . . . . . . . . . . . . . . . . . . . . . . . . . . . . . . . 4.12
Interior trim maintenance . . . . . . . . . . . . . . . . . . . . . . . . . . . . . . . . . . . . . . . . . . . . . . . . . . . . . . . . . . 4.14
Page 166 of 239
brake fluid .............................................................. (current page)
levels: brake fluid ........................................................ (current page)
tanks and reservoirs brake fluid ........................................................ (current page)
4.8
ENG_UD18903_5
Niveaux / filtres (X95 - B95 - D95 - Renault)
ENG_NU_837-6_BDK95_Renault_4
Jaune NoirNoir texte
brake fluid
levelS (2/3)
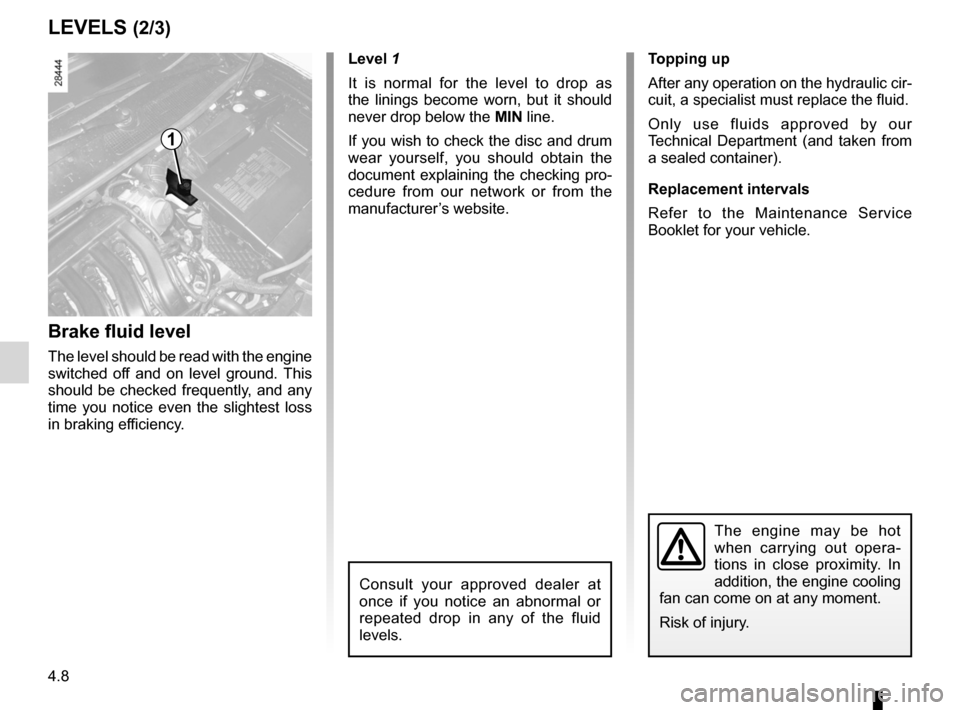
Brake fluid level
The level should be read with the engine
switched off and on level ground. This
should be checked frequently, and any
time you notice even the slightest loss
in braking efficiency. level 1
It is normal for the level to drop as
the linings become worn, but it should
never drop below the
Min line.
If you wish to check the disc and drum
wear yourself, you should obtain the
document explaining the checking pro-
cedure from our network or from the
manufacturer’s website. t
opping up
After any operation on the hydraulic cir-
cuit, a specialist must replace the fluid.
Only use fluids approved by our
Technical Department (and taken from
a sealed container).
Replacement intervals
Refer to the Maintenance Service
Booklet for your vehicle.
1
The engine may be hot
when carrying out opera -
tions in close proximity. In
addition, the engine cooling
fan can come on at any moment.
Risk of injury.
Consult your approved dealer at
once if you notice an abnormal or
repeated drop in any of the fluid
levels.
Page 176 of 239

ENG_NU_837-6_BDK95_Renault_5
Jaune NoirNoir texte
Depending on the vehicle, in the event
of a punct")
5.4
ENG_UD18914_3
Kit de gonflage (X61 - X95 - B95 - D95 - L38 - X38 - X32 - B32 - Renaul\
t)
ENG_NU_837-6_BDK95_Renault_5
Jaune NoirNoir texte
Depending on the vehicle, in the event
of a puncture, use the kit located under -
neath the luggage compartment carpet.
Depending on the vehicle, remove the
central partition in the storage compart-
ment to access the inflation kit.
Open the kit, remove caps 1 and 3 (the
cap must not be removed from the
bottle) then screw bottle 2 to its base 3.
tyre Pressure KIt (2/3)
Do not pull out the foreign
body causing the puncture
if it is still in the tyre.
143
5
6
78
2
Before using this kit, park
the vehicle at a sufficient
distance from traffic, switch
on the hazard warning
lights, apply the handbrake, ask all
passengers to leave the vehicle and
keep them away from traffic.
w ith the ignition on,
– connect adapter 8 to the accessories
socket on the dashboard of the vehi-
cle;
– unscrew the valve cap on the wheel
concerned and screw inflation
adapter 6 onto the valve;
– press switch 5 to inflate the tyre to
the recommended pressure (check
the label affixed to the edge of the
driver’s door);
– after a maximum of 7 minutes, stop
inflating and read the pressure (on
pressure gauge 4);
n ote: while the bottle is emptying
(approximately 30 seconds), pres -
sure gauge 4 will briefly indicate a
pressure of 6 bar, then the pressure
will drop.
– adjust the pressure: to increase
it, continue inflating with the kit, to
reduce it, turn button 7 located on
the inflation adapter.
If the correct pressure cannot be
achieved, repair is impossible. Do
not drive the vehicle. consult an ap-
proved dealer.