heated RENAULT MEGANE RS 2012 X95 / 3.G Owners Manual
[x] Cancel search | Manufacturer: RENAULT, Model Year: 2012, Model line: MEGANE RS, Model: RENAULT MEGANE RS 2012 X95 / 3.GPages: 239, PDF Size: 9.2 MB
Page 23 of 239
front seat adjustment ............................(up to the end of the DU)
front seats adjustment ...................................... (up to the end of the DU)
front seats with manual controls ........................................ (current page)
1.17
ENG_UD14583_3
Sièges avant à commandes manuelles (X95 - B95 - D95 - Renault)
ENG_NU_837-6_BDK95_Renault_1
fRONT sEATs WITH mANUAL cONTROL (1/2)
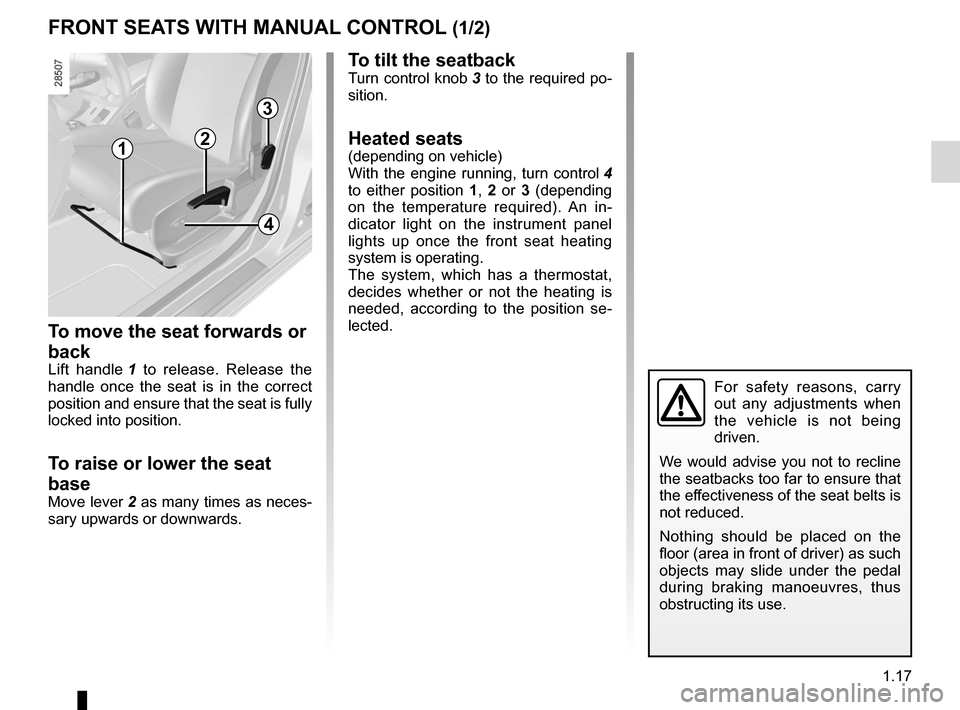
To move the seat forwards or
back
Lift handle 1 to release. Release the
handle once the seat is in the correct
position and ensure that the seat is fully
locked into position.
To raise or lower the seat
base
Move lever 2 as many times as neces-
sary upwards or downwards.
To tilt the seatbackTurn control knob 3 to the required po-
sition.
Heated seats(depending on vehicle)
With the engine running, turn control 4
to either position 1, 2 or 3 (depending
on the temperature required). An in -
dicator light on the instrument panel
lights up once the front seat heating
system is operating.
The system, which has a thermostat,
decides whether or not the heating is
needed, according to the position se -
lected.
For safety reasons, carry
out any adjustments when
the vehicle is not being
driven.
We would advise you not to recline
the seatbacks too far to ensure that
the effectiveness of the seat belts is
not reduced.
Nothing should be placed on the
floor (area in front of driver) as such
objects may slide under the pedal
during braking manoeuvres, thus
obstructing its use.
1
3
2
4
Page 25 of 239
front seatswith electric controls ........................................ (current page)
1.19
ENG_UD18878_3
Sièges avant à à commandes électriques (X95 - B95 - D95 - R\
enault)
ENG_NU_837-6_BDK95_Renault_1
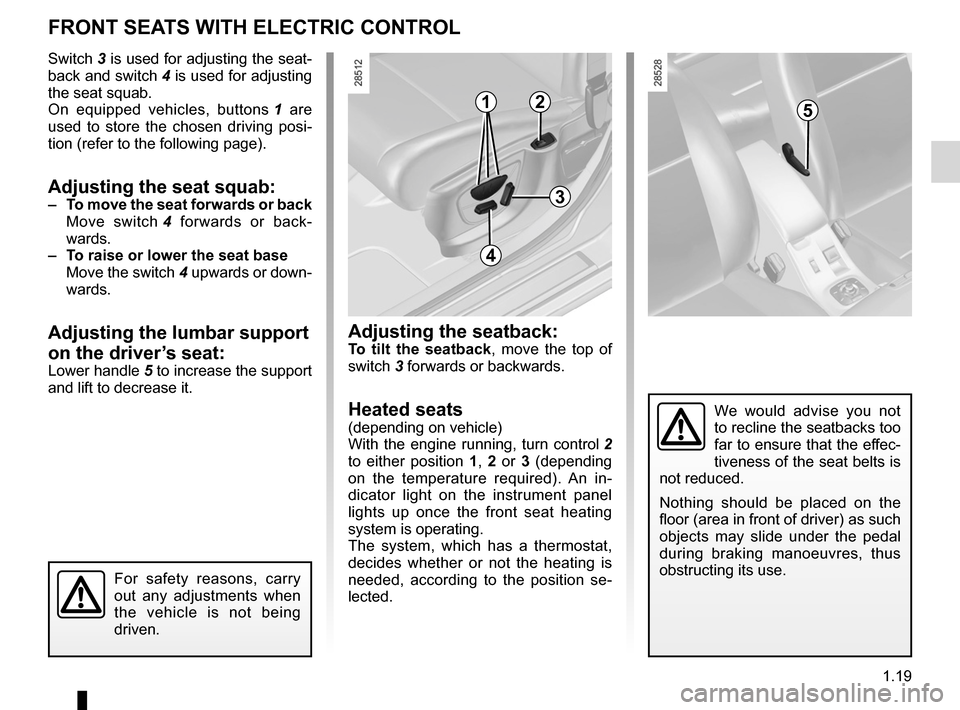
Switch 3 is used for adjusting the seat-
back and switch 4 is used for adjusting
the seat squab.
On equipped vehicles, buttons 1 are
used to store the chosen driving posi -
tion (refer to the following page).
Adjusting the seat squab:– To move the seat forwards or back
Move switch 4 forwards or back -
wards.
– To raise or lower the seat base
Move the switch 4 upwards or down -
wards.
Adjusting the lumbar support
on the driver’s seat:
Lower handle 5 to increase the support
and lift to decrease it.
For safety reasons, carry
out any adjustments when
the vehicle is not being
driven.
We would advise you not
to recline the seatbacks too
far to ensure that the effec-
tiveness of the seat belts is
not reduced.
Nothing should be placed on the
floor (area in front of driver) as such
objects may slide under the pedal
during braking manoeuvres, thus
obstructing its use.
Adjusting the seatback:To tilt the seatback , move the top of
switch 3 forwards or backwards.
Heated seats(depending on vehicle)
With the engine running, turn control 2
to either position 1, 2 or 3 (depending
on the temperature required). An in -
dicator light on the instrument panel
lights up once the front seat heating
system is operating.
The system, which has a thermostat,
decides whether or not the heating is
needed, according to the position se -
lected.
fRONT sEATs WITH ELEcTRIc cONTROL
2
4
3
15
Page 59 of 239
JauneNoirNoir texte
1.53
ENG_UD18927_5
Tableau de bord : témoins lumineux (X95 - B95 - D95 - Renault)
ENG_NU_837-6_BDK95_Renault_1
ßf ront seat belt reminder
warning light
This lights up on the central display
when starting the engine then, if the
driver’s or front passenger’s seat belt
(if this seat is occupied) is not fastened
and the vehicle has reached approxi -
mately 12 mph (20 km/h), it flashes and
a bleep sounds for around 120 sec -
onds.
Note: an object placed on the passen-
ger seat base may activate the warning
light in some cases.
Rear seat belt reminder (depending
on vehicle)
the
ß warning light on the cen -
tral display lights up accompanied by a
message on the instrument panel indi -
cating the number of seat belts buck -
led for approximately 30 seconds each
time:
– the vehicle is started;
– a door is opened;
– a rear seat belt is fastened or unfas-
tened.
Check that the rear passengers are
wearing seat belts and that the number
of seat belt shown as fastened corre -
sponds to the number of rear bench
seat places occupied.
WARNINg LIgHTs (4/4)
ðHeated seats operating indi -
cator
This indicates that one of the heated
seats is in operation.
MLow fuel level warning light
This comes on when the igni -
tion is switched on and goes out after a
few seconds. If it comes on when driv-
ing accompanied by a beep, fill up with
fuel as soon as possible. There is only
approximately 30 miles (50 km) worth
of fuel left after the warning light first
comes on.
Üparticle filter
Refer to the information on
“Special features of diesel versions” in
Section 2.
The presence and operation of the warning lights dEpENd ON THE EQUIpmENT ANd cOUNTRY.
Page 75 of 239
rear view mirrors ................................... (up to the end of the DU)
1.69
ENG_UD6288_1
Rétroviseurs (X95 - B95 - D95 - Renault)
ENG_NU_837-6_BDK95_Renault_1
Rear view mirrors
folding door mirrors
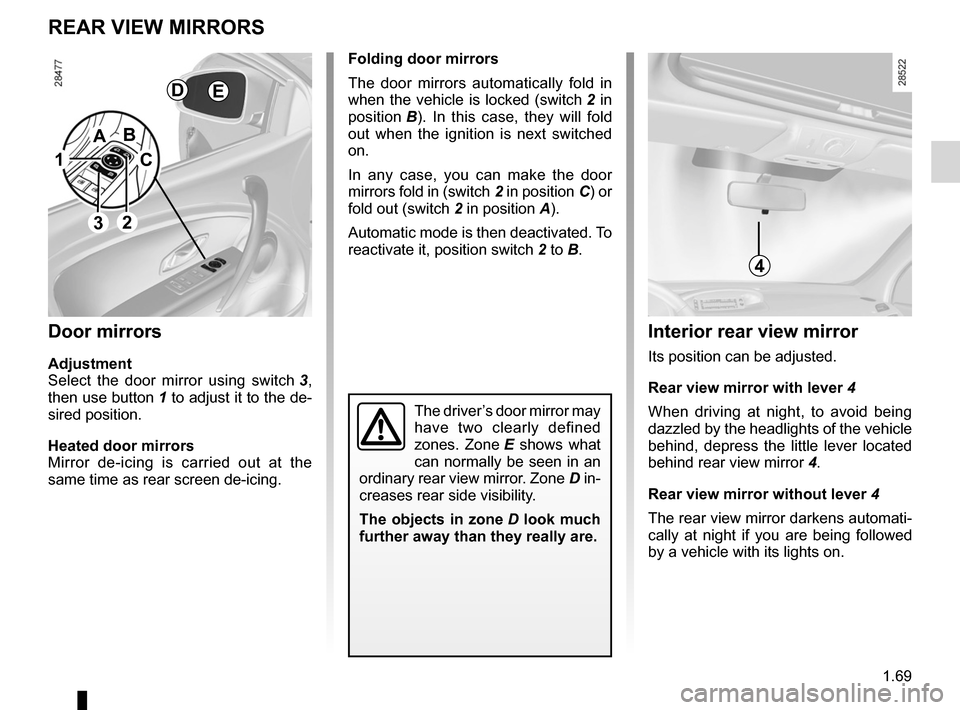
The door mirrors automatically fold in
when the vehicle is locked (switch 2 in
position B ). In this case, they will fold
out when the ignition is next switched
on.
In any case, you can make the door
mirrors fold in (switch 2 in position C) or
fold out (switch 2 in position A).
Automatic mode is then deactivated. To
reactivate it, position switch 2 to B.
REAR vIEW mIRRORs
door mirrors
Adjustment
Select the door mirror using switch 3 ,
then use button 1 to adjust it to the de-
sired position.
Heated door mirrors
Mirror de-icing is carried out at the
same time as rear screen de-icing.
The driver’s door mirror may
have two clearly defined
zones. Zone E shows what
can normally be seen in an
ordinary rear view mirror. Zone D in-
creases rear side visibility.
The objects in zone D look much
further away than they really are.
Interior rear view mirror
Its position can be adjusted.
Rear view mirror with lever 4
When driving at night, to avoid being
dazzled by the headlights of the vehicle
behind, depress the little lever located
behind rear view mirror 4.
Rear view mirror without lever 4
The rear view mirror darkens automati-
cally at night if you are being followed
by a vehicle with its lights on.
1
2
A
c
B
4
dE
3
Page 129 of 239
JauneNoirNoir texte
3.7
ENG_UD14525_3
Air conditionné automatique (X95 - B95 - D95 - L38 - X38 - X32 - B32\
- Renault)
ENG_NU_837-6_BDK95_Renault_3
AuT oMATIc clIMATE coNTRol (2/5)
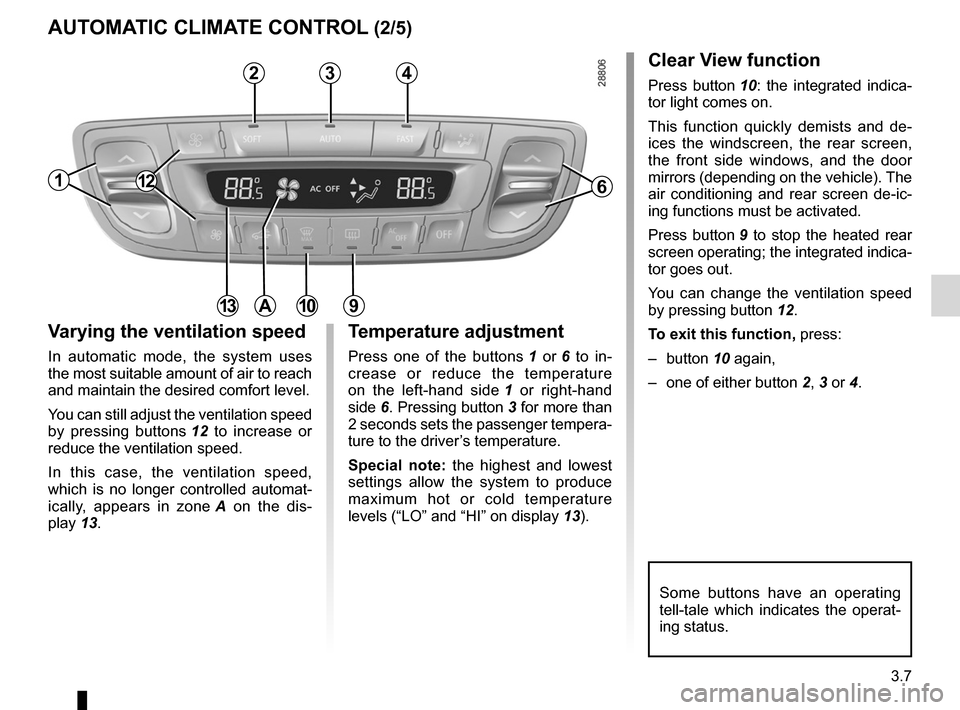
Varying the ventilation speed
In automatic mode, the system uses
the most suitable amount of air to reach
and maintain the desired comfort level.
You can still adjust the ventilation speed
by pressing buttons 12 to increase or
reduce the ventilation speed.
In this case, the ventilation speed,
which is no longer controlled automat-
ically, appears in zone A on the dis -
play 13.
Some buttons have an operating
tell-tale which indicates the operat -
ing status.
121
3
Temperature adjustment
Press one of the buttons 1 or 6 to in -
crease or reduce the temperature
on the left-hand side 1 or right-hand
side 6. Pressing button 3 for more than
2 seconds sets the passenger tempera-
ture to the driver’s temperature.
Special note: the highest and lowest
settings allow the system to produce
maximum hot or cold temperature
levels (“LO” and “HI” on display 13).
6
A13
clear View function
Press button 10 : the integrated indica -
tor light comes on.
This function quickly demists and de -
ices the windscreen, the rear screen,
the front side windows, and the door
mirrors (depending on the vehicle). The
air conditioning and rear screen de -ic -
ing functions must be activated.
Press button 9 to stop the heated rear
screen operating; the integrated indica -
tor goes out.
You can change the ventilation speed
by pressing button 12.
To exit this function, press:
– button 10 again,
– one of either button 2, 3 or 4.
109
24
Page 196 of 239
5.24
ENG_UD14417_2
Fusibles (X95 - B95 - D95 - Renault)
ENG_NU_837-6_BDK95_Renault_5
Fuses (2/2)
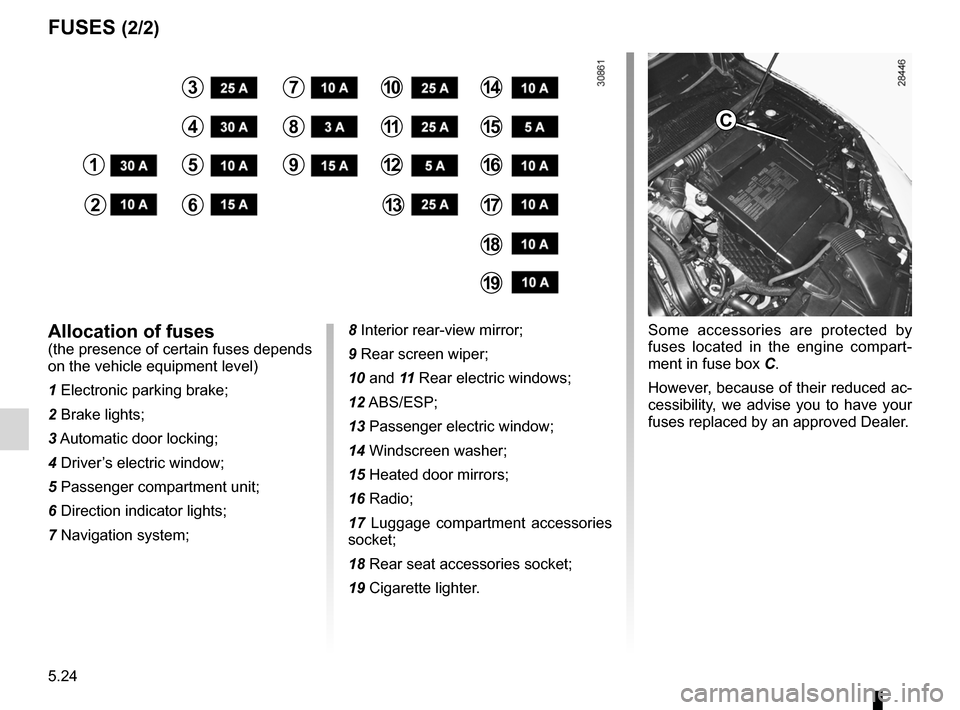
Some accessories are protected by
fuses located in the engine compart -
ment in fuse box C.
However, because of their reduced ac-
cessibility, we advise you to have your
fuses replaced by an approved Dealer.allocation of fuses(the presence of certain fuses depends
on the vehicle equipment level)
1 Electronic parking brake;
2 Brake lights;
3 Automatic door locking;
4 Driver’s electric window;
5 Passenger compartment unit;
6 Direction indicator lights;
7 Navigation system; 8 Interior rear-view mirror;
9 Rear screen wiper;
10 and 11 Rear electric windows;
12 ABS/ESP;
13 Passenger electric window;
14 Windscreen washer;
15 Heated door mirrors;
16 Radio;
17
Luggage compartment accessories
socket;
18 Rear seat accessories socket;
19 Cigarette lighter.
c
1
2
3
4
5
6
7
8
9
10
11
12
13
14
15
16
17
18
19