page 10 RENAULT MEGANE RS 2012 X95 / 3.G Owners Manual
[x] Cancel search | Manufacturer: RENAULT, Model Year: 2012, Model line: MEGANE RS, Model: RENAULT MEGANE RS 2012 X95 / 3.GPages: 239, PDF Size: 9.2 MB
Page 8 of 239
locking the doors .................................. (up to the end of the DU)
emergency key ..................................... (up to the end of the DU)
child safety ............................................................. (current page)
children (safety) ..................................................... (current page)
RENAULT card use .................................................. (up to the end of the DU)
1.2
ENG_UD6258_1
Cartes RENAULT : généralités (X95 - B95 - D95 - Renault)
ENG_NU_837-6_BDK95_Renault_1
Jaune NoirNoir texte
Range of the RENAULT cardThis varies according to the surround -
ings. It is important to make sure when
handling the RENAULT card that you
do not lock or unlock the doors by inad -
vertently pressing the buttons.
RENAULT cards: General information, use, deadlocking
RENAULT cARds: general information (1/2)
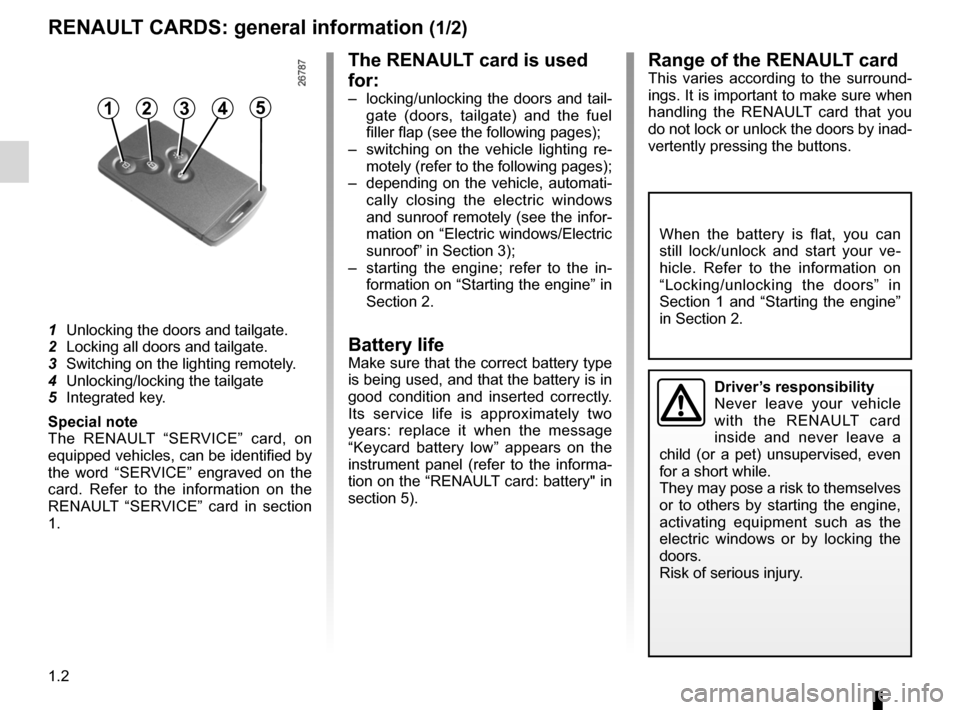
1 Unlocking the doors and tailgate.
2 Locking all doors and tailgate.
3 Switching on the lighting remotely.
4 Unlocking/locking the tailgate
5 Integrated key.
special note
The RENAULT “SERVICE” card, on
equipped vehicles, can be identified by
the word “SERVICE” engraved on the
card. Refer to the information on the
RENAULT “SERVICE” card in section
1.
The RENAULT card is used
for:
– locking/unlocking the doors and tail-
gate (doors, tailgate) and the fuel
filler flap (see the following pages);
– switching on the vehicle lighting re -
motely (refer to the following pages);
– depending on the vehicle, automati-
cally closing the electric windows
and sunroof remotely (see the infor-
mation on “Electric windows/Electric
sunroof” in Section 3);
– starting the engine; refer to the in -
formation on “Starting the engine” in
Section 2.
Battery lifeMake sure that the correct battery type
is being used, and that the battery is in
good condition and inserted correctly.
Its service life is approximately two
years: replace it when the message
“ Keycard battery low ” appears on the
instrument panel (refer to the informa -
tion on the “RENAULT card: battery" in
section 5).
driver’s responsibility
Never leave your vehicle
with the RENAULT card
inside and never leave a
child (or a pet) unsupervised, even
for a short while.
They may pose a risk to themselves
or to others by starting the engine,
activating equipment such as the
electric windows or by locking the
doors.
Risk of serious injury.
45123
When the battery is flat, you can
still lock/unlock and start your ve -
hicle. Refer to the information on
“Locking/unlocking the doors” in
Section 1 and “Starting the engine”
in Section 2.
Page 12 of 239
child safety............................................................. (current page)
children (safety) ..................................................... (current page)
1.6
ENG_UD14783_3
Carte RENAULT en mode mains libres (X95 - B95 - Renault)
ENG_NU_837-6_BDK95_Renault_1
Jaune NoirNoir texte
HANds-fREE RENAULT cARd: use (2/3)
Locking the vehicle
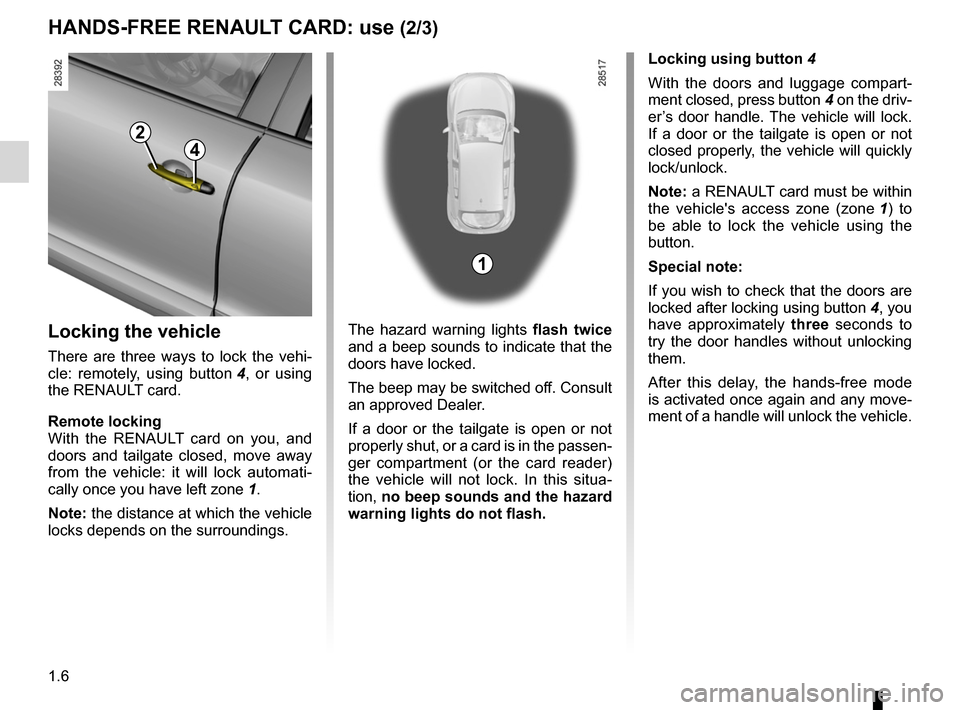
There are three ways to lock the vehi-
cle: remotely, using button 4 , or using
the RENAULT card.
Remote locking
With the RENAULT card on you, and
doors and tailgate closed, move away
from the vehicle: it will lock automati -
cally once you have left zone 1.
Note: the distance at which the vehicle
locks depends on the surroundings. The hazard warning lights
flash twice
and a beep sounds to indicate that the
doors have locked.
The beep may be switched off. Consult
an approved Dealer.
If a door or the tailgate is open or not
properly shut, or a card is in the passen -
ger compartment (or the card reader)
the vehicle will not lock. In this situa -
tion, no beep sounds and the hazard
warning lights do not flash.
2
4
Locking using button 4
With the doors and luggage compart -
ment closed, press button 4 on the driv-
er’s door handle. The vehicle will lock.
If a door or the tailgate is open or not
closed properly, the vehicle will quickly
lock/unlock.
Note: a RENAULT card must be within
the vehicle's access zone (zone 1 ) to
be able to lock the vehicle using the
button.
special note:
If you wish to check that the doors are
locked after locking using button 4, you
have approximately three seconds to
try the door handles without unlocking
them.
After this delay, the hands-free mode
is activated once again and any move-
ment of a handle will unlock the vehicle.
1
Page 14 of 239
central door locking .............................. (up to the end of the DU)
doors/tailgate ........................................ (up to the end of the DU)
locking the doors .................................. (up to the end of the DU)
RENAULT card use .................................................. (up to the end of the DU)
deadlocking the doors ........................................... (current page)
1.8
ENG_UD10814_2
Cartes RENAULT : super-condamnation (X95 - B95 - D95 - Renault)
ENG_NU_837-6_BDK95_Renault_1
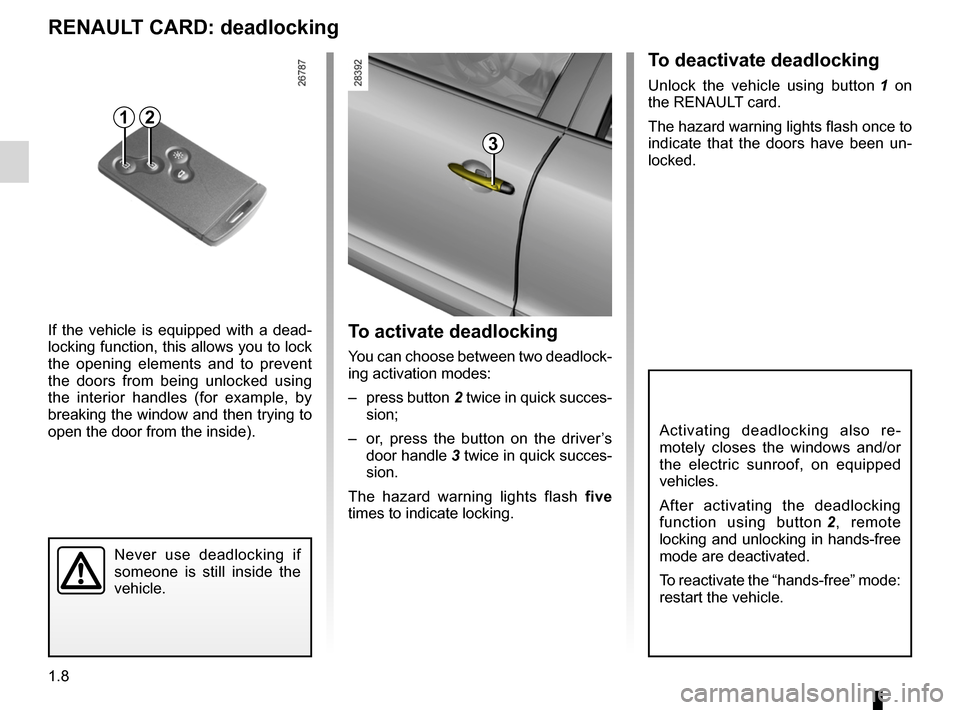
To deactivate deadlocking
Unlock the vehicle using button 1 on
the RENAULT card.
The hazard warning lights flash once to
indicate that the doors have been un -
locked.
Never use deadlocking if
someone is still inside the
vehicle.
To activate deadlocking
You can choose between two deadlock -
ing activation modes:
– press button 2 twice in quick succes-
sion;
– or, press the button on the driver’s
door handle 3 twice in quick succes-
sion.
The hazard warning lights flash five
times to indicate locking.
If the vehicle is equipped with a dead
-
locking function, this allows you to lock
the opening elements and to prevent
the doors from being unlocked using
the interior handles (for example, by
breaking the window and then trying to
open the door from the inside).
RENAULT cARd: deadlocking
2
Activating deadlocking also re -
motely closes the windows and/or
the electric sunroof, on equipped
vehicles.
After activating the deadlocking
function using button 2 , remote
locking and unlocking in hands-free
mode are deactivated.
To reactivate the “hands-free” mode:
restart the vehicle.
3
1
Page 16 of 239
warning buzzer ...................................................... (current page)
doors ..................................................... (up to the end of the DU)
locking the doors .................................. (up to the end of the DU)
opening the doors ................................. (up to the end of the DU)
closing the doors .................................. (up to the end of the DU)
children ................................................. (up to the end of the DU)
doors/tailgate ........................................ (up to the end of the DU)
1.10
ENG_UD18872_4
Ouverture et fermeture des portes (X95 - B95 - D95 - Renault)
ENG_NU_837-6_BDK95_Renault_1
Jaune NoirNoir texte
Doors
OpENINg ANd cLOsINg THE dOORs (1/2)
Opening the doors from the
outside
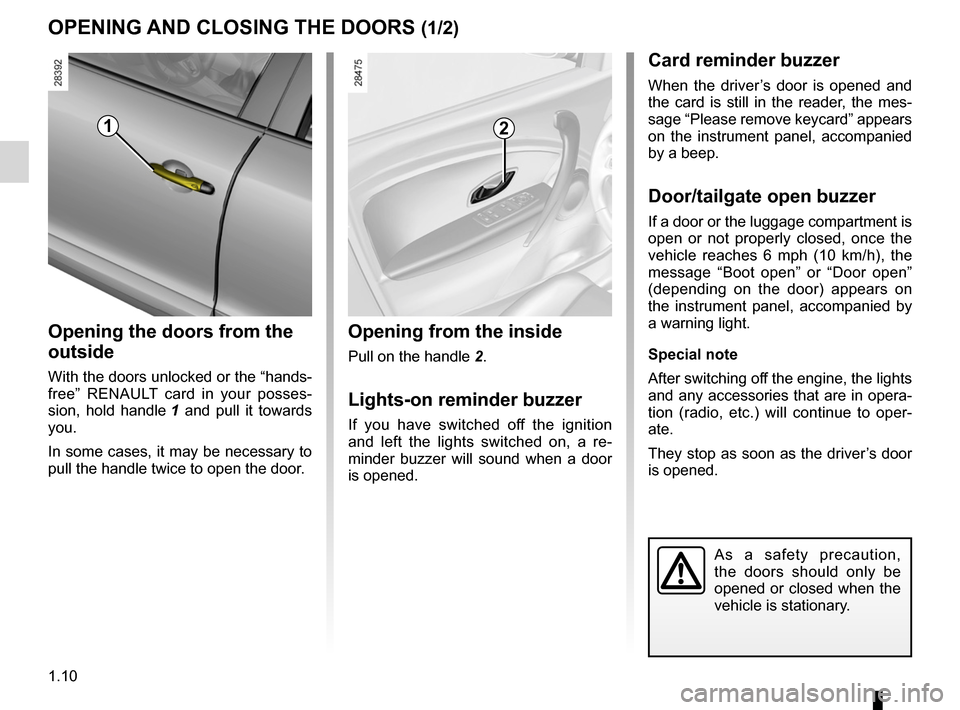
With the doors unlocked or the “hands -
free” RENAULT card in your posses -
sion, hold handle 1 and pull it towards
you.
In some cases, it may be necessary to
pull the handle twice to open the door.
Opening from the inside
Pull on the handle 2.
Lights-on reminder buzzer
If you have switched off the ignition
and left the lights switched on, a re -
minder buzzer will sound when a door
is opened.
card reminder buzzer
When the driver’s door is opened and
the card is still in the reader, the mes-
sage “Please remove keycard” appears
on the instrument panel, accompanied
by a beep.
door/tailgate open buzzer
If a door or the luggage compartment is
open or not properly closed, once the
vehicle reaches 6 mph (10 km/h), the
message “ Boot open” or “Door open ”
(depending on the door) appears on
the instrument panel, accompanied by
a warning light.
special note
After switching off the engine, the lights
and any accessories that are in opera -
tion (radio, etc.) will continue to oper -
ate.
They stop as soon as the driver’s door
is opened.
12
As a safety precaution,
the doors should only be
opened or closed when the
vehicle is stationary.
Page 17 of 239
child safety............................................................. (current page)
children (safety) ..................................................... (current page)
JauneNoirNoir texte
1.11
ENG_UD18872_4
Ouverture et fermeture des portes (X95 - B95 - D95 - Renault)
ENG_NU_837-6_BDK95_Renault_1
OpENINg ANd cLOsINg THE dOORs (2/2)
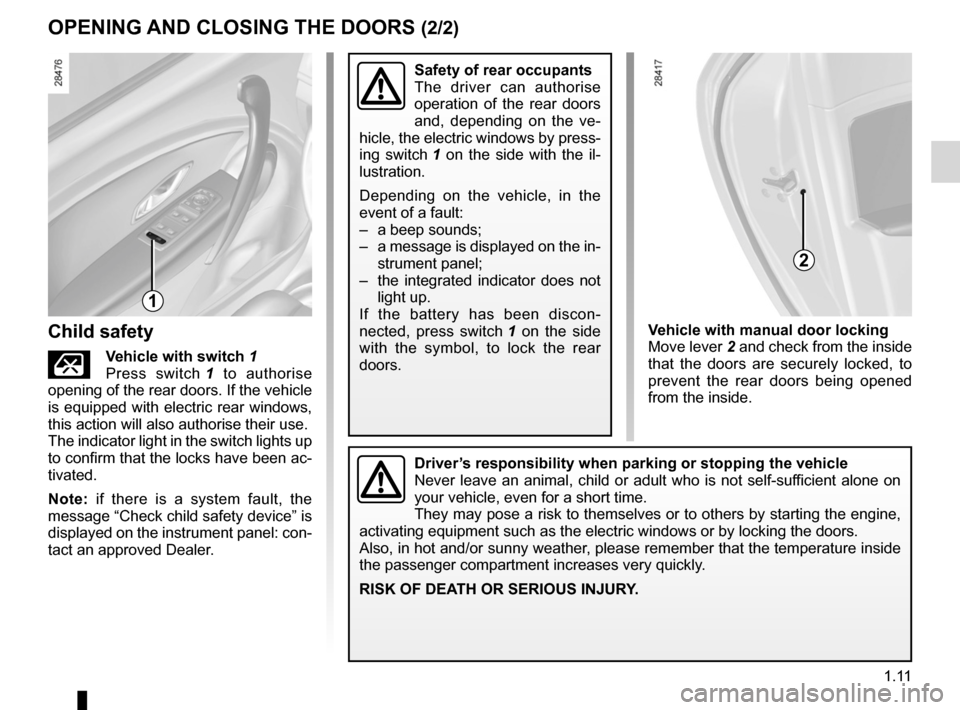
child safety
Çv ehicle with switch 1
Press switch 1 to authorise
opening of the rear doors. If the vehicle
is equipped with electric rear windows,
this action will also authorise their use.
The indicator light in the switch lights up
to confirm that the locks have been ac-
tivated.
Note: if there is a system fault, the
message “Check child safety device” is
displayed on the instrument panel: con-
tact an approved Dealer.
1
v ehicle with manual door locking
Move lever 2 and check from the inside
that the doors are securely locked, to
prevent the rear doors being opened
from the inside.
2
safety of rear occupants
The driver can authorise
operation of the rear doors
and, depending on the ve -
hicle, the electric windows by press-
ing switch 1 on the side with the il -
lustration.
Depending on the vehicle, in the
event of a fault:
– a beep sounds;
– a message is displayed on the in-
strument panel;
– the integrated indicator does not
light up.
If the battery has been discon -
nected, press switch 1 on the side
with the symbol, to lock the rear
doors.
driver’s responsibility when parking or stopping the vehicle
Never leave an animal, child or adult who is not self-sufficient alone on
your vehicle, even for a short time.
They may pose a risk to themselves or to others by starting the engine,
activating equipment such as the electric windows or by locking the door\
s.
Also, in hot and/or sunny weather, please remember that the temperature inside
the passenger compartment increases very quickly.
RIsK Of dEATH OR sERIOUs INJURY.
Page 18 of 239

opening the doors ................................. (up to the end of the DU)
closing the doors .................................. (up to the end of the DU)
unlocking the doors .............................. (up to the end of the DU)
central door locking .............................. (up to the end of the DU)
1.12
ENG_UD11876_3
Verrouillage / Déverrouillage des portes (X95 - B95 - D95 - Renault)\
ENG_NU_837-6_BDK95_Renault_1
Jaune NoirNoir texte
LOcKINg/UNLOcKINg THE dOORs (1/2)
Locking/Unlocking the doors
from the outside
This is done using the RENAULT Card;
see the “RENAULT Card” information in
Section 1.
In certain cases, the RENAULT card
may not work:
– if the RENAULT card battery is weak,
flat, etc.
– if equipment operating on the same
frequency as the card (mobile
phones, etc.) is used;
– vehicle located in a high electromag -
netic radiation zone.
It is then possible:
– to use the key integrated into the
card to unlock the front left-hand
door;
– to lock each of the doors manually;
– to use the interior door locking/un -
locking control (refer to the following
pages).
Using the key integrated in
the RENAULT card
– Remove cover A from the left-hand
door (using the end of key 2 ) in
notch 1;
– move it upwards to remove cover A;
– insert the key 2 into the lock of the
front left-hand door and lock or
unlock.
Locking the doors manually
Turn screw 3 with the door open (using
the end of the key) and close the door.
This means that the doors are then
locked from the outside.
The doors may then only be opened
from the inside or by using the key in
the front left-hand door.
A
2
3
1
Page 23 of 239
front seat adjustment ............................(up to the end of the DU)
front seats adjustment ...................................... (up to the end of the DU)
front seats with manual controls ........................................ (current page)
1.17
ENG_UD14583_3
Sièges avant à commandes manuelles (X95 - B95 - D95 - Renault)
ENG_NU_837-6_BDK95_Renault_1
fRONT sEATs WITH mANUAL cONTROL (1/2)
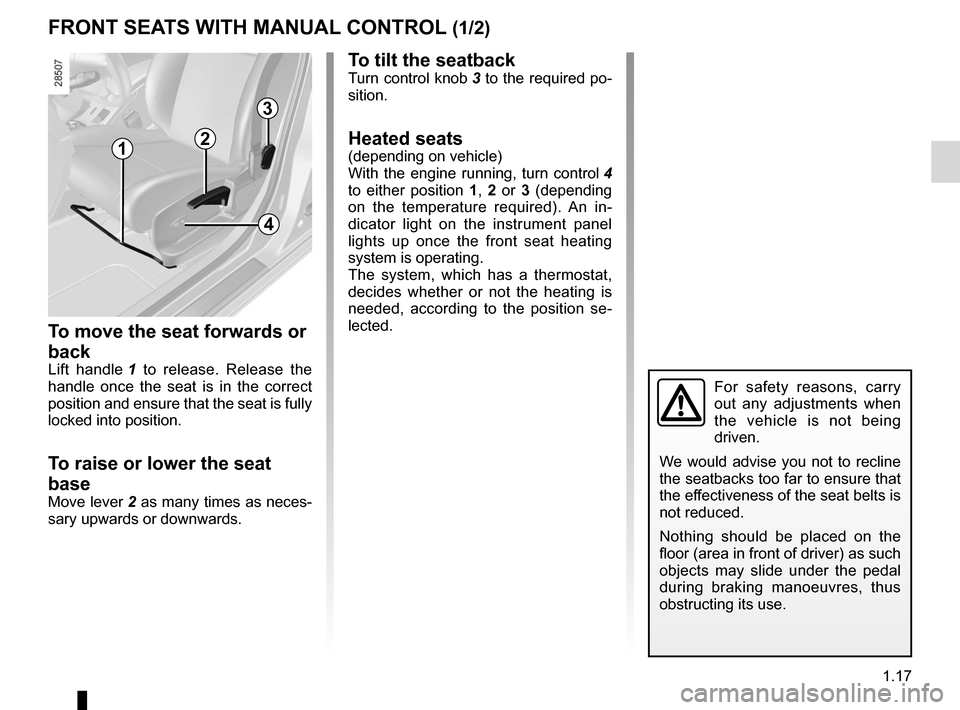
To move the seat forwards or
back
Lift handle 1 to release. Release the
handle once the seat is in the correct
position and ensure that the seat is fully
locked into position.
To raise or lower the seat
base
Move lever 2 as many times as neces-
sary upwards or downwards.
To tilt the seatbackTurn control knob 3 to the required po-
sition.
Heated seats(depending on vehicle)
With the engine running, turn control 4
to either position 1, 2 or 3 (depending
on the temperature required). An in -
dicator light on the instrument panel
lights up once the front seat heating
system is operating.
The system, which has a thermostat,
decides whether or not the heating is
needed, according to the position se -
lected.
For safety reasons, carry
out any adjustments when
the vehicle is not being
driven.
We would advise you not to recline
the seatbacks too far to ensure that
the effectiveness of the seat belts is
not reduced.
Nothing should be placed on the
floor (area in front of driver) as such
objects may slide under the pedal
during braking manoeuvres, thus
obstructing its use.
1
3
2
4
Page 25 of 239
front seatswith electric controls ........................................ (current page)
1.19
ENG_UD18878_3
Sièges avant à à commandes électriques (X95 - B95 - D95 - R\
enault)
ENG_NU_837-6_BDK95_Renault_1
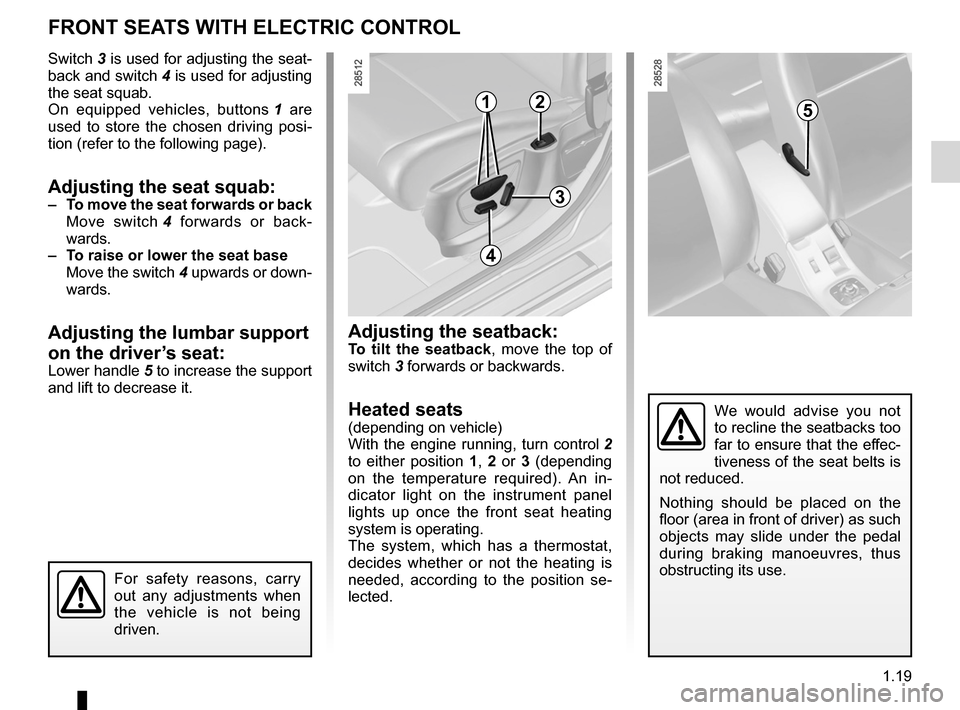
Switch 3 is used for adjusting the seat-
back and switch 4 is used for adjusting
the seat squab.
On equipped vehicles, buttons 1 are
used to store the chosen driving posi -
tion (refer to the following page).
Adjusting the seat squab:– To move the seat forwards or back
Move switch 4 forwards or back -
wards.
– To raise or lower the seat base
Move the switch 4 upwards or down -
wards.
Adjusting the lumbar support
on the driver’s seat:
Lower handle 5 to increase the support
and lift to decrease it.
For safety reasons, carry
out any adjustments when
the vehicle is not being
driven.
We would advise you not
to recline the seatbacks too
far to ensure that the effec-
tiveness of the seat belts is
not reduced.
Nothing should be placed on the
floor (area in front of driver) as such
objects may slide under the pedal
during braking manoeuvres, thus
obstructing its use.
Adjusting the seatback:To tilt the seatback , move the top of
switch 3 forwards or backwards.
Heated seats(depending on vehicle)
With the engine running, turn control 2
to either position 1, 2 or 3 (depending
on the temperature required). An in -
dicator light on the instrument panel
lights up once the front seat heating
system is operating.
The system, which has a thermostat,
decides whether or not the heating is
needed, according to the position se -
lected.
fRONT sEATs WITH ELEcTRIc cONTROL
2
4
3
15
Page 26 of 239
storing the driver’s seat position ...........(up to the end of the DU)
front seat driver’s position memory ................. (up to the end of the DU)
1.20
ENG_UD18876_1
Siège avant à commande électrique avec mémorisation (B95 - \
D95 - K95 - Renault)
ENG_NU_837-6_BDK95_Renault_1
fRONT sEATs WITH ELEcTRIc cONTROL WITH sTORAgE Of sETTINgs
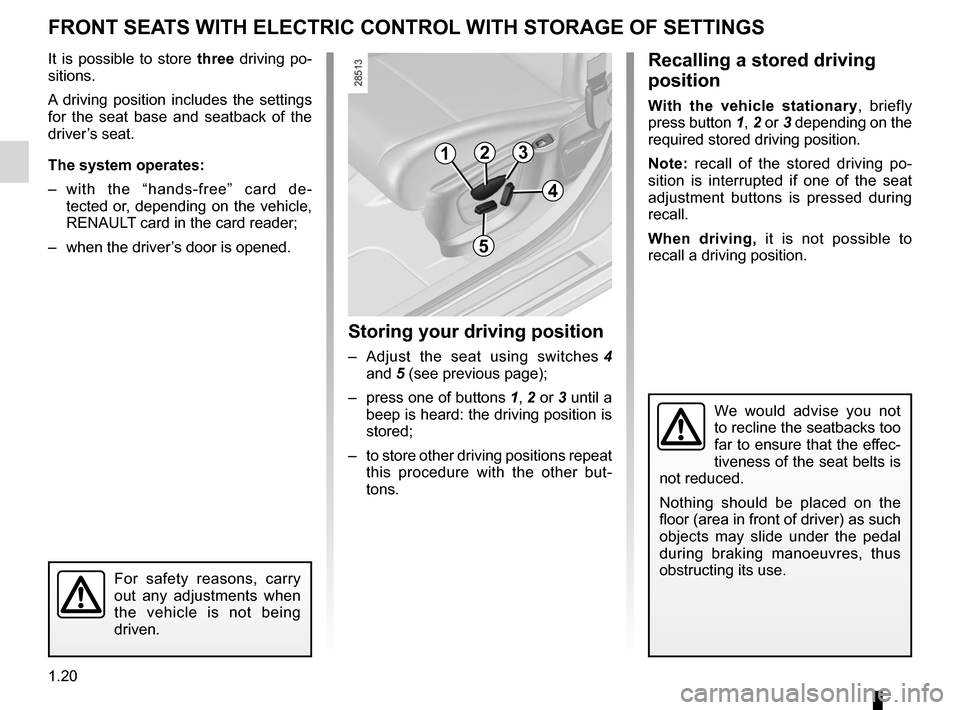
It is possible to store three driving po-
sitions.
A driving position includes the settings
for the seat base and seatback of the
driver’s seat.
The system operates:
– with the “hands-free” card de -
tected or, depending on the vehicle,
RENAULT card in the card reader;
– when the driver’s door is opened.
storing your driving position
– Adjust the seat using switches 4
and 5 (see previous page);
– press one of buttons 1, 2 or 3 until a
beep is heard: the driving position is
stored;
– to store other driving positions repeat
this procedure with the other but -
tons.
Recalling a stored driving
position
With the vehicle stationary , briefly
press button 1, 2 or 3 depending on the
required stored driving position.
Note: recall of the stored driving po -
sition is interrupted if one of the seat
adjustment buttons is pressed during
recall.
When driving, it is not possible to
recall a driving position.
123
4
5
We would advise you not
to recline the seatbacks too
far to ensure that the effec-
tiveness of the seat belts is
not reduced.
Nothing should be placed on the
floor (area in front of driver) as such
objects may slide under the pedal
during braking manoeuvres, thus
obstructing its use.
For safety reasons, carry
out any adjustments when
the vehicle is not being
driven.
Page 28 of 239
seat belts .............................................. (up to the end of the DU)
driving position settings ........................................... (up to the end of the DU)
adjusting your driving position ............................... (current page)
front seats adjustment ...................................... (up to the end of the DU)
1.22
ENG_UD17353_5
Ceintures de sécurité (X95 - B95 - D95 - Renault)
ENG_NU_837-6_BDK95_Renault_1
Jaune NoirNoir texte
Always wear your seat belt when trav-
elling in your vehicle. You must also
comply with the legislation of the par -
ticular country you are in.
Seat belts
I n c o r r e c t l y a d j u s t e d o r
twisted seat belts may
cause injuries in the event
of an accident.
Use one seat belt per person,
whether child or adult.
Even pregnant women should wear
a seat belt. In this case, ensure that
the lap belt is not exerting too much
pressure on the abdomen, but do
not allow any slack.
Before starting, first adjust your driv-
ing position, then ask all occupants
to adjust their seat belts to ensure
optimum protection.
Adjusting your driving
position
– s it well back in your seat (having
first removed your coat or jacket).
This is essential to ensure your back
is positioned correctly;
– adjust the distance between the
seat and the pedals. Your seat
should be as far back as possible
while still allowing you to depress
the clutch pedal fully. The seatback
should be adjusted so that your arms
are slightly bent when you hold the
steering wheel;
– adjust the position of your head -
rest. For maximum safety, your head
must be as close as possible to the
headrest;
– adjust the height of the seat. This
adjustment allows you to select the
seat position which offers you the
best possible view;
– adjust the position of the steering
wheel.
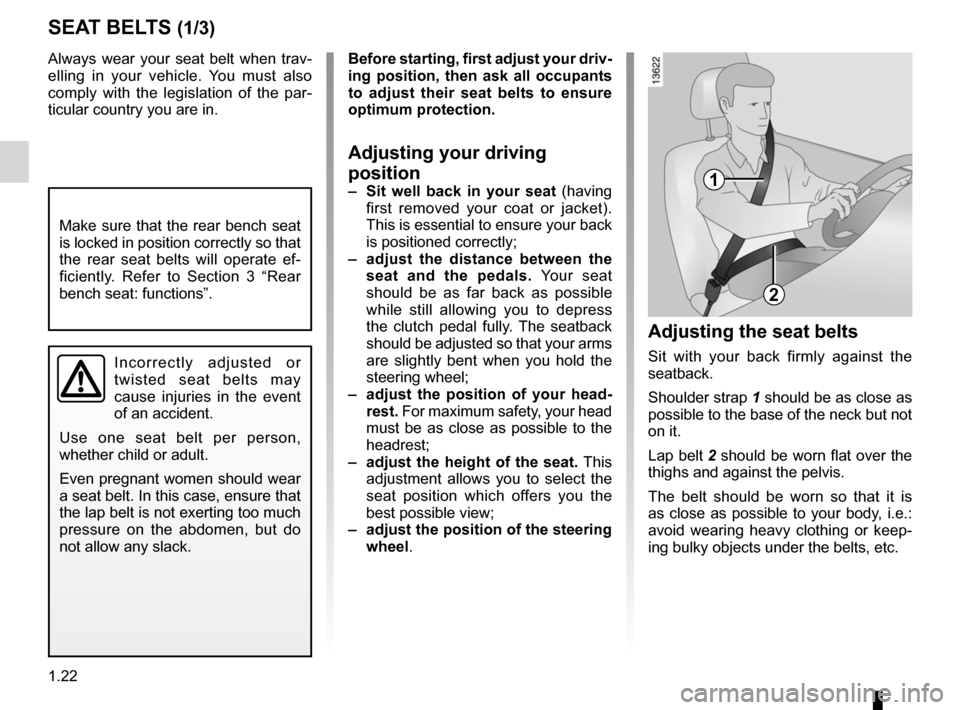
Adjusting the seat belts
Sit with your back firmly against the
seatback.
Shoulder strap 1 should be as close as
possible to the base of the neck but not
on it.
Lap belt 2 should be worn flat over the
thighs and against the pelvis.
The belt should be worn so that it is
as close as possible to your body, i.e.:
avoid wearing heavy clothing or keep -
ing bulky objects under the belts, etc.
sEAT BELTs (1/3)
1
2
Make sure that the rear bench seat
is locked in position correctly so that
the rear seat belts will operate ef -
ficiently. Refer to Section 3 “Rear
bench seat: functions”.