RENAULT SCENIC 2017 J95 / 3.G Repair Manual
Manufacturer: RENAULT, Model Year: 2017, Model line: SCENIC, Model: RENAULT SCENIC 2017 J95 / 3.GPages: 358, PDF Size: 10.42 MB
Page 61 of 358

1.55
X = Seat not suitable for fitting child seats ISOFIX.
IUF/IL = On equipped vehicles, seat which allows an approved “Universal/semi-u\
niversal” or “vehicle specific” child seat to be at-
tached using the ISOFIX system; check that it can be fitted.
i-U = Suitable for the i-Size restraint devices in the “universal” forwa\
rd-facing and backward-facing category.
(1) Raise the seat to the maximum and position it as far back as possible, \
tilting the seatback slightly (approximately 25°).
(2) If necessary, position the vehicle seat as far back as possible. Move the front seat\
as far forward as possible to install a re ar-
facing child seat, then move back the seat in front as far as it will go\
, although without allowing it to come into contact with the
child seat.
(3) In all situations, remove the rear headrest of the seat on which the chi\
ld seat is positioned. This must be done before fitting the
child seat. Please refer to the information on the “Rear headrests”\
in Section 3. Move the seat in front of the child forwards,
move the seatback forward to avoid contact between the seat and the chil\
d’s legs.
The size of the ISOFIX child seat is indicated by a letter:
– A, B and B1: for forward-facing seats in group 1 (9 to 18 kg);
– C and D: shell seat or rear-facing seats in group 0+ (less than 13 kg)\
or group 1 (9 to 18 kg);
– E: rear-facing shell seats in group 0 (less than 10 kg) or 0+ (less t\
han 13 kg);
– F and G: cots in group 0 (less than 10 kg).
CHILD SEATS: attachment using the ISOFIX system (3/6)
(4) RISK OF DEATH OR SERIOUS INJURY: before installing a child seat in the front passenger seat, make sure t\
he
airbag has been deactivated (refer to the information on “Child safe\
ty: deactivation, activation of the front passenger
airbag” in Section 1).
Page 62 of 358
1.56
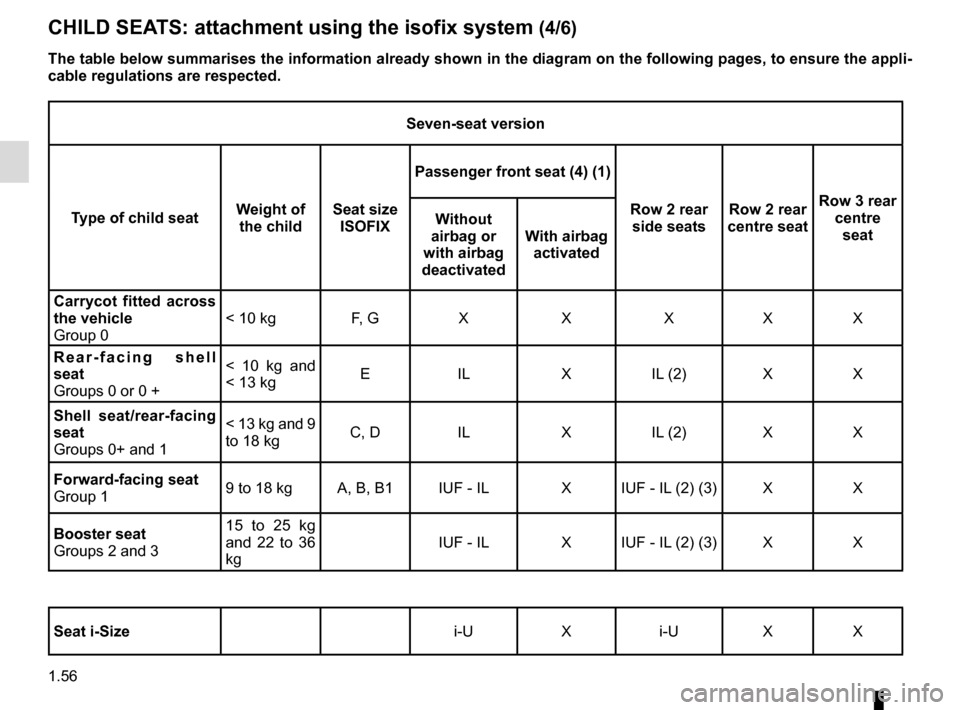
Seven-seat version
Type of child seat Weight of
the child Seat size
ISOFIX Passenger front seat (4) (1)
Row 2 rear side seats Row 2 rear
centre seat Row 3 rear
centre seat
Without
airbag or
with airbag
deactivated With airbag
activated
Carrycot fitted across
the vehicle
Group 0 < 10 kg F, G X X X X X
Rear-facing shell
seat
Groups 0 or 0 + < 10 kg and
< 13 kg
E IL X IL (2) X X
Shell seat/rear-facing
seat
Groups 0+ and 1 < 13 kg and 9
to 18 kg
C, D IL X IL (2) X X
Forward-facing seat
Group 1 9 to 18 kg A, B, B1 IUF - IL X IUF - IL (2) (3) X X
Booster seat
Groups 2 and 3 15 to 25 kg
and 22 to 36
kg
IUF - IL X IUF - IL (2) (3) X X
Seat i-Size i-U X i-U X X
CHILD SEATS: attachment using the isofix system (4/6)
The table below summarises the information already shown in the diagram \
on the following pages, to ensure the appli-
cable regulations are respected.
Page 63 of 358
1.57
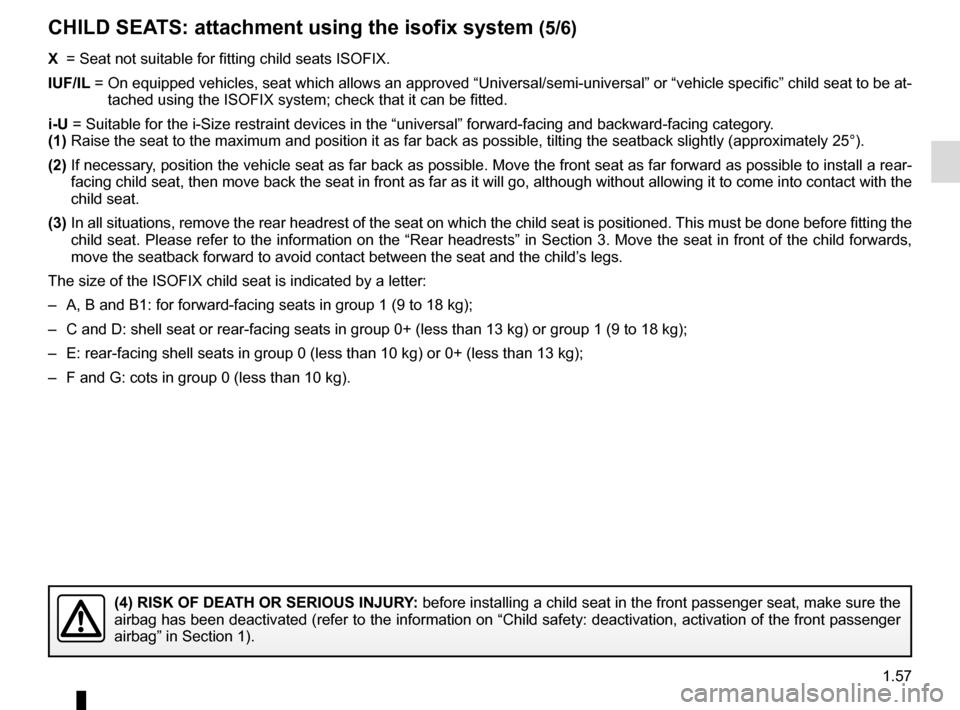
X = Seat not suitable for fitting child seats ISOFIX.
IUF/IL = On equipped vehicles, seat which allows an approved “Universal/semi-u\
niversal” or “vehicle specific” child seat to be at-
tached using the ISOFIX system; check that it can be fitted.
i-U = Suitable for the i-Size restraint devices in the “universal” forwa\
rd-facing and backward-facing category.
(1) Raise the seat to the maximum and position it as far back as possible, \
tilting the seatback slightly (approximately 25°).
(2) If necessary, position the vehicle seat as far back as possible. Move the front seat\
as far forward as possible to install a re ar-
facing child seat, then move back the seat in front as far as it will go\
, although without allowing it to come into contact with the
child seat.
(3) In all situations, remove the rear headrest of the seat on which the chi\
ld seat is positioned. This must be done before fitting the
child seat. Please refer to the information on the “Rear headrests”\
in Section 3. Move the seat in front of the child forwards,
move the seatback forward to avoid contact between the seat and the chil\
d’s legs.
The size of the ISOFIX child seat is indicated by a letter:
– A, B and B1: for forward-facing seats in group 1 (9 to 18 kg);
– C and D: shell seat or rear-facing seats in group 0+ (less than 13 kg)\
or group 1 (9 to 18 kg);
– E: rear-facing shell seats in group 0 (less than 10 kg) or 0+ (less t\
han 13 kg);
– F and G: cots in group 0 (less than 10 kg).
CHILD SEATS: attachment using the isofix system (5/6)
(4) RISK OF DEATH OR SERIOUS INJURY: before installing a child seat in the front passenger seat, make sure t\
he
airbag has been deactivated (refer to the information on “Child safe\
ty: deactivation, activation of the front passenger
airbag” in Section 1).
Page 64 of 358
1.58
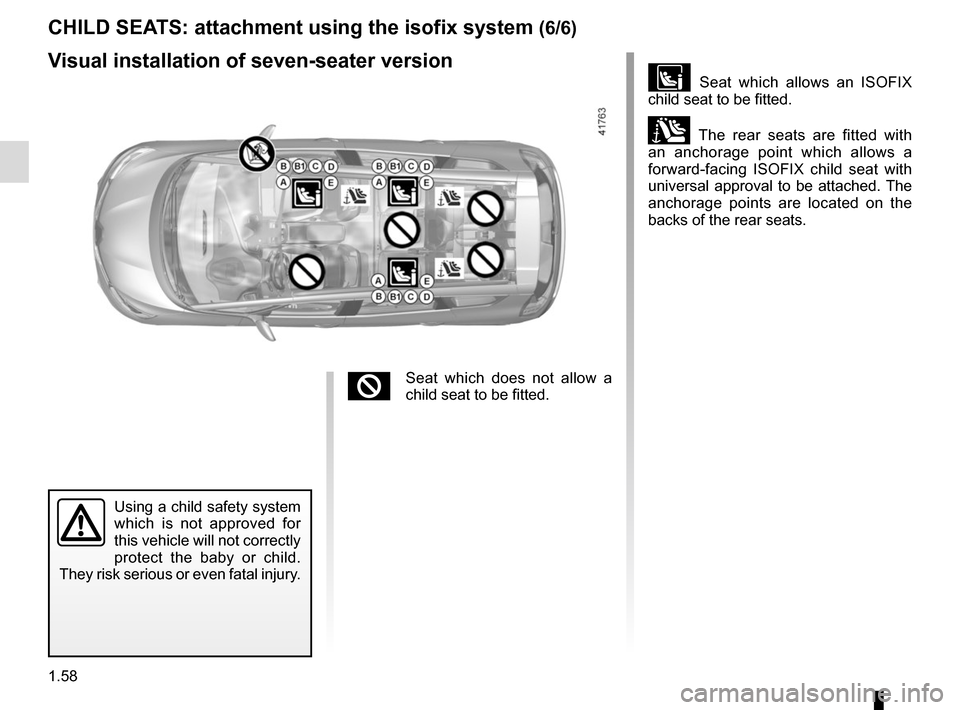
Visual installation of seven-seater version
Seat which allows an ISOFIX
child seat to be fitted.
± The rear seats are fitted with
an anchorage point which allows a
forward-facing ISOFIX child seat with
universal approval to be attached. The
anchorage points are located on the
backs of the rear seats.
Using a child safety system
which is not approved for
this vehicle will not correctly
protect the baby or child.
They risk serious or even fatal injury.
²Seat which does not allow a
child seat to be fitted.
CHILD SEATS: attachment using the isofix system (6/6)
Page 65 of 358
1.59
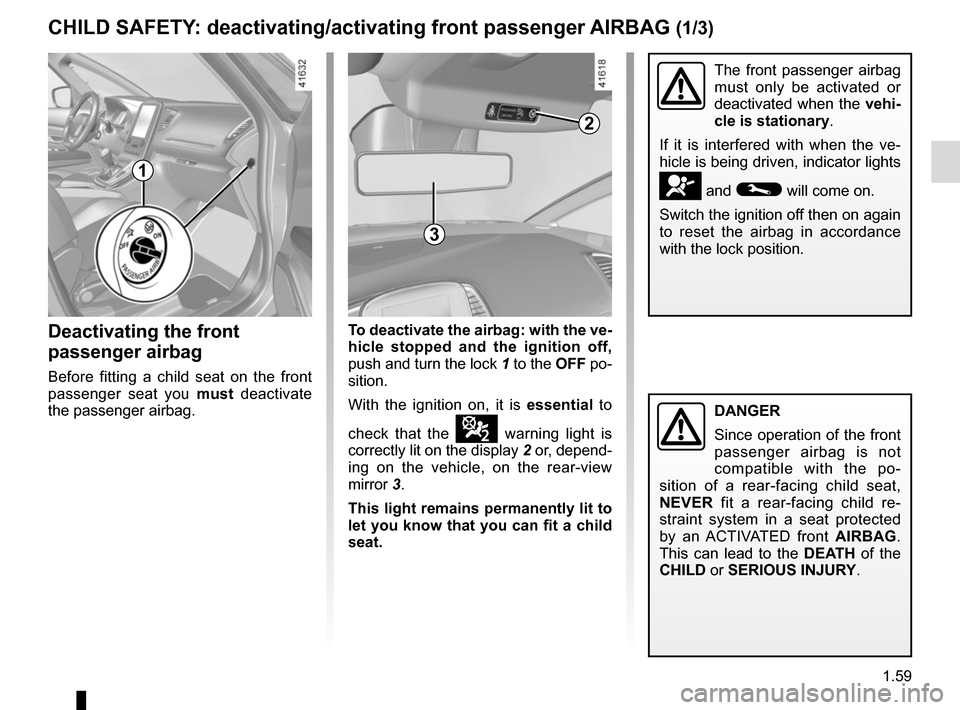
Deactivating the front
passenger airbag
Before fitting a child seat on the front
passenger seat you must deactivate
the passenger airbag.
The front passenger airbag
must only be activated or
deactivated when the vehi-
cle is stationary.
If it is interfered with when the ve-
hicle is being driven, indicator lights
å and © will come on.
Switch the ignition off then on again
to reset the airbag in accordance
with the lock position.
CHILD SAFETY: deactivating/activating front passenger AIRBAG (1/3)
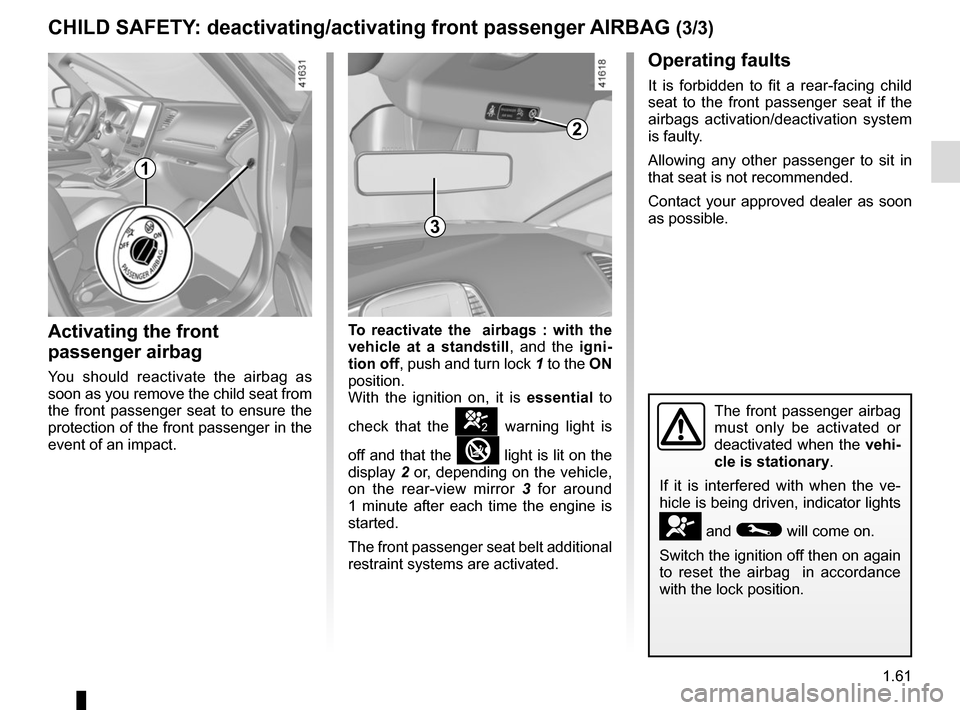
To deactivate the airbag: with the ve-
hicle stopped and the ignition off,
push and turn the lock 1 to the OFF po-
sition.
With the ignition on, it is essential to
check that the
¹ warning light is
correctly lit on the display 2 or, depend-
ing on the vehicle, on the rear-view
mirror 3.
This light remains permanently lit to
let you know that you can fit a child
seat.
DANGER
Since operation of the front
passenger airbag is not
compatible with the po-
sition of a rear-facing child seat,
NEVER fit a rear-facing child re-
straint system in a seat protected
by an ACTIVATED front AIRBAG. This can lead to the DEATH of the
CHILD or SERIOUS INJURY.
1
2
3
Page 66 of 358
1.60
4
A
A
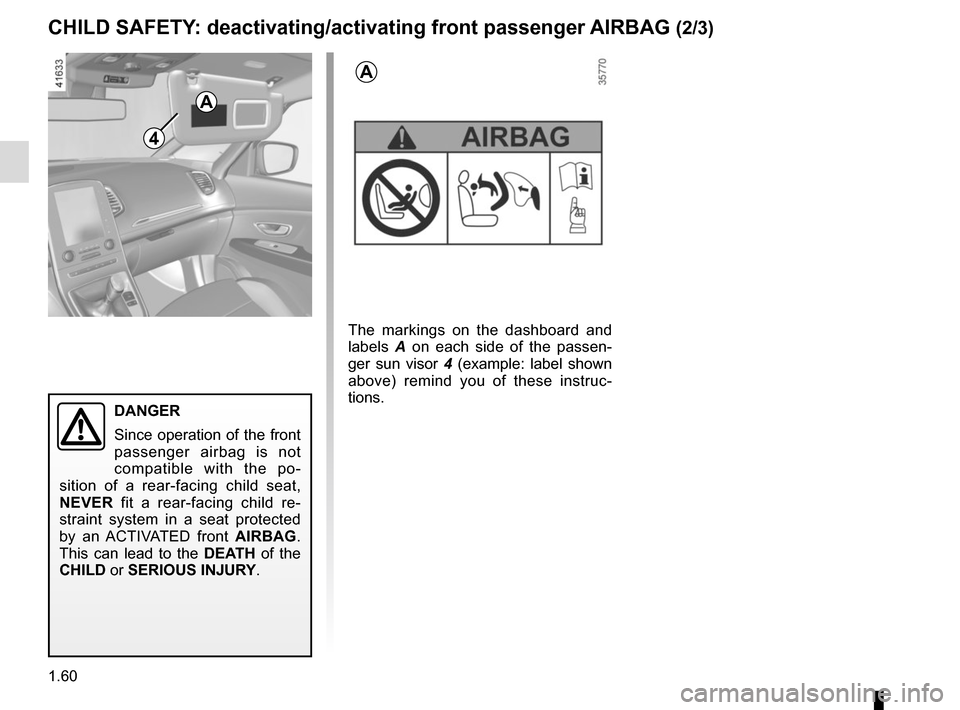
The markings on the dashboard and
labels A on each side of the passen-
ger sun visor 4 (example: label shown
above) remind you of these instruc-
tions.
CHILD SAFETY: deactivating/activating front passenger AIRBAG (2/3)
DANGER
Since operation of the front
passenger airbag is not
compatible with the po-
sition of a rear-facing child seat,
NEVER fit a rear-facing child re-
straint system in a seat protected
by an ACTIVATED front AIRBAG.
This can lead to the DEATH of the
CHILD or SERIOUS INJURY.
Page 67 of 358
1.61
CHILD SAFETY: deactivating/activating front passenger AIRBAG (3/3)
Operating faults
It is forbidden to fit a rear-facing child
seat to the front passenger seat if the
airbags activation/deactivation system
is faulty.
Allowing any other passenger to sit in
that seat is not recommended.
Contact your approved dealer as soon
as possible.
Activating the front
passenger airbag
You should reactivate the airbag as
soon as you remove the child seat from
the front passenger seat to ensure the
protection of the front passenger in the
event of an impact.To reactivate the
airbags : with the
vehicle at a standstill, and the igni-
tion off , push and turn lock 1 to the ON
position.
With the ignition on, it is essential to
check that the
] warning light is
off and that the
light is lit on the
display 2 or, depending on the vehicle,
on the rear-view mirror 3 for around
1 minute after each time the engine is
started.
The front passenger seat belt additional
restraint systems are activated.
The front passenger airbag
must only be activated or
deactivated when the vehi-
cle is stationary.
If it is interfered with when the ve-
hicle is being driven, indicator lights
å and © will come on.
Switch the ignition off then on again
to reset the airbag in accordance
with the lock position.
1
2
3
Page 68 of 358
1.62
DRIVER’S POSITION, LEFT-HAND DRIVE (1/2)
5489121
1429
1013711
28
62212
25
3
2623
16
17
1818
15
11
19
24
16
17
20
21
22
Page 69 of 358
1.63
DRIVER’S POSITION, LEFT-HAND DRIVE (2/2)
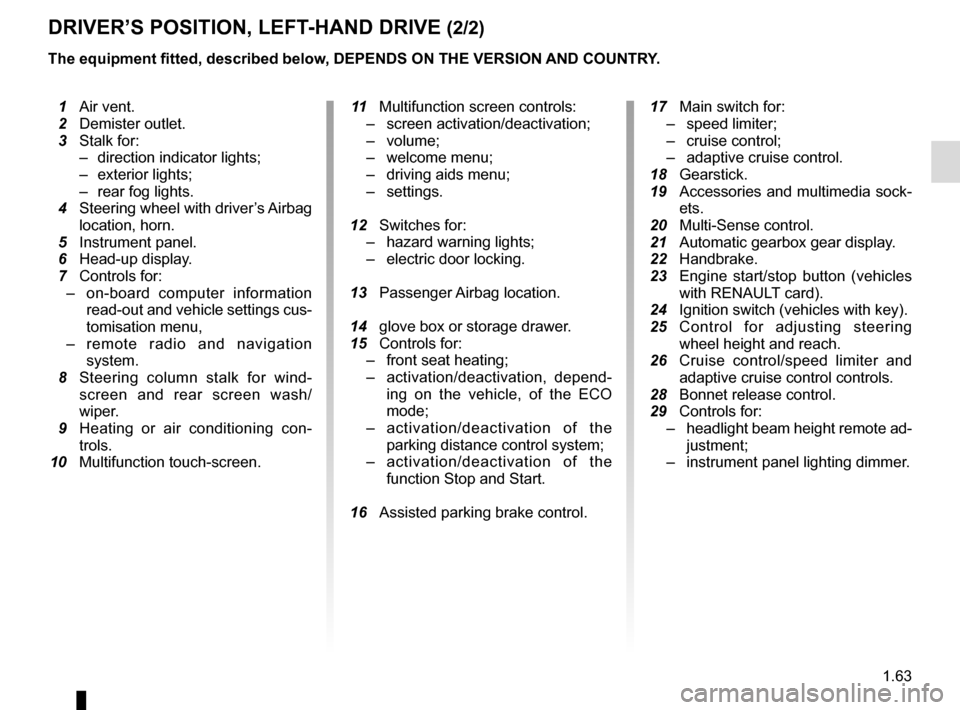
The equipment fitted, described below, DEPENDS ON THE VERSION AND COUNTRY.
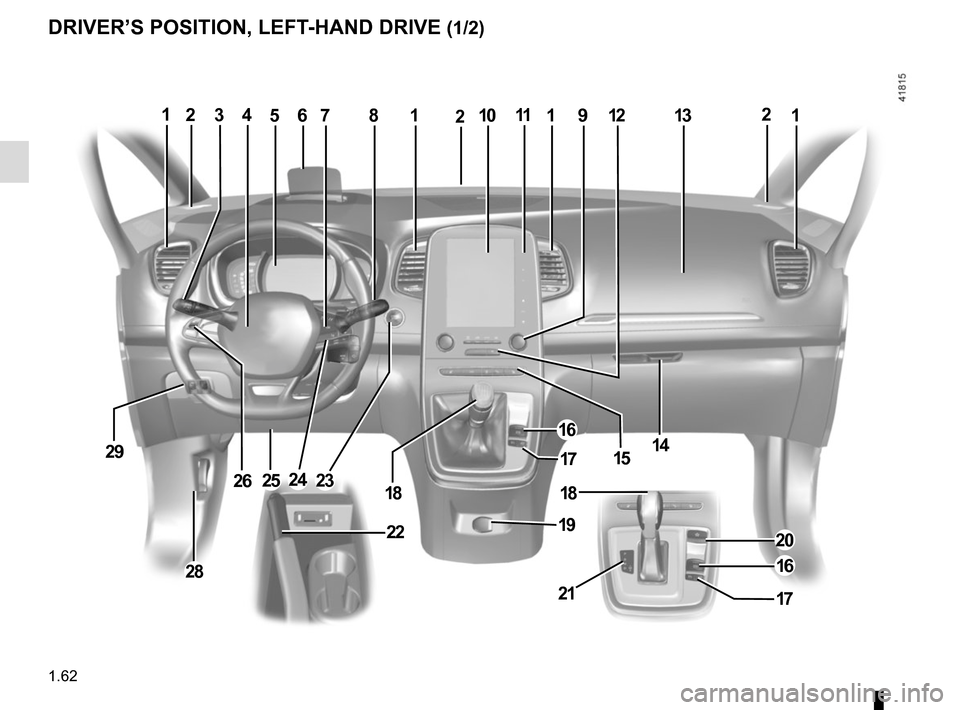
1 Air vent.
2 Demister outlet.
3 Stalk for:
– direction indicator lights;
– exterior lights;
– rear fog lights.
4 Steering wheel with driver’s Airbag
location, horn.
5 Instrument panel.
6 Head-up display.
7 Controls for:
– on-board computer information
read-out and vehicle settings cus-
tomisation menu,
– remote radio and navigation
system.
8 Steering column stalk for wind-
screen and rear screen wash/
wiper.
9 Heating or air conditioning con-
trols.
10 Multifunction touch-screen.
11 Multifunction screen controls:
– screen activation/deactivation;
– volume;
– welcome menu;
– driving aids menu;
– settings.
12 Switches for:
– hazard warning lights;
– electric door locking.
13 Passenger Airbag location.
14 glove box or storage drawer.
15 Controls for:
– front seat heating;
– activation/deactivation, depend-
ing on the vehicle, of the ECO
mode;
– activation/deactivation of the
parking distance control system;
– activation/deactivation of the
function Stop and Start.
16 Assisted parking brake control.
17 Main switch for:
– speed limiter;
– cruise control;
– adaptive cruise control.
18 Gearstick.
19 Accessories and multimedia sock-
ets.
20 Multi-Sense control.
21
Automatic gearbox gear display.
22 Handbrake.
23 Engine start/stop button (vehicles
with RENAUL
T card).
24 Ignition switch (vehicles with key).
25 Control for adjusting steering
wheel height and reach.
26 Cruise control/speed limiter and
adaptive cruise control controls.
28 Bonnet release control.
29 Controls for:
– headlight beam height remote ad-
justment;
– instrument panel lighting dimmer.
Page 70 of 358
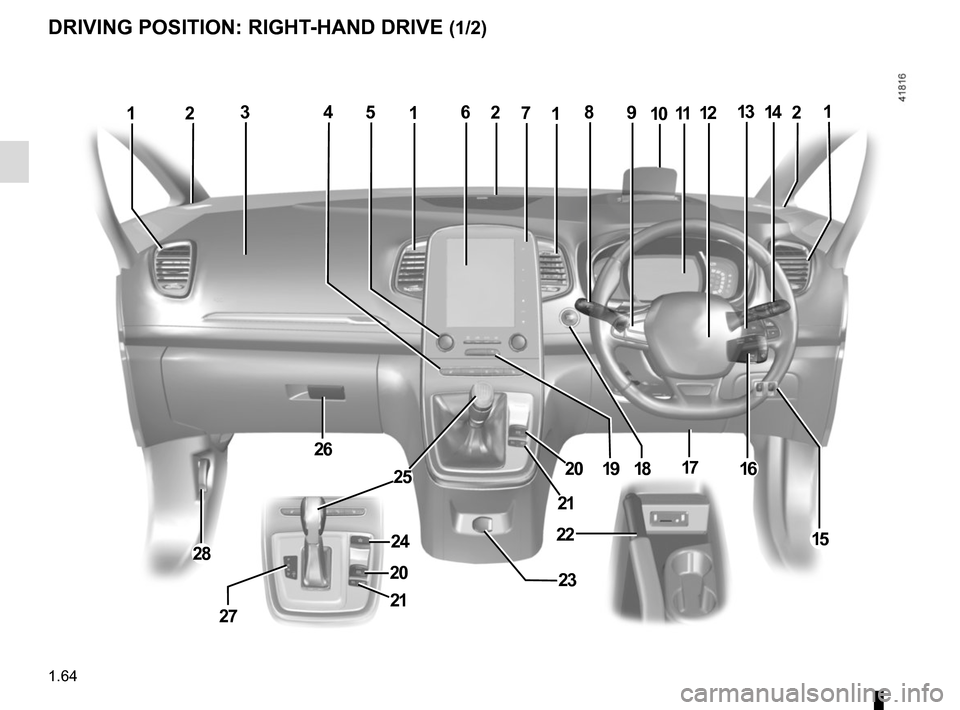
1.64
DRIVING POSITION: RIGHT-HAND DRIVE (1/2)
281112142
26
19
23
7313119126
1617
2815
54
18
1
27
10
20
21
24
20
25
21
22