spare wheel RENAULT TWINGO 2012 2.G Owners Manual
[x] Cancel search | Manufacturer: RENAULT, Model Year: 2012, Model line: TWINGO, Model: RENAULT TWINGO 2012 2.GPages: 220, PDF Size: 6.73 MB
Page 148 of 220
tyre pressure......................................... (up to the end of the DU)
tyre pressures ....................................... (up to the end of the DU)
tyres ...................................................... (up to the end of the DU)
4.10
ENG_UD29222_2
Pression de gonflage des pneumatiques (X44 - Renault)
ENG_NU_952-4_X44_Renault_4
Jaune NoirNoir texte
Tyre pressure
TyRE pRESSURE (1/2)
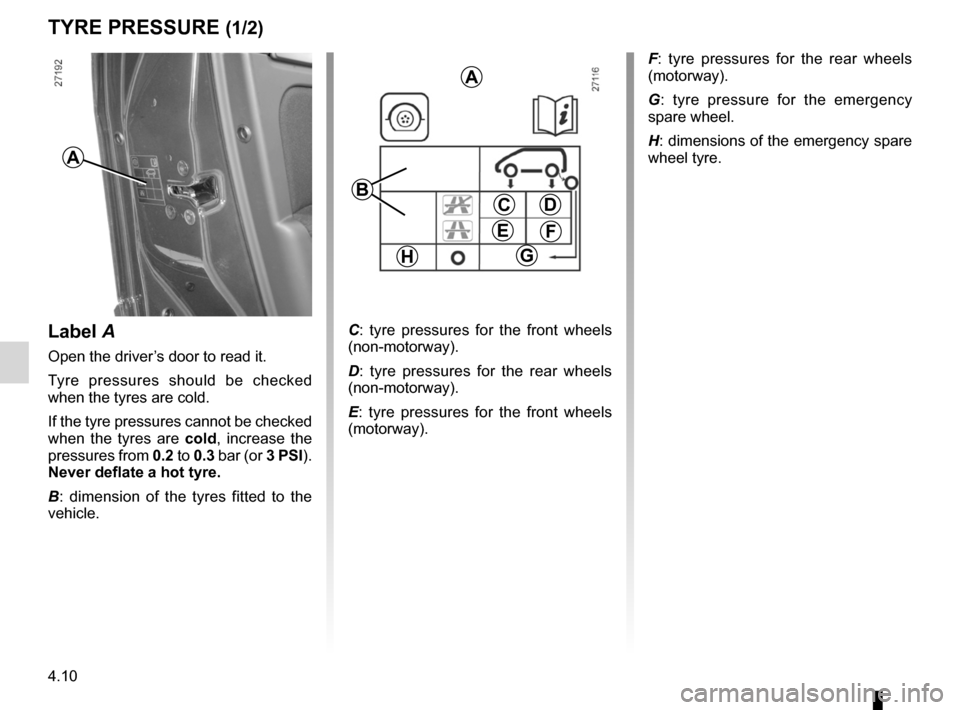
Label A
Open the driver’s door to read it.
Tyre pressures should be checked
when the tyres are cold.
If the tyre pressures cannot be checked
when the tyres are cold, increase the
pressures from 0.2 to 0.3 bar (or 3 pSI).
Never deflate a hot tyre.
B : dimension of the tyres fitted to the
vehicle. C
: tyre pressures for the front wheels
(non-motorway).
D : tyre pressures for the rear wheels
(non-motorway).
E : tyre pressures for the front wheels
(motorway).
CD
FE
G
A
h
A
B
F : tyre pressures for the rear wheels
(motorway).
G : tyre pressure for the emergency
spare wheel.
H: dimensions of the emergency spare
wheel tyre.
Page 156 of 220
emergency spare wheel ....................... (up to the end of the DU)
puncture ................................................ (up to the end of the DU)
jack ....................................................... (up to the end of the DU)
5.2
ENG_UD24731_4
Crevaison (X44 - Renault)
ENG_NU_952-4_X44_Renault_5
Puncture
Puncture
In the event of a puncture,
depending on the vehicle,
you will have:
An emergency spare wheel or tyre in -
flation kit (refer to the information on the
following pages).
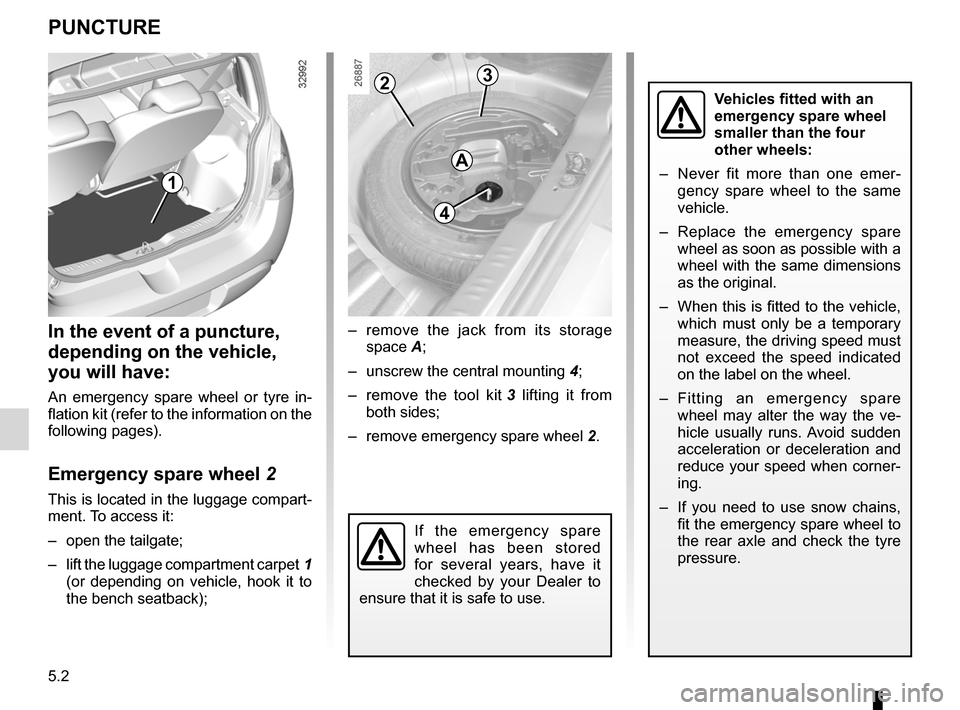
emergency spare wheel 2
This is located in the luggage compart-
ment. To access it:
– open the tailgate;
– lift the luggage compartment carpet 1
(or depending on vehicle, hook it to
the bench seatback);
1
2
4
3
A
– remove the jack from its storage
space A;
– unscrew the central mounting 4;
– remove the tool kit 3 lifting it from
both sides;
– remove emergency spare wheel 2.
If the emergency spare
wheel has been stored
for several years, have it
checked by your Dealer to
ensure that it is safe to use.
Vehicles fitted with an
emergency spare wheel
smaller than the four
other wheels:
– Never fit more than one emer -
gency spare wheel to the same
vehicle.
– Replace the emergency spare
wheel as soon as possible with a
wheel with the same dimensions
as the original.
– When this is fitted to the vehicle,
which must only be a temporary
measure, the driving speed must
not exceed the speed indicated
on the label on the wheel.
– Fitting an emergency spare
wheel may alter the way the ve -
hicle usually runs. Avoid sudden
acceleration or deceleration and
reduce your speed when corner-
ing.
– If you need to use snow chains,
fit the emergency spare wheel to
the rear axle and check the tyre
pressure.
Page 160 of 220
hubcap tool ............................................................ (current page)
wheelbrace ............................................................ (current page)
emergency spare wheel ........................................ (current page)
towing hitch ............................................................ (current page)
5.6
ENG_UD24733_5
Bloc outils (X44 - Renault)
ENG_NU_952-4_X44_Renault_5
Tool kit
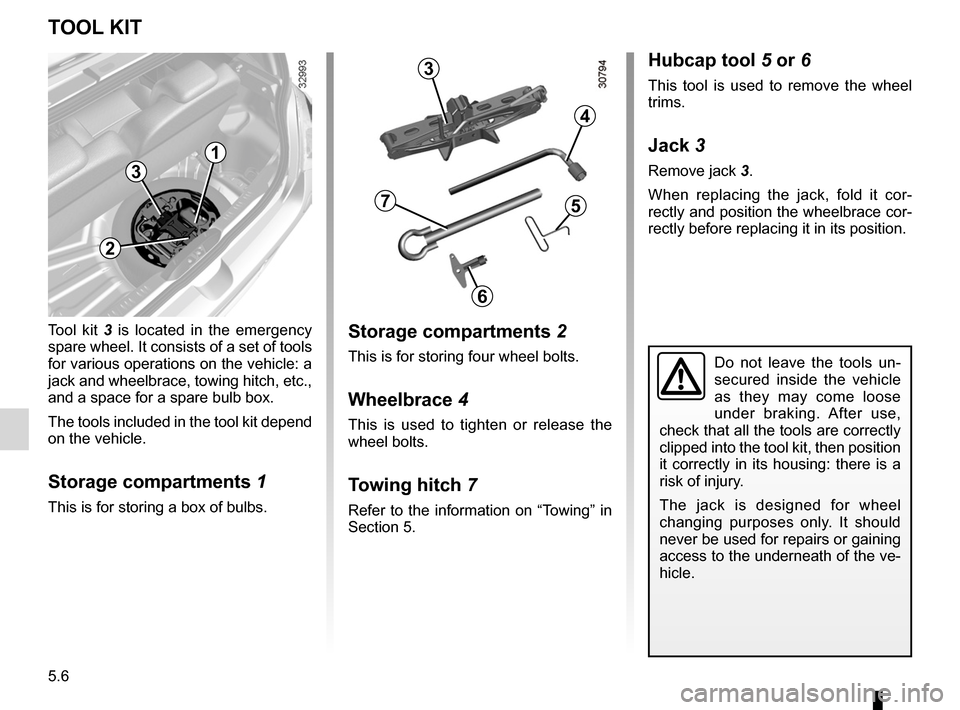
Tool kit 3 is located in the emergency
spare wheel. It consists of a set of tools
for various operations on the vehicle: a
jack and wheelbrace, towing hitch, etc.,
and a space for a spare bulb box.
The tools included in the tool kit depend
on the vehicle.
Storage compartments 1
This is for storing a box of bulbs.
Storage compartments 2
This is for storing four wheel bolts.
Wheelbrace 4
This is used to tighten or release the
wheel bolts.
t owing hitch 7
Refer to the information on “Towing” in
Section 5.
Hubcap tool 5 or 6
This tool is used to remove the wheel
trims.
Jack 3
Remove jack 3.
When replacing the jack, fold it cor -
rectly and position the wheelbrace cor-
rectly before replacing it in its position.
Do not leave the tools un -
secured inside the vehicle
as they may come loose
under braking. After use,
check that all the tools are correctly
clipped into the tool kit, then position
it correctly in its housing: there is a
risk of injury.
The jack is designed for wheel
changing purposes only. It should
never be used for repairs or gaining
access to the underneath of the ve-
hicle.
t OOL KIt
1
3
2
3
4
5
6
7
Page 163 of 220
JauneNoirNoir texte
5.9
ENG_UD24734_6
Changement de roue (X44 - Renault)
ENG_NU_952-4_X44_Renault_5
Anti-theft bolts
If you use anti-theft bolts, fit these
nearest the valve (otherwise it may
not be possible to fit the wheel trim).
If the vehicle is parked on
the hard shoulder, you must
warn other road users of
your vehicle’s presence
with a warning triangle or with other
devices as per the legislation apply-
ing to the country you are in.
If you have a puncture, re -
place the wheel as soon as
possible.
A tyre which has been punc-
tured should always be inspected
(and repaired, where possible) by a
specialist.
Fit the emergency spare wheel on the
central hub and turn it to locate the
mounting holes in the wheel and the
hub.
If bolts are supplied with the emergency
spare wheel, only use these bolts for
the emergency spare wheel. Tighten
the bolts, checking that the wheel is
correctly positioned on its hub and un-
screw the jack.
With the wheel on the ground, tighten
the bolts fully and have the tightness
of the bolts checked (tightening torque:
105 Nm) and the emergency spare
wheel pressure checked as soon as
possible.
cHAngIng A WHeeL (2/2)
Page 165 of 220
JauneNoirNoir texte
5.11
ENG_UD19374_3
Pneumatiques (X44 - Renault)
ENG_NU_952-4_X44_Renault_5
tYreS (2/3)
t yre pressures
Tyre pressures must be adhered to (in-
cluding the emergency spare wheel).
Pressures must be checked at least
once a month and always before a
long journey (refer to the information on
“Tyre pressures”). Pressures should be checked when the
tyres are cold; ignore higher pressures
which may be reached in hot weather
or following a fast journey.
If tyre pressures cannot be checked
when the tyres are
cold, the normal
pressures must be increased by 0.2 to
0.3 bar (or 3 PSI).
never deflate a hot tyre.
note: a label (depending on country or
model) fixed to the edge or frame of the
driver’s door gives the recommended
tyre pressures.
Fitting new tyres
changing wheels around
This practice is not recommended.
emergency spare wheel
Refer to the information on the
“Emergency spare wheel” and in -
structions on “Changing a wheel” in
Section 5.
For safety reasons, this op-
eration must be carried out
by a specialist.
Fitting different tyres may
change your vehicle as follows:
– it may mean that your vehicle no
longer conforms to current regu-
lations;
– it may change the way it handles
when cornering;
– it may cause the steering to be
heavy;
– it may affect the use of snow
chains.
Please be aware that a
missing valve cap can
make the tyres less airtight
and lead to pressure loss.
Always use valve caps identical to
those fitted originally and tighten
them fully.
Incorrect tyre pressures
lead to abnormal tyre wear
and unusually hot running.
These are factors which
may seriously affect safety and lead
to:
– poor road holding;
– the risk of blow-outs or of throw-
ing a tread.
Tyre pressures depend on the load
and the driving speed. Adjust the
pressures according to the condi -
tions of use. (Refer to the informa -
tion on “Tyre pressures”).
Page 181 of 220
fuses ..................................................... (up to the end of the DU)
5.27
ENG_UD24741_10
Fusibles (X44 - Renault)
ENG_NU_952-4_X44_Renault_5
Fuses
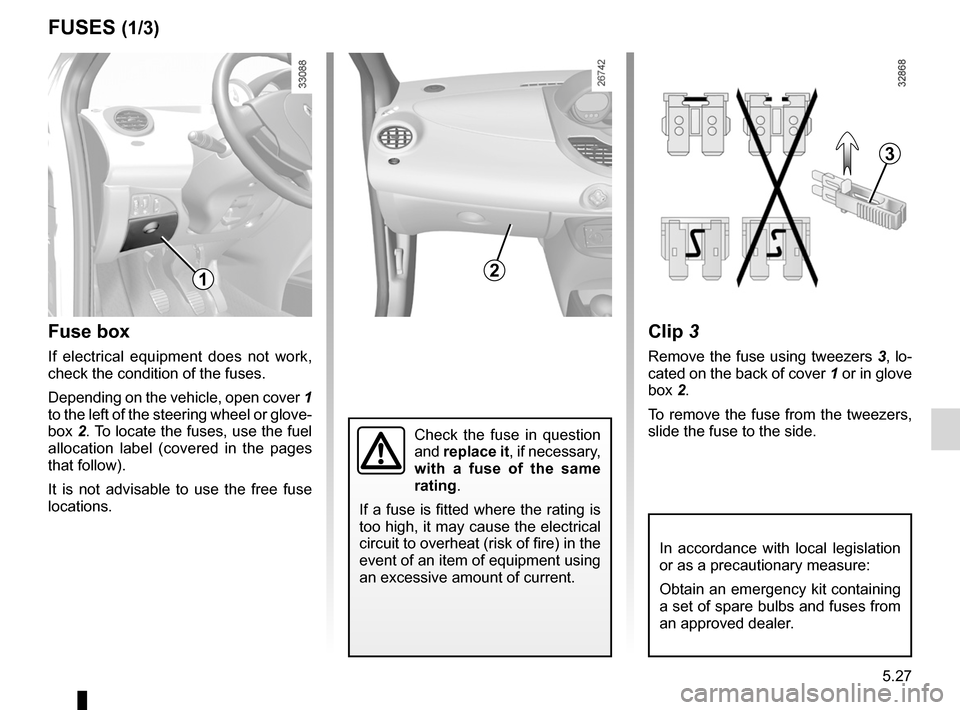
Fuse box
If electrical equipment does not work,
check the condition of the fuses.
Depending on the vehicle, open cover 1
to the left of the steering wheel or glove -
box 2. To locate the fuses, use the fuel
allocation label (covered in the pages
that follow).
It is not advisable to use the free fuse
locations.
FuSeS (1/3)
In accordance with local legislation
or as a precautionary measure:
Obtain an emergency kit containing
a set of spare bulbs and fuses from
an approved dealer.
clip 3
Remove the fuse using tweezers 3, lo-
cated on the back of cover 1 or in glove
box 2.
To remove the fuse from the tweezers,
slide the fuse to the side.
2
3
1
Check the fuse in question
and replace it, if necessary,
with a fuse of the same
rating.
If a fuse is fitted where the rating is
too high, it may cause the electrical
circuit to overheat (risk of fire) in the
event of an item of equipment using
an excessive amount of current.
Page 214 of 220
7.2
FRA_UD30806_17
Index (X44 - Renault)
ENG_NU_952-4_X44_Renault_7
Jaune NoirNoir texte
AlphAbeticAl index (2/5)
emergency braking ................................................ 2.12 → 2.14
emergency key .................................................................... 1.2
emergency spare wheel ............................................... 5.2, 5.6
engine technical specifications .................................................. 6.4
engine immobiliser (switch) ................................................. 2.2
engine oil ................................................................... 4.4 → 4.9
engine oil capacity ..................................................... 4.4 → 4.6
engine oil level .................................................... 4.4, 4.7 → 4.9
engine specifications ........................................................... 6.4
environment ....................................................................... 2.11
ESP: Electronic Stability Program .........................2.12 → 2.14
external temperature .............................................. 1.56 – 1.57
F
faults operating faults ................................................ 5.35 → 5.39
filter air filter .................................................................... 2.8, 4.9
diesel filter ............................................................... 2.8, 4.9
oil filter ........................................................................... 4.6
passenger compartment filter ........................................ 4.9
fitting a radio ........................................................... 5.32 – 5.33
front lights changing bulbs .................................................. 5.14 – 5.15
front seat adjustment ......................................................... 1.13
front seats ............................................................... 1.13 – 1.14
fuel advice on fuel economy ..................................... 2.8 → 2.10
filling ............................................................................. 1.66
grade .............................................................................. 6.4
fuel economy ........................................................... 2.8 → 2.10
fuel grade ........................................................................... 1.65
fuel level ............................................................................ 1.48fuel tank
.................................................................. 1.65 – 1.66
fuel tank capacity ............................................................... 1.65
fuses ...................................................................... 5.27 → 5.29
G
gear lever ............................................................................. 2.6
h
handbrake ............................................................................ 2.7
hands-free telephone integrated control ............................ 3.40
hazard warning lights signal .............................................. 1.39
headlight beam adjustment ............................................... 1.61
headrest .................................................................... 1.12, 3.29
heated seats ...................................................................... 1.13
heating and air conditioning system ........................ 3.7 → 3.17
heating system ........................................................ 3.4 → 3.18
horn ................................................................................... 2.24
hubcap tool .......................................................................... 5.6
i
ignition switch ...................................................................... 2.2
indicators ........................................................................... 1.48
indicators: exterior temperature indicator ...................................... 1.56
instrument panel .................................................... 1.44 → 1.53
interior lighting: changing bulbs .................................................. 5.22 – 5.23
J
jack ...................................................................................... 5.2
K
keys ............................................................................ 1.2 – 1.3