boot RENAULT TWINGO 2017 3.G Owners Manual
[x] Cancel search | Manufacturer: RENAULT, Model Year: 2017, Model line: TWINGO, Model: RENAULT TWINGO 2017 3.GPages: 228, PDF Size: 6.76 MB
Page 10 of 228
1.4
1
2
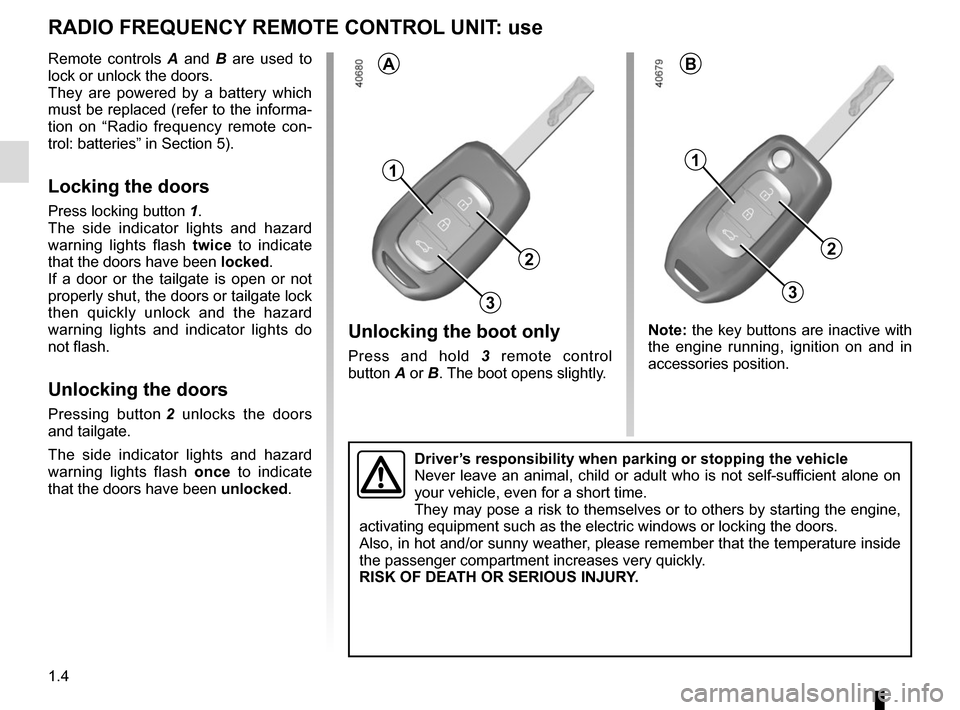
Unlocking the boot only
Press and hold 3 remote control
button A or B. The boot opens slightly.
RADIO FREQUENCY REMOTE CONTROL UNIT: use
Remote controls A and B are used to
lock or unlock the doors.
They are powered by a battery which
must be replaced (refer to the informa-
tion on “Radio frequency remote con-
trol: batteries” in Section 5).
Locking the doors
Press locking button 1.
The side indicator lights and hazard
warning lights flash twice to indicate
that the doors have been locked.
If a door or the tailgate is open or not
properly shut, the doors or tailgate lock
then quickly unlock and the hazard
warning lights and indicator lights do
not flash.
Unlocking the doors
Pressing button 2 unlocks the doors
and tailgate.
The side indicator lights and hazard
warning lights flash once to indicate
that the doors have been unlocked.
BA
Note: the key buttons are inactive with
the engine running, ignition on and in
accessories position.
3
1
2
3
Driver’s responsibility when parking or stopping the vehicle
Never leave an animal, child or adult who is not self-sufficient alone on
your vehicle, even for a short time.
They may pose a risk to themselves or to others by starting the engine, \
activating equipment such as the electric windows or locking the doors.
Also, in hot and/or sunny weather, please remember that the temperature inside
the passenger compartment increases very quickly.
RISK OF DEATH OR SERIOUS INJURY.
Page 13 of 228
1.7
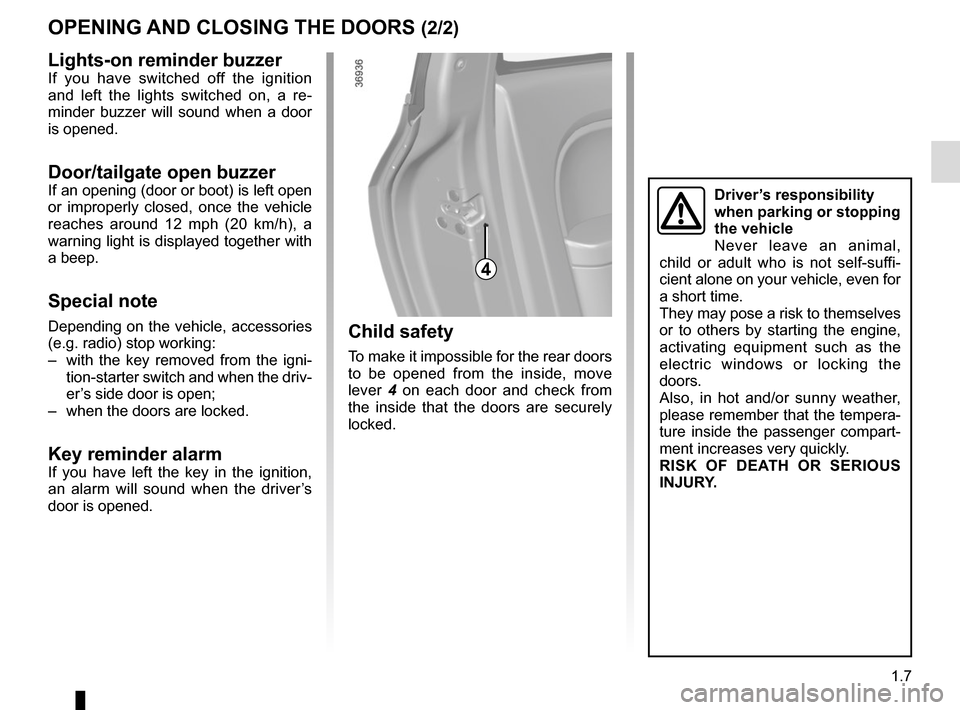
Child safety
To make it impossible for the rear doors
to be opened from the inside, move
lever 4 on each door and check from
the inside that the doors are securely
locked.
OPENING AND CLOSING THE DOORS (2/2)
Driver’s responsibility
when parking or stopping
the vehicle
Never leave an animal,
child or adult who is not self-suffi-
cient alone on your vehicle, even for
a short time.
They may pose a risk to themselves
or to others by starting the engine,
activating equipment such as the
electric windows or locking the
doors.
Also, in hot and/or sunny weather,
please remember that the tempera-
ture inside the passenger compart-
ment increases very quickly.
RISK OF DEATH OR SERIOUS
INJURY.
4
Lights-on reminder buzzerIf you have switched off the ignition
and left the lights switched on, a re-
minder buzzer will sound when a door
is opened.
Door/tailgate open buzzerIf an opening (door or boot) is left open
or improperly closed, once the vehicle
reaches around 12 mph (20 km/h), a
warning light is displayed together with
a beep.
Special note
Depending on the vehicle, accessories
(e.g. radio) stop working:
– with the key removed from the igni- tion-starter switch and when the driv-
er’s side door is open;
– when the doors are locked.
Key reminder alarmIf you have left the key in the ignition,
an alarm will sound when the driver’s
door is opened.
Page 14 of 228
1.8
Locking/unlocking from the
outside
This is done using the remote con-
trol: please refer to the information on
“Radio frequency remote control: gen-
eral information” in Section 1.
In some cases, the radio frequency
remote control may not work:
– if the remote control battery is worn or flat, etc.
– if appliances are operating on the same frequency as the remote con-
trol (mobile phone, etc.);
– vehicle located in a high electromag- netic radiation zone.
It is then possible:
– use the radio frequency remote con- trol key or the emergency key to
unlock the front left-hand door;
– to use the interior door locking/un- locking control (refer to the following
pages).
LOCKING/UNLOCKING THE DOORS (1/2)
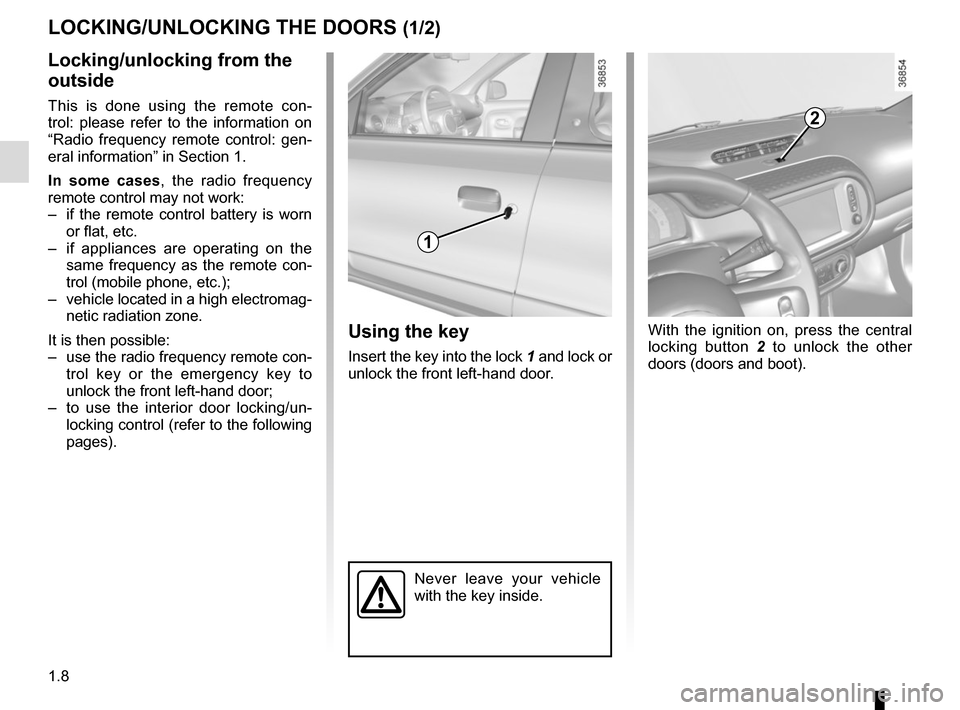
With the ignition on, press the central
locking button 2 to unlock the other
doors (doors and boot).Using the key
Insert the key into the lock 1 and lock or
unlock the front left-hand door.
2
Never leave your vehicle
with the key inside.
1
Page 15 of 228
1.9
LOCKING/UNLOCKING THE DOORS (2/2)
Door and tailgate status
indicator
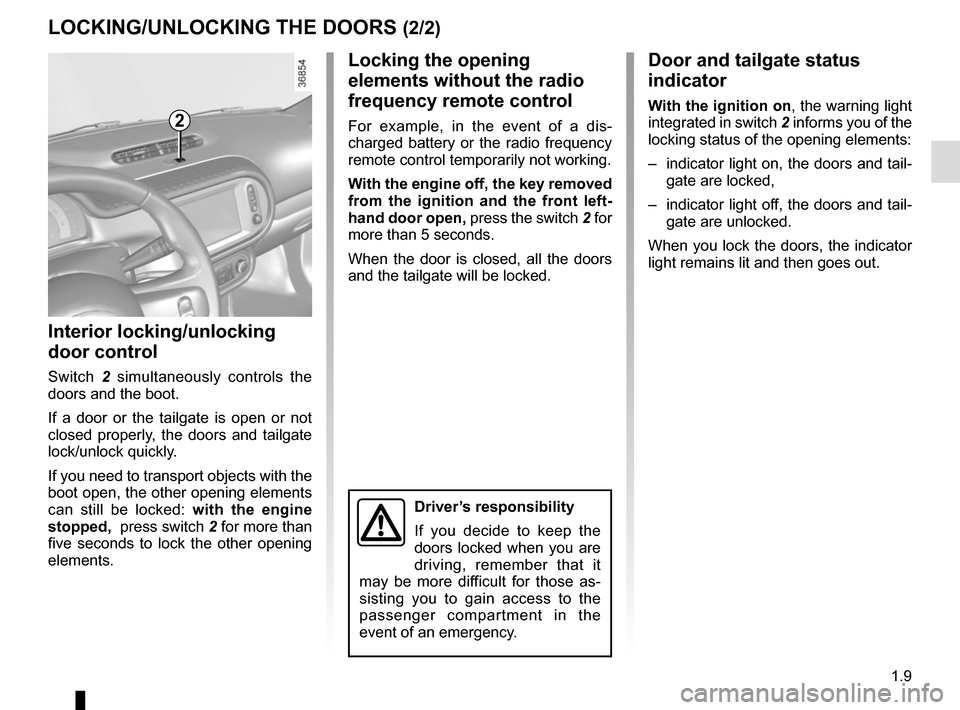
With the ignition on, the warning light
integrated in switch 2 informs you of the
locking status of the opening elements:
– indicator light on, the doors and tail- gate are locked,
– indicator light off, the doors and tail- gate are unlocked.
When you lock the doors, the indicator
light remains lit and then goes out.
Locking the opening
elements without the radio
frequency remote control
For example, in the event of a dis-
charged battery or the radio frequency
remote control temporarily not working.
With the engine off, the key removed
from the ignition and the front left-
hand door open, press the switch 2 for
more than 5 seconds.
When the door is closed, all the doors
and the tailgate will be locked.
Interior locking/unlocking
door control
Switch 2 simultaneously controls the
doors and the boot.
If a door or the tailgate is open or not
closed properly, the doors and tailgate
lock/unlock quickly.
If you need to transport objects with the
boot open, the other opening elements
can still be locked: with the engine
stopped, press switch 2 for more than
five seconds to lock the other opening
elements.
2
Driver’s responsibility
If you decide to keep the
doors locked when you are
driving, remember that it
may be more difficult for those as-
sisting you to gain access to the
passenger compartment in the
event of an emergency.
Page 33 of 228
1.27
CHILD SAFETY: choosing a child seat mounting (2/3)
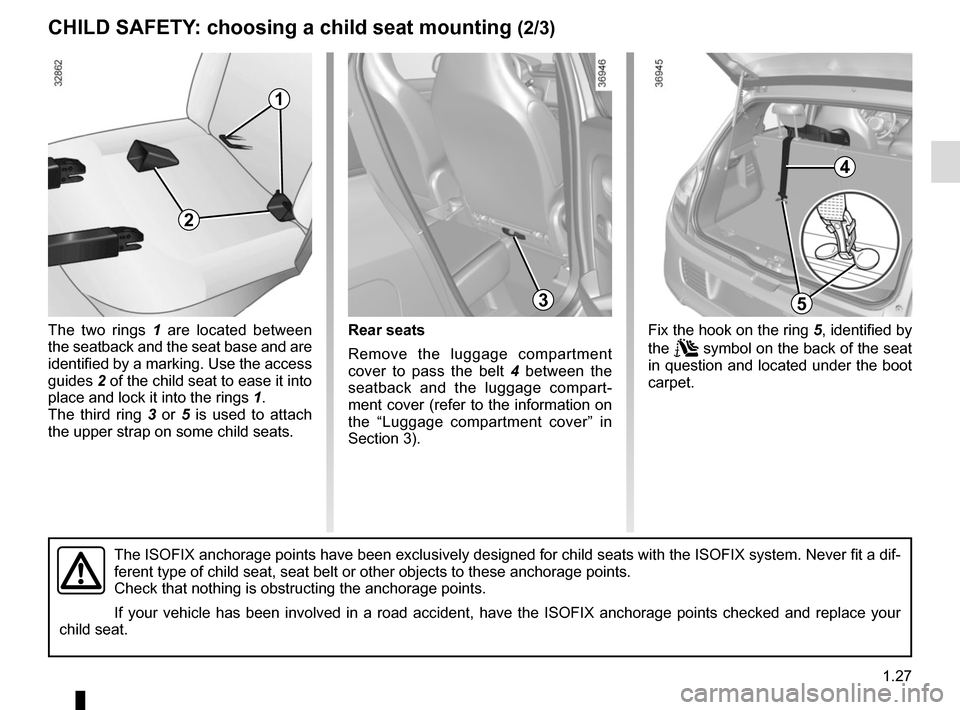
The two rings 1 are located between
the seatback and the seat base and are
identified by a marking. Use the access
guides 2 of the child seat to ease it into
place and lock it into the rings 1.
The third ring 3 or 5 is used to attach
the upper strap on some child seats.Rear seats
Remove the luggage compartment
cover to pass the belt 4 between the
seatback and the luggage compart-
ment cover (refer to the information on
the “Luggage compartment cover” in
Section 3).
4
The ISOFIX anchorage points have been exclusively designed for child sea\
ts with the ISOFIX system. Never fit a dif-
ferent type of child seat, seat belt or other objects to these anchorage\
points.
Check that nothing is obstructing the anchorage points.
If your vehicle has been involved in a road accident, have the ISOFIX an\
chorage points checked and replace your
child seat.
5
1
2
Fix the hook on the ring 5, identified by
the
symbol on the back of the seat
in question and located under the boot
carpet.
3
Page 39 of 228
1.33
CHILD SAFETY: attachment using the ISOFIX system (1/3)
RISK OF DEATH OR
SERIOUS INJURY: Before
installing a child seat on the
front passenger seat, check
that the airbag has been deacti-
vated (please refer to “Child safety:
front passenger airbag deactivation
and activation” in Section 1).
Using a child safety system
which is not approved for
this vehicle will not correctly
protect the baby or child.
They risk serious or even fatal injury.
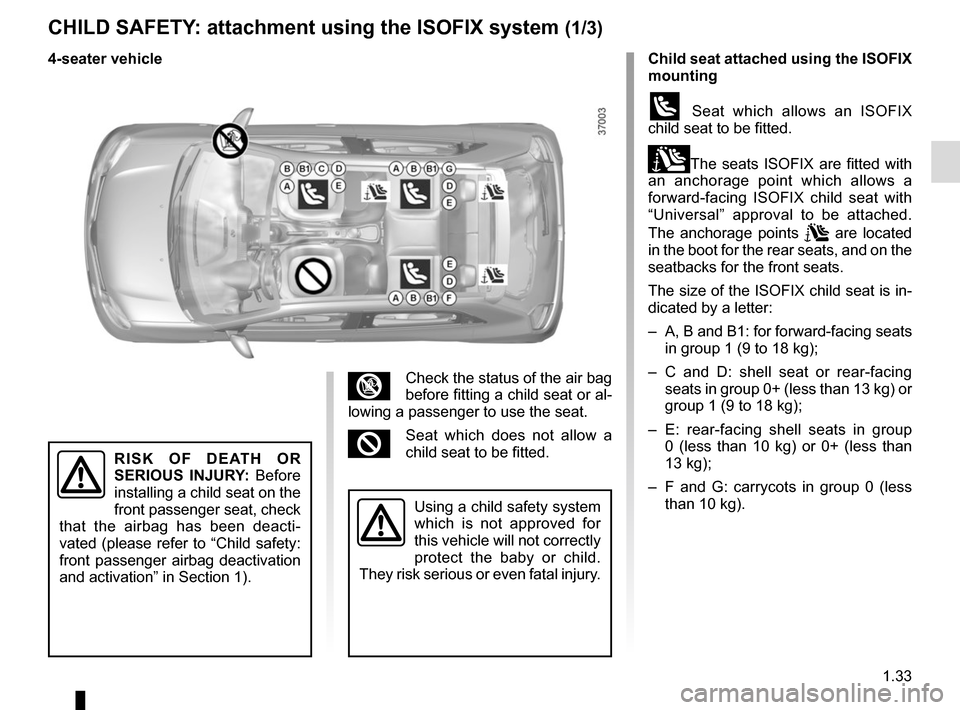
³Check the status of the air bag
before fitting a child seat or al-
lowing a passenger to use the seat.
²Seat which does not allow a
child seat to be fitted.
4-seater vehicle Child seat attached using the
ISOFIX
mounting
ü Seat which allows an ISOFIX
child seat to be fitted.
±The seats ISOFIX are fitted with
an anchorage point which allows a
forward-facing ISOFIX child seat with
“Universal” approval to be attached.
The anchorage points
are located
in the boot for the rear seats, and on the
seatbacks for the front seats.
The size of the ISOFIX child seat is in-
dicated by a letter:
– A, B and B1: for forward-facing seats in group 1 (9 to 18 kg);
– C and D: shell seat or rear-facing seats in group 0+ (less than 13 kg) or
group 1 (9 to 18 kg);
– E: rear-facing shell seats in group 0 (less than 10 kg) or 0+ (less than
13 kg);
– F and G: carrycots in group 0 (less than 10 kg).
Page 68 of 228
1.62
HEADLIGHT BEAM ADJUSTMENT (1/2)
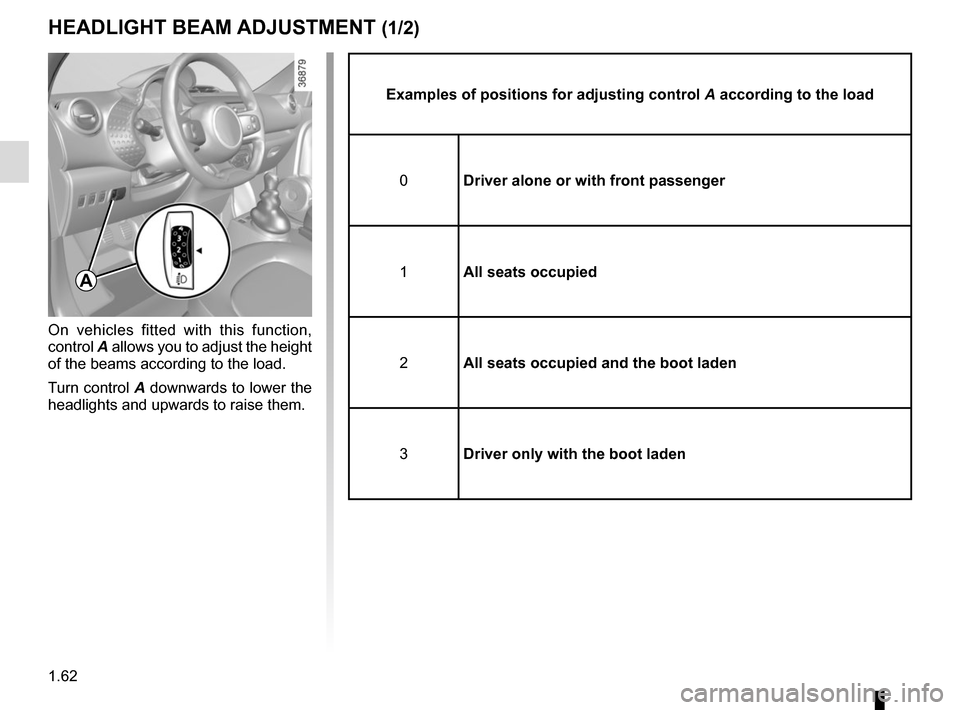
On vehicles fitted with this function,
control A allows you to adjust the height
of the beams according to the load.
Turn control A downwards to lower the
headlights and upwards to raise them.
Examples of positions for adjusting control A according to the load
0 Driver alone or with front passenger
1 All seats occupied
2 All seats occupied and the boot laden
3 Driver only with the boot laden
A
Page 115 of 228
2.41
REVERSING CAMERA (2/2)
This function is an additio-
nal aid. It cannot, therefore,
under any circumstances
replace the vigilance or the
responsibility of the driver.
The driver should always pay at-
tention to sudden incidents during
driving: always ensure that there
are no moving obstacles (such as
a child, animal, pram, bicycle, etc.)
or small, narrow objects such as
stones or posts in your path when
manoeuvring.
C
B
A
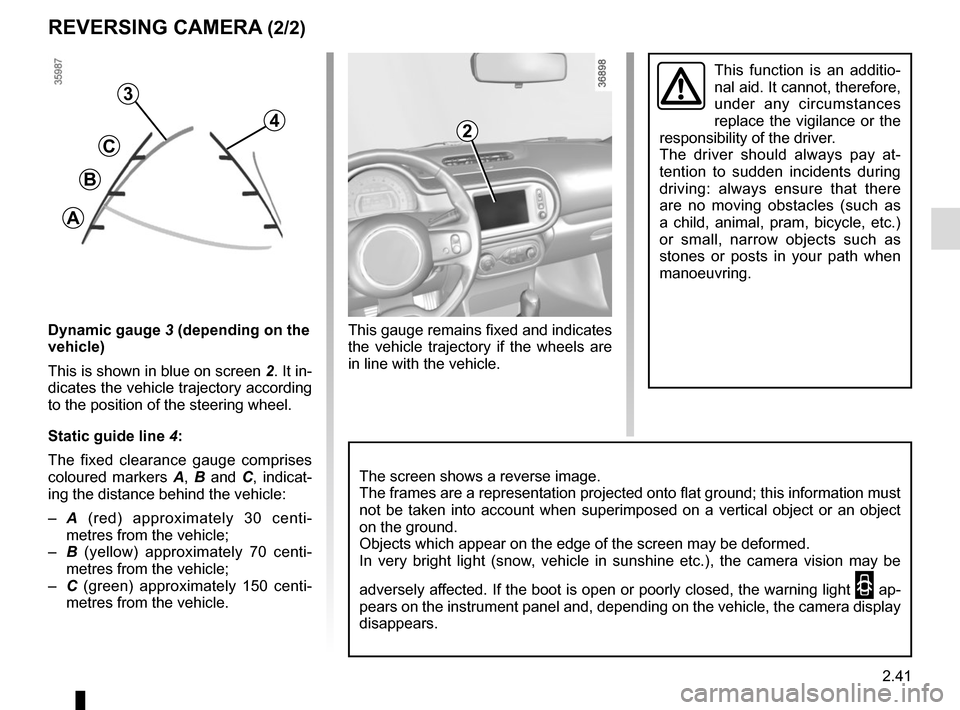
Dynamic gauge 3 (depending on the
vehicle)
This is shown in blue on screen 2. It in-
dicates the vehicle trajectory according
to the position of the steering wheel.
Static guide line 4:
The fixed clearance gauge comprises
coloured markers A, B and C , indicat-
ing the distance behind the vehicle:
– A (red) approximately 30 centi-
metres from the vehicle;
– B (yellow) approximately 70 centi-
metres from the vehicle;
– C (green) approximately 150 centi-
metres from the vehicle.
4
3
The screen shows a reverse image.
The frames are a representation projected onto flat ground; this informa\
tion must
not be taken into account when superimposed on a vertical object or an o\
bject
on the ground.
Objects which appear on the edge of the screen may be deformed.
In very bright light (snow, vehicle in sunshine etc.), the camera vision may be
adversely affected. If the boot is open or poorly closed, the warning light
2 ap-
pears on the instrument panel and, depending on the vehicle, the camera \
display
disappears.
2
This gauge remains fixed and indicates
the vehicle trajectory if the wheels are
in line with the vehicle.
Page 121 of 228
3.1
Section 3: Your comfort
Air Vents . . . . . . . . . . . . . . . . . . . . . . . . . . . . . . . . . . . .\
. . . . . . . . . . . . . . . . . . . . . . . . . . . . . . . . . . 3.2
Manual air conditioning, heating system . . . . . . . . . . . . . . . . . . . . . . . . . . . . . . . . . . . . \
. . . . . . . . . . 3.4
Automatic climate control . . . . . . . . . . . . . . . . . . . . . . . . . . . . . . . . . . . .\
. . . . . . . . . . . . . . . . . . . . . 3.7
Air conditioning: information and advice on use . . . . . . . . . . . . . . . . . . . . . . . . . . . . . . . . . . . .\
. . . . 3.11
Electric windows . . . . . . . . . . . . . . . . . . . . . . . . . . . . . . . . . . . .\
. . . . . . . . . . . . . . . . . . . . . . . . . . . . 3.12
Sunroof . . . . . . . . . . . . . . . . . . . . . . . . . . . . . . . . . . . .\
. . . . . . . . . . . . . . . . . . . . . . . . . . . . . . . . . . . 3.14
Interior lighting . . . . . . . . . . . . . . . . . . . . . . . . . . . . . . . . . . . . \
. . . . . . . . . . . . . . . . . . . . . . . . . . . . . . 3.15
Passenger compartment storage/fittings . . . . . . . . . . . . . . . . . . . . . . . . . . . . . . . . . . . . \
. . . . . . . . . . 3.16
Ashtray, cigarette lighter, accessories socket . . . . . . . . . . . . . . . . . . . . . . . . . . . . . . . . . . . .\
. . . . . . 3.21
Rear headrests . . . . . . . . . . . . . . . . . . . . . . . . . . . . . . . . . . . .\
. . . . . . . . . . . . . . . . . . . . . . . . . . . . . 3.22
Rear bench seat . . . . . . . . . . . . . . . . . . . . . . . . . . . . . . . . . . . .\
. . . . . . . . . . . . . . . . . . . . . . . . . . . . 3.23
Luggage compartment. . . . . . . . . . . . . . . . . . . . . . . . . . . . . . . . . . . . \
. . . . . . . . . . . . . . . . . . . . . . . . 3.24
Luggage cover . . . . . . . . . . . . . . . . . . . . . . . . . . . . . . . . . . . . \
. . . . . . . . . . . . . . . . . . . . . . . . . . . . . . 3.25
Boot storage . . . . . . . . . . . . . . . . . . . . . . . . . . . . . . . . . . . .\
. . . . . . . . . . . . . . . . . . . . . . . . . . . . . . . 3.26
Transporting objects in the luggage compartment . . . . . . . . . . . . . . . . . . . . . . . . . . . . . . . . . . . .\
. . 3.27
Roof bars . . . . . . . . . . . . . . . . . . . . . . . . . . . . . . . . . . . . \
. . . . . . . . . . . . . . . . . . . . . . . . . . . . . . . . . . 3.28
Spoiler . . . . . . . . . . . . . . . . . . . . . . . . . . . . . . . . . . . . \
. . . . . . . . . . . . . . . . . . . . . . . . . . . . . . . . . . . . 3.28
Multimedia equipment . . . . . . . . . . . . . . . . . . . . . . . . . . . . . . . . . . . . \
. . . . . . . . . . . . . . . . . . . . . . . . 3.29
Page 135 of 228
3.15
Unlocking and opening the doors or
tailgate switches on the timed cour-
tesy lights and lights.
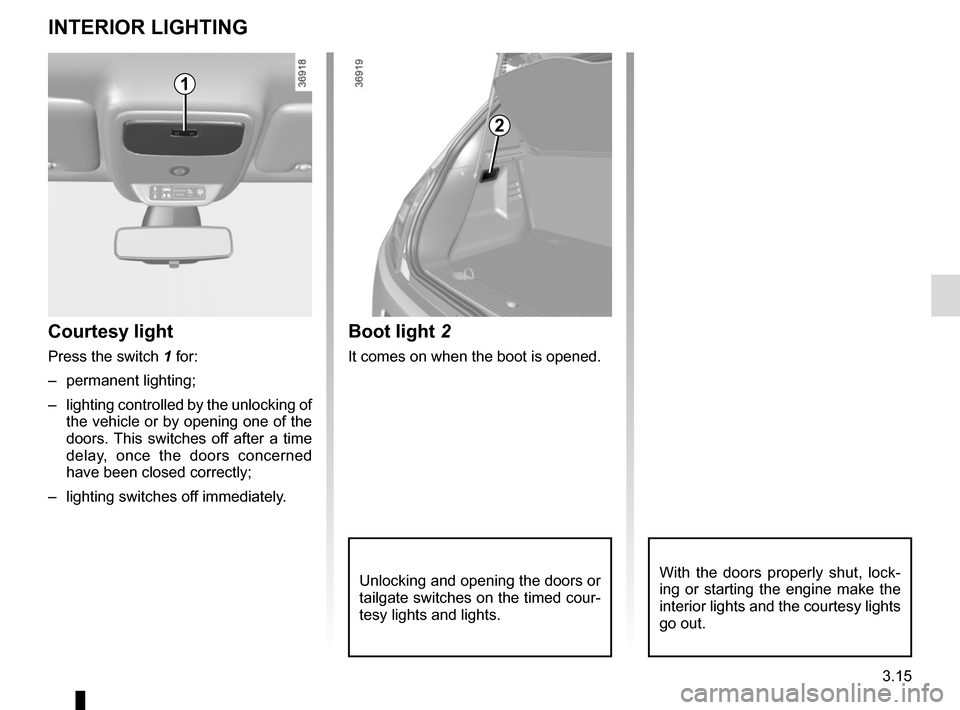
Boot light 2
It comes on when the boot is opened.
Courtesy light
Press the switch 1 for:
– permanent lighting;
– lighting controlled by the unlocking of
the vehicle or by opening one of the
doors. This switches off after a time
delay, once the doors concerned
have been closed correctly;
– lighting switches off immediately.
INTERIOR LIGHTING
1
2
With the doors properly shut, lock-
ing or starting the engine make the
interior lights and the courtesy lights
go out.