start stop button RENAULT TWINGO 2017 3.G Owners Manual
[x] Cancel search | Manufacturer: RENAULT, Model Year: 2017, Model line: TWINGO, Model: RENAULT TWINGO 2017 3.GPages: 228, PDF Size: 6.76 MB
Page 9 of 228
1.3
KEY, RADIO FREQUENCY REMOTE CONTROL: general information (2/2)
Radio frequency remote
control operating range
This varies according to the surroun-
dings: take care not to lock or unlock
the doors by inadvertently pressing the
buttons on the remote control.
Note: If a door or the luggage compart-
ment lid is open or not closed properly,
the doors and luggage compartment lid
lock/unlock quickly.
Interference
Interference by factors in the imme-
diate vicinity (external installations or
the use of equipment operating on the
same frequency as the remote control)
may affect the operation of the remote
control.
Replacement and additional keys
or remote controls.
You must only contact an approved
dealer:
– If you need to replace a key it will be necessary to take the vehicle
and all of its keys to an approved
Dealer in order to initialise the
system.
– Depending on the vehicle, you have the option of using up to
four remote controls.
Remote control unit failure
Make sure that the correct battery
type is being used, and that the bat-
tery is in good condition and inser-
ted correctly. These batteries have
a service life of approximately two
years.
Refer to Section 5: “Radio fre-
quency remote control: batteries”
for the battery changing procedure.
The key must not be used for any
function other than those described
in the handbook (removing the cap
from a bottle, etc.).
Driver’s responsibility
when parking or stopping
the vehicle
Never leave an animal,
child or adult who is not self-suffi-
cient alone on your vehicle, even for
a short time.
They may pose a risk to themselves
or to others by starting the engine,
activating equipment such as the
electric windows or locking the
doors.
Also, in hot and/or sunny weather,
please remember that the tempera-
ture inside the passenger compart-
ment increases very quickly.
RISK OF DEATH OR SERIOUS
INJURY.
Page 10 of 228
1.4
1
2
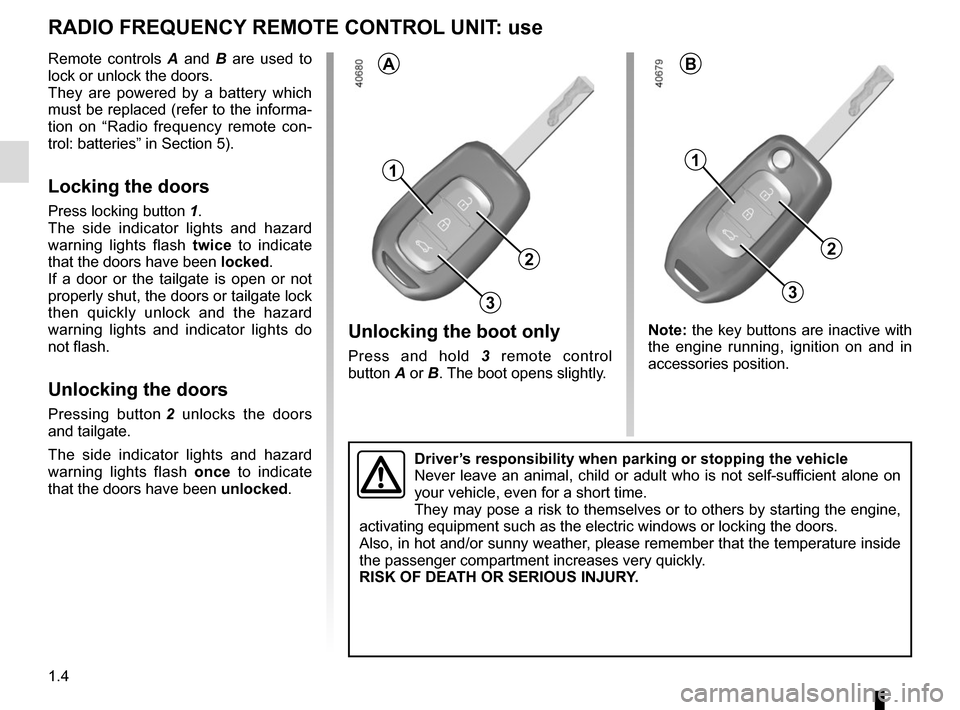
Unlocking the boot only
Press and hold 3 remote control
button A or B. The boot opens slightly.
RADIO FREQUENCY REMOTE CONTROL UNIT: use
Remote controls A and B are used to
lock or unlock the doors.
They are powered by a battery which
must be replaced (refer to the informa-
tion on “Radio frequency remote con-
trol: batteries” in Section 5).
Locking the doors
Press locking button 1.
The side indicator lights and hazard
warning lights flash twice to indicate
that the doors have been locked.
If a door or the tailgate is open or not
properly shut, the doors or tailgate lock
then quickly unlock and the hazard
warning lights and indicator lights do
not flash.
Unlocking the doors
Pressing button 2 unlocks the doors
and tailgate.
The side indicator lights and hazard
warning lights flash once to indicate
that the doors have been unlocked.
BA
Note: the key buttons are inactive with
the engine running, ignition on and in
accessories position.
3
1
2
3
Driver’s responsibility when parking or stopping the vehicle
Never leave an animal, child or adult who is not self-sufficient alone on
your vehicle, even for a short time.
They may pose a risk to themselves or to others by starting the engine, \
activating equipment such as the electric windows or locking the doors.
Also, in hot and/or sunny weather, please remember that the temperature inside
the passenger compartment increases very quickly.
RISK OF DEATH OR SERIOUS INJURY.
Page 47 of 228
1.41
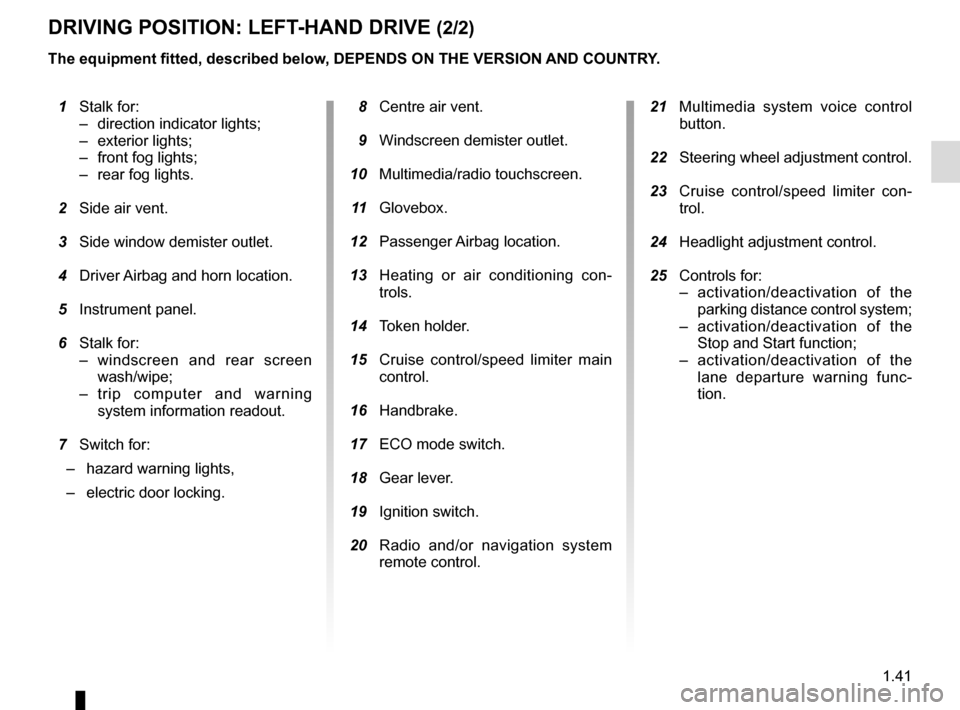
DRIVING POSITION: LEFT-HAND DRIVE (2/2)
1 Stalk for:
– direction indicator lights;
– exterior lights;
– front fog lights;
– rear fog lights.
2 Side air vent.
3 Side window demister outlet.
4 Driver Airbag and horn location.
5 Instrument panel.
6 Stalk for:
– windscreen and rear screen wash/wipe;
– trip computer and warning system information readout.
7 Switch for:
– hazard warning lights,
– electric door locking.
The equipment fitted, described below, DEPENDS ON THE VERSION AND COUNTRY.
8 Centre air vent.
9 Windscreen demister outlet.
10 Multimedia/radio touchscreen.
11 Glovebox.
12 Passenger Airbag location.
13 Heating or air conditioning con-
trols.
14 Token holder.
15 Cruise control/speed limiter main
control.
16 Handbrake.
17 ECO mode switch.
18 Gear lever.
19 Ignition switch.
20 Radio and/or navigation system
remote control.
21 Multimedia system voice control
button.
22 Steering wheel adjustment control.
23 Cruise control/speed limiter con-
trol.
24 Headlight adjustment control.
25 Controls for:
– activation/deactivation of the parking distance control system;
– activation/deactivation of the Stop and Start function;
– activation/deactivation of the lane departure warning func-
tion.
Page 49 of 228
1.43
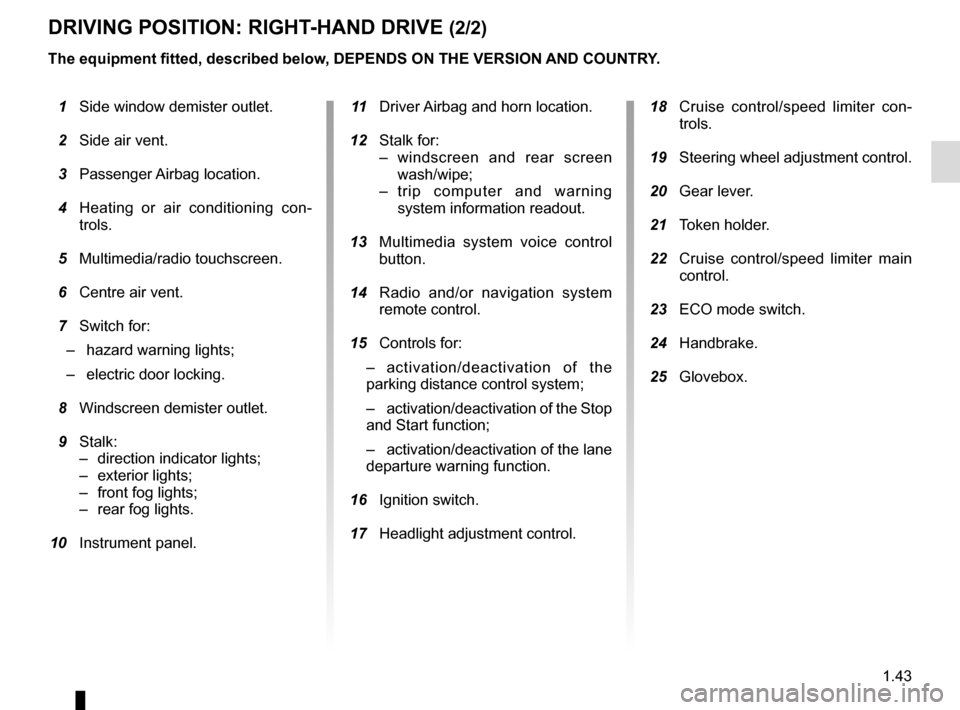
DRIVING POSITION: RIGHT-HAND DRIVE (2/2)
The equipment fitted, described below, DEPENDS ON THE VERSION AND COUNTRY.
1 Side window demister outlet.
2 Side air vent.
3 Passenger Airbag location.
4 Heating or air conditioning con-
trols.
5 Multimedia/radio touchscreen.
6 Centre air vent.
7 Switch for:
– hazard warning lights;
– electric door locking.
8 Windscreen demister outlet.
9 Stalk:
– direction indicator lights;
– exterior lights;
– front fog lights;
– rear fog lights.
10 Instrument panel. 11 Driver Airbag and horn location.
12 Stalk for:
– windscreen and rear screen wash/wipe;
– trip computer and warning system information readout.
13 Multimedia system voice control
button.
14 Radio and/or navigation system
remote control.
15 Controls for:
– activation/deactivation of the
parking distance control system;
– activation/deactivation of the Stop
and Start function;
– activation/deactivation of the lane
departure warning function.
16 Ignition switch.
17 Headlight adjustment control.
18 Cruise control/speed limiter con-
trols.
19 Steering wheel adjustment control.
20 Gear lever.
21 Token holder.
22 Cruise control/speed limiter main
control.
23 ECO mode switch.
24 Handbrake.
25 Glovebox.
Page 116 of 228
2.42
AUTOMATIC TRANSMISSION (1/4)
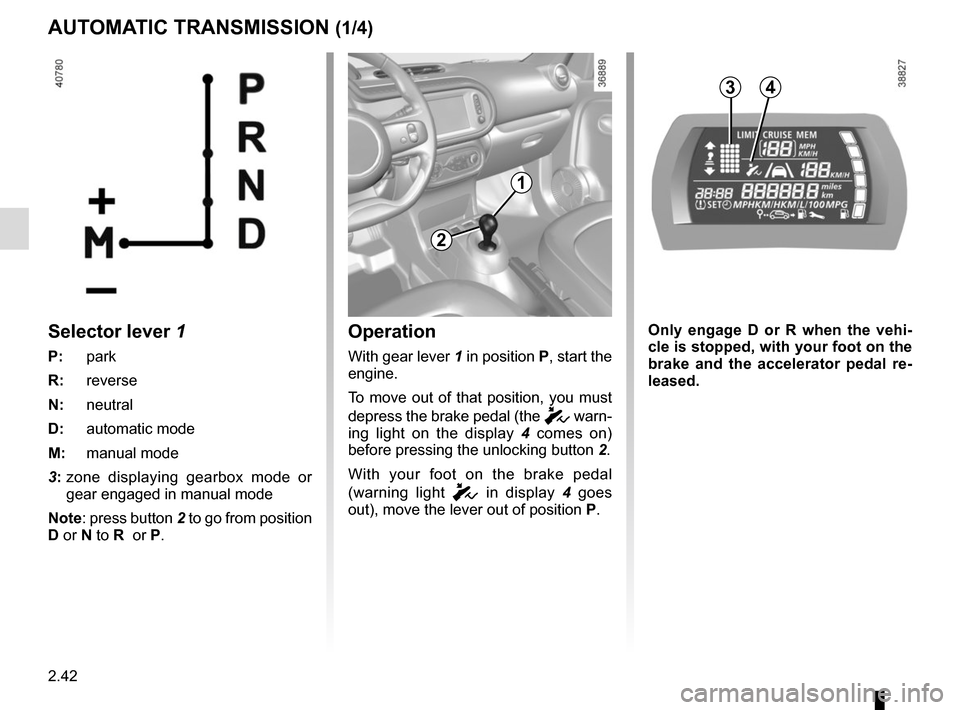
Operation
With gear lever 1 in position P, start the
engine.
To move out of that position, you must
depress the brake pedal (the
c warn-
ing light on the display 4 comes on)
before pressing the unlocking button 2.
With your foot on the brake pedal
(warning light
c in display 4 goes
out), move the lever out of position P.
2
1
Selector lever 1
P: park
R: reverse
N: neutral
D: automatic mode
M: manual mode
3: zone displaying gearbox mode or
gear engaged in manual mode
Note: press button 2 to go from position
D or N to R or P.
43
Only engage D or R when the vehi-
cle is stopped, with your foot on the
brake and the accelerator pedal re-
leased.
Page 119 of 228
2.45
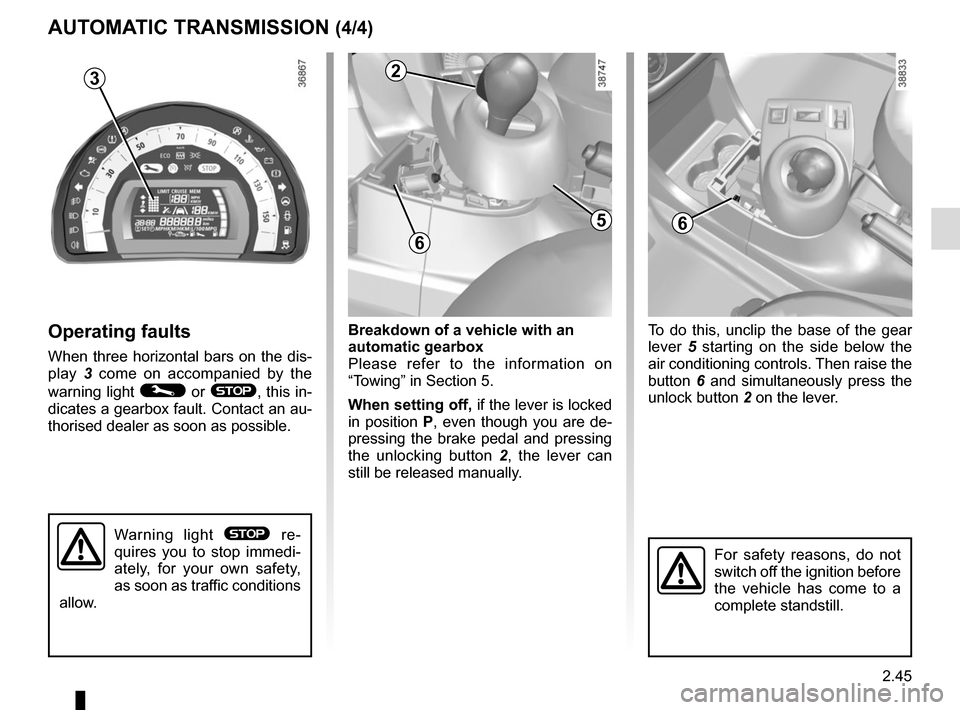
Breakdown of a vehicle with an
automatic gearbox
Please refer to the information on
“Towing” in Section 5.
When setting off, if the lever is locked
in position P, even though you are de-
pressing the brake pedal and pressing
the unlocking button 2, the lever can
still be released manually.
AUTOMATIC TRANSMISSION (4/4)
Operating faults
When three horizontal bars on the dis-
play 3 come on accompanied by the
warning light
© or ®, this in-
dicates a gearbox fault. Contact an au-
thorised dealer as soon as possible. To do this, unclip the base of the gear
lever
5 starting on the side below the
air conditioning controls. Then raise the
button 6 and simultaneously press the
unlock button 2 on the lever.
For safety reasons, do not
switch off the ignition before
the vehicle has come to a
complete standstill.
5
2
3
6
6
3
Warning light ® re-
quires you to stop immedi-
ately, for your own safety,
as soon as traffic conditions
allow.
Page 127 of 228
3.7
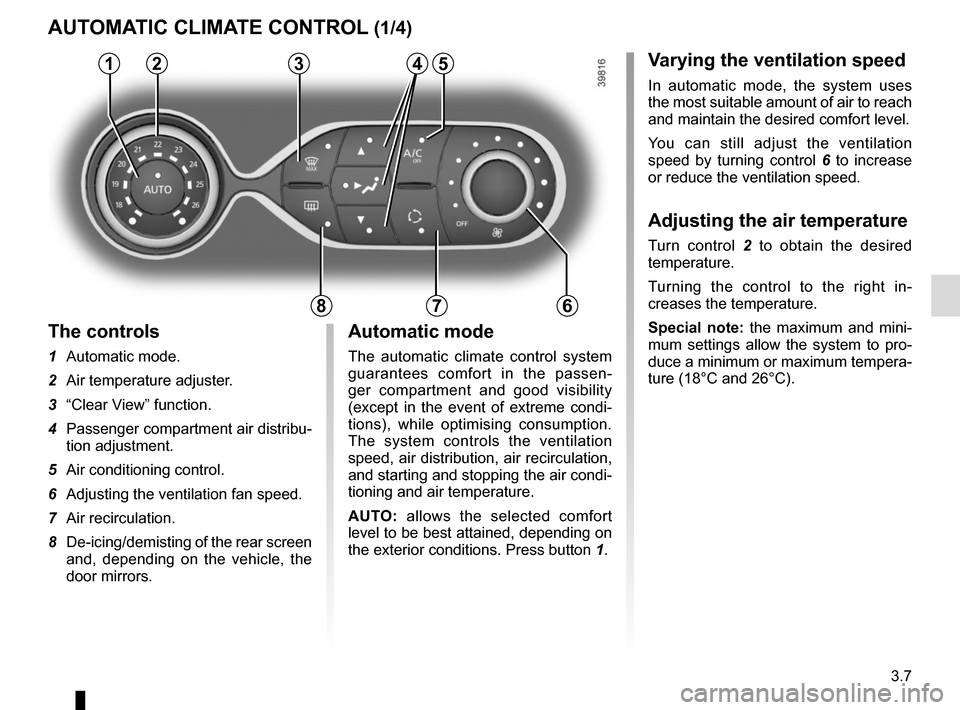
Varying the ventilation speed
In automatic mode, the system uses
the most suitable amount of air to reach
and maintain the desired comfort level.
You can still adjust the ventilation
speed by turning control 6 to increase
or reduce the ventilation speed.
Adjusting the air temperature
Turn control 2 to obtain the desired
temperature.
Turning the control to the right in-
creases the temperature.
Special note: the maximum and mini-
mum settings allow the system to pro-
duce a minimum or maximum tempera-
ture (18°C and 26°C).
The controls
1 Automatic mode.
2 Air temperature adjuster.
3 “Clear View” function.
4 Passenger compartment air distribu-
tion adjustment.
5 Air conditioning control.
6 Adjusting the ventilation fan speed.
7 Air recirculation.
8 De-icing/demisting of the rear screen
and, depending on the vehicle, the
door mirrors.
AUTOMATIC CLIMATE CONTROL (1/4)
235
786
Automatic mode
The automatic climate control system
guarantees comfort in the passen-
ger compartment and good visibility
(except in the event of extreme condi-
tions), while optimising consumption.
The system controls the ventilation
speed, air distribution, air recirculation,
and starting and stopping the air condi-
tioning and air temperature.
AUTO: allows the selected comfort
level to be best attained, depending on
the exterior conditions. Press button 1.
14
Page 130 of 228
3.10
AUTOMATIC CLIMATE CONTROL (4/4)
76
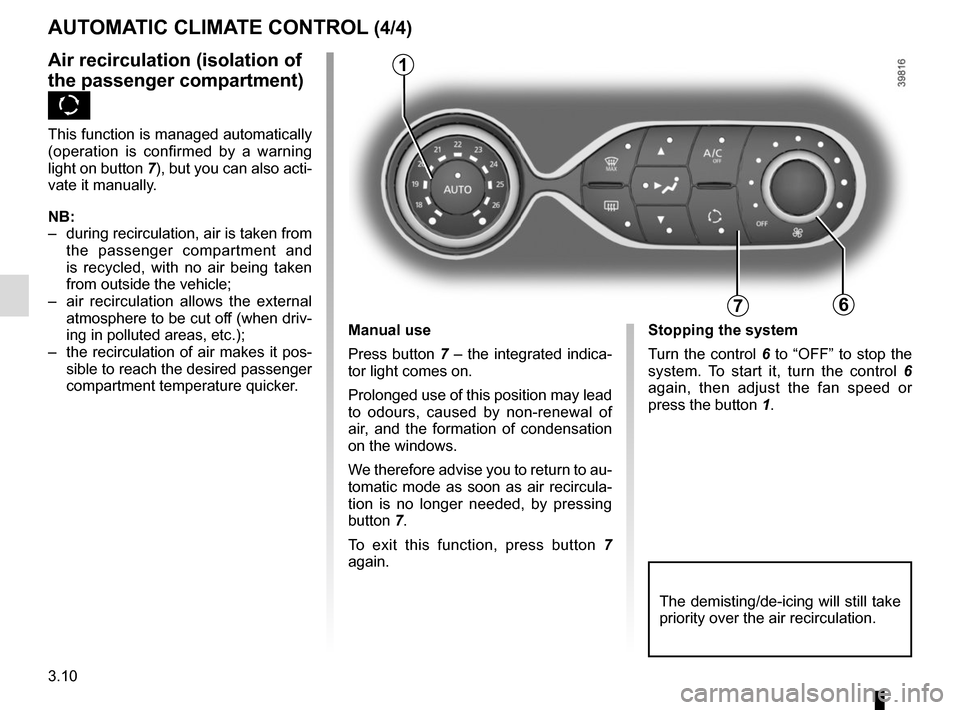
Air recirculation (isolation of
the passenger compartment)
K
This function is managed automatically
(operation is confirmed by a warning
light on button 7), but you can also acti-
vate it manually.
NB:
– during recirculation, air is taken from the passenger compartment and
is recycled, with no air being taken
from outside the vehicle;
– air recirculation allows the external atmosphere to be cut off (when driv-
ing in polluted areas, etc.);
– the recirculation of air makes it pos- sible to reach the desired passenger
compartment temperature quicker.
1
The demisting/de-icing will still take
priority over the air recirculation.
Manual use
Press button 7 – the integrated indica-
tor light comes on.
Prolonged use of this position may lead
to odours, caused by non-renewal of
air, and the formation of condensation
on the windows.
We therefore advise you to return to au-
tomatic mode as soon as air recircula-
tion is no longer needed, by pressing
button 7.
To exit this function, press button 7
again. Stopping the system
Turn the control 6 to “OFF” to stop the
system. To start it, turn the control
6
again, then adjust the fan speed or
press the button 1.
Page 194 of 228
5.26
TOWING: breakdown recovery (1/2)
Towing a vehicle with an
automatic gearbox
With the engine switched off, the trans-
mission is no longer lubricated. It is
preferable to tow this type of vehicle on
a trailer or tow it with the rear wheels off
the ground.
In exceptional circumstances, you
may tow it with all four wheels on the
ground, only in a forward gear, with the
gear in neutral position N, over a maxi-
mum distance of 31 miles (50 km) and
not exceeding a speed of 15.5 mph
(25 km/h).
If the gear lever cannot be put into the
N position, please consult an autho-
rised dealer.1
2
Before any towing, put the gears into
neutral (neutral position for vehicles
equipped with a manual gearbox or N
position for vehicles equipped with an
automatic gearbox).
Unlock the steering column; the igni-
tion key must be in “ M” position (ig-
nition) to enable signalling (“Stop”
lights, hazard warning lights, etc.).
Always switch on the lights when
driving at night.
Release the parking brake.
It is also essential to observe the towing
regulations imposed by current legisla-
tion in your country. Please contact an
authorised dealer.
When the engine is
stopped, steering and brak-
ing assistance are not op-
erational.
Do not remove the key from
the ignition when the vehi-
cle is being towed.
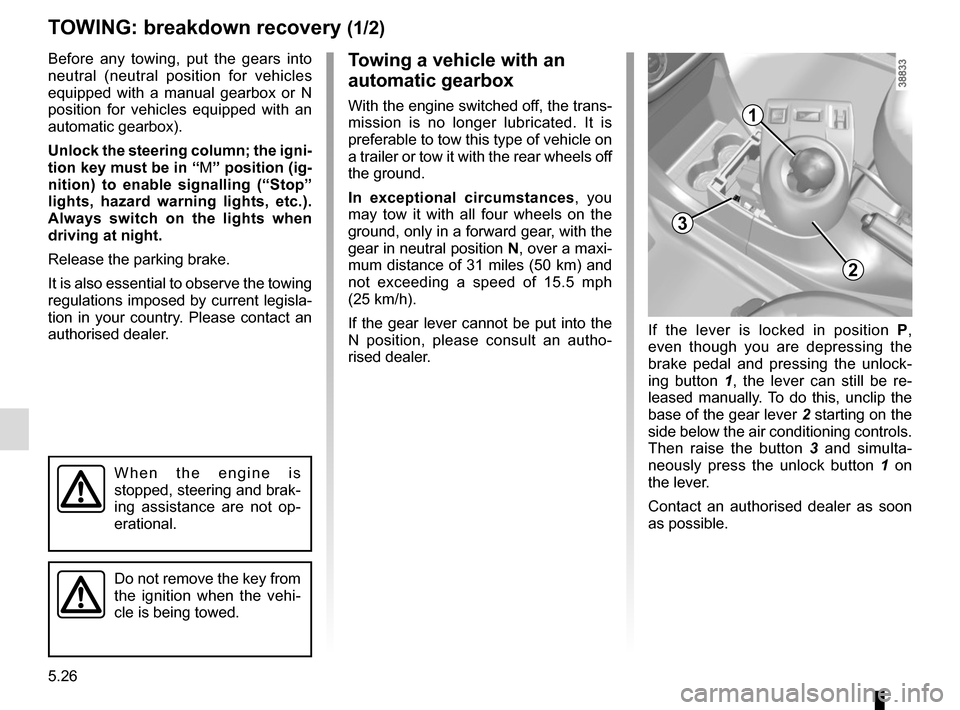
3
If the lever is locked in position P ,
even though you are depressing the
brake pedal and pressing the unlock-
ing button 1 , the lever can still be re-
leased manually. To do this, unclip the
base of the gear lever 2 starting on the
side below the air conditioning controls.
Then raise the button 3 and simulta-
neously press the unlock button 1 on
the lever.
Contact an authorised dealer as soon
as possible.