points RENAULT ZOE 2014 1.G Owners Manual
[x] Cancel search | Manufacturer: RENAULT, Model Year: 2014, Model line: ZOE, Model: RENAULT ZOE 2014 1.GPages: 214, PDF Size: 4.13 MB
Page 3 of 214
0.1
Translated from French. Copying or translation, in part or in full, is fo\
rbidden unless prior written permission has been obtained from the vehicle manu-facturer.
This driver’s handbook contains the information necessary:
– for you to familiarise yourself with your vehicle, to use it to its best\
advantage and to benefit fully from the all the func tions and
the technical developments it incorporates.
– to ensure that it always gives the best performance by following the sim\
ple, but comprehensive advice concerning regular main -
tenance.
– to enable you to deal quickly with minor faults not requiring specialist\
attention.
It is well worth taking a few minutes to read this handbook to familiari\
se yourself with the information and guidelines it cont ains
about the vehicle and its functions and new features. If certain points \
are still unclear, our Network technicians will be only too
pleased to provide you with any additional information.
The following symbol will help you when reading this handbook:
Welcome to your new electric vehicle
The descriptions of the models given in this handbook are based on the t\
echnical specifications at the time of writing. This hand-
book covers all items of equipment (both standard and optional) available for these models but whether or not these are
fitted to the vehicle depends on the version, options selected and the c\
ountry where the vehicle is sold.
This handbook may also contain information about items of equipment to b\
e introduced later in the model year.
Throughout the manual, the “approved Dealer” is your RENAULT Dealer. To indicate a hazard, danger or safety recommendation.
Enjoy driving your new vehicle.
Page 47 of 214
1.41
ADDITIONAL METHODS OF RESTRAINT
The air bag is designed to complement the action of the seat belt. Both \
the air bags and seat belts are integral parts of
the same protection system. It is therefore essential to wear seat belts\
at all times. If seat belts are not worn, the oc-
cupants are exposed to the risk of serious injury in the event of an acc\
ident. It may also increase the risk of minor su-
perficial injuries occurring when the air bag is deployed, although such\
minor injuries are always possible with air bags.
If the vehicle should overturn or suffer a rear impact, however severe, the pretensioners and air bags are no\
t always triggered .
Shocks to the underbody of the vehicle, e.g. from pavements, potholes or\
stones, can all trigger these systems.
– No work or modification whatsoever may be carried out on any part of the air bag system (air bags, preten\
sioners, compu-
ter, wiring harness, etc.), except by qualified personnel from an approved\
dealer.
– To ensure that the system is in good working order and to avoid accidenta\
l triggering of the system which may cause injury, only qualified Network personnel may work on the air bag system.
– As a safety precaution, have the air bag system checked if your vehicle \
has been involved in an accident, or is stolen or broken into.
– When selling or lending the vehicle, inform the user of these points and\
hand over this driver’s handbook with the vehicle.
– When scrapping your vehicle, contact your approved dealer for disposal o\
f the gas generator(s).
All of the warnings below are given so that the air bag is not obstructed in any way when it is inflated and also to prevent
the risk of serious injuries caused by items which may be dislodged when\
the air bag inflates.
Page 48 of 214
1.42
CHILD SAFETY: General information (1/2)
Carrying children
Children, and adults, must be correctly
seated and strapped in for all journeys.
The children being carried in your vehi-
cle are your responsibility.
A child is not a miniature adult. Children
are at risk of specific injuries as their
muscles and bones have not yet fin-
ished growing. The seat belt alone
would not provide suitable protection.
Use an approved child seat and ensure
you use it correctly.
A collision at 30 mph
(50 km/h) is the same as fall-
ing a distance of 10 metres.
Transporting a child without
a restraint is the equivalent of allow-
ing him or her to play on a fourth-
floor balcony without railings.
Never travel with a child held in your
arms. In the event of an accident,
you will not be able to keep hold of
the child, even if you yourself are
wearing a seat belt.
If your vehicle has been involved in
a road accident, replace the child
seat and have the seat belts and
ISOFIX anchorage points checked.
To prevent the doors being
opened, use the “Child
safety” device (refer to the
information on “Opening
and closing the doors” in Section 1).
Driver’s responsibility
when parking or stopping
the vehicle
Never leave an animal,
child or adult who is not self-suffi-
cient alone on your vehicle, even for
a short time.
They may pose a risk to themselves
or to others by starting the engine,
activating equipment such as the
electric windows or by locking the
doors.
Also, in hot and/or sunny weather,
please remember that the tempera-
ture inside the passenger compart-
ment increases very quickly.
RISK OF DEATH OR SERIOUS
INJURY.
Page 52 of 214
1.46
CHILD SAFETY: choosing a child/baby seat mounting (2/2)
The ISOFIX anchorage points have been exclusively designed for child sea\
ts with the ISOFIX system. Never fit a dif-
ferent type of child seat, seat belt or other objects to these anchorage\
points.
Check that nothing is obstructing the anchorage points.
If your vehicle has been involved in a road accident, have the ISOFIX an\
chorage points checked and replace your child seat.
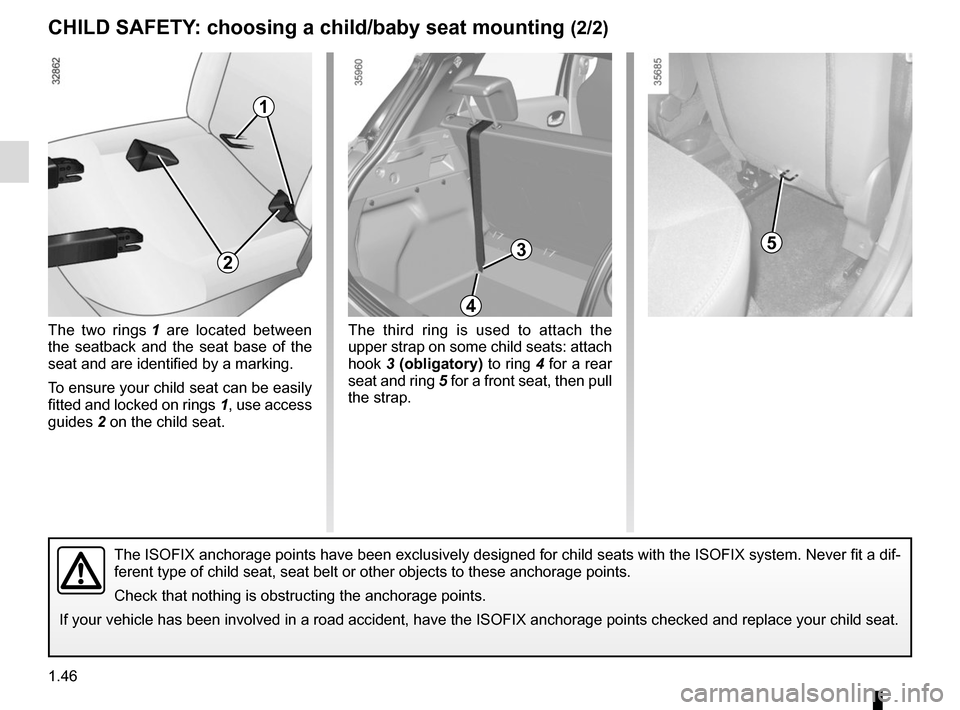
The two rings 1 are located between
the seatback and the seat base of the
seat and are identified by a marking.
To ensure your child seat can be easily
fitted and locked on rings 1, use access
guides 2 on the child seat.
1
2
The third ring is used to attach the
upper strap on some child seats: attach
hook 3 (obligatory) to ring 4 for a rear
seat and ring 5 for a front seat, then pull
the strap.
3
4
5
Page 54 of 214
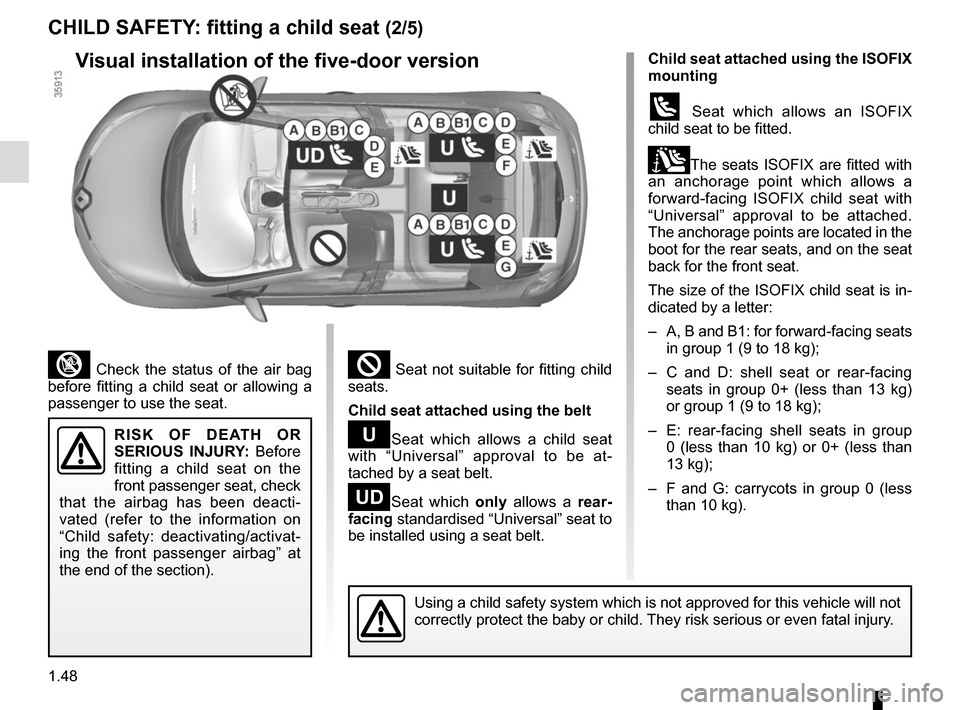
1.48
² Seat not suitable for fitting child
seats.
Child seat attached using the belt
¬Seat which allows a child seat
with “Universal” approval to be at-
tached by a seat belt.
−Seat which only allows a rear-
facing standardised “Universal” seat to
be installed using a seat belt.
³ Check the status of the air bag
before fitting a child seat or allowing a
passenger to use the seat.
RISK OF DEATH OR
SERIOUS INJURY: Before
fitting a child seat on the
front passenger seat, check
that the airbag has been deacti-
vated (refer to the information on
“Child safety: deactivating/activat-
ing the front passenger airbag” at
the end of the section).
Child seat attached using the ISOFIX
mounting
ü Seat which allows an ISOFIX
child seat to be fitted.
±The seats ISOFIX are fitted with
an anchorage point which allows a
forward-facing ISOFIX child seat with
“Universal” approval to be attached.
The anchorage points are located in the
boot for the rear seats, and on the seat
back for the front seat.
The size of the ISOFIX child seat is in-
dicated by a letter:
– A, B and B1: for forward-facing seats in group 1 (9 to 18 kg);
– C and D: shell seat or rear-facing seats in group 0+ (less than 13 kg)
or group 1 (9 to 18 kg);
– E: rear-facing shell seats in group 0 (less than 10 kg) or 0+ (less than
13 kg);
– F and G: carrycots in group 0 (less than 10 kg).
Using a child safety system which is not approved for this vehicle will \
not
correctly protect the baby or child. They risk serious or even fatal injury.
CHILD SAFETY: fitting a child seat (2/5)
Visual installation of the five-door version
Page 144 of 214
3.24
Before moving the seatback, put
the seat belt in belt guide A to avoid
damaging it.
For safety reasons, carry
out any adjustments when
the vehicle is not being
driven.
The configuration of the two-seat
bench with the small seatback B
pulled down, does not allow the
central seat to be used as it would
be impossible to buckle the seat belt
(belt buckles inaccessible).
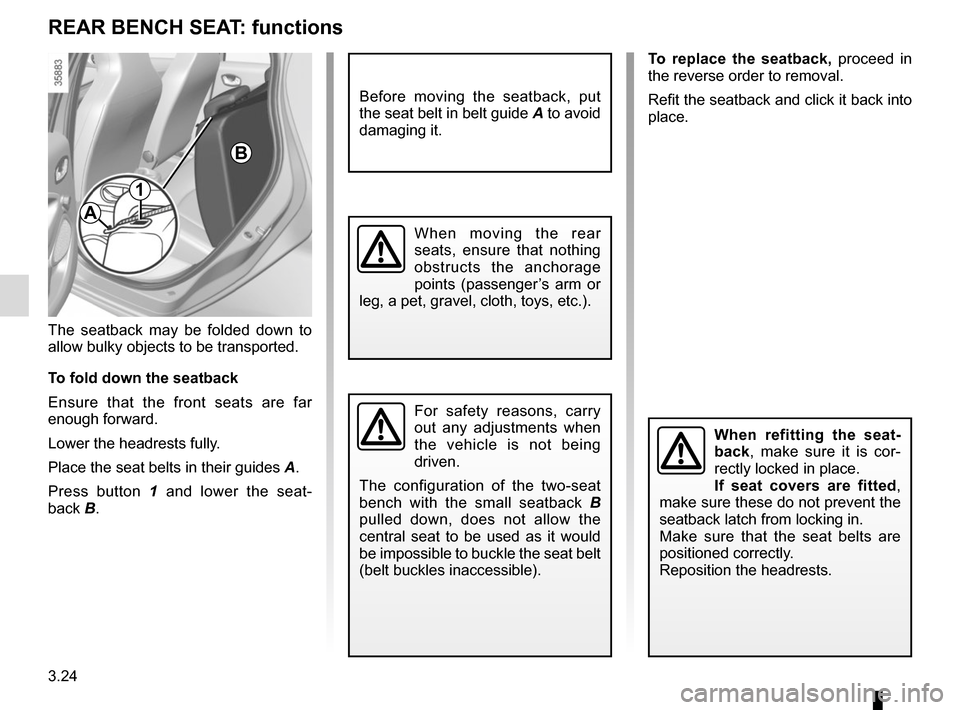
The seatback may be folded down to
allow bulky objects to be transported.
To fold down the seatback
Ensure that the front seats are far
enough forward.
Lower the headrests fully.
Place the seat belts in their guides A.
Press button 1 and lower the seat-
back B.
REAR BENCH SEAT: functions
B
A
1
To replace the seatback, proceed in
the reverse order to removal.
Refit the seatback and click it back into
place.
When moving the rear
seats, ensure that nothing
obstructs the anchorage
points (passenger’s arm or
leg, a pet, gravel, cloth, toys, etc.).
When refitting the seat-
back, make sure it is cor-
rectly locked in place.
If seat covers are fitted ,
make sure these do not prevent the
seatback latch from locking in.
Make sure that the seat belts are
positioned correctly.
Reposition the headrests.
Page 148 of 214
3.28
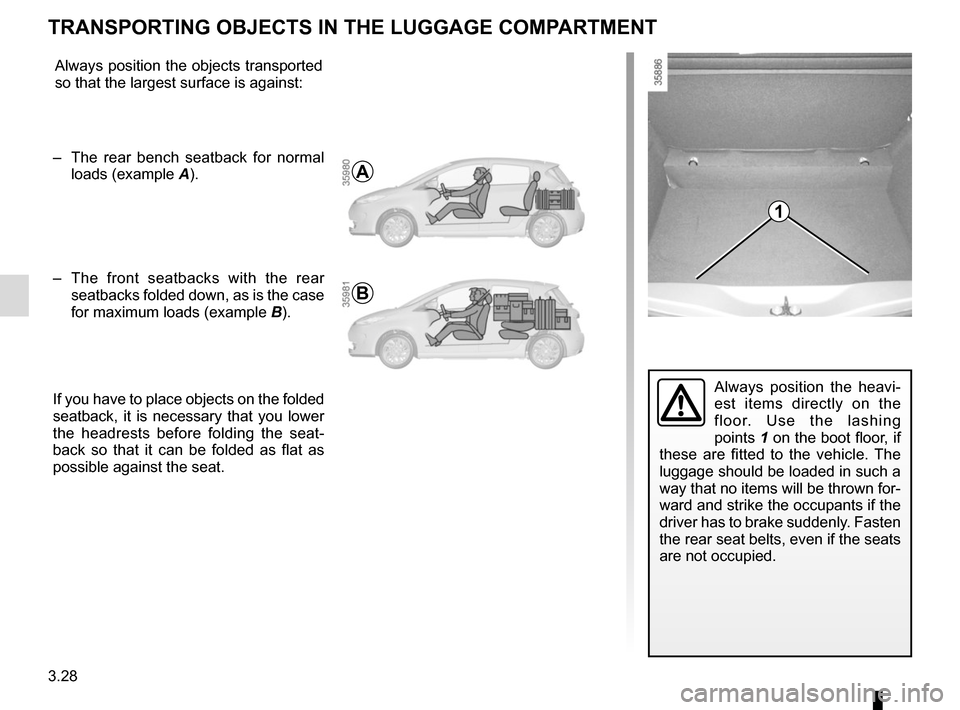
TRANSPORTING OBJECTS IN THE LUGGAGE COMPARTMENT
Always position the heavi-
est items directly on the
floor. Use the lashing
points 1 on the boot floor, if
these are fitted to the vehicle. The
luggage should be loaded in such a
way that no items will be thrown for-
ward and strike the occupants if the
driver has to brake suddenly. Fasten
the rear seat belts, even if the seats
are not occupied.
1
Always position the objects transported
so that the largest surface is against:
– The rear bench seatback for normal loads (example A).
– The front seatbacks with the rear
seatbacks folded down, as is the case
for maximum loads (example B).
If you have to place objects on the folded
seatback, it is necessary that you lower
the headrests before folding the seat-
back so that it can be folded as flat as
possible against the seat.
A
B
Page 168 of 214
5.6
TYRES (1/3)
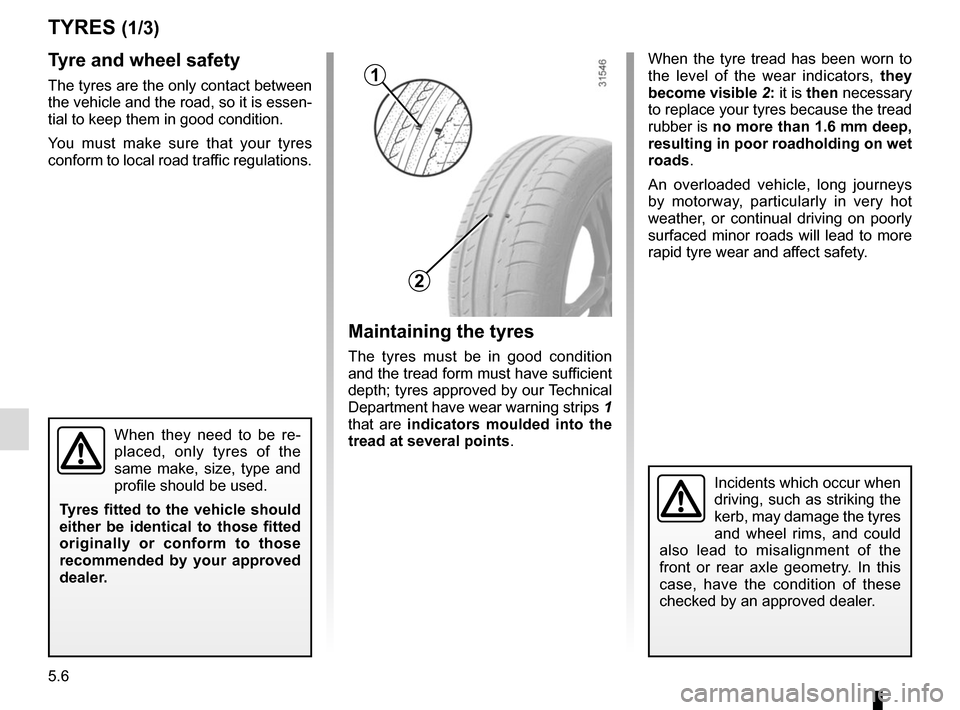
Maintaining the tyres
The tyres must be in good condition
and the tread form must have sufficient
depth; tyres approved by our Technical
Department have wear warning strips 1
that are indicators moulded into the
tread at several points.
Tyre and wheel safety
The tyres are the only contact between
the vehicle and the road, so it is essen-
tial to keep them in good condition.
You must make sure that your tyres
conform to local road traffic regulations. When the tyre tread has been worn to
the level of the wear indicators,
they
become visible 2: it is then necessary
to replace your tyres because the tread
rubber is no more than 1.6 mm deep,
resulting in poor roadholding on wet
roads.
An overloaded vehicle, long journeys
by motorway, particularly in very hot
weather, or continual driving on poorly
surfaced minor roads will lead to more
rapid tyre wear and affect safety.
When they need to be re-
placed, only tyres of the
same make, size, type and
profile should be used.
Tyres fitted to the vehicle should
either be identical to those fitted
originally or conform to those
recommended by your approved
dealer.
Incidents which occur when
driving, such as striking the
kerb, may damage the tyres
and wheel rims, and could
also lead to misalignment of the
front or rear axle geometry. In this
case, have the condition of these
checked by an approved dealer.
2
1
Page 183 of 214
5.21
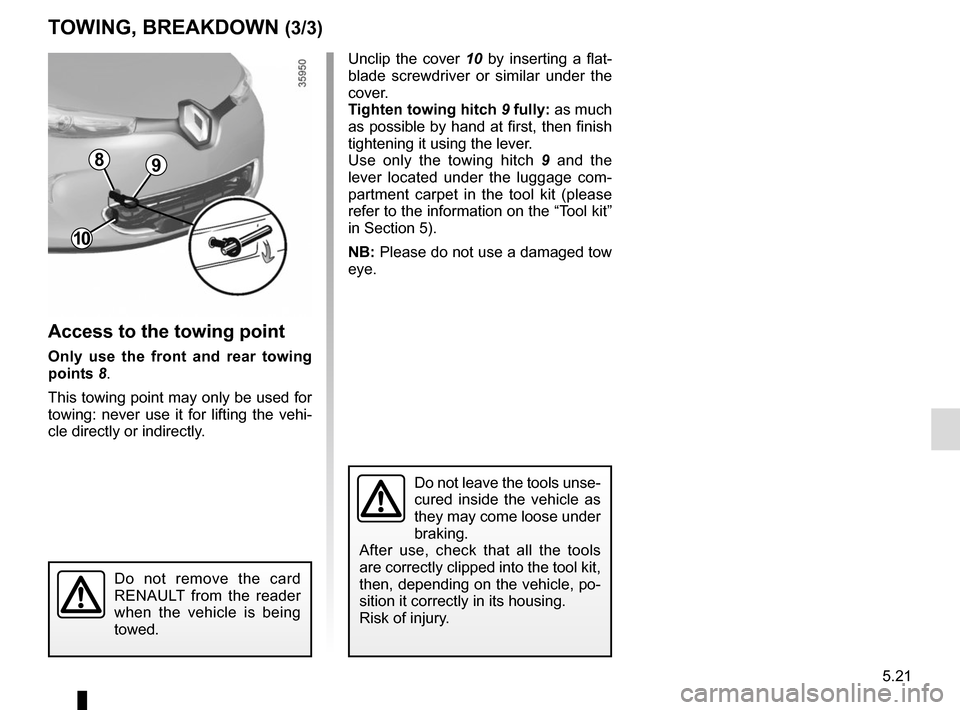
TOWING, BREAKDOWN (3/3)
Access to the towing point
Only use the front and rear towing
points 8.
This towing point may only be used for
towing: never use it for lifting the vehi-
cle directly or indirectly.
Unclip the cover 10 by inserting a flat-
blade screwdriver or similar under the
cover.
Tighten towing hitch 9 fully: as much
as possible by hand at first, then finish
tightening it using the lever.
Use only the towing hitch 9 and the
lever located under the luggage com-
partment carpet in the tool kit (please
refer to the information on the “Tool kit”
in Section 5).
NB: Please do not use a damaged tow
eye.
Do not leave the tools unse-
cured inside the vehicle as
they may come loose under
braking.
After use, check that all the tools
are correctly clipped into the tool kit,
then, depending on the vehicle, po-
sition it correctly in its housing.
Risk of injury.
Do not remove the card
RENAULT from the reader
when the vehicle is being
towed.
98
10