engine RENAULT ZOE 2017 1.G Workshop Manual
[x] Cancel search | Manufacturer: RENAULT, Model Year: 2017, Model line: ZOE, Model: RENAULT ZOE 2017 1.GPages: 220, PDF Size: 4.07 MB
Page 165 of 220
4.9
BODYWORK MAINTENANCE (1/2)
What you should not doDo not degrease or clean mechani-
cal components (e.g. the engine com-
partment), underneath the body, parts
with hinges (e.g. inside the doors) and
painted plastic external fittings (e.g.
bumpers) using high-pressure clean-
ing equipment or by spraying on prod-
ucts not approved by our Technical
Department. Doing this could give rise
to corrosion or operational faults.
Wash the vehicle in bright sunlight or
freezing temperatures.
Do not scrape off mud or dirt without
pre-wetting.
Allow dirt to accumulate on the exterior.
Allow rust to form following minor im-
pacts.
Do not use solvents not approved by
our Technical Department to remove
stains as this could damage the paint-
work.
Do not drive in snow or muddy condi-
tions without washing the vehicle, par-
ticularly under the wheel arches and
body.
A well-maintained vehicle will last
longer. It is therefore recommended to
maintain the exterior of the vehicle reg-
ularly.
Your vehicle has been treated with very
effective anti-corrosion products. It is
nevertheless subject to various outside
influences.
Corrosive agents in the atmosphere
–
atmospheric pollution (built-up and
industrial areas),
– saline atmospheres (near the sea,
particularly in hot weather),
– seasonal and damp weather condi-
tions (e.g. road salt in winter, water
from road cleaners, etc.).
Minor impacts
Abrasive action
Dust and sand in the air, mud, road grit
thrown up by other vehicles, etc.
You should take a number of minor pre-
cautions in order to safeguard your ve-
hicle against such risks.You should
Wash your car frequently, with the
engine off , with cleaning products rec-
ommended by the manufacturer (never
use abrasive products). Rinse thor-
oughly beforehand with a jet:
– spots of tree resin and industrial
grime;
– mud in the wheel arches and under-
neath the body which forms damp
patches;
– bird droppings , which cause a
chemical reaction with the paint that
rapidly discolours paintwork and
may even cause the paint to peel
off;
wash the vehicle immediately to
remove these marks since it is im-
possible to remove them by polish-
ing;
– salt, particularly in the wheel arches
and underneath the body after driv-
ing in areas where the roads have
been gritted.
Withdraw the vegetable falls (resin, film
etc.) from the vehicle regularly.
Page 166 of 220
4.10
Using a roller type car wash
Return the windscreen wiper stalk to
the Park position (refer to the informa-
tion on the “Windscreen washer, wiper”
in Section 1). Check the mounting of
external accessories, additional lights
and mirrors, and ensure that the wiper
blades are secured with adhesive tape.
Remove the radio aerial mast if your
vehicle is fitted with this equipment.
Remember to remove the tape and refit
the antenna after washing.
Observe the vehicle stopping distances
when driving on gravelled surfaces to
prevent paint damage.
Repair, or have repaired quickly, areas
where the paint has been damaged, to
prevent corrosion spreading.
Remember to visit the body shop pe-
riodically in order to maintain your
anti-corrosion warranty. Refer to the
Maintenance Document.
Respect local regulations about wash-
ing vehicles (e.g. do not wash your ve-
hicle on a public highway).
If it is necessary to clean mechani-
cal components, hinges, etc., spray
them with products approved by our
Technical Department to protect them
after they have been cleaned.
BODYWORK MAINTENANCE (2/2)
Cleaning the headlights
As the headlights are made of plastic
“glass”, use a soft cloth or cotton wool
to clean them. If this does not clean
them properly, moisten the cloth with
soapy water, then wipe clean with a soft
damp cloth or cotton wool.
Finally, carefully dry off with a soft dry
cloth.
Cleaning products containing alco-
hol must not be used.
Vehicles with a matte paint
finish
This type of paint requires certain pre-
cautions.
Do not do the following
– use wax-based products (polishing);
– rub too hard;
– wash the vehicle in a roller-type car
wash;
– wash the vehicle using a high-pres-
sure device;
– attach stickers to the paintwork (risk
of leaving marks).
You should do the following
Wash the vehicle by hand using plenty
of water, using a soft cloth or a gentle
sponge.
We have selected special products
to care for your vehicle and you can
obtain these from the manufactur-
er’s accessory outlets.
Washing the vehicle
Never wash the engine
compartment, the charging
connection or the traction
battery with a high-pressure jet.
This risks damaging the electric cir-
cuit.
Never wash the vehicle while it is
charging.
Risk of electric shock and a risk to
life.
Page 172 of 220
5.4
TYRE PRESSURE KIT (2/3)
Depending on the vehicle, in the event
of a puncture, use the kit located in the
boot or underneath the luggage com-
partment carpet.
Vehicle fitted with a tyre pressure
loss warning system
If under-inflated (puncture, low pres-
sure, etc.), the warning light
lights up on the instrument panel. See
“Tyre pressure loss warning” in
Section 2.
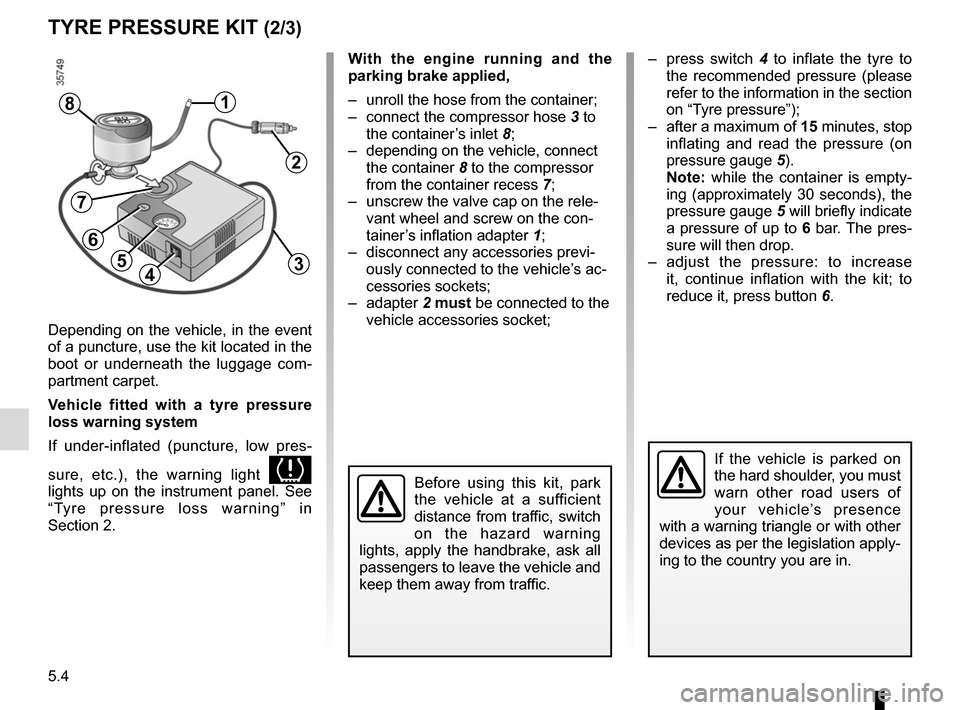
With the engine running and the
parking brake applied,
– unroll the hose from the container;
– connect the compressor hose 3 to
the container’s inlet 8;
– depending on the vehicle, connect the container 8 to the compressor
from the container recess 7;
– unscrew the valve cap on the rele- vant wheel and screw on the con-
tainer’s inflation adapter 1;
– disconnect any accessories previ- ously connected to the vehicle’s ac-
cessories sockets;
– adapter 2 must be connected to the
vehicle accessories socket;
45
1
Before using this kit, park
the vehicle at a sufficient
distance from traffic, switch
on the hazard warning
lights, apply the handbrake, ask all
passengers to leave the vehicle and
keep them away from traffic.
8
If the vehicle is parked on
the hard shoulder, you must
warn other road users of
your vehicle’s presence
with a warning triangle or with other
devices as per the legislation apply-
ing to the country you are in.
– press switch 4 to inflate the tyre to
the recommended pressure (please
refer to the information in the section
on “Tyre pressure”);
– after a maximum of 15 minutes, stop inflating and read the pressure (on
pressure gauge 5).
Note: while the container is empty-
ing (approximately 30 seconds), the
pressure gauge 5 will briefly indicate
a pressure of up to 6 bar. The pres-
sure will then drop.
– adjust the pressure: to increase it, continue inflation with the kit; to
reduce it, press button 6.
2
3
7
6
Page 177 of 220
5.9
FRONT HEADLIGHTS: changing bulbs
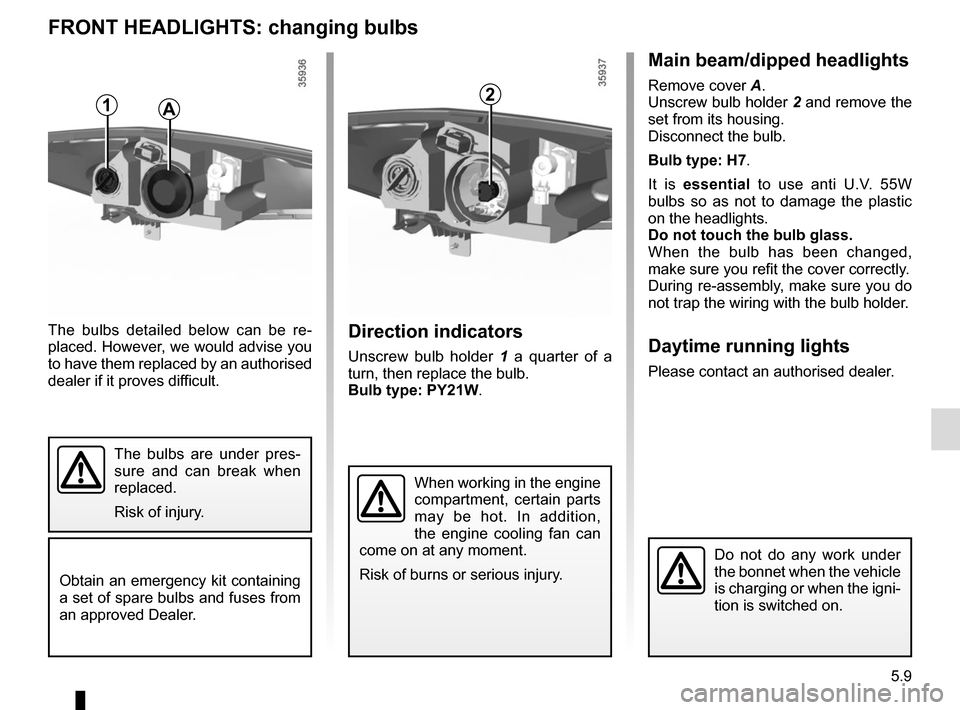
Direction indicators
Unscrew bulb holder 1 a quarter of a
turn, then replace the bulb.
Bulb type: PY21W.
The bulbs detailed below can be re-
placed. However, we would advise you
to have them replaced by an authorised
dealer if it proves difficult.
1A
Obtain an emergency kit containing
a set of spare bulbs and fuses from
an approved Dealer.
Main beam/dipped headlights
Remove cover A.
Unscrew bulb holder 2 and remove the
set from its housing.
Disconnect the bulb.
Bulb type: H7.
It is essential to use anti U.V. 55W
bulbs so as not to damage the plastic
on the headlights.
Do not touch the bulb glass.
When the bulb has been changed,
make sure you refit the cover correctly.
During re-assembly, make sure you do
not trap the wiring with the bulb holder.
Daytime running lights
Please contact an authorised dealer.
The bulbs are under pres-
sure and can break when
replaced.
Risk of injury.
2
When working in the engine
compartment, certain parts
may be hot. In addition,
the engine cooling fan can
come on at any moment.
Risk of burns or serious injury.
Do not do any work under
the bonnet when the vehicle
is charging or when the igni-
tion is switched on.
Page 186 of 220
5.18
WINDSCREEN WIPER BLADES
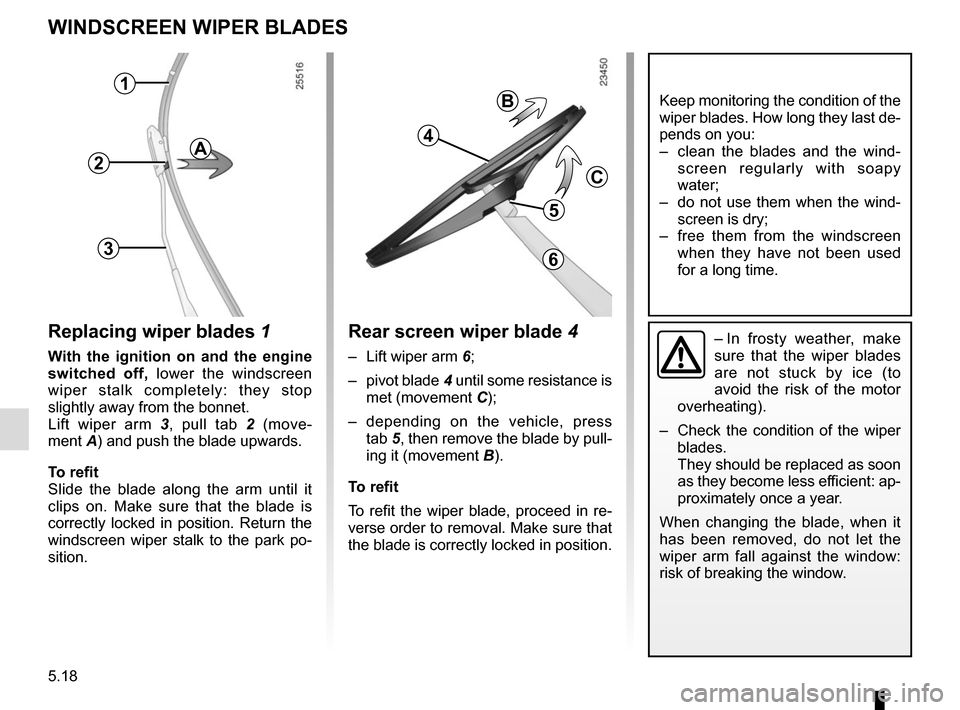
Replacing wiper blades 1
With the ignition on and the engine
switched off, lower the windscreen
wiper stalk completely: they stop
slightly away from the bonnet.
Lift wiper arm 3 , pull tab 2 (move-
ment A) and push the blade upwards.
To refit
Slide the blade along the arm until it
clips on. Make sure that the blade is
correctly locked in position. Return the
windscreen wiper stalk to the park po-
sition.
1
2
3
Keep monitoring the condition of the
wiper blades. How long they last de-
pends on you:
– clean the blades and the wind- screen regularly with soapy
water;
– do not use them when the wind- screen is dry;
– free them from the windscreen when they have not been used
for a long time.
A
– In frosty weather, make
sure that the wiper blades
are not stuck by ice (to
avoid the risk of the motor
overheating).
– Check the condition of the wiper
blades.
They should be replaced as soon
as they become less efficient: ap-
proximately once a year.
When changing the blade, when it
has been removed, do not let the
wiper arm fall against the window:
risk of breaking the window.Rear screen wiper blade 4
– Lift wiper arm 6;
– pivot blade 4 until some resistance is
met (movement C);
– depending on the vehicle, press tab 5, then remove the blade by pull-
ing it (movement B).
To refit
To refit the wiper blade, proceed in re-
verse order to removal. Make sure that
the blade is correctly locked in position.
4
5
B
C
6
Page 187 of 220
5.19
Choice of breakdown service
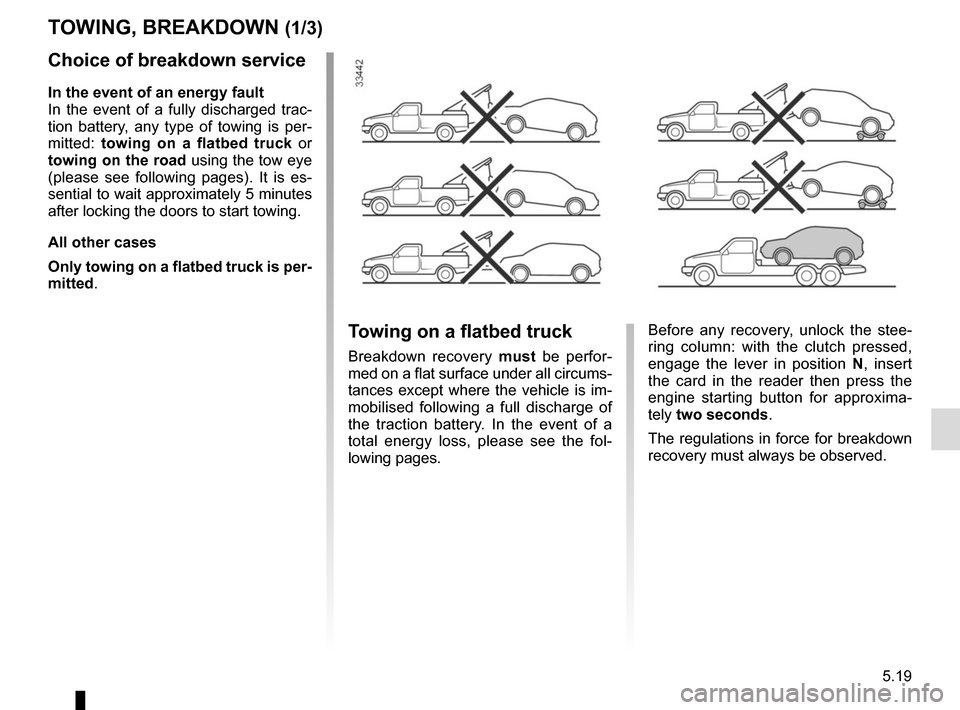
In the event of an energy fault
In the event of a fully discharged trac-
tion battery, any type of towing is per-
mitted: towing on a flatbed truck or
towing on the road using the tow eye
(please see following pages). It is es-
sential to wait approximately 5 minutes
after locking the doors to start towing.
All other cases
Only towing on a flatbed truck is per-
mitted.
TOWING, BREAKDOWN (1/3)
Before any recovery, unlock the stee-
ring column: with the clutch pressed,
engage the lever in position N, insert
the card in the reader then press the
engine starting button for approxima-
tely two seconds.
The regulations in force for breakdown
recovery must always be observed.Towing on a flatbed truck
Breakdown recovery must be perfor-
med on a flat surface under all circums-
tances except where the vehicle is im-
mobilised following a full discharge of
the traction battery. In the event of a
total energy loss, please see the fol-
lowing pages.
Page 188 of 220
5.20
Once you have finished towing, press
the engine start button twice (risk of
running down the 12 V battery).
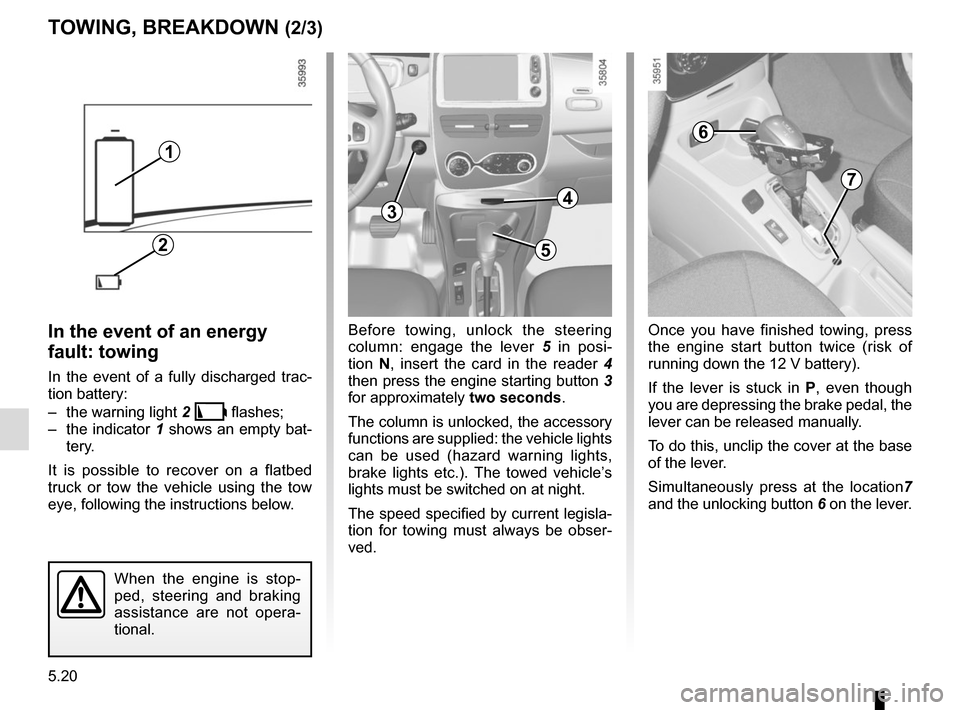
If the lever is stuck in P, even though
you are depressing the brake pedal, the
lever can be released manually.
To do this, unclip the cover at the base
of the lever.
Simultaneously press at the location 7
and the unlocking button 6 on the lever.
TOWING, BREAKDOWN (2/3)
6
7
In the event of an energy
fault: towing
In the event of a fully discharged trac-
tion battery:
– the warning light 2
Ṏ flashes;
– the indicator 1 shows an empty bat-
tery.
It is possible to recover on a flatbed
truck or tow the vehicle using the tow
eye, following the instructions below.
When the engine is stop-
ped, steering and braking
assistance are not opera-
tional.
Before towing, unlock the steering
column: engage the lever 5 in posi-
tion N, insert the card in the reader 4
then press the engine starting button 3
for approximately two seconds.
The column is unlocked, the accessory
functions are supplied: the vehicle lights
can be used (hazard warning lights,
brake lights etc.). The towed vehicle’s
lights must be switched on at night.
The speed specified by current legisla-
tion for towing must always be obser-
ved.
3
5
4
1
2
Page 191 of 220
5.23
OPERATING FAULTS (2/4)
FAULTSPOSSIBLE CAUSESWHAT TO DO
The programmable air conditioning
fails to work. One of the usage conditions is not
complied with (the traction battery
is not charged, etc).Please refer to the information on “Air-
conditioning: programming” in Section 3.
The remote control does not lock or
unlock the doors. The remote control battery is flat. Use the emergency key.
Use of appliances operating on
the same frequency as the remote
control (mobile phone, etc.).Stop using the devices or use the key.
Vehicle located in a high electro-
magnetic radiation zone.
Secondary 12 V battery dis-
charged. Replace the battery. You can still lock/unlock
and start your vehicle (refer to the information
on “Locking, unlocking the opening elements”
in Section 1 and “Starting, stopping the engine”
in Section 2).
The steering column remains
locked. Steering wheel locked.
Move the steering wheel while pressing the
engine start button (refer to Section 2 “Starting
the engine”).
Vibrations. Tyres not inflated to correct pres-
sures, incorrectly balanced or dam-
aged. Check the tyre pressures. If this is not the
problem, have them checked by an approved
Dealer.
Page 195 of 220
6.1
Section 6: Technical specifications
Vehicle identification plates . . . . . . . . . . . . . . . . . . . . . . . . . . . . . . . . . . . . \
. . . . . . . . . . . . . . . . . . . . 6.2
Engine identification plate . . . . . . . . . . . . . . . . . . . . . . . . . . . . . . . . . . . .\
. . . . . . . . . . . . . . . . . . . . . 6.3
Engine specification. . . . . . . . . . . . . . . . . . . . . . . . . . . . . . . . . . . . \
. . . . . . . . . . . . . . . . . . . . . . . . . . 6.3
Weights . . . . . . . . . . . . . . . . . . . . . . . . . . . . . . . . . . . .\
. . . . . . . . . . . . . . . . . . . . . . . . . . . . . . . . . . . 6.4
Dimensions . . . . . . . . . . . . . . . . . . . . . . . . . . . . . . . . . . . .\
. . . . . . . . . . . . . . . . . . . . . . . . . . . . . . . . 6.5
Replacement parts and repairs . . . . . . . . . . . . . . . . . . . . . . . . . . . . . . . . . . . . \
. . . . . . . . . . . . . . . . . 6.6
Service sheets . . . . . . . . . . . . . . . . . . . . . . . . . . . . . . . . . . . . \
. . . . . . . . . . . . . . . . . . . . . . . . . . . . . . 6.7
Anticorrosion check . . . . . . . . . . . . . . . . . . . . . . . . . . . . . . . . . . . . \
. . . . . . . . . . . . . . . . . . . . . . . . . . 6.13
Page 197 of 220
6.3
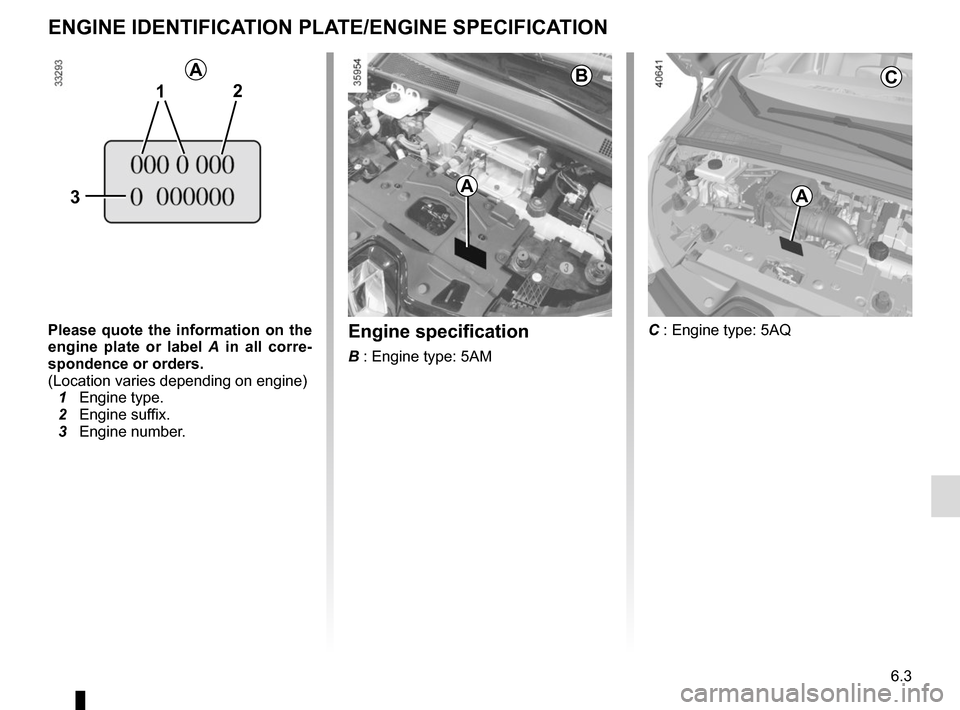
ENGINE IDENTIFICATION PLATE/ENGINE SPECIFICATION
Please quote the information on the
engine plate or label A in all corre-
spondence or orders.
(Location varies depending on engine)
1 Engine type.
2 Engine suffix.
3 Engine number.
A
2
3
1
Engine specification
B : Engine type: 5AM
A
C : Engine type: 5AQ
A
BC