stop start RENAULT ZOE 2018 Owner's Manual
[x] Cancel search | Manufacturer: RENAULT, Model Year: 2018, Model line: ZOE, Model: RENAULT ZOE 2018Pages: 226, PDF Size: 5.51 MB
Page 108 of 226
2.14
TYRE PRESSURE LOSS WARNING (2/3)
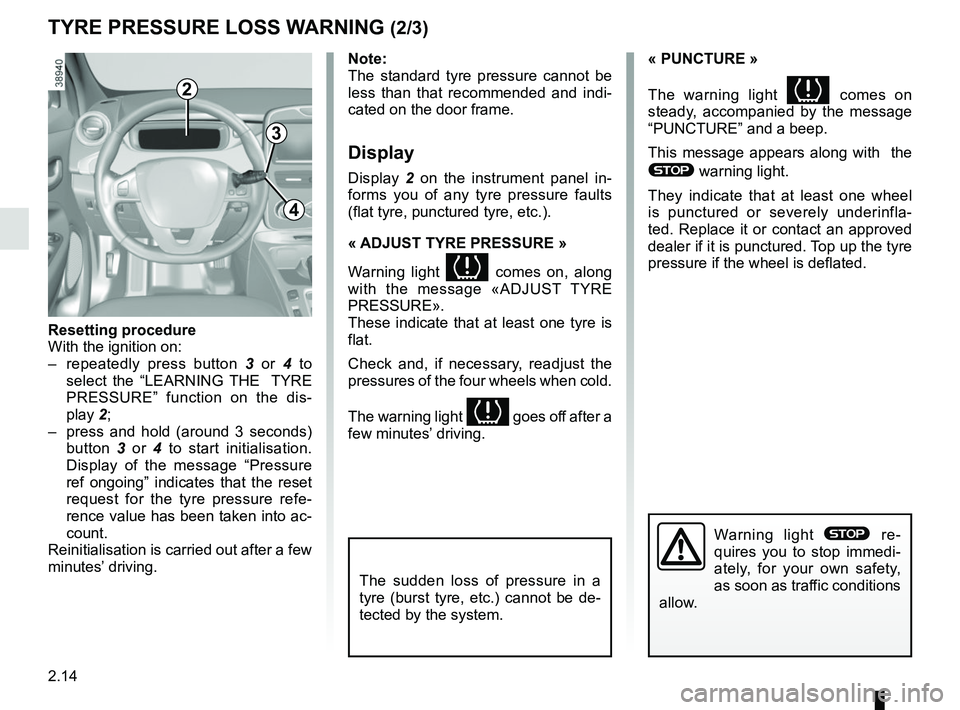
2
3
4
Note:
The standard tyre pressure cannot be
less than that recommended and indi-
cated on the door frame.
Display
Display 2 on the instrument panel in-
forms you of any tyre pressure faults
(flat tyre, punctured tyre, etc.).
« ADJUST TYRE PRESSURE »
Warning light
comes on, along
with the message «ADJUST TYRE
PRESSURE».
These indicate that at least one tyre is
flat.
Check and, if necessary, readjust the
pressures of the four wheels when cold.
The warning light
goes off after a
few minutes’ driving.
« PUNCTURE »
The warning light
comes on
steady, accompanied by the message
“PUNCTURE” and a beep.
This message appears along with the
® warning light.
They indicate that at least one wheel
is punctured or severely underinfla-
ted. Replace it or contact an approved
dealer if it is punctured. Top up the tyre
pressure if the wheel is deflated.
Warning light ® re-
quires you to stop immedi-
ately, for your own safety,
as soon as traffic conditions
allow.
Resetting procedure
With the ignition on:
– repeatedly press button 3 or 4 to
select the “LEARNING THE TYRE
PRESSURE” function on the dis-
play 2;
– press and hold (around 3 seconds) button 3 or 4 to start initialisation.
Display of the message “Pressure
ref ongoing” indicates that the reset
request for the tyre pressure refe-
rence value has been taken into ac-
count.
Reinitialisation is carried out after a few
minutes’ driving.
The sudden loss of pressure in a
tyre (burst tyre, etc.) cannot be de-
tected by the system.
Page 113 of 226
2.19
The hill start assistance
system cannot completely
prevent the vehicle from
rolling backwards in all sit-
uations (extremely steep gradients,
etc.).
In all cases, the driver may depress
the brake pedal to prevent the vehi-
cle from rolling backwards.
The hill start assistance function
should not be used for prolonged
stops: use the brake pedal.
This function is not designed to im-
mobilise the vehicle permanently.
If necessary, use the brake pedal to
stop the vehicle.
The driver must remain particularly
vigilant when driving on slippery or
low-grip surfaces.
Risk of serious injury.
Hill start assistance
Depending on the gradient of the in-
cline, this system assists the driver
when starting on a hill. It prevents the
vehicle from rolling backwards by au-
tomatically applying the brakes when
the driver lifts his/her foot off the brake
pedal to depress the accelerator pedal.
System operation
It only operates when the gear lever is in
a position other than neutral (other than
N or P ) and the vehicle is completely
stationary (brake pedal depressed).
The system holds the vehicle for ap-
proximately 2 seconds. The brakes are
then gradually released (the vehicle will
move according to the slope).
DRIVER CORRECTION DEVICES, AIDS (4/5)
Page 114 of 226

2.20
Regenerative braking system
When braking, the regenerative brak-
ing system can convert the energy pro-
duced by the vehicle deceleration into
electric energy.
This will recharge the 400V traction bat-
tery and gain greater vehicle range.Operating faults
– © lights up on the instrument
panel, alongside the message
“Check braking system”: braking as-
sistance is available at all times.
Under these conditions, the feel of
applying the brake pedal may be dif-
ferent.
You are recommended to apply
strong continuous pressure to the
pedal.
Please see an authorised dealer.
–
û lights up on the instrument
panel, alongside the message
“Braking system fault”: this indi-
cates a fault in the braking system.
Please call an authorised dealer.
DRIVER CORRECTION DEVICES, AIDS (5/5)
The û warning light re-
quires you to stop immedi-
ately, for your own safety,
as soon as traffic conditions allow.
Switch off the engine and do not
restart it. Contact an Authorised
Dealer.
Page 133 of 226
3.7
AUTOMATIC AIR-CONDITIONING (1/4)
The system controls the fan speed, air
distribution, air recirculation,starting
and stopping the air conditioning, the
heating and air temperature.
AUTO: allows the selected comfort
level to be best attained, depending on
the exterior conditions. Press button 1.
Adjusting the air temperatureTurn control 2 to obtain the desired
temperature. The further the pointer is
away from the heating stop position,
the higher the temperature will be.
If the outdoor temperature is too high,
the heating decreases automatically.
This limits energy consumption and
maintains the range of the vehicle.
Special note: the highest and lowest
settings allow the system to produce
maximum hot or cold temperature
levels (“ LOW” and “HIGH" indicated on
the multimedia display).
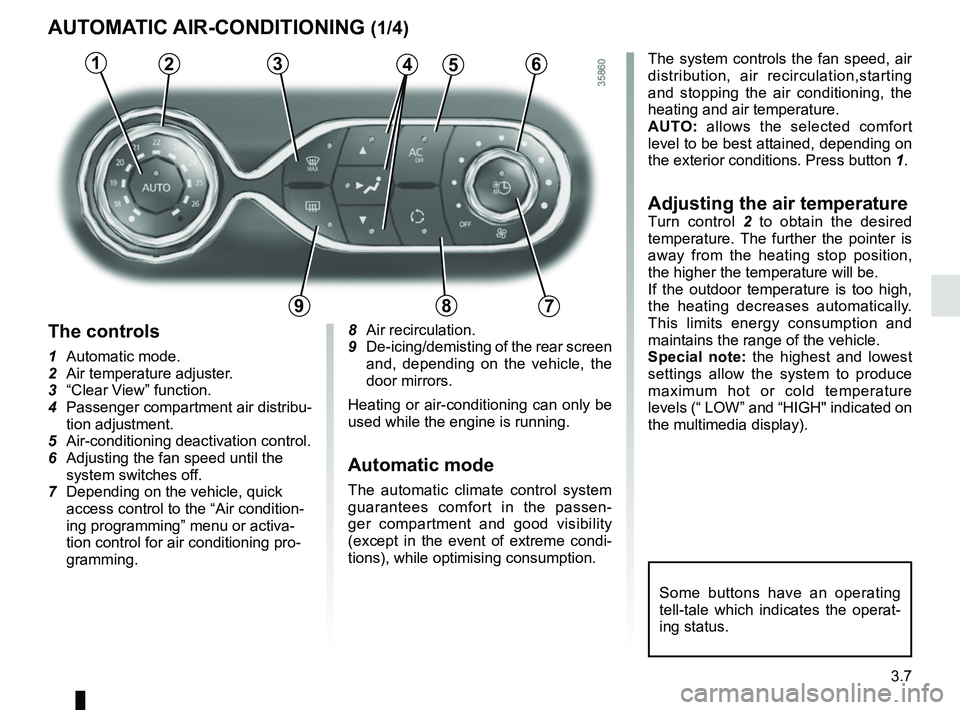
8 Air recirculation.
9
De-icing/demisting of the rear screen
and, depending on the vehicle, the
door mirrors.
Heating or air-conditioning can only be
used while the engine is running.
Automatic mode
The automatic climate control system
guarantees comfort in the passen-
ger compartment and good visibility
(except in the event of extreme condi-
tions), while optimising consumption.
The controls
1 Automatic mode.
2 Air temperature adjuster.
3 “Clear View” function.
4 Passenger compartment air distribu- tion adjustment.
5 Air-conditioning deactivation control.
6 Adjusting the fan speed until the
system switches off.
7 Depending on the vehicle, quick access control to the “Air condition-
ing programming” menu or activa-
tion control for air conditioning pro-
gramming.
3456
897
12
Some buttons have an operating
tell-tale which indicates the operat-
ing status.
Page 134 of 226
3.8
3
Deactivating the air-
conditioning
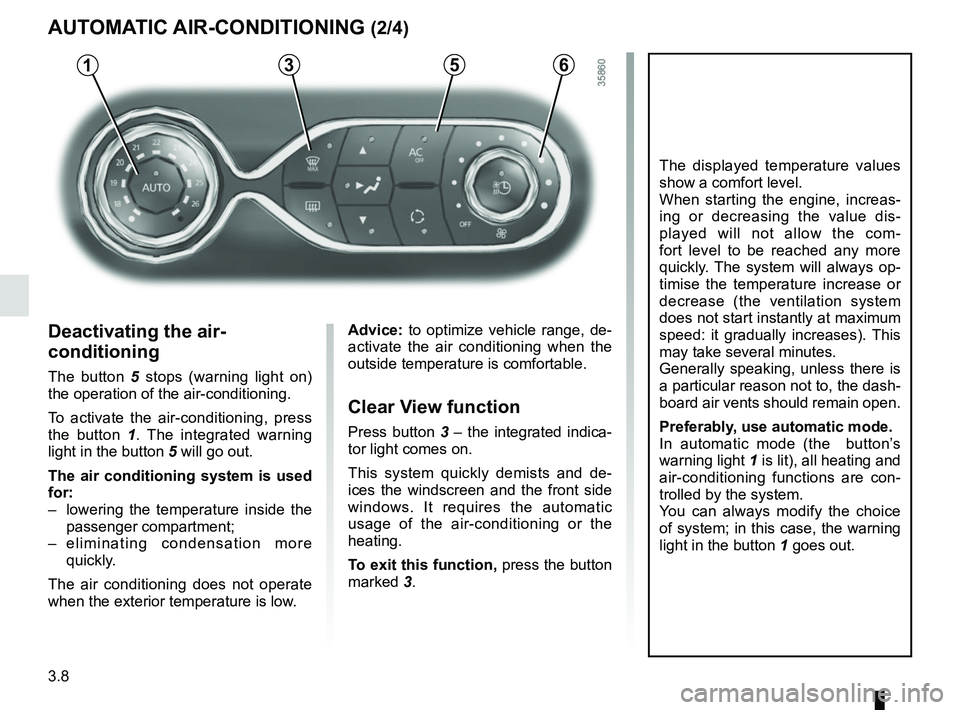
The button 5 stops (warning light on)
the operation of the air-conditioning.
To activate the air-conditioning, press
the button 1 . The integrated warning
light in the button 5 will go out.
The air conditioning system is used
for:
– lowering the temperature inside the passenger compartment;
– eliminating condensation more quickly.
The air conditioning does not operate
when the exterior temperature is low.
5
AUTOMATIC AIR-CONDITIONING (2/4)
The displayed temperature values
show a comfort level.
When starting the engine, increas-
ing or decreasing the value dis-
played will not allow the com-
fort level to be reached any more
quickly. The system will always op-
timise the temperature increase or
decrease (the ventilation system
does not start instantly at maximum
speed: it gradually increases). This
may take several minutes.
Generally speaking, unless there is
a particular reason not to, the dash-
board air vents should remain open.
Preferably, use automatic mode.
In automatic mode (the button’s
warning light 1 is lit), all heating and
air-conditioning functions are con-
trolled by the system.
You can always modify the choice
of system; in this case, the warning
light in the button 1 goes out.
Advice: to optimize vehicle range, de-
activate the air conditioning when the
outside temperature is comfortable.
Clear View function
Press button 3 – the integrated indica-
tor light comes on.
This system quickly demists and de-
ices the windscreen and the front side
windows. It requires the automatic
usage of the air-conditioning or the
heating.
To exit this function, press the button
marked 3.
61
Page 135 of 226
3.9
AUTOMATIC AIR-CONDITIONING (3/4)
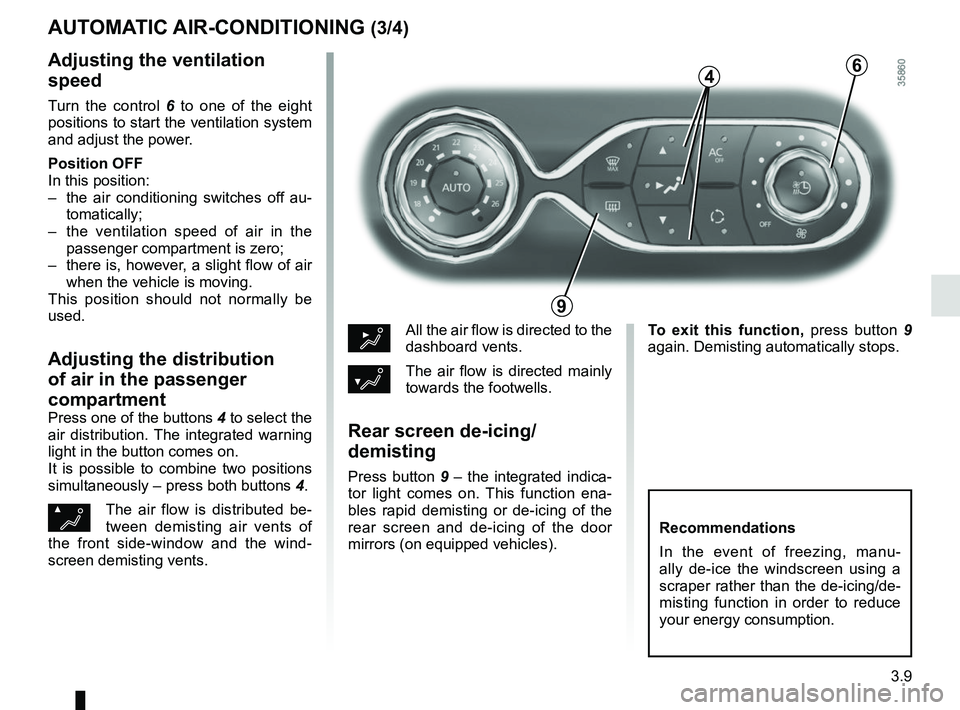
Adjusting the ventilation
speed
Turn the control 6 to one of the eight
positions to start the ventilation system
and adjust the power.
Position OFF
In this position:
– the air conditioning switches off au- tomatically;
– the ventilation speed of air in the passenger compartment is zero;
– there is, however, a slight flow of air when the vehicle is moving.
This position should not normally be
used.
Adjusting the distribution
of air in the passenger
compartment
Press one of the buttons 4 to select the
air distribution. The integrated warning
light in the button comes on.
It is possible to combine two positions
simultaneously – press both buttons 4.
ØThe air flow is distributed be-
tween demisting air vents of
the front side-window and the wind-
screen demisting vents.
½All the air flow is directed to the
dashboard vents.
¿The air flow is directed mainly
towards the footwells.
Rear screen de-icing/
demisting
Press button 9 – the integrated indica-
tor light comes on. This function ena-
bles rapid demisting or de-icing of the
rear screen and de-icing of the door
mirrors (on equipped vehicles).
9
6
Recommendations
In the event of freezing, manu-
ally de-ice the windscreen using a
scraper rather than the de-icing/de-
misting function in order to reduce
your energy consumption.
To exit this function, press button 9
again. Demisting automatically stops.
4
Page 137 of 226
3.11
AIR CONDITIONING: remote activation
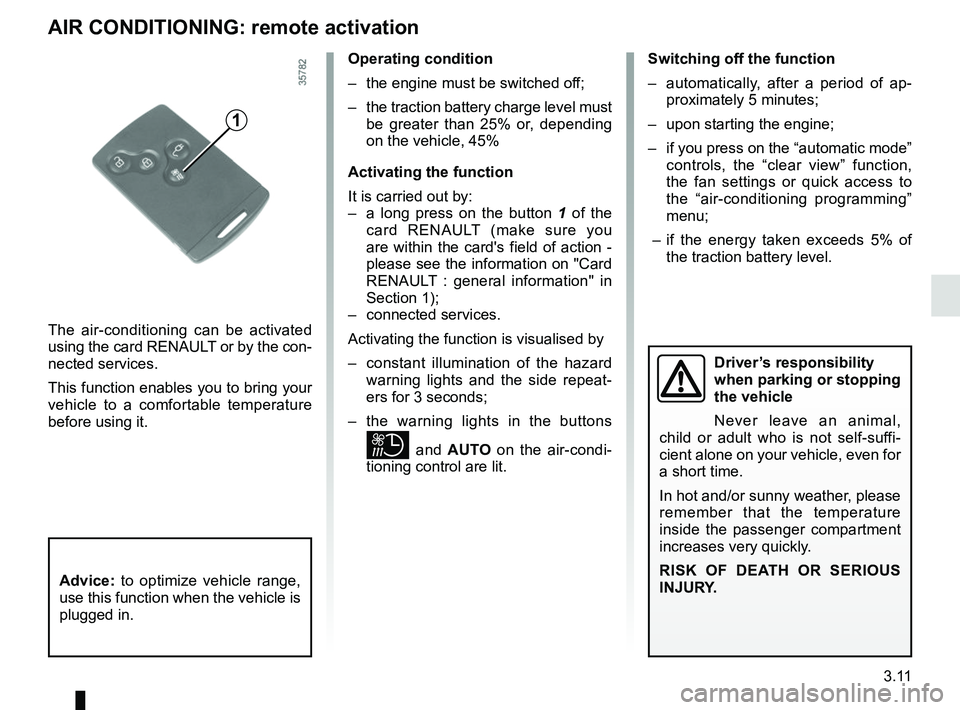
The air-conditioning can be activated
using the card RENAULT or by the con-
nected services.
This function enables you to bring your
vehicle to a comfortable temperature
before using it.
1
Operating condition
– the engine must be switched off;
– the traction battery charge level must be greater than 25% or, depending
on the vehicle, 45%
Activating the function
It is carried out by:
– a long press on the button 1 of the
card RENAULT (make sure you
are within the card's field of action -
please see the information on "Card
RENAULT : general information" in
Section 1);
– connected services.
Activating the function is visualised by
– constant illumination of the hazard warning lights and the side repeat-
ers for 3 seconds;
– the warning lights in the buttons
and AUTO on the air-condi-
tioning control are lit. Switching off the function
– automatically, after a period of ap-
proximately 5 minutes;
– upon starting the engine;
– if you press on the “automatic mode” controls, the “clear view” function,
the fan settings or quick access to
the “air-conditioning programming”
menu;
– if the energy taken exceeds 5% of the traction battery level.
Driver’s responsibility
when parking or stopping
the vehicle
Never leave an animal,
child or adult who is not self-suffi-
cient alone on your vehicle, even for
a short time.
In hot and/or sunny weather, please
remember that the temperature
inside the passenger compartment
increases very quickly.
RISK OF DEATH OR SERIOUS
INJURY.
Advice: to optimize vehicle range,
use this function when the vehicle is
plugged in.
Page 143 of 226
3.17
AIR IONIZER
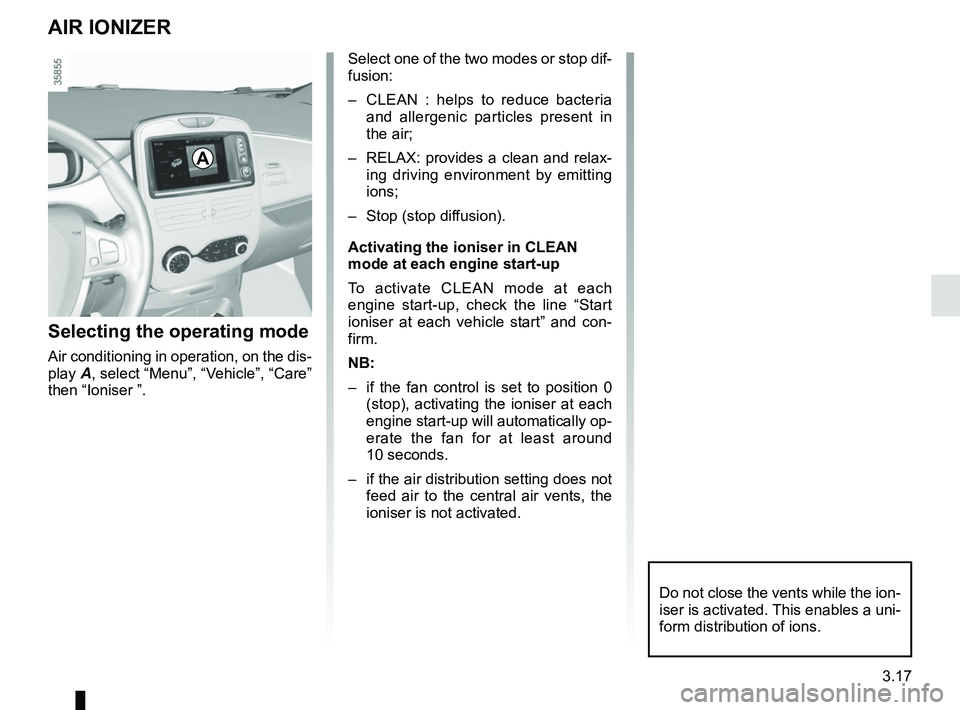
Selecting the operating mode
Air conditioning in operation, on the dis-
play A, select “Menu”, “Vehicle”, “Care”
then “Ioniser ”.
Select one of the two modes or stop dif-
fusion:
– CLEAN : helps to reduce bacteria and allergenic particles present in
the air;
– RELAX: provides a clean and relax- ing driving environment by emitting
ions;
– Stop (stop diffusion).
Activating the ioniser in CLEAN
mode at each engine start-up
To activate CLEAN mode at each
engine start-up, check the line “Start
ioniser at each vehicle start” and con-
firm.
NB:
– if the fan control is set to position 0 (stop), activating the ioniser at each
engine start-up will automatically op-
erate the fan for at least around
10 seconds.
– if the air distribution setting does not feed air to the central air vents, the
ioniser is not activated.
Do not close the vents while the ion-
iser is activated. This enables a uni-
form distribution of ions.
A
Page 144 of 226
3.18
AIR CONDITIONING: information and operating instructions (1/2)
Do not open the refriger-
ant fluid circuit. The fluid
may damage eyes or skin.
Advice on use
In some situations, (air conditioning
off, air recirculation activated, ventila-
tion speed at zero or low, etc.) you may
notice that condensation starts to form
on the windows and windscreen.
If there is condensation, use the “Clear
View” function to remove it, then use
the air conditioning in automatic mode
to stop it forming again.
Maintenance
Refer to the Maintenance Document
for your vehicle for the inspection fre-
quency.
Range
It is normal to notice an increase in
energy usage when the air conditioning
is operating. Recommendations to limit energy
consumption and maintain the
range of the vehicle:
Drive with the air vents open and the
windows closed. If the vehicle has been
parked in the sun, open the doors for a
few moments to let the hot air escape
before starting the engine.
Favour:
– before departure, the use of the air-
conditioning programming or remote
activation. Please refer to the infor-
mation on “Air-conditioning: pro-
gramming” and “Air-conditioning:
remote activation” in Section 2);
– during your journeys, using ECO mode. Please see information about
“ECO mode function” in Section 2.
Operating faults
As a general rule, contact your ap-
proved dealer in the event of an oper-
ating fault.
– Reduction in de-icing, demisting
or air conditioning performance.
This may be caused by the passen-
ger compartment filter cartridge be-
coming clogged.
– No hot or cold air is being pro-
duced. Check that the controls are
set correctly and that the fuses are
sound. Otherwise, switch off the
system.
Presence of water under the
vehicle
After prolonged use of the air condi-
tioning system, it is normal for water
to be present under the vehicle. This is
caused by condensation.
Vehicles equipped with
modeECO
Once activated, ECO mode may
reduce air conditioning perform-
ance. Please refer to the informa-
tion on “Driving advice, Eco-driving”
in Section 2.
Use the air conditioning system reg-
ularly, even in cold weather, running
it at least once a month for approxi-
mately 5 minutes.
Page 145 of 226
3.19
AIR CONDITIONING: information and operating instructions (2/2)
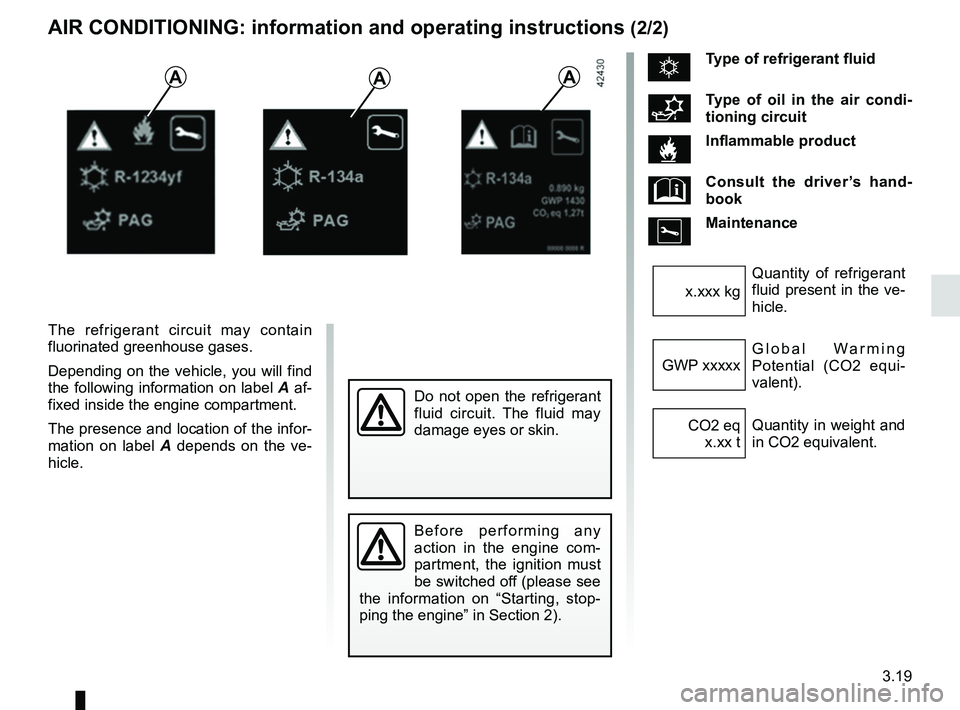
The refrigerant circuit may contain
fluorinated greenhouse gases.
Depending on the vehicle, you will find
the following information on label A af-
fixed inside the engine compartment.
The presence and location of the infor-
mation on label A depends on the ve-
hicle.
AAA
Do not open the refrigerant
fluid circuit. The fluid may
damage eyes or skin.
ÑType of refrigerant fluid
Type of oil in the air condi-
tioning circuit
\bInflammable product
Consult the driver’s hand-
book
Maintenance
Quantity of refrigerant
fluid present in the ve-
hicle.
x.xxx kg
Global Warming
Potential (CO2 equi-
valent).
GWP xxxxx
Quantity in weight and
in CO2 equivalent.
CO2 eq
x.xx t
Before performing any
action in the engine com-
partment, the ignition must
be switched off (please see
the information on “Starting, stop-
ping the engine” in Section 2).