light SAAB 9-2X 2005 User Guide
[x] Cancel search | Manufacturer: SAAB, Model Year: 2005, Model line: 9-2X, Model: SAAB 9-2X 2005Pages: 444, PDF Size: 5.76 MB
Page 392 of 444
11 -6 7
Maintenance and service
– CONTINUED –
11
18 February 2004
"HID headlight bulbs (optional on cer-
tain U.S. models)High-intensity-discharge (HID) bulbs are used
for the low beams of the headlights. These HID
bulbs use an extremely high voltage. To avoid
the risk of an electric shock and resulting seri-
ous injury, you should not attempt to replace
them. Neither should you attempt to replace the
high-beam bulbs, remove/refit the headlight as-
semblies, or remove any headlight-assembly
components. For replacement of the headlight
bulbs (low-beam and high-beam), removal and
installation of the headlight assemblies, and re-
moval of headlight-assembly components,
contact your Saab dealer.
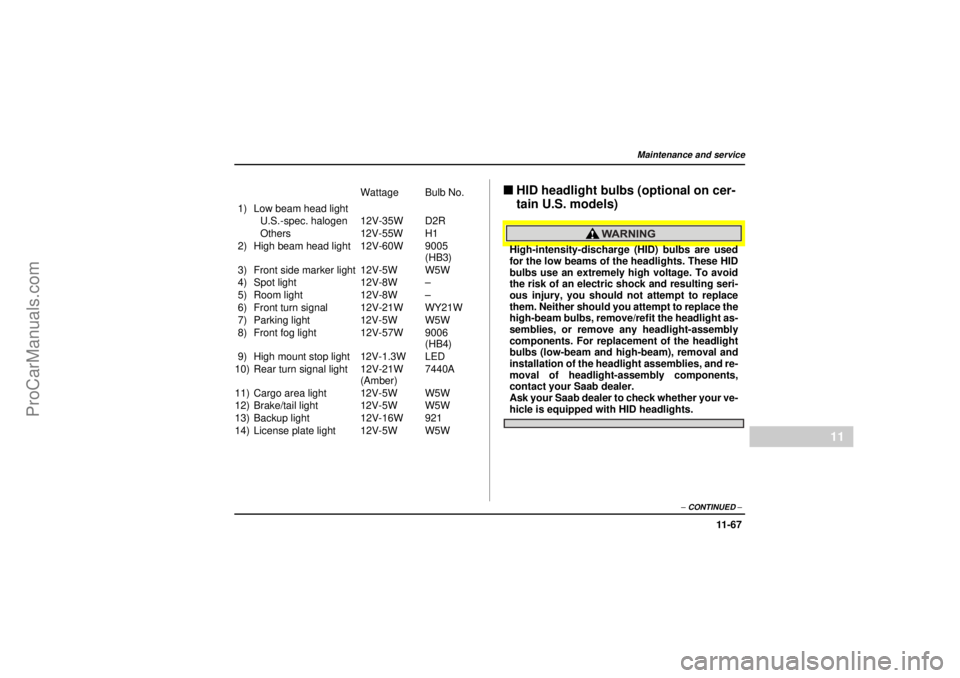
Ask your Saab dealer to check whether your ve-hicle is equipped with HID headlights. Wattage Bulb No.
1) Low beam head light
U.S.-spec. halogen 12V-35W D2R
Others 12V-55W H1
2) High beam head light 12V-60W 9005
(HB3)
3) Front side marker light 12V-5W W5W
4) Spot light 12V-8W –
5) Room light 12V-8W –
6) Front turn signal 12V-21W WY21W
7) Parking light 12V-5W W5W
8) Front fog light 12V-57W 9006
(HB4)
9) High mount stop light 12V-1.3W LED
10) Rear turn signal light 12V-21W
(Amber)7440A
11) Cargo area light 12V-5W W5W
12) Brake/tail light 12V-5W W5W
13) Backup light 12V-16W 921
14) License plate light 12V-5W W5W
ProCarManuals.com
Page 393 of 444
11 - 6 8Maintenance and service
18 February 2004
"Halogen headlight bulbs (U.S./CA-
models equipped with HID low beam
bulbs)Halogen headlight bulbs become very hot while
in use. If you touch the bulb surface with bare
hands or greasy gloves, finger prints or grease
on the bulb surface will develop into hot spots
and cause the bulb to break. If there are finger
prints or grease on the bulb surface, wipe them
away with a soft cloth moistened with alcohol.
Ask your Saab dealer to check whether your ve-hicle is equipped with HID headlights.NOTE!If headlight aiming is required, consult your
Saab dealer for proper adjustment of the headlight
aim.
!It may be difficult to replace the bulbs. Have
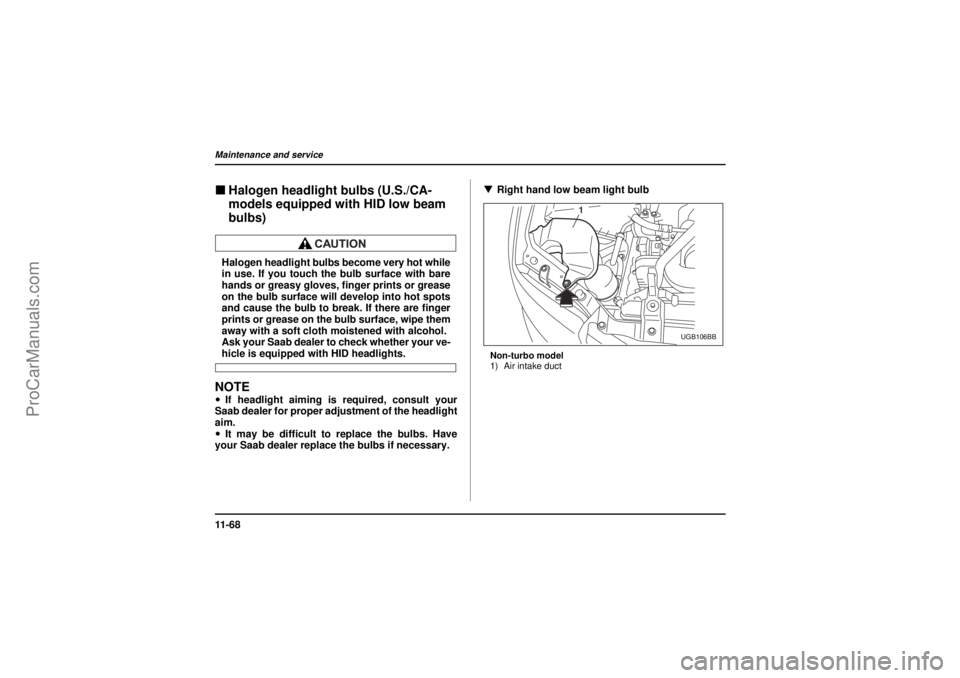
your Saab dealer replace the bulbs if necessary.!Right hand low beam light bulb
Non-turbo model
1) Air intake duct
1
UGB106BB
ProCarManuals.com
Page 395 of 444
11 - 7 0Maintenance and service
26 December 2003
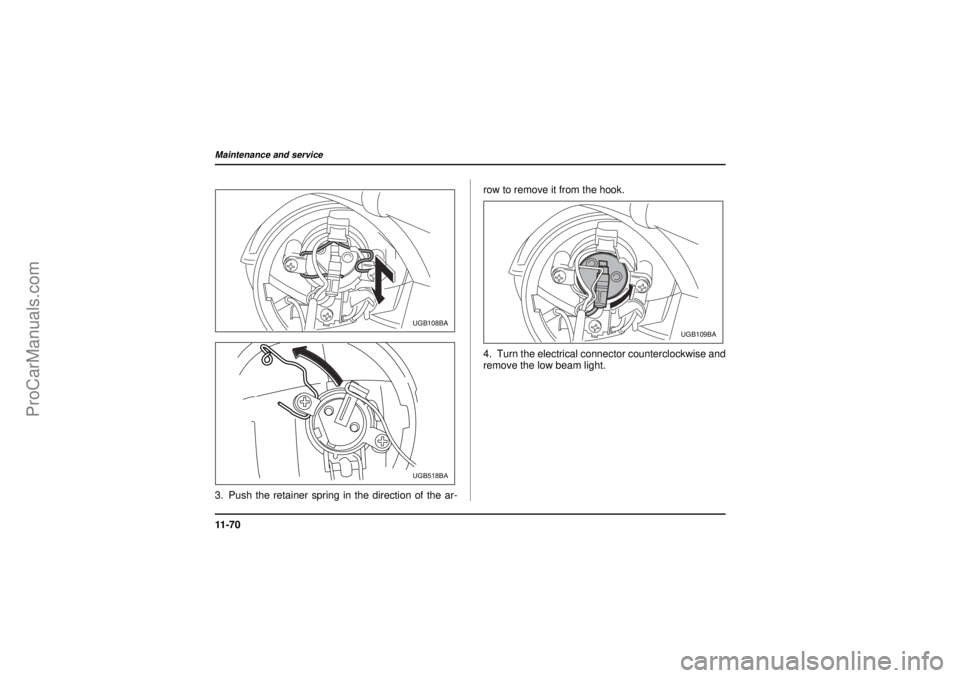
3. Push the retainer spring in the direction of the ar-row to remove it from the hook.
4. Turn the electrical connector counterclockwise and
remove the low beam light.
UGB108BAUGB518BA
UGB109BA
ProCarManuals.com
Page 396 of 444
11 -7 1
Maintenance and service
– CONTINUED –
11
26 December 2003
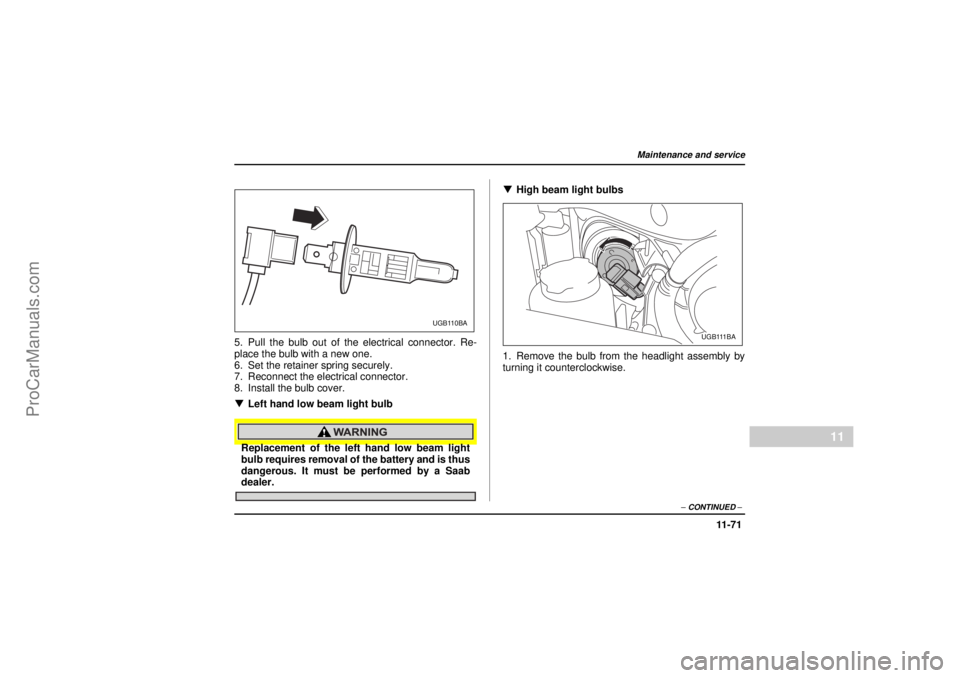
5. Pull the bulb out of the electrical connector. Re-
place the bulb with a new one.
6. Set the retainer spring securely.
7. Reconnect the electrical connector.
8. Install the bulb cover.
!Left hand low beam light bulbReplacement of the left hand low beam light
bulb requires removal of the battery and is thus
dangerous. It must be performed by a Saabdealer.!High beam light bulbs
0
1. Remove the bulb from the headlight assembly by
turning it counterclockwise.
UGB110BA
UGB111BA
ProCarManuals.com
Page 397 of 444
11 - 7 2Maintenance and service
26 December 2003
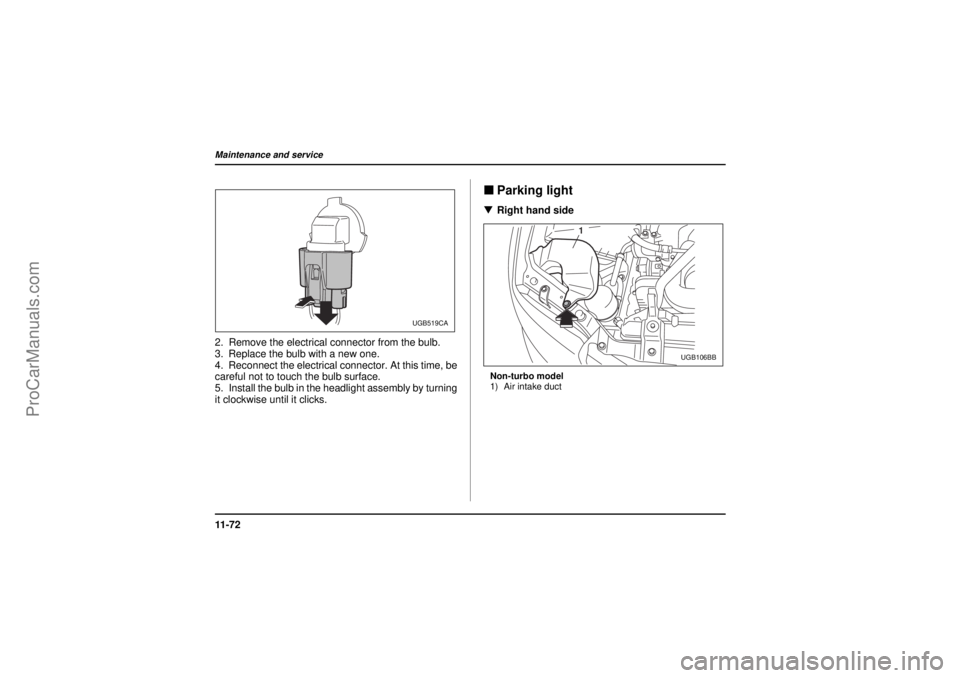
2. Remove the electrical connector from the bulb.
3. Replace the bulb with a new one.
4. Reconnect the electrical connector. At this time, be
careful not to touch the bulb surface.
5. Install the bulb in the headlight assembly by turning
it clockwise until it clicks.
"Parking light!Right hand sideNon-turbo model
1) Air intake duct
UGB519CA
1
UGB106BB
ProCarManuals.com
Page 399 of 444
11 - 7 4Maintenance and service
18 February 2004
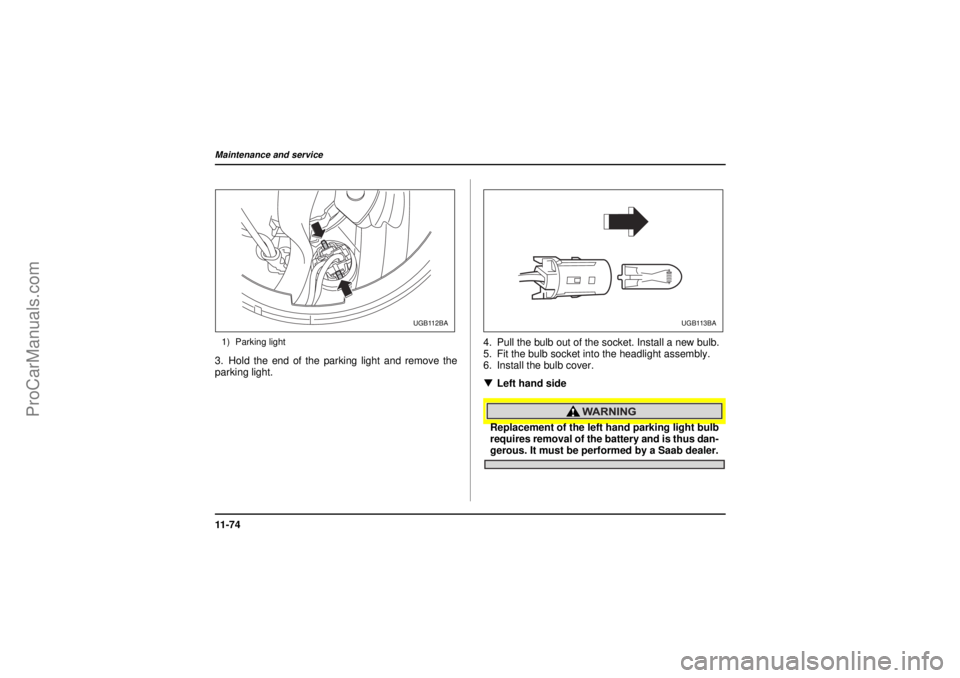
1) Parking light3. Hold the end of the parking light and remove the
parking light.4. Pull the bulb out of the socket. Install a new bulb.
5. Fit the bulb socket into the headlight assembly.
6. Install the bulb cover.
!Left hand side
Replacement of the left hand parking light bulb
requires removal of the battery and is thus dan-gerous. It must be performed by a Saab dealer.
UGB112BA
UGB113BA
ProCarManuals.com
Page 400 of 444
11 -7 5
Maintenance and service
– CONTINUED –
11
26 December 2003
"Front turn signal light and front side
marker light bulbs!Right hand side
It may be difficult to replace the bulbs. Have your Saab
dealer replace the bulbs if necessary.
!Left hand side
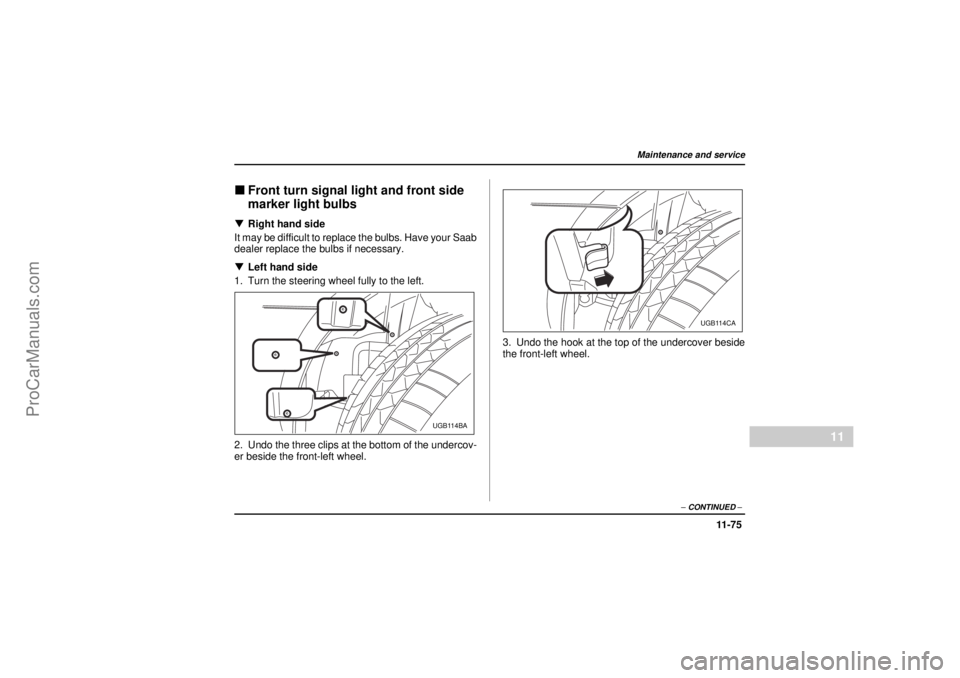
1. Turn the steering wheel fully to the left.
2. Undo the three clips at the bottom of the undercov-
er beside the front-left wheel.3. Undo the hook at the top of the undercover beside
the front-left wheel.
UGB114BA
UGB114CA
ProCarManuals.com
Page 401 of 444
11 - 7 6Maintenance and service
26 December 2003
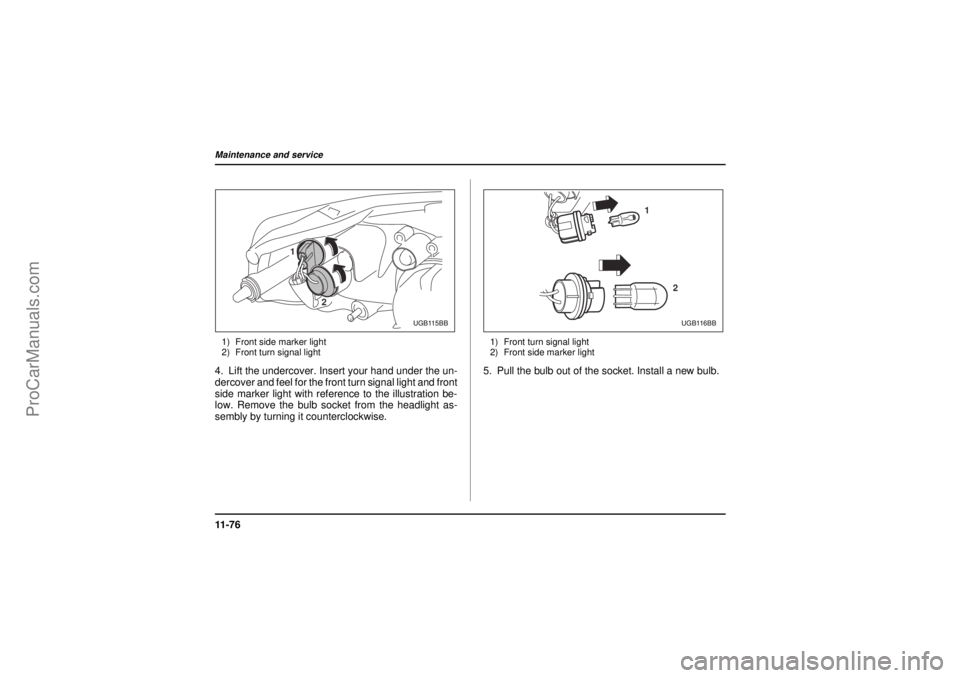
1) Front side marker light
2) Front turn signal light4. Lift the undercover. Insert your hand under the un-
dercover and feel for the front turn signal light and front
side marker light with reference to the illustration be-
low. Remove the bulb socket from the headlight as-
sembly by turning it counterclockwise.
1) Front turn signal light
2) Front side marker light5. Pull the bulb out of the socket. Install a new bulb.
1
2
UGB115BB
1
2
UGB116BB
ProCarManuals.com
Page 402 of 444
11 -7 7
Maintenance and service
– CONTINUED –
11
26 December 2003
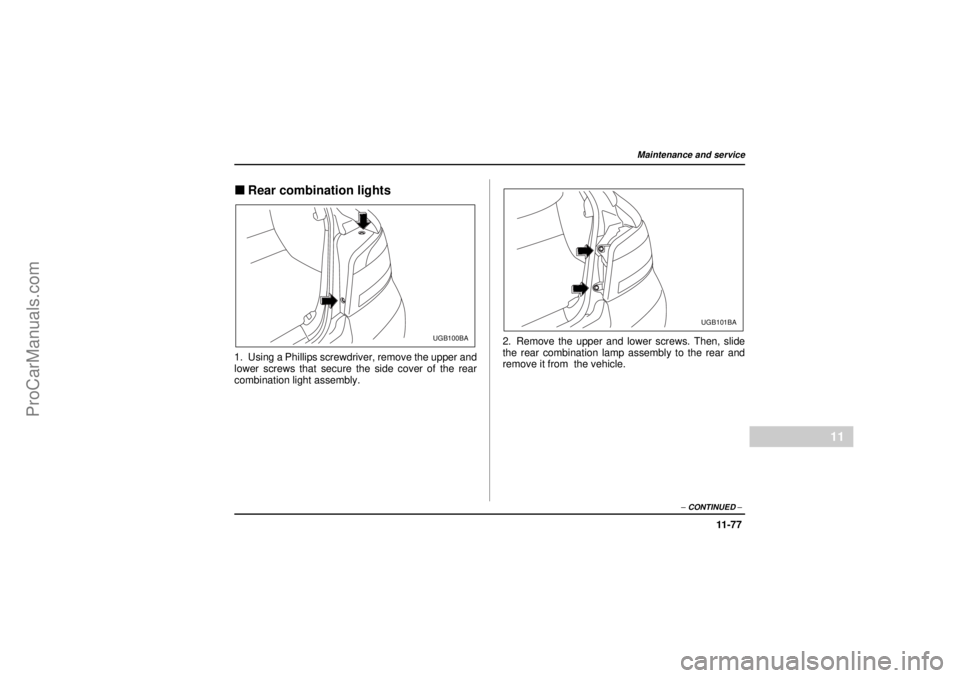
"Rear combination lights1. Using a Phillips screwdriver, remove the upper and
lower screws that secure the side cover of the rear
combination light assembly.2. Remove the upper and lower screws. Then, slide
the rear combination lamp assembly to the rear and
remove it from the vehicle.
UGB100BA
UGB101BA
ProCarManuals.com
Page 403 of 444
11 - 7 8Maintenance and service
18 February 2004
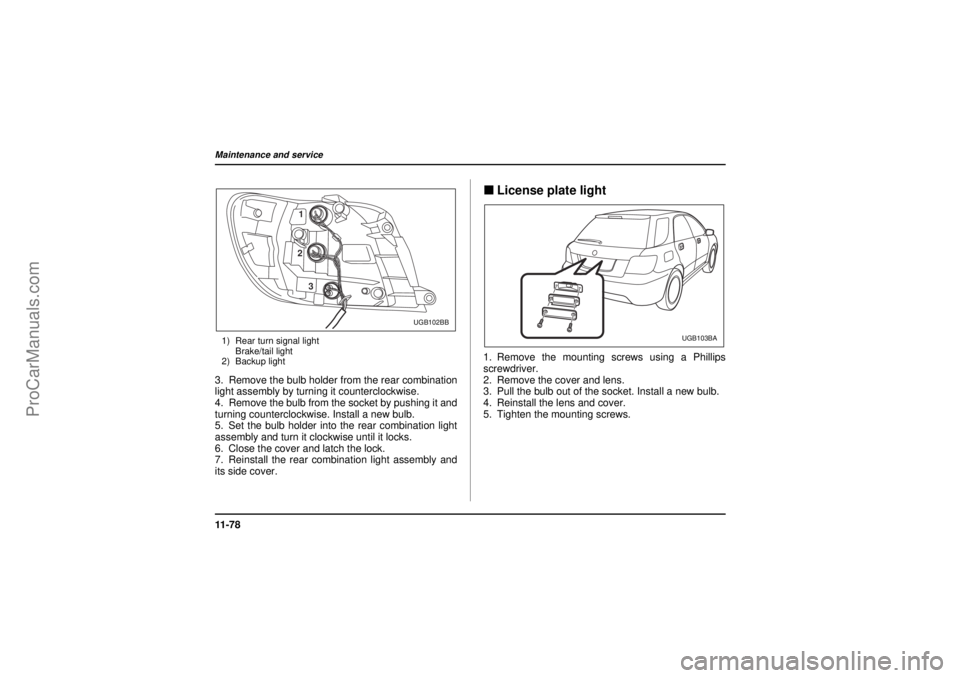
1) Rear turn signal light
Brake/tail light
2) Backup light3. Remove the bulb holder from the rear combination
light assembly by turning it counterclockwise.
4. Remove the bulb from the socket by pushing it and
turning counterclockwise. Install a new bulb.
5. Set the bulb holder into the rear combination light
assembly and turn it clockwise until it locks.
6. Close the cover and latch the lock.
7. Reinstall the rear combination light assembly and
its side cover.
"License plate light1. Remove the mounting screws using a Phillips
screwdriver.
2. Remove the cover and lens.
3. Pull the bulb out of the socket. Install a new bulb.
4. Reinstall the lens and cover.
5. Tighten the mounting screws.
1
2
3
UGB102BB
UGB103BA
ProCarManuals.com