brake light SAAB 9-3 2001 Owners Manual
[x] Cancel search | Manufacturer: SAAB, Model Year: 2001, Model line: 9-3, Model: SAAB 9-3 2001Pages: 260, PDF Size: 12.01 MB
Page 4 of 260
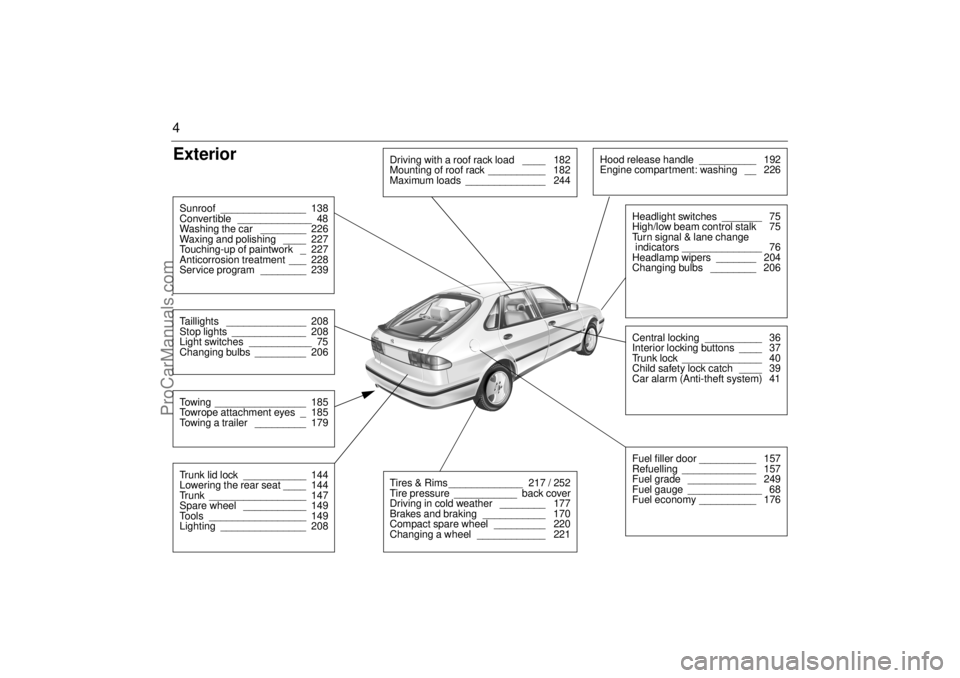
4Exterior Sunroof _______________ 138
Convertible _____________ 48
Washing the car ________ 226
Waxing and polishing ____ 227
Touching-up of paintwork _ 227
Anticorrosion treatment ___ 228
Service program ________ 239Taillights ______________ 208
Stop lights _____________ 208
Light switches ___________ 75
Changing bulbs _________ 206Towing ________________ 185
Towrope attachment eyes _ 185
Towing a trailer _________ 179Trunk lid lock ___________ 144
Lowering the rear seat ____ 144
Trunk _________________ 147
Spare wheel ___________ 149
Tools _________________ 149
Lighting _______________ 208
Driving with a roof rack load ____ 182
Mounting of roof rack __________ 182
Maximum loads ______________ 244
Hood release handle __________ 192
Engine compartment: washing __ 226
Central locking __________ 36
Interior locking buttons ____ 37
Trunk lock ______________ 40
Child safety lock catch ____ 39
Car alarm (Anti-theft system) 41Headlight switches _______ 75
High/low beam control stalk 75
Turn signal & lane change
indicators ______________ 76
Headlamp wipers _______ 204
Changing bulbs ________ 206Fuel filler door __________ 157
Refuelling _____________ 157
Fuel grade ____________ 249
Fuel gauge _____________ 68
Fuel economy __________ 176
Tires & Rims _____________ 217 / 252
Tire pressure ___________ back cover
Driving in cold weather ________ 177
Brakes and braking ___________ 170
Compact spare wheel _________ 220
Changing a wheel ____________ 221
ProCarManuals.com
Page 61 of 260
61 Instruments and controls
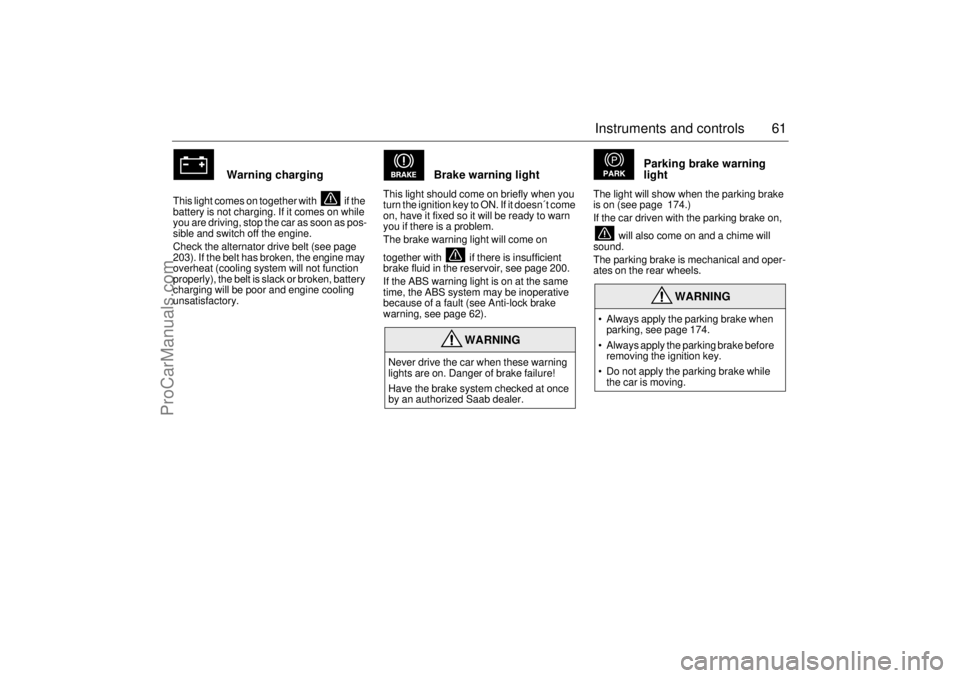
Warning charging
This light comes on together with if the
battery is not charging. If it comes on while
you are driving, stop the car as soon as pos-
sible and switch off the engine.
Check the alternator drive belt (see page
203). If the belt has broken, the engine may
overheat (cooling system will not function
properly), the belt is slack or broken, battery
charging will be poor and engine cooling
unsatisfactory.
Brake warning light
This light should come on briefly when you
turn the ignition key to ON. If it doesn´t come
on, have it fixed so it will be ready to warn
you if there is a problem.
The brake warning light will come on
together with if there is insufficient
brake fluid in the reservoir, see page 200.
If the ABS warning light is on at the same
time, the ABS system may be inoperative
because of a fault (see Anti-lock brake
warning, see page 62).
Parking brake warning
light
The light will show when the parking brake
is on (see page 174.)
If the car driven with the parking brake on,
will also come on and a chime will
sound.
The parking brake is mechanical and oper-
ates on the rear wheels.
WARNING
Never drive the car when these warning
lights are on. Danger of brake failure!
Have the brake system checked at once
by an authorized Saab dealer.
WARNING
Always apply the parking brake when
parking, see page 174.
Always apply the parking brake before
removing the ignition key.
Do not apply the parking brake while
the car is moving.
ProCarManuals.com
Page 62 of 260
62 Instruments and controls
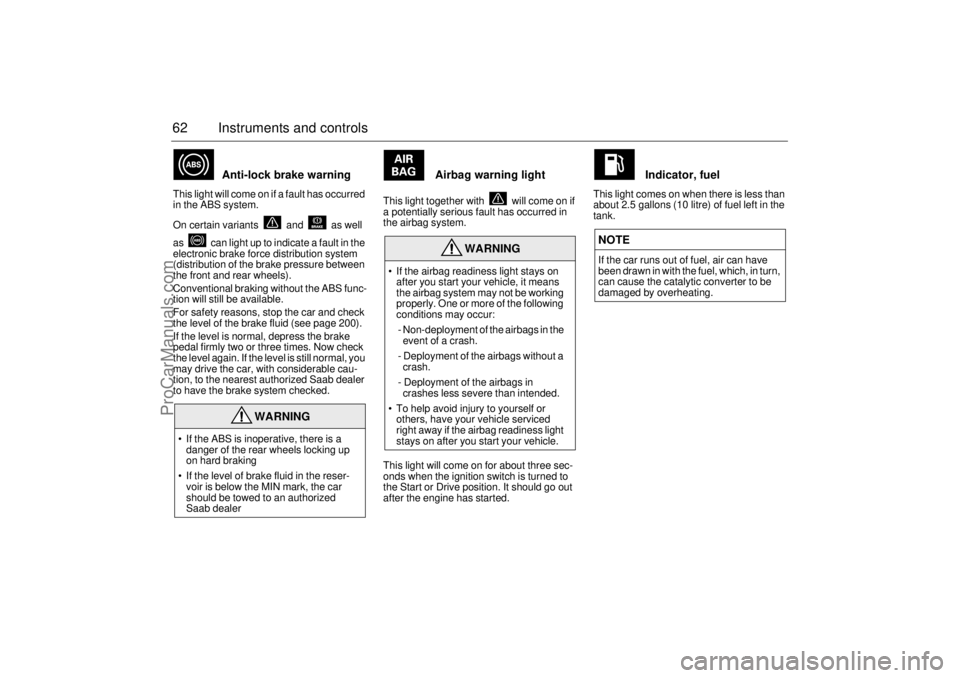
Anti-lock brake warning
This light will come on if a fault has occurred
in the ABS system.
On certain variants and as well
as can light up to indicate a fault in the
electronic brake force distribution system
(distribution of the brake pressure between
the front and rear wheels).
Conventional braking without the ABS func-
tion will still be available.
For safety reasons, stop the car and check
the level of the brake fluid (see page 200).
If the level is normal, depress the brake
pedal firmly two or three times. Now check
the level again. If the level is still normal, you
may drive the car, with considerable cau-
tion, to the nearest authorized Saab dealer
to have the brake system checked.
Airbag warning light
This light together with will come on if
a potentially serious fault has occurred in
the airbag system.
This light will come on for about three sec-
onds when the ignition switch is turned to
the Start or Drive position. It should go out
after the engine has started.
Indicator, fuel
This light comes on when there is less than
about 2.5 gallons (10 litre) of fuel left in the
tank.
WARNING
If the ABS is inoperative, there is a
danger of the rear wheels locking up
on hard braking
If the level of brake fluid in the reser-
voir is below the MIN mark, the car
should be towed to an authorized
Saab dealer
WARNING
If the airbag readiness light stays on
after you start your vehicle, it means
the airbag system may not be working
properly. One or more of the following
conditions may occur:
- Non-deployment of the airbags in the
event of a crash.
- Deployment of the airbags without a
crash.
- Deployment of the airbags in
crashes less severe than intended.
To help avoid injury to yourself or
others, have your vehicle serviced
right away if the airbag readiness light
stays on after you start your vehicle.
NOTEIf the car runs out of fuel, air can have
been drawn in with the fuel, which, in turn,
can cause the catalytic converter to be
damaged by overheating.
ProCarManuals.com
Page 63 of 260
63 Instruments and controls
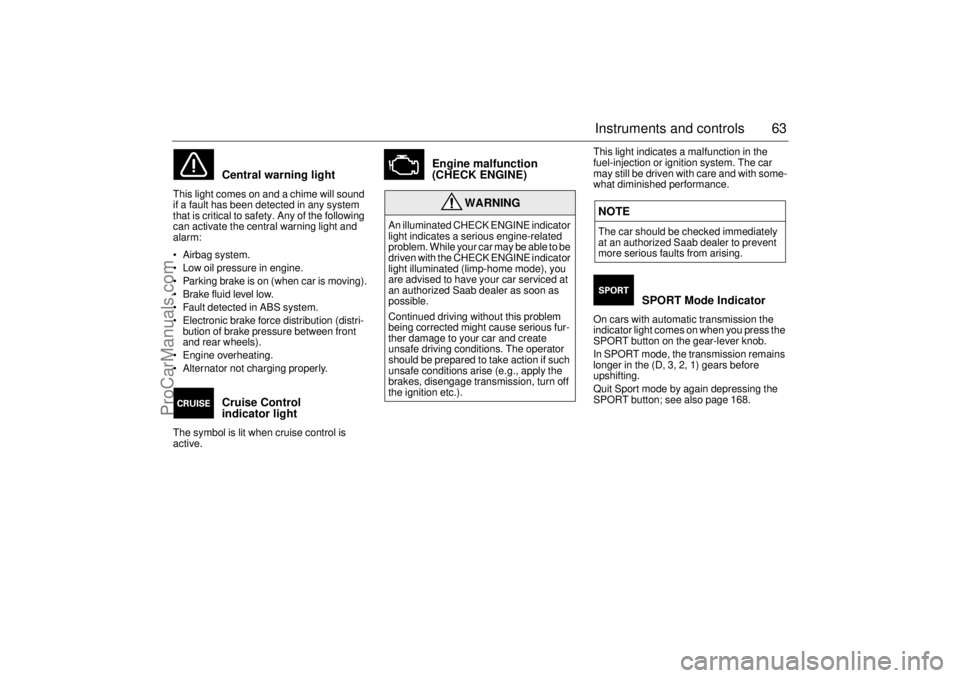
Central warning light
This light comes on and a chime will sound
if a fault has been detected in any system
that is critical to safety. Any of the following
can activate the central warning light and
alarm:
Airbag system.
Low oil pressure in engine.
Parking brake is on (when car is moving).
Brake fluid level low.
Fault detected in ABS system.
Electronic brake force distribution (distri-
bution of brake pressure between front
and rear wheels).
Engine overheating.
Alternator not charging properly.
Cruise Control
indicator light
The symbol is lit when cruise control is
active.
Engine malfunction
(CHECK ENGINE)
This light indicates a malfunction in the
fuel-injection or ignition system. The car
may still be driven with care and with some-
what diminished performance.
SPORT Mode Indicator
On cars with automatic transmission the
indicator light comes on when you press the
SPORT button on the gear-lever knob.
In SPORT mode, the transmission remains
longer in the (D, 3, 2, 1) gears before
upshifting.
Quit Sport mode by again depressing the
SPORT button; see also page 168.
WARNING
An illuminated CHECK ENGINE indicator
light indicates a serious engine-related
problem. While your car may be able to be
driven with the CHECK ENGINE indicator
light illuminated (limp-home mode), you
are advised to have your car serviced at
an authorized Saab dealer as soon as
possible.
Continued driving without this problem
being corrected might cause serious fur-
ther damage to your car and create
unsafe driving conditions. The operator
should be prepared to take action if such
unsafe conditions arise (e.g., apply the
brakes, disengage transmission, turn off
the ignition etc.).
NOTEThe car should be checked immediately
at an authorized Saab dealer to prevent
more serious faults from arising.
ProCarManuals.com
Page 73 of 260

73 Instruments and controls
The following CHECK messages may be
displayed: 1) This message will be displayed approximately
600 miles (1,000 km) before the next sched-
uled service is due, or when 365 days have
elapsed since the last service. The message
should be cleared at the time of that service
(see the Saab Warranties & Service Record
Booklet).
This message can also be deleted by first
briefly pressing the CLR button, then depress-
ing it a second time for at least eight seconds
until "SERVICE" appears on the display and a
chime sounds. The message can only be
deleted when it is shown on the SID.
Night panelTo improve night-driving conditions inside
the car, the Night Panel mode can be
selected. In this mode, the amount of infor-
mation displayed is reduced, and only the
most important instruments and displays
will be illuminated.
When the Night Panel button is pressed,
only the speedometer will be illuminated (up
to the 87-mph or 140-km/h graduation), all
the other instruments illumination will be
extinguished and their needles moved to
zero. Both the SID and the ACC displays will
be extinguished and the backlighting for
switches and other controls will be dimmed.
Note: All indicator and warning lights,
together with the display of CHECK mes-
sages, will operate as normal. The following conditions will wake up the
respective displays in the Night-Panel
mode:
Setting of the Audio System, SID or ACC
(display comes on for ten seconds).
CHECK message generated in the SID.
High engine revs cause the rev counter to
be illuminated until the engine speed has
fallen again.
If the quantity of fuel remaining falls below
4 gallons (15 liters), the fuel gauge will be
illuminated.
If the engine temperature rises above nor-
mal, the temperature gauge will be illumi-
nated.
If the speed of the car exceeds 84 mph
(135 km/h), the entire speedometer will
be illuminated.
In cars with automatic transmission, if the
selector lever is moved from D to position
3, 2 or 1, the selector indication on the
main instrument panel will be illuminated.
To restore the displays and lighting to the
normal mode, press the Night-Panel button. Display shows: See
page
BRAKE LIGHT FAILURE 208
FRONT LIGHT FAILURE 206
REAR LIGHT FAILURE 208
FOG LIGHT FAILURE 209
WASHER FLUID LEVEL LOW 205
TIGHTEN FUEL FILLER CAP 157
FILL COOLANT FLUID 198
KEY NOT ACCEPTED 45
REPLACE KEY BATTERY 45
SERVICE THEFT ALARM 45
TRANSMISSION OVERHEATING 165
TIME FOR SERVICE
1)
236
ProCarManuals.com
Page 152 of 260
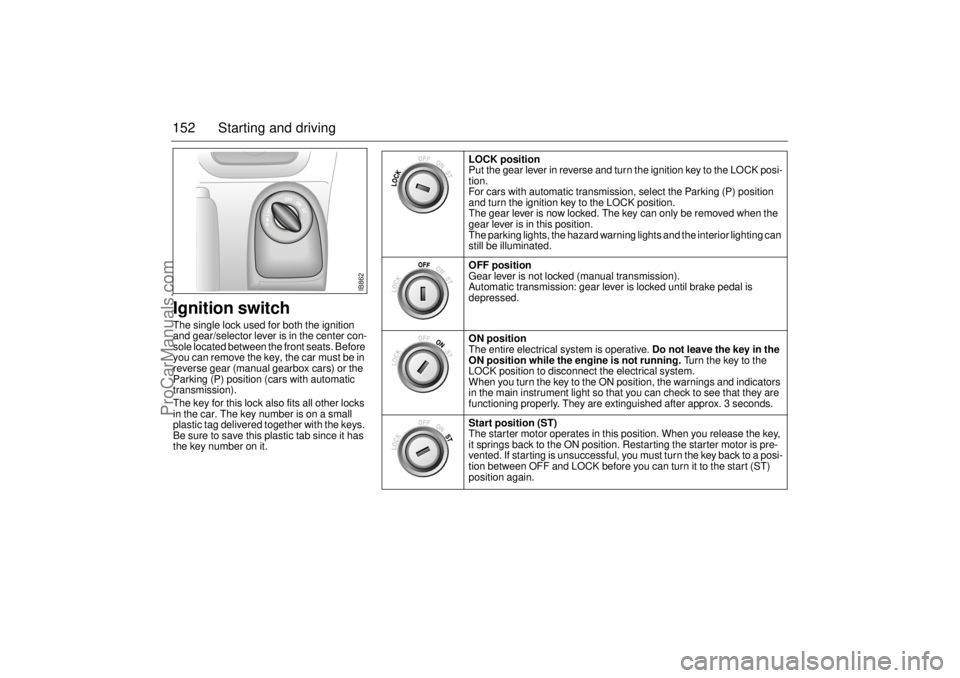
152 Starting and drivingIgnition switchThe single lock used for both the ignition
and gear/selector lever is in the center con-
sole located between the front seats. Before
you can remove the key, the car must be in
reverse gear (manual gearbox cars) or the
Parking (P) position (cars with automatic
transmission).
The key for this lock also fits all other locks
in the car. The key number is on a small
plastic tag delivered together with the keys.
Be sure to save this plastic tab since it has
the key number on it.
IB862
LOCK position
Put the gear lever in reverse and turn the ignition key to the LOCK posi-
tion.
For cars with automatic transmission, select the Parking (P) position
and turn the ignition key to the LOCK position.
The gear lever is now locked. The key can only be removed when the
gear lever is in this position.
The parking lights, the hazard warning lights and the interior lighting can
still be illuminated.
OFF position
Gear lever is not locked (manual transmission).
Automatic transmission: gear lever is locked until brake pedal is
depressed.
ON position
The entire electrical system is operative. Do not leave the key in the
ON position while the engine is not running. Turn the key to the
LOCK position to disconnect the electrical system.
When you turn the key to the ON position, the warnings and indicators
in the main instrument light so that you can check to see that they are
functioning properly. They are extinguished after approx. 3 seconds.
Start position (ST)
The starter motor operates in this position. When you release the key,
it springs back to the ON position. Restarting the starter motor is pre-
vented. If starting is unsuccessful, you must turn the key back to a posi-
tion between OFF and LOCK before you can turn it to the start (ST)
position again.
ProCarManuals.com
Page 153 of 260
153 Starting and driving
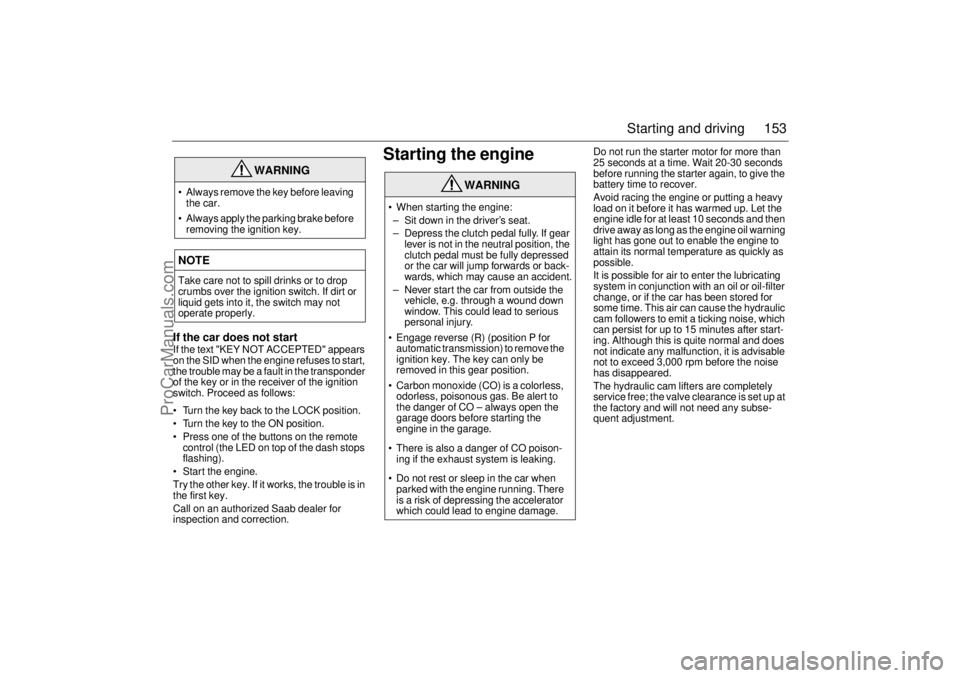
If the car does not startIf the text "KEY NOT ACCEPTED" appears
on the SID when the engine refuses to start,
the trouble may be a fault in the transponder
of the key or in the receiver of the ignition
switch. Proceed as follows:
• Turn the key back to the LOCK position.
Turn the key to the ON position.
Press one of the buttons on the remote
control (the LED on top of the dash stops
flashing).
Start the engine.
Try the other key. If it works, the trouble is in
the first key.
Call on an authorized Saab dealer for
inspection and correction.
Starting the engine
Do not run the starter motor for more than
25 seconds at a time. Wait 20-30 seconds
before running the starter again, to give the
battery time to recover.
Avoid racing the engine or putting a heavy
load on it before it has warmed up. Let the
engine idle for at least 10 seconds and then
drive away as long as the engine oil warning
light has gone out to enable the engine to
attain its normal temperature as quickly as
possible.
It is possible for air to enter the lubricating
system in conjunction with an oil or oil-filter
change, or if the car has been stored for
some time. This air can cause the hydraulic
cam followers to emit a ticking noise, which
can persist for up to 15 minutes after start-
ing. Although this is quite normal and does
not indicate any malfunction, it is advisable
not to exceed 3,000 rpm before the noise
has disappeared.
The hydraulic cam lifters are completely
service free; the valve clearance is set up at
the factory and will not need any subse-
quent adjustment.
WARNING
Always remove the key before leaving
the car.
Always apply the parking brake before
removing the ignition key.NOTETake care not to spill drinks or to drop
crumbs over the ignition switch. If dirt or
liquid gets into it, the switch may not
operate properly.
WARNING
When starting the engine:
– Sit down in the driver’s seat.
– Depress the clutch pedal fully. If gear
lever is not in the neutral position, the
clutch pedal must be fully depressed
or the car will jump forwards or back-
wards, which may cause an accident.
– Never start the car from outside the
vehicle, e.g. through a wound down
window. This could lead to serious
personal injury.
Engage reverse (R) (position P for
automatic transmission) to remove the
ignition key. The key can only be
removed in this gear position.
Carbon monoxide (CO) is a colorless,
odorless, poisonous gas. Be alert to
the danger of CO – always open the
garage doors before starting the
engine in the garage.
There is also a danger of CO poison-
ing if the exhaust system is leaking.
Do not rest or sleep in the car when
parked with the engine running. There
is a risk of depressing the accelerator
which could lead to engine damage.
ProCarManuals.com
Page 161 of 260
161 Starting and driving
Engine Break-in PeriodPistons, cylinder bores and bearings need
time to obtain uniform, wear-resistant sur-
faces.
If a new engine is driven too hard, this grad-
ual process of bedding-in will not be possi-
ble and the life of the engine will be short-
ened.
During the first 1,200 miles (2,000 km), do
not exceed 5,000 rpm.
In addition, refrain from driving the car at full
throttle, other than for brief instances,
during the first 1,800 miles (3,000 km).Wearing in new brake padsNew brake pads take time to bed in, about
90 miles (150 km) if the car is driven largely
under stop-and-go conditions or about
300 miles (500 km) of highway driving.
To extend the useful life of the pads, avoid
hard braking as much as possible.
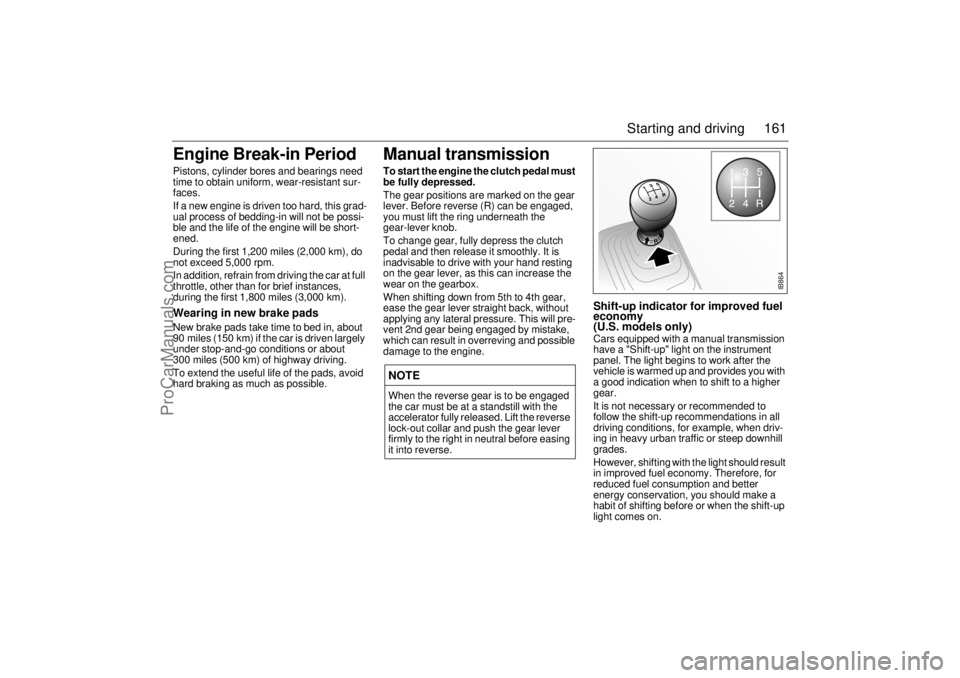
Manual transmissionTo start the engine the clutch pedal must
be fully depressed.
The gear positions are marked on the gear
lever. Before reverse (R) can be engaged,
you must lift the ring underneath the
gear-lever knob.
To change gear, fully depress the clutch
pedal and then release it smoothly. It is
inadvisable to drive with your hand resting
on the gear lever, as this can increase the
wear on the gearbox.
When shifting down from 5th to 4th gear,
ease the gear lever straight back, without
applying any lateral pressure. This will pre-
vent 2nd gear being engaged by mistake,
which can result in overreving and possible
damage to the engine.
Shift-up indicator for improved fuel
economy
(U.S. models only)Cars equipped with a manual transmission
have a "Shift-up" light on the instrument
panel. The light begins to work after the
vehicle is warmed up and provides you with
a good indication when to shift to a higher
gear.
It is not necessary or recommended to
follow the shift-up recommendations in all
driving conditions, for example, when driv-
ing in heavy urban traffic or steep downhill
grades.
However, shifting with the light should result
in improved fuel economy. Therefore, for
reduced fuel consumption and better
energy conservation, you should make a
habit of shifting before or when the shift-up
light comes on.
NOTEWhen the reverse gear is to be engaged
the car must be at a standstill with the
accelerator fully released. Lift the reverse
lock-out collar and push the gear lever
firmly to the right in neutral before easing
it into reverse.
IB864
ProCarManuals.com
Page 166 of 260
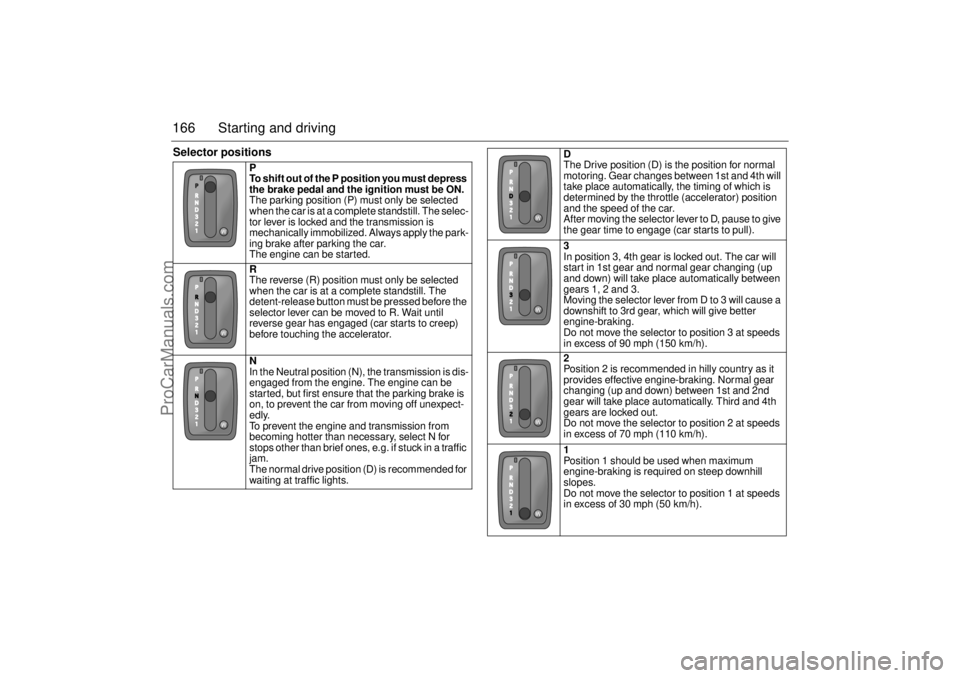
166 Starting and drivingSelector positions
P
To shift out of the P position you must depress
the brake pedal and the ignition must be ON.
The parking position (P) must only be selected
when the car is at a complete standstill. The selec-
tor lever is locked and the transmission is
mechanically immobilized. Always apply the park-
ing brake after parking the car.
The engine can be started.
R
The reverse (R) position must only be selected
when the car is at a complete standstill. The
detent-release button must be pressed before the
selector lever can be moved to R. Wait until
reverse gear has engaged (car starts to creep)
before touching the accelerator.
N
In the Neutral position (N), the transmission is dis-
engaged from the engine. The engine can be
started, but first ensure that the parking brake is
on, to prevent the car from moving off unexpect-
edly.
To prevent the engine and transmission from
becoming hotter than necessary, select N for
stops other than brief ones, e.g. if stuck in a traffic
jam.
The normal drive position (D) is recommended for
waiting at traffic lights.
D
The Drive position (D) is the position for normal
motoring. Gear changes between 1st and 4th will
take place automatically, the timing of which is
determined by the throttle (accelerator) position
and the speed of the car.
After moving the selector lever to D, pause to give
the gear time to engage (car starts to pull).
3
In position 3, 4th gear is locked out. The car will
start in 1st gear and normal gear changing (up
and down) will take place automatically between
gears 1, 2 and 3.
Moving the selector lever from D to 3 will cause a
downshift to 3rd gear, which will give better
engine-braking.
Do not move the selector to position 3 at speeds
in excess of 90 mph (150 km/h).
2
Position 2 is recommended in hilly country as it
provides effective engine-braking. Normal gear
changing (up and down) between 1st and 2nd
gear will take place automatically. Third and 4th
gears are locked out.
Do not move the selector to position 2 at speeds
in excess of 70 mph (110 km/h).
1
Position 1 should be used when maximum
engine-braking is required on steep downhill
slopes.
Do not move the selector to position 1 at speeds
in excess of 30 mph (50 km/h).
ProCarManuals.com
Page 169 of 260
169 Starting and driving
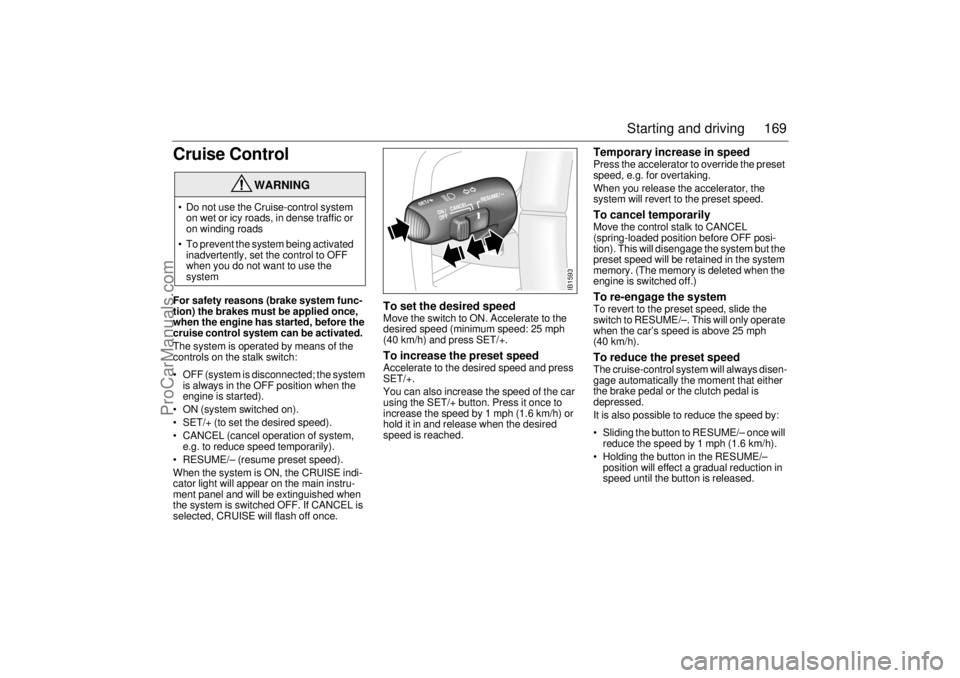
Cruise ControlFor safety reasons (brake system func-
tion) the brakes must be applied once,
when the engine has started, before the
cruise control system can be activated.
The system is operated by means of the
controls on the stalk switch:
OFF (system is disconnected; the system
is always in the OFF position when the
engine is started).
ON (system switched on).
SET/+ (to set the desired speed).
CANCEL (cancel operation of system,
e.g. to reduce speed temporarily).
RESUME/– (resume preset speed).
When the system is ON, the CRUISE indi-
cator light will appear on the main instru-
ment panel and will be extinguished when
the system is switched OFF. If CANCEL is
selected, CRUISE will flash off once.
To set the desired speed Move the switch to ON. Accelerate to the
desired speed (minimum speed: 25 mph
(40 km/h) and press SET/+. To increase the preset speed Accelerate to the desired speed and press
SET/+.
You can also increase the speed of the car
using the SET/+ button. Press it once to
increase the speed by 1 mph (1.6 km/h) or
hold it in and release when the desired
speed is reached.
Temporary increase in speed Press the accelerator to override the preset
speed, e.g. for overtaking.
When you release the accelerator, the
system will revert to the preset speed. To cancel temporarily Move the control stalk to CANCEL
(spring-loaded position before OFF posi-
tion). This will disengage the system but the
preset speed will be retained in the system
memory. (The memory is deleted when the
engine is switched off.) To re-engage the system To revert to the preset speed, slide the
switch to RESUME/–. This will only operate
when the car’s speed is above 25 mph
(40 km/h). To reduce the preset speedThe cruise-control system will always disen-
gage automatically the moment that either
the brake pedal or the clutch pedal is
depressed.
It is also possible to reduce the speed by:
Sliding the button to RESUME/– once will
reduce the speed by 1 mph (1.6 km/h).
Holding the button in the RESUME/–
position will effect a gradual reduction in
speed until the button is released.
WARNING
Do not use the Cruise-control system
on wet or icy roads, in dense traffic or
on winding roads
To prevent the system being activated
inadvertently, set the control to OFF
when you do not want to use the
system
IB1593
ProCarManuals.com