stop start SAAB 9-3 2003 Owners Manual
[x] Cancel search | Manufacturer: SAAB, Model Year: 2003, Model line: 9-3, Model: SAAB 9-3 2003Pages: 256, PDF Size: 21.66 MB
Page 99 of 256

99 Interior equipment
Electric windowsThe electric windows are operated by
means of switches in the door armrests.
For the electric windows to work, the remote
control must be in the ON position in the
ignition switch.
At the end of a journey and having removed
the remote control, you can still operate the
windows, so long as neither of the front
doors has been opened.
Windows having the automatic closing func-
tion (option) can be operated as long as the
car is unlocked and until 20 minutes has passed since the remote control was
removed from the ignition switch.
To openPress down the front edge of the button one
step.
The window will stop when it is fully open or
when the button is released.
Automatic opening: Press the button all
the way down and release it.Comfort opening (option)Comfort opening is the remote opening of
windows and the sunroof.
Press and hold the unlocking button on the
remote control until the windows and sun-
roof start to open (approx. 2 s).
WARNING
Bear in mind the pinch hazard when clos-
ing the side windows. Risk of serious or
fatal injuries!
•Always remove the remote control
from the ignition switch and open one
of the front doors when you leave the
car to prevent personal injury caused
by the activation of the electric
windows, for example, due to children
playing.
The person operating the electric
window is responsible for ensuring
that no one, especially a child, has
their head, hands or fingers in the
window openings, before raising the
window.
Window switches
Window switch in rear door
ProCarManuals.com
Page 112 of 256
112 Interior equipmentInterior rearview mirror with garage
opener, autodimming function and
compass (certain variants only)
Retain your original garage door opener
(transmitter) for future programming proce-
dures (i.e., new vehicle purchase). It is also
suggested that upon the sale of the vehicle,
the programmed garage opener buttons be
erased for security purposes, see page 113.Preparations for first-time programming
Before programming the garage opener for
the first time, you must delete any factory
codes.
Press and hold buttons 1 and 3 for about
20 seconds until the LED starts to flash.
This deletes the factory codes and initiates
the programming phase.
Programming the garage opener
The garage opener can record and store the
frequencies of three different remote con-
trols.
The battery in the remote control should be
fairly new for programming to work well.
1 Turn the ignition ON.
2 Hold your existing garage door opener
1–3 in. (3–7 cm) below the rearview
mirror. Sit where you can see the LED
(4) during programming.
3 Press the button on the remote control
and the desired button on the rear view
mirror at the same time.
4 The LED will now start to flash, slowly at
first and then rapidly. The rapidly flash-
ing LED indicates that programming is
complete and that you can release the
buttons.
The remote control may stop transmitting
during programming. If so, continue to hold
the button on the rearview mirror and
release and press the button on the remote
control every other second, "cycling" until
programming is completed.
WARNING
Make sure that people and objects are out
of the way of moving door or gate to
prevent potential harm or damage.
When programming the garage opener,
you may be operating a garage door or
gate operator.
Do not use the garage opener with any
garage door opener that lacks the safety
stop and reverse feature as required by
federal safety standards. (This includes
any garage door opener model manufac-
tured before April 1, 1982.). A garage
door opener which cannot detect an
object, signaling the door to stop and
reverse, does not meet current federal
safety standards. Using a garage door
opener without these features increases
risk of serious injury or death.
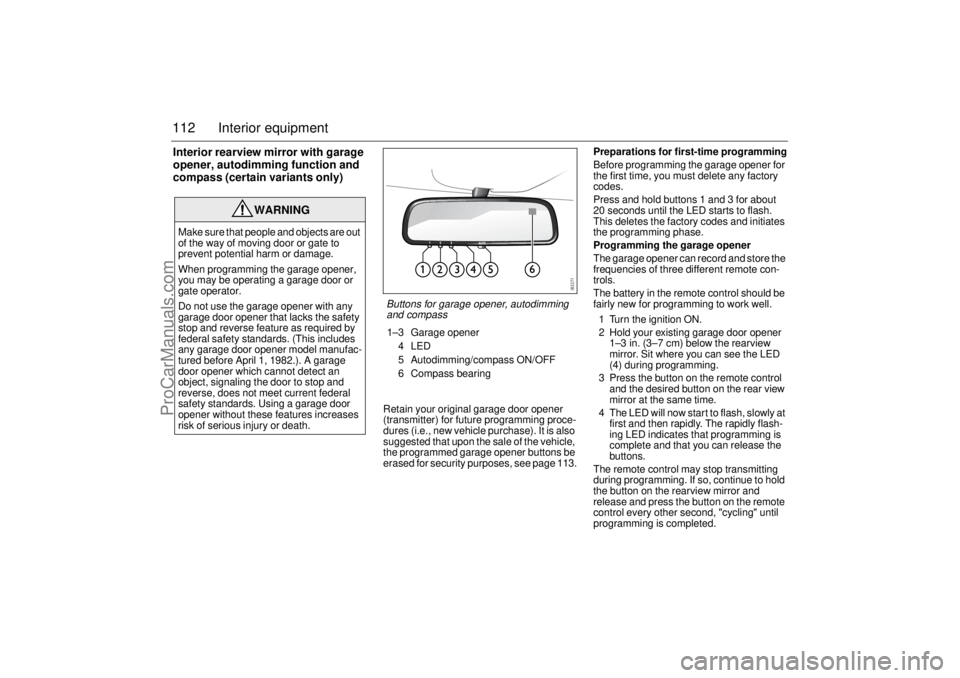
Buttons for garage opener, autodimming
and compass1–3 Garage opener
4LED
5 Autodimming/compass ON/OFF
6 Compass bearing
ProCarManuals.com
Page 123 of 256
123 Starting and driving
Steering wheel lockThe steering wheel lock is electronic. The
lock engages when the remote control is
removed from the ignition and unlocks when
the remote control is inserted. A click can be
heard when the steering wheel lock locks
and unlocks.
If the car is parked with one front wheel
touching the curb, for example, you may
need to turn the steering wheel slightly
when you insert the remote control to allow
the steering wheel lock to unlock. If you do
not succeed on first attempt you must
remove the remote control before trying
again. Turn the steering wheel and insert
the remote control into the ignition switch.
If the steering wheel lock does not disen-
gage it will not be possible to turn the remote
control in the ignition switch.
The following message is shown on the SID:If a fault arises affecting the steering wheel
lock, the following message will be
displayed on the SID:
If the steering wheel lock malfunctions while
the remote control is in the ignition switch,
this may prevent the removal of the remote
control or prevent the car from being
restarted once the engine has been
switched off.
If you have to leave the car, lock the car by
pressing down the lock buttons on the
doors. Lock the front left door from outside
with the traditional key (see page 40). The
car is now locked but the alarm is inactive.
Starting the engine
Steering wheel locked.
Pull out key, turn steering
wheel. Try again.
Steering lock malfunc.
Make a safe stop.
Contact Saab dealer.
WARNING
When starting the engine:
- Sit down in the driver’s seat.
- Depress the clutch pedal fully. If the
gear lever is not in the neutral position,
the clutch pedal must be fully
depressed or the car will jump
forwards or backwards, which may
cause a crash.
- Never start the car from outside the
vehicle, e.g. through a window that is
down. This could lead to serious
personal injury.
Cars with automatic transmission:
select position P to remove the ignition
key. The key can only be removed in
this gear position.
Carbon monoxide (CO) is a colorless,
odorless, poisonous gas. Be alert to
the danger of CO – always open the
garage doors before starting the
engine in the garage.
Do not rest or sleep in the car when
parked with the engine running. There
is a risk of depressing the accelerator
which could lead to engine damage.
There is also a danger of CO poison-
ing if the exhaust system is leaking.
ProCarManuals.com
Page 125 of 256

125 Starting and driving
Useful tips on starting the engineIf the engine has failed to start after several
attempts in very cold weather, proceed as
follows:
1 Turn the ignition switch to ON (it is
essential that you turn the ignition to
ON before depressing the accelerator).
2 Press the accelerator to the floor and run
the starter motor for 5-10 seconds. This
will prevent the engine being flooded
(fully depressed accelerator cuts off the
fuel supply).
3 Now start the engine in the normal way
- do not touch the accelerator.
If the engine stalls immediately after starting
(e.g. if the clutch was released too quickly),
do not touch the accelerator when restarting
the engine.
Important
considerations for
driving1 Starting and driving
Do not use full throttle until the engine
is warm, so as to avoid unnecessary
wear. If the needle of the turbo gauge
repeatedly enters the red zone, the
engine may suddenly lose power, due
to the initiation of a monitoring system
that limits the boost pressure. Contact
a Saab dealer as soon as possible.
Under certain barometric conditions
(high outside temperature and/or high
altitude) the needle may enter the first
part of the red zone without necessarily
indicating that a fault has arisen.
A protective function (interruption of the
fuel supply) limits the engine speed.2 Stopping the engine
Do not rev the engine immediately
before switching it off - stop the engine
when it is idling.
3 Regulating the charging pressure
The system is optimized for AON 90.
One of the advantages of boost pres-
sure regulation is that the engine can
also be run safely on gasoline with a
lower octane rating, although not lower
than AON 87. Severe engine damage
will occur if gasoline lower than 87
octane is used. However, engine
performance will fall slightly and heavy
loading and laboring should be
avoided. For optimum performance,
use the recommended grade of fuel.
The maximum boost pressure is regu-
lated according to the tendency of the
engine to knock. Short-lived knocking
is perfectly normal. This can occur
when the engine is running at about
3,000 rpm under a heavy load. The
extent of this knocking will depend on
the grade of fuel in the tank.
Isolated instances of knocking can
occur with low-octane fuel. This
controlled form of knocking, followed
by a reduction in the boost pressure, is
a sign that the control system is work-
ing normally, and is perfectly safe for
the engine.
ProCarManuals.com
Page 129 of 256
129 Starting and driving
Refueling1 Switch off the engine.
2 Open the filler cap, located in the right-
hand rear fender.
3 Insert the fuel pump nozzle beyond the
flange on the filler pipe and let the first
mark (a ring, a pimple or the first spring-
coil) rest on the flange. Do not withdraw
the nozzle while filling is in progress.
4 Cease refueling the first time the pump
stops.Filler cap
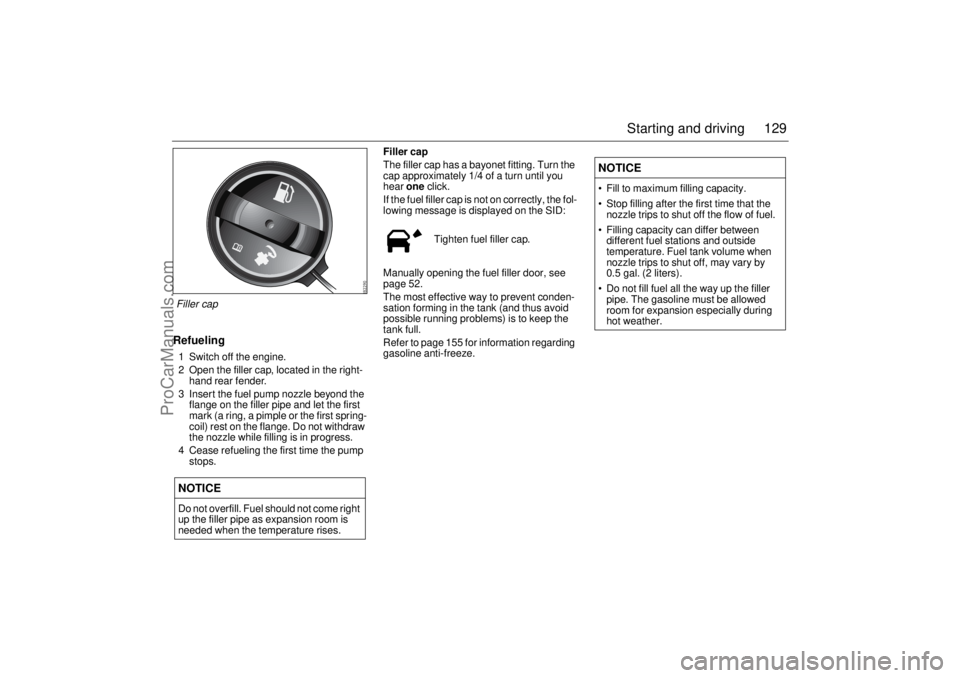
The filler cap has a bayonet fitting. Turn the
cap approximately 1/4 of a turn until you
hear one click.
If the fuel filler cap is not on correctly, the fol-
lowing message is displayed on the SID:
Manually opening the fuel filler door, see
page 52.
The most effective way to prevent conden-
sation forming in the tank (and thus avoid
possible running problems) is to keep the
tank full.
Refer to page 155 for information regarding
gasoline anti-freeze.NOTICEDo not overfill. Fuel should not come right
up the filler pipe as expansion room is
needed when the temperature rises.
Tighten fuel filler cap.
NOTICE Fill to maximum filling capacity.
Stop filling after the first time that the
nozzle trips to shut off the flow of fuel.
Filling capacity can differ between
different fuel stations and outside
temperature. Fuel tank volume when
nozzle trips to shut off, may vary by
0.5 gal. (2 liters).
Do not fill fuel all the way up the filler
pipe. The gasoline must be allowed
room for expansion especially during
hot weather.
Filler cap
ProCarManuals.com
Page 132 of 256

132 Starting and drivingIf your vehicle is certified to meet California
Emission Standards (indicated on the
underhood emission control label), it is
designed to operate on fuels that meet Cal-
ifornia specifications. If such fuels are not
available in states adopting California emis-
sions standards, your vehicle will operate
satisfactorily on fuels meeting federal spec-
ifications, but emission control system per-
formance may be affected. The malfunction
indicator lamp on your instrument panel
may turn on and/or your vehicle may fail a
smog-check test. See "Engine malfunction
(CHECK ENGINE)" on page 55. If this
occurs, return to your authorized Saab
dealer for diagnosis to determine the cause
of failure. In the event it is determined that
the cause of the condition is the type of fuels
used, repairs may not be covered by your
warranty.Some gasolines that are not reformulated
for low emissions may contain an octane-
enhancing additive called methylcyclopen-
tadienyl manganese tricarbonyl (MMT); ask
your service station operator whether or not
the fuel contains MMT. Saab does not
recommend the use of such gasolines. If
fuels containing MMT are used, spark plug
life may be reduced and your emission
control system performance may be
affected. The Engine malfunction (CHECK
ENGINE) light on your instrument panel
may turn on. If this occurs, return to your
authorized Saab dealer for service.
Engine Break-in PeriodPistons, cylinder bores and bearings need
time to obtain uniform, wear-resistant
surfaces.
If a new engine is driven too hard, this grad-
ual process of bedding-in will not be possi-
ble and the life of the engine will be short-
ened.
During the first 1,200 miles (2,000 km),
do not exceed 5,000 rpm.
In addition, refrain from driving the car at full
throttle, other than for brief instances,
during the first 1,800 miles (3,000 km).Wearing in new brake padsNew brake pads take time to bed in, about
90 miles (150 km) if the car is driven largely
under stop-and-go conditions or about
300 miles (500 km) of highway driving.
To extend the useful life of the pads, avoid
hard braking as much as possible.
ProCarManuals.com
Page 135 of 256

135 Starting and driving
Park Brake Shift LockThe transmission has a security function
known as Park Brake Shift Lock. To move
the gear selector lever out of the P or N posi-
tion, the gear selector lever detent (catch)
must be pressed in at the same time as the
brake pedal is held depressed.
The detent button on the selector lever has
to be pressed in before the lever can be
moved between certain positions.
Temporary override of Park Brake Shift
Lock, see page 137.
Adaptive gear change patternsThe adaptive gear change pattern function
adapts gear changing to the prevailing driv-
ing conditions. The transmission control
module senses the engine load, vehicle
speed and temperature of the transmission.
A suitable gear change pattern is then
selected automatically to avoid unneces-
sary gear changes and undesired increases
in transmission temperature.
Certain variants use a special change pat-
tern for the first few minutes after a cold start
so that the catalytic converter reaches its
working temperature more quickly.
Thermal transmission protectionThe transmission has built-in protection
against overheating. This protection is pro-
vided by the control module, which changes
gear change patterns.
1 If the temperature of the transmission
fluid exceeds 257°F (125°C), the gear
change pattern is changed.
2 If the temperature of the transmission
fluid exceeds 275°F (135°C), the gear
change pattern is again changed.
3 If the temperature of the transmission
fluid exceeds 302°F (150°C), engine
torque will be limited to 147 ft.lbs.
(200 Nm).
The following message is shown on the SID:
If this message appears, stop the car as
soon as it is safe to do so and allow the
engine to idle until the message has gone
out. The selector lever should be in
position P.Gearbox too hot.
Make a safe stop.
Open hood to cool down.
Selector lever detent
ProCarManuals.com
Page 138 of 256
138 Starting and drivingSelector lever positions
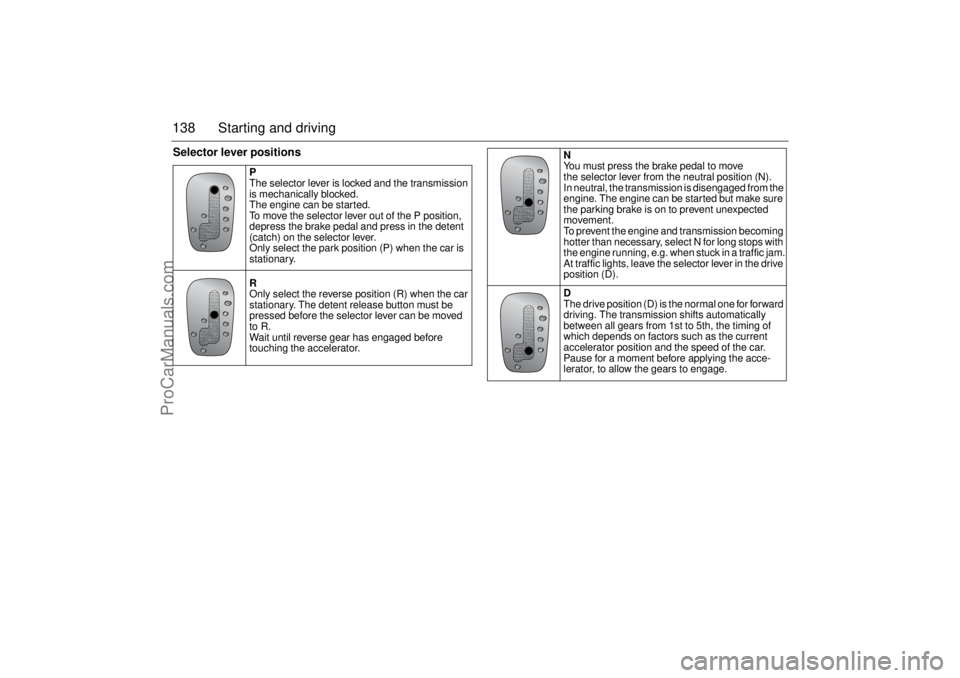
P
The selector lever is locked and the transmission
is mechanically blocked.
The engine can be started.
To move the selector lever out of the P position,
depress the brake pedal and press in the detent
(catch) on the selector lever.
Only select the park position (P) when the car is
stationary.
R
Only select the reverse position (R) when the car
stationary. The detent release button must be
pressed before the selector lever can be moved
to R.
Wait until reverse gear has engaged before
touching the accelerator.
N
You must press the brake pedal to move
the selector lever from the neutral position (N).
In neutral, the transmission is disengaged from the
engine. The engine can be started but make sure
the parking brake is on to prevent unexpected
movement.
To prevent the engine and transmission becoming
hotter than necessary, select N for long stops with
the engine running, e.g. when stuck in a traffic jam.
At traffic lights, leave the selector lever in the drive
position (D).
D
The drive position (D) is the normal one for forward
driving. The transmission shifts automatically
between all gears from 1st to 5th, the timing of
which depends on factors such as the current
accelerator position and the speed of the car.
Pause for a moment before applying the acce-
lerator, to allow the gears to engage.
ProCarManuals.com
Page 142 of 256
142 Starting and driving
ABS brakesThe Antilock Braking System (ABS) modu-
lates the brake pressure to each wheel. The
pressure is automatically reduced just
before the wheel locks up and then
increases again to the point at which the
wheel is just about to lock. The wheel sen-
sors send information to the brake system’s
electronic control module for every 4 or so
inches (decimetre) that the car rolls. This
information is processed continuously to
ensure that the adjustment of the brake
pressure will be as exact as possible.
Adjustment takes place up to 12 times per
second.The brake system provides Electronic
Brakeforce Distribution (EBD). This distri-
butes the brake pressure between the front
and rear wheels, in such a way as to achieve
optimum braking performance irrespective
of the car’s speed or load.
The ABS has a built-in diagnostics function
which will switch on the ABS warning light
if a fault is detected in the system (see
page 54).
The following message will appear on the
SID (and corresponding symbol on main
instrument unit) if a fault is detected:
WARNING
It is prudent to try your brakes from
time to time, especially when driving in
heavy rain, through water collected on
the road, in snow, on a wet road
surface or in salty slush. In such condi-
tions, the brakes may take longer than
normal to take effect. To rectify this,
touch the brake pedal periodically to
dry the brakes out.
The same applies after the car has
been washed or when the weather is
very humid.
Avoid parking the car with wet brakes.
Before parking, and if the traffic condi-
tions allow, brake quite heavily so that
the brake discs and pads warm up and
dry.
The brakes are power assisted and it
should be kept in mind that the servo
unit only provides the power assis-
tance when the engine is running.
The brake pressure required when the
engine is off,(e.g. when the car is
being towed) is roughly four times the
normal pedal force required. The
pedal also feels hard and unrespon-
sive.
Overheating can cause the brakes to
fade!
WARNING
The additional safety afforded by the
ABS system is not designed to allow
drivers to drive faster but to make
normal driving safer.
To stop as quickly as possible, without
loss of directional stability, whether
the road surface is dry, wet or slippery,
press the brake pedal down hard
without letting up (do not pump the
pedal), declutching simulta-
neously, and steer the car to safety.
Antilock brake malfunction.
Contact Saab dealer.
ProCarManuals.com
Page 156 of 256
156 Starting and drivingDriving with tire chainsSnow chains must only be fitted to the wheel
and tire dimensions that Saab recommends
in "Technical data" on page 235.
Contact a Saab dealer regarding approved
tire chains.
Driving in hot climatesAlways check the coolant level before start-
ing a journey. When the engine is cold, the
coolant must not lie above the KALT/COLD
mark on the expansion tank (boundary
between the upper and lower sections of the
tank).
At the end of a journey, allow the engine to
idle for 2–3 minutes before switching it off.
If the needle on the temperature gauge
enters the red zone, the following message
will be shown on the SID:
1 Stop the car but do not switch off the
engine. Do not remove the cap on the
cooling system expansion tank, even if
the tank is empty. The engine tempera-
ture should decrease. If the temperature
continues to rise with the engine idling,
the engine must be switched off.2 If the engine is idling and the needle on
the temperature gauge falls, wait until a
normal temperature is shown (about in
the middle of the scale) before switching
off the engine. If the coolant needs to be
topped up, carefully unscrew the
expansion tank cap.
Fill as required with a mixture of 50 %
antifreeze and 50 % clean water. Use an
antifreeze approved by Saab.
3 Have the car’s cooling system checked
at a Saab dealer.
WARNING
Do not drive at speeds above 30 mph
(50 km/h) when tire chains are fitted.
Tire chains can reduce directional
stability.
Do not fit tire chains to the car’s rear
wheels.NOTICE Check the links frequently for wear.
Check that the chains do not foul the
wheel arch liner at full lock.
Refer to the "Technical data" section
on page 235, for information on wheel
and tire dimensions approved for the
fitting of tire chains.
Hot engine.
Make a safe stop.
Run engine on idle.
WARNING
Exercise care when opening the hood
if the engine is overheated. Never
remove the expansion tank cap
completely when the engine is hot.
The cooling system is pressurized -
hot coolant and vapour can escape.
These can cause injury to your eyes
and burns. Open the cap slowly to
release the pressure before removing
it.
ProCarManuals.com