rear view mirror SAAB 9-3 2005 Owners Manual
[x] Cancel search | Manufacturer: SAAB, Model Year: 2005, Model line: 9-3, Model: SAAB 9-3 2005Pages: 292, PDF Size: 23 MB
Page 7 of 292
5
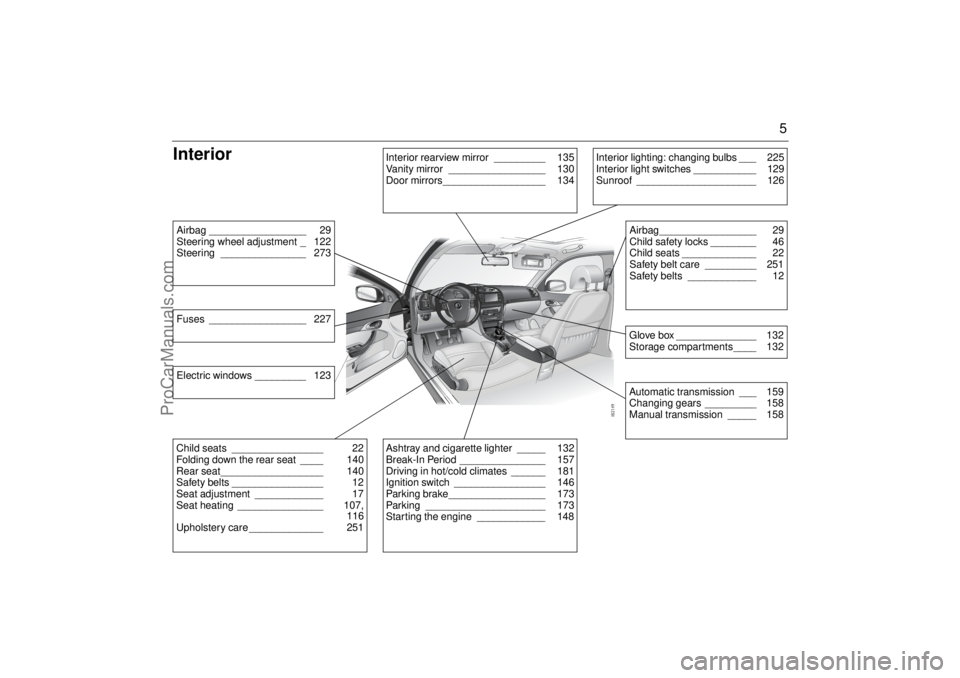
InteriorAirbag _________________ 29
Steering wheel adjustment _ 122
Steering _______________ 273
Interior rearview mirror _________ 135
Vanity mirror _________________ 130
Door mirrors__________________ 134
Airbag_________________ 29
Child safety locks ________ 46
Child seats _____________ 22
Safety belt care _________ 251
Safety belts ____________ 12Glove box ______________ 132
Storage compartments____ 132Automatic transmission ___ 159
Changing gears _________ 158
Manual transmission _____ 158
Child seats ________________ 22
Folding down the rear seat ____ 140
Rear seat__________________ 140
Safety belts ________________ 12
Seat adjustment ____________ 17
Seat heating _______________ 107,
116
Upholstery care _____________ 251
Interior lighting: changing bulbs ___ 225
Interior light switches ___________ 129
Sunroof _____________________ 126
Ashtray and cigarette lighter _____ 132
Break-In Period _______________ 157
Driving in hot/cold climates ______ 181
Ignition switch ________________ 146
Parking brake_________________ 173
Parking _____________________ 173
Starting the engine ____________ 148
Fuses _________________ 227Electric windows _________ 123
ProCarManuals.com
Page 103 of 292
101 Instruments and controls
to prioritize the windshield. The following
message is displayed on the SID:
To prevent the smell of washer fluid from
entering the car, recirculation can be acti-
vated automatically while the windshield is
washed. The recirculation symbol will how-
ever not light up. This function is optional;
contact a Saab dealer. This automatic recir-
culation is the factory default setting as long
as the system is working in full "AUTO"
mode with no customized settings.
Headlight washers(certain variants only)
The headlights are washed at the same time
as the windshield if the headlights are on.
The headlights are washed every fifth time
the windshield washers are used or if two
(2) minutes have elapsed since the wind-
shield was last washed.
The headlight washers are not activated at
speeds in excess of 125 mph (200 km/h).
Rain sensor(option)
The rain sensor automatically controls the
windshield wipers. The sensor is located on
the windshield beside the rearview mirror.
The system varies the frequency of wiping
between single sweeps and continuous
wiping, depending on the amount of pre-
cipitation.
Activate the rain sensor by lifting the stalk
switch to the AUTO position. The wipers
make one sweep for reference to see how
much water is on the windshield. In the
future, the sensor compares the amount of
water on the windshield with this reference
value. Washer fluid level low.
Refill.
WARNING
Turn the rain sensor off if the ignition is
ON to avoid personal injury when clearing
snow and ice from the windshield.NOTICETurn the rain sensor off before washing
the car in an automatic carwash, to avoid
damaging the windshield wipers.
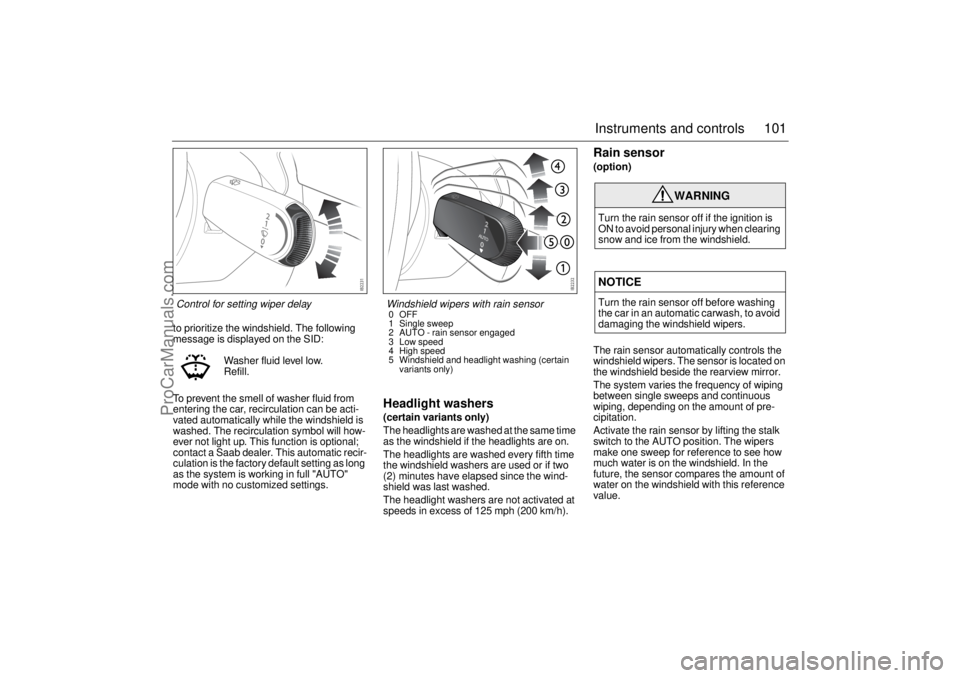
Control for setting wiper delay
Windshield wipers with rain sensor0OFF
1 Single sweep
2 AUTO - rain sensor engaged
3 Low speed
4 High speed
5 Windshield and headlight washing (certain
variants only)
ProCarManuals.com
Page 123 of 292
121 Interior equipment
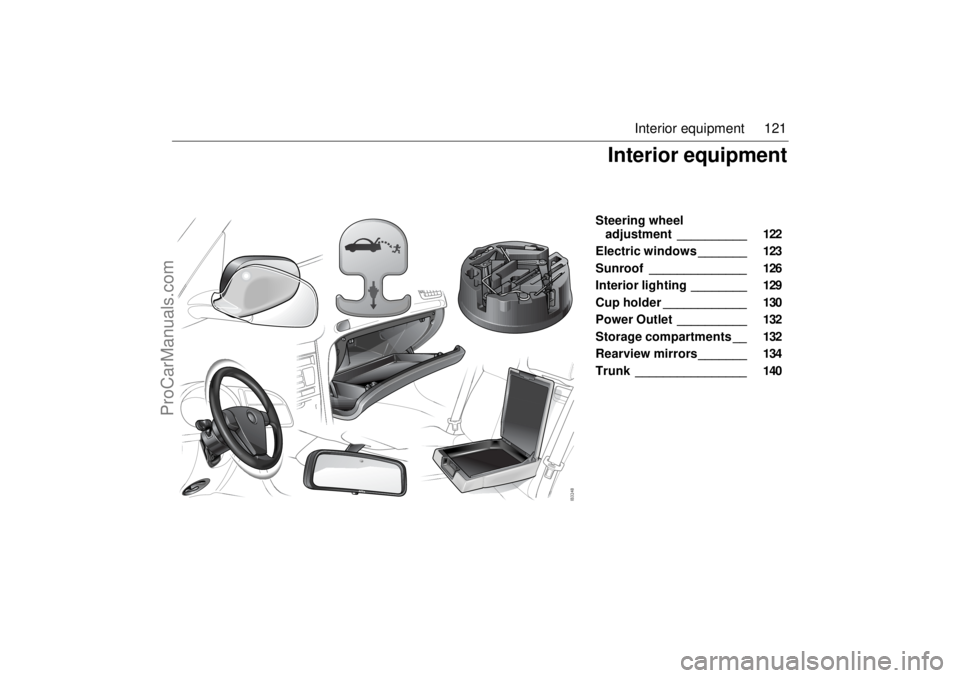
Steering wheel
adjustment __________ 122
Electric windows _______ 123
Sunroof ______________ 126
Interior lighting ________ 129
Cup holder ____________ 130
Power Outlet __________ 132
Storage compartments __ 132
Rearview mirrors_______ 134
Trunk ________________ 140
Interior equipment
ProCarManuals.com
Page 131 of 292
129 Interior equipment
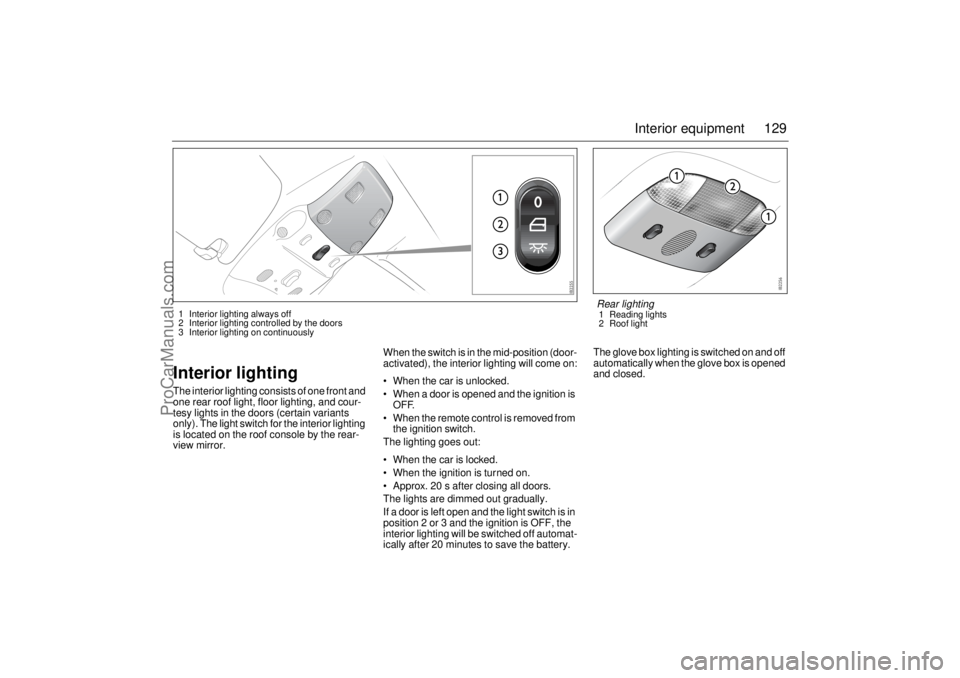
Interior lightingThe interior lighting consists of one front and
one rear roof light, floor lighting, and cour-
tesy lights in the doors (certain variants
only). The light switch for the interior lighting
is located on the roof console by the rear-
view mirror.When the switch is in the mid-position (door-
activated), the interior lighting will come on:
When the car is unlocked.
When a door is opened and the ignition is
OFF.
When the remote control is removed from
the ignition switch.
The lighting goes out:
When the car is locked.
When the ignition is turned on.
Approx. 20 s after closing all doors.
The lights are dimmed out gradually.
If a door is left open and the light switch is in
position 2 or 3 and the ignition is OFF, the
interior lighting will be switched off automat-
ically after 20 minutes to save the battery.The glove box lighting is switched on and off
automatically when the glove box is opened
and closed.1 Interior lighting always off
2 Interior lighting controlled by the doors
3 Interior lighting on continuously
Rear lighting1 Reading lights
2 Roof light
ProCarManuals.com
Page 136 of 292
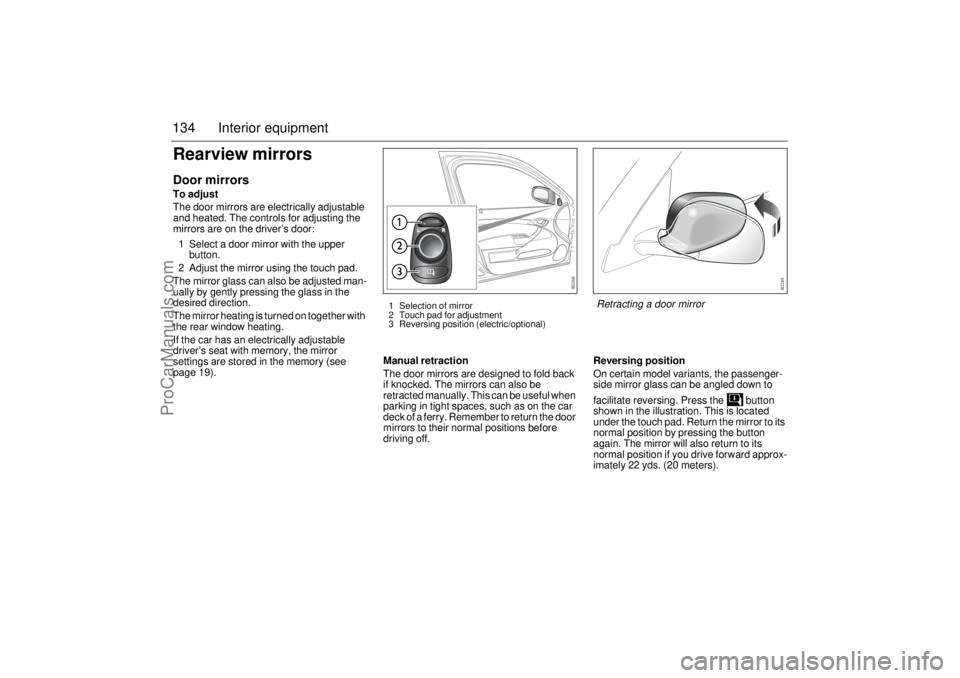
134 Interior equipmentRearview mirrorsDoor mirrorsTo adjust
The door mirrors are electrically adjustable
and heated. The controls for adjusting the
mirrors are on the driver’s door:
1 Select a door mirror with the upper
button.
2 Adjust the mirror using the touch pad.
The mirror glass can also be adjusted man-
ually by gently pressing the glass in the
desired direction.
The mirror heating is turned on together with
the rear window heating.
If the car has an electrically adjustable
driver’s seat with memory, the mirror
settings are stored in the memory (see
page 19).Manual retraction
The door mirrors are designed to fold back
if knocked. The mirrors can also be
retracted manually. This can be useful when
parking in tight spaces, such as on the car
deck of a ferry. Remember to return the door
mirrors to their normal positions before
driving off.Reversing position
On certain model variants, the passenger-
side mirror glass can be angled down to
facilitate reversing. Press the button
shown in the illustration. This is located
under the touch pad. Return the mirror to its
normal position by pressing the button
again. The mirror will also return to its
normal position if you drive forward approx-
imately 22 yds. (20 meters).
1 Selection of mirror
2 Touch pad for adjustment
3 Reversing position (electric/optional)
Retracting a door mirror
ProCarManuals.com
Page 137 of 292
135 Interior equipment
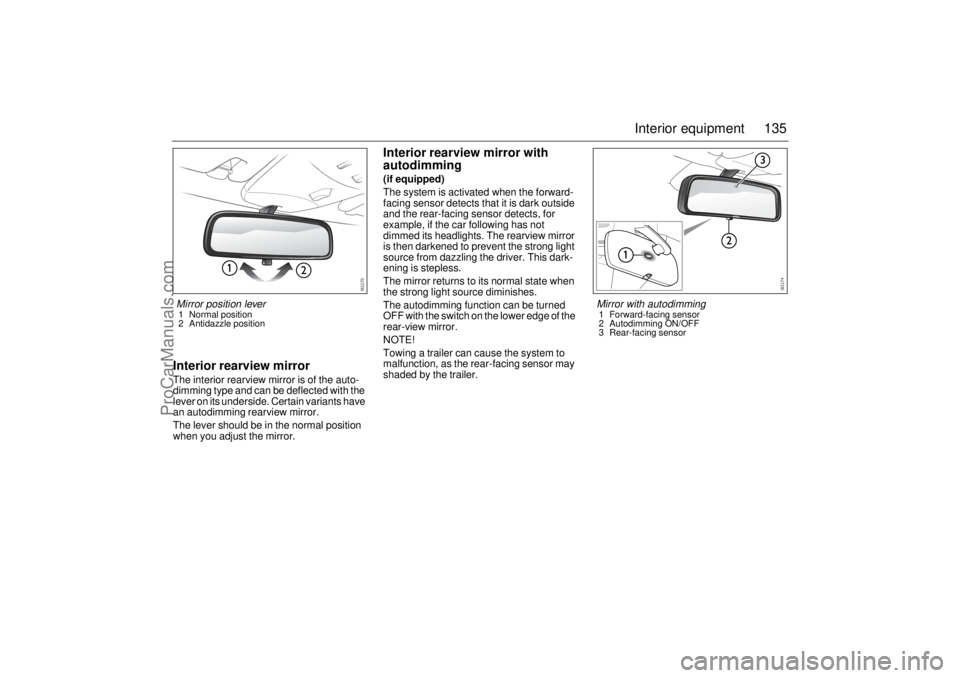
Interior rearview mirrorThe interior rearview mirror is of the auto-
dimming type and can be deflected with the
lever on its underside. Certain variants have
an autodimming rearview mirror.
The lever should be in the normal position
when you adjust the mirror.
Interior rearview mirror with
autodimming(if equipped)
The system is activated when the forward-
facing sensor detects that it is dark outside
and the rear-facing sensor detects, for
example, if the car following has not
dimmed its headlights. The rearview mirror
is then darkened to prevent the strong light
source from dazzling the driver. This dark-
ening is stepless.
The mirror returns to its normal state when
the strong light source diminishes.
The autodimming function can be turned
OFF with the switch on the lower edge of the
rear-view mirror.
NOTE!
Towing a trailer can cause the system to
malfunction, as the rear-facing sensor may
shaded by the trailer.
Mirror position lever1 Normal position
2 Antidazzle position
Mirror with autodimming1 Forward-facing sensor
2 Autodimming ON/OFF
3 Rear-facing sensor
ProCarManuals.com
Page 138 of 292
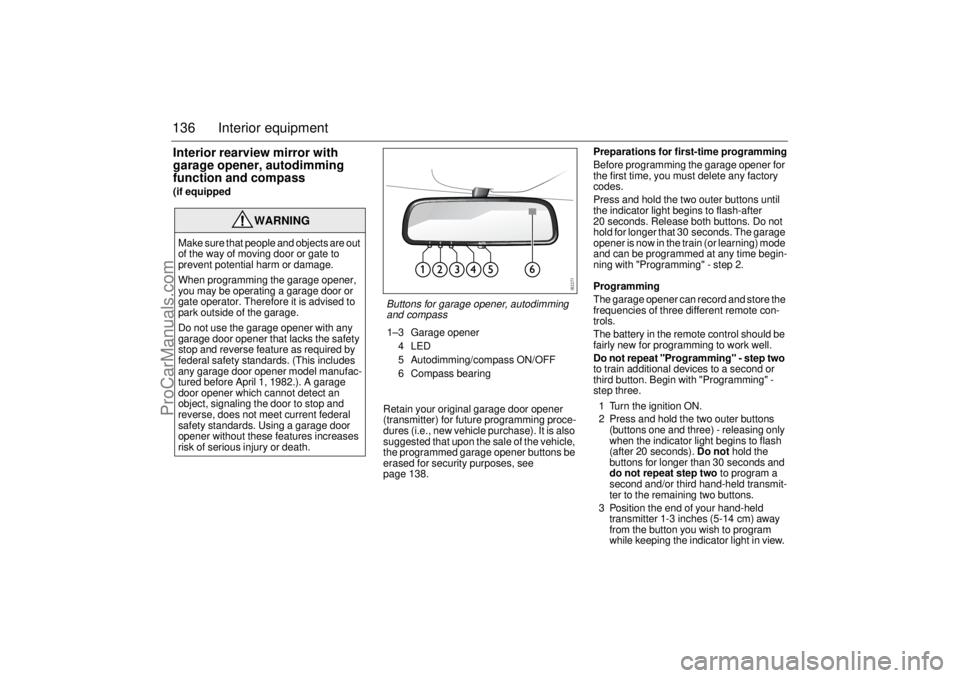
136 Interior equipmentInterior rearview mirror with
garage opener, autodimming
function and compass(if equipped
Retain your original garage door opener
(transmitter) for future programming proce-
dures (i.e., new vehicle purchase). It is also
suggested that upon the sale of the vehicle,
the programmed garage opener buttons be
erased for security purposes, see
page 138.Preparations for first-time programming
Before programming the garage opener for
the first time, you must delete any factory
codes.
Press and hold the two outer buttons until
the indicator light begins to flash-after
20 seconds. Release both buttons. Do not
hold for longer that 30 seconds. The garage
opener is now in the train (or learning) mode
and can be programmed at any time begin-
ning with "Programming" - step 2.
Programming
The garage opener can record and store the
frequencies of three different remote con-
trols.
The battery in the remote control should be
fairly new for programming to work well.
Do not repeat "Programming" - step two
to train additional devices to a second or
third button. Begin with "Programming" -
step three.
1 Turn the ignition ON.
2 Press and hold the two outer buttons
(buttons one and three) - releasing only
when the indicator light begins to flash
(after 20 seconds). Do not hold the
buttons for longer than 30 seconds and
do not repeat step two to program a
second and/or third hand-held transmit-
ter to the remaining two buttons.
3 Position the end of your hand-held
transmitter 1-3 inches (5-14 cm) away
from the button you wish to program
while keeping the indicator light in view.
WARNING
Make sure that people and objects are out
of the way of moving door or gate to
prevent potential harm or damage.
When programming the garage opener,
you may be operating a garage door or
gate operator. Therefore it is advised to
park outside of the garage.
Do not use the garage opener with any
garage door opener that lacks the safety
stop and reverse feature as required by
federal safety standards. (This includes
any garage door opener model manufac-
tured before April 1, 1982.). A garage
door opener which cannot detect an
object, signaling the door to stop and
reverse, does not meet current federal
safety standards. Using a garage door
opener without these features increases
risk of serious injury or death.
Buttons for garage opener, autodimming
and compass1–3 Garage opener
4LED
5 Autodimming/compass ON/OFF
6 Compass bearing
ProCarManuals.com
Page 141 of 292
139 Interior equipment
CompassThe compass is built into the rearview mir-
ror. The compass bearing is displayed in the
top right-hand corner of the mirror and is
updated every other second. The compass
displays the car’s direction of travel: N, NE,
E, etc.
Switch the compass display on and off by
pressing button 5 for 3 seconds, see illus-
tration on page 138.
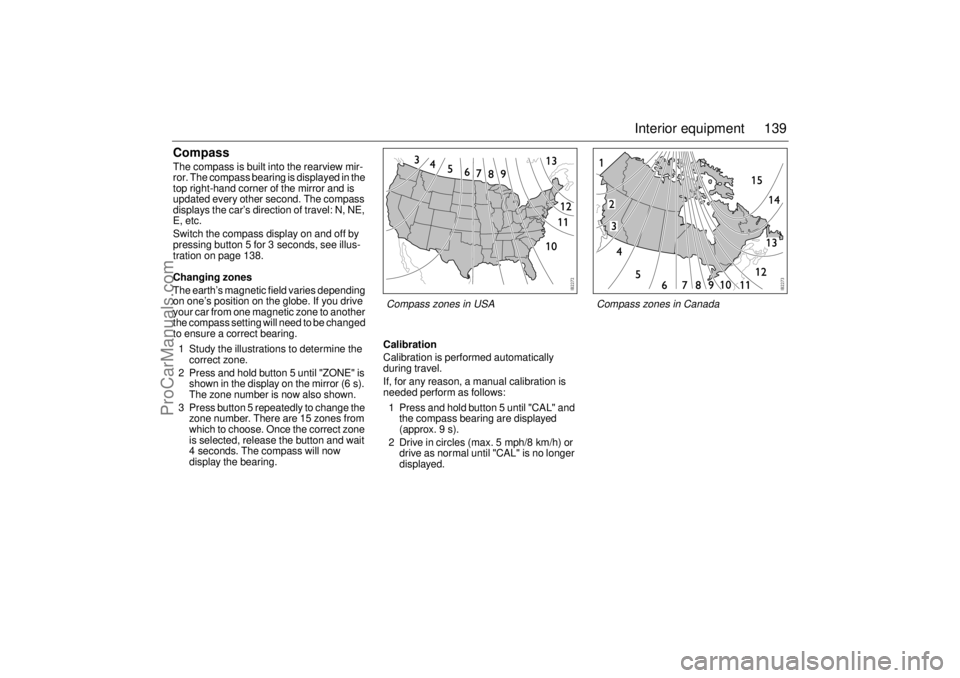
Changing zones
The earth’s magnetic field varies depending
on one’s position on the globe. If you drive
your car from one magnetic zone to another
the compass setting will need to be changed
to ensure a correct bearing.
1 Study the illustrations to determine the
correct zone.
2 Press and hold button 5 until "ZONE" is
shown in the display on the mirror (6 s).
The zone number is now also shown.
3 Press button 5 repeatedly to change the
zone number. There are 15 zones from
which to choose. Once the correct zone
is selected, release the button and wait
4 seconds. The compass will now
display the bearing.Calibration
Calibration is performed automatically
during travel.
If, for any reason, a manual calibration is
needed perform as follows:
1 Press and hold button 5 until "CAL" and
the compass bearing are displayed
(approx. 9 s).
2 Drive in circles (max. 5 mph/8 km/h) or
drive as normal until "CAL" is no longer
displayed.
Compass zones in Canada
Compass zones in USA
ProCarManuals.com
Page 189 of 292

187 Starting and driving
Checks before drivingMake sure that the car and trailer are in
good working order. This is essential since
towing a trailer increases the strain on the
car.
Check and if necessary adjust the tire
pressure of the car and trailer.
Make sure all wheel bolts are properly
tightened.
Make sure that the equipment joining the
car and trailer is properly secured and
adjusted.
Make sure the trailer’s electrical cable is
properly connected and is not so long that
it drags along the ground. Also, make
sure the cable is not too short and risks
breaking when turning a corner.
Check all bulbs.
Check the car and trailer brakes.
Make sure that all items on or in the
camper or trailer are properly secured.
Make sure that the trailer’s jockey wheel
is raised and locked.
Check the distribution of the load so that
the car and trailer are well balanced.
Check that the rearview mirrors provide
the best possible rearward vision.
Make sure the trailer’s safety cable is
correctly attached.
Driving considerationsAlways take extra care when towing a
trailer, as the car’s handling will be different
and its braking performance reduced. The
trailer’s braking system and suspension
also have a considerable effect on these
characteristics. See also "Driving with a
load" on page 189.
Drive carefully:
descending hills
on uneven roads
over railway crossings
when meeting large vehicles
If the car has automatic transmission, select
gear M1 when ascending or descending
steep hills.
ReversingGet someone to help you keep an eye out
behind the trailer as the door mirrors do not
always provide sufficient rearward vision
when reversing.
ProCarManuals.com
Page 232 of 292
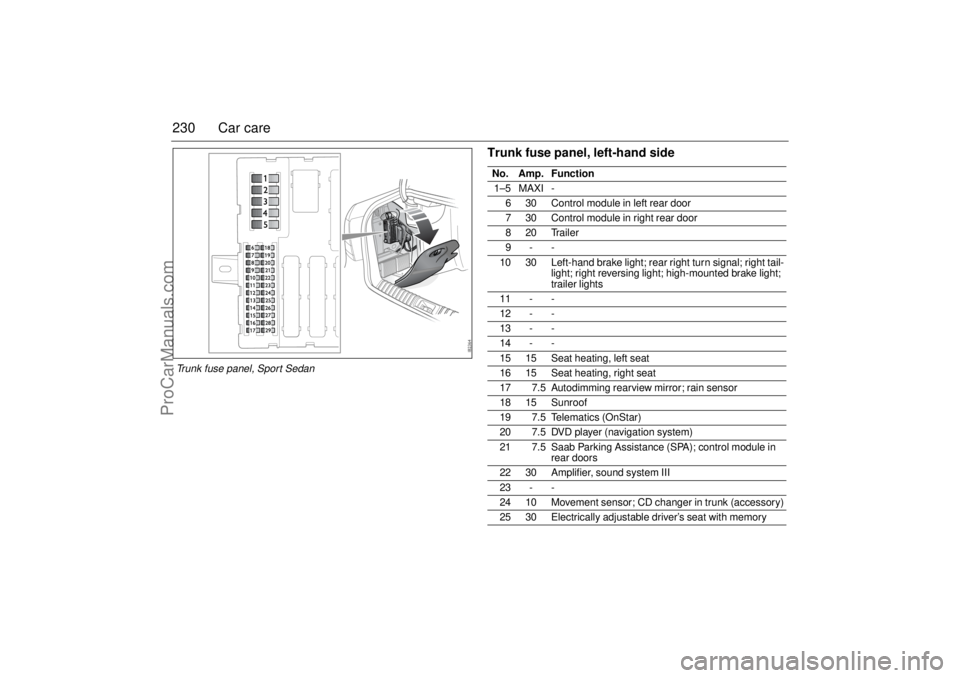
230 Car care
Trunk fuse panel, left-hand sideNo. Amp. Function
1–5 MAXI -
6 30 Control module in left rear door
7 30 Control module in right rear door
820Trailer
9--
10 30 Left-hand brake light; rear right turn signal; right tail-
light; right reversing light; high-mounted brake light;
trailer lights
11 - -
12 - -
13 - -
14 - -
15 15 Seat heating, left seat
16 15 Seat heating, right seat
17 7.5 Autodimming rearview mirror; rain sensor
18 15 Sunroof
19 7.5 Telematics (OnStar)
20 7.5 DVD player (navigation system)
21 7.5 Saab Parking Assistance (SPA); control module in
rear doors
22 30 Amplifier, sound system III
23 - -
24 10 Movement sensor; CD changer in trunk (accessory)
25 30 Electrically adjustable driver’s seat with memory
Trunk fuse panel, Sport Sedan
ProCarManuals.com