low beam SAAB 9-3 2006 Owners Manual
[x] Cancel search | Manufacturer: SAAB, Model Year: 2006, Model line: 9-3, Model: SAAB 9-3 2006Pages: 318, PDF Size: 28.05 MB
Page 3 of 318
3
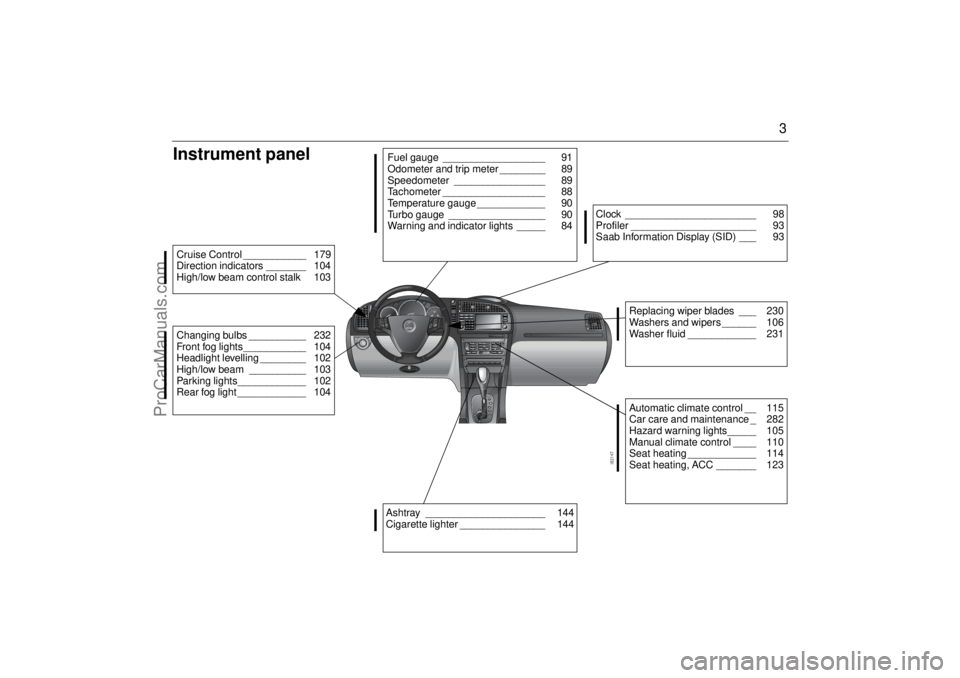
Instrument panelChanging bulbs __________ 232
Front fog lights___________ 104
Headlight levelling ________ 102
High/low beam __________ 103
Parking lights____________ 102
Rear fog light ____________ 104Cruise Control ___________ 179
Direction indicators _______ 104
High/low beam control stalk 103
Fuel gauge __________________ 91
Odometer and trip meter ________ 89
Speedometer ________________ 89
Tachometer __________________ 88
Temperature gauge ____________ 90
Turbo gauge _________________ 90
Warning and indicator lights _____ 84Ashtray _____________________ 144
Cigarette lighter _______________ 144
Clock _______________________ 98
Profiler ______________________ 93
Saab Information Display (SID) ___ 93
Replacing wiper blades ___ 230
Washers and wipers ______ 106
Washer fluid ____________ 231Automatic climate control __ 115
Car care and maintenance _ 282
Hazard warning lights_____ 105
Manual climate control ____ 110
Seat heating ____________ 114
Seat heating, ACC _______ 123
93U S M 06.book Page 3 Friday, February 18, 2005 1:15 PM
ProCarManuals.com
Page 86 of 318

86 Instruments and controlsThis light shows when the high beam is on
(see page 103).
This light indicates when the front fog lights
are on (see page 104).
The front fog lights are switched off auto-
matically when the engine is switched off.
When the fog lights are next needed, they
will have to be switched on manually.
This light should come on briefly when you
turn the ignition key to ON. If it doesn´t come
on, have it fixed so it will be ready to warn
you if there is a problem. This light indicates
when the brake fluid level is too low (see
page 224).The following message is shown on the
Saab Information Display (SID):
For safety reasons, stop the car and check
the level of the brake fluid (see page 224).
If the level is normal, depress the brake
pedal firmly two or three times. Now check
the level again. If the level is still normal, you
may drive the car, with considerable cau-
tion, to the nearest workshop to have the
brake system checked. We recommend
that you contact a Saab dealer.The brake system provides Electronic
Brakeforce Distribution (EBD). This distrib-
utes the brake pressure between the front
and rear wheels, in such a way as to achieve
optimum braking performance irrespective
of the car’s load.
If a fault arises in the EBD function, the ,
and lights will come on. Also, the
following message will appear on the Saab
Information Display (SID):
If this is the case, drive carefully and contact
a workshop as soon as possible. We recom-
mend that you contact a Saab dealer. Refer
to Brake warning light on page 86, Antilock
braking warning on page 84 and ESP OFF
indicator on page 92.
High beam Indicator
Front fog lights3
Brake warning light
Brake fluid level low.
Make a safe stop.
Contact Saab dealer.
WARNING
Never drive the car if these two lights
are on at the same time. Danger of
brake failure!
If the level of brake fluid in the reser-
voir is below the MIN mark, the vehicle
should be transported on a recovery
vehicle.
Have the brake system checked
immediately at a Saab dealer.
Brake malfunction.
Make a safe stop.
Contact Saab dealer.
93U S M 06.book Page 86 Friday, February 18, 2005 1:15 PM
ProCarManuals.com
Page 102 of 318

102 Instruments and controlsSwitchesThe parking lights and daytime running
lights come on automatically when the igni-
tion switch is in the ON position.
High beam can not be activated in this posi-
tion but headlight flasher can.
The parking lights can be turned on irre-
spective of the position of the ignition
switch. If the parking lights are on and the
driver’s door is opened, a reminder to turn
them off will sound.
Do not use the parking lights alone while
driving.
The parking lights may be used in combina-
tion with the front fog lights (see page 104).
Low beam headlights are turned on when
the ignition switch is turned to ON and
turned off when the switch is turned back to
LOCK.
Headlight levelling3Cars with xenon headlights are equipped
with an automatic headlight levelling sys-
tem, which self-calibrates each time the
vehicle is started.
If a fault arises in the automatic headlight
levelling system, the headlights will be
angled down to avoid dazzling drivers in
oncoming traffic. Adjust your speed accord-
ingly as the range of the headlights will be
reduced. Check fuse 20 in the engine bay
fuse box (see page 252).
A fault in the system will produce the follow-
ing message on the Saab Information Dis-
play (SID):
Special equipment is required for adjusting
the basic headlight alignment.
Daytime Running Lights
Parking lights
Headlights
Headlight levelling
malfunction.
Contact Saab dealer.
Light switches
93U S M 06.book Page 102 Friday, February 18, 2005 1:15 PM
ProCarManuals.com
Page 103 of 318

103 Instruments and controls
High/low beamTo switch between high and low beam, pull
the control stalk all the way towards the
steering wheel. (Headlight switch must be
ON.)
The symbol on the main instrument
panel shows when the high beam is on.Headlight flasherTo flash your headlights, pull the control
stalk half-way towards the steering wheel.
The high beam will remain on until you
release the stalk.
Courtesy Headlamp FeatureA delay function allows the low beam head-
lights and back-up lights to remain on for
about 30 seconds after the driver’s door has
been closed.
To activate this function:
1 After turning off the engine, remove the
remote control.
2 Open the driver’s door.
3 Pull the control stalk all the way towards
the steering wheel.
The low beam headlights and reversing
lights will come on and remain on for
30 seconds when the door is closed.
Instrument lightingThe brightness of the instrument lighting
can be adjusted by pressing the button (+ or
- signs on the button above the NIGHT-
PANEL button).
Dipswitch1 Headlight flasher
2 High/low beam
Adjusting instrument illumination
93U S M 06.book Page 103 Friday, February 18, 2005 1:15 PM
ProCarManuals.com
Page 232 of 318

232 Car care
Changing bulbsAutochecking of lightsThe bulbs that are most important from the point of view of traffic
safety are monitored by the car’s electrical system. If one of these
bulbs should fail, a message will be displayed on the SID.
Example of SID message:
The following bulbs are not checked: parking lights, front fog lights,
reversing lights, license plate lighting, side marker lights and side
direction indicators.
SportCombi
The tail lights and brake lights consist of LEDs. If approx. 3/4 of the
LEDs on one side are broken then this is indicated in the SID.If a stop light bulb fails
Sport Sedan: If a stop light bulb fails, the adjacent taillight will act
as a stop light to ensure traffic safety. Change the broken bulb when
possible.
All rear light bulbs are of the same type and rated 21 W, with the
exception of the license plate lighting which is rated 5 W.
Wrong bulb fitted
If a dipped or main beam bulb of too high a rating is fitted, a bulb
failure message will be shown on the SID (a too high wattage bulb
can damage the reflector).
If the following message is displayed but the bulb shines, it is most
likely that an incorrect bulb has been fitted.
Note:
When changing bulbs, fit the same type of bulb (e.g. Long-Life)
as that removed.
Headlight aiming, page 283.
WARNING
Before changing a bulb in the engine bay, switch off the engine
to avoid the danger of fingers and hands being injured by moving
parts.
The radiator fan can cut in even when the engine is switched off.NOTICESwitch off the ignition before changing a bulb, to avoid possible
short-circuiting.
Left low beam failure.
Right high beam failure.
93U S M 06.book Page 232 Friday, February 18, 2005 1:15 PM
ProCarManuals.com
Page 233 of 318
233 Car careXenon headlight, dipped beam3Xenon headlights produce roughly two times as much light as halo-
gen bulbs and have a significantly longer service life.
The lamp units consist of a gas discharge lamp containing xenon.
When the lights are switched on a very high voltage activates the
xenon gas. The lamps soon reach full intensity.
Cars with xenon headlights have automatic levelling. The levelling
system is comprised of two sensors, one on the front suspension
and one on the rear suspension, and a control unit by the engine bay
fuse box. Headlight alignment is adjusted automatically to the car’s
load to prevent dazzling drivers in oncoming traffic.
If a fault is detected in the system, the following message will be dis-
played on the SID:
WARNING
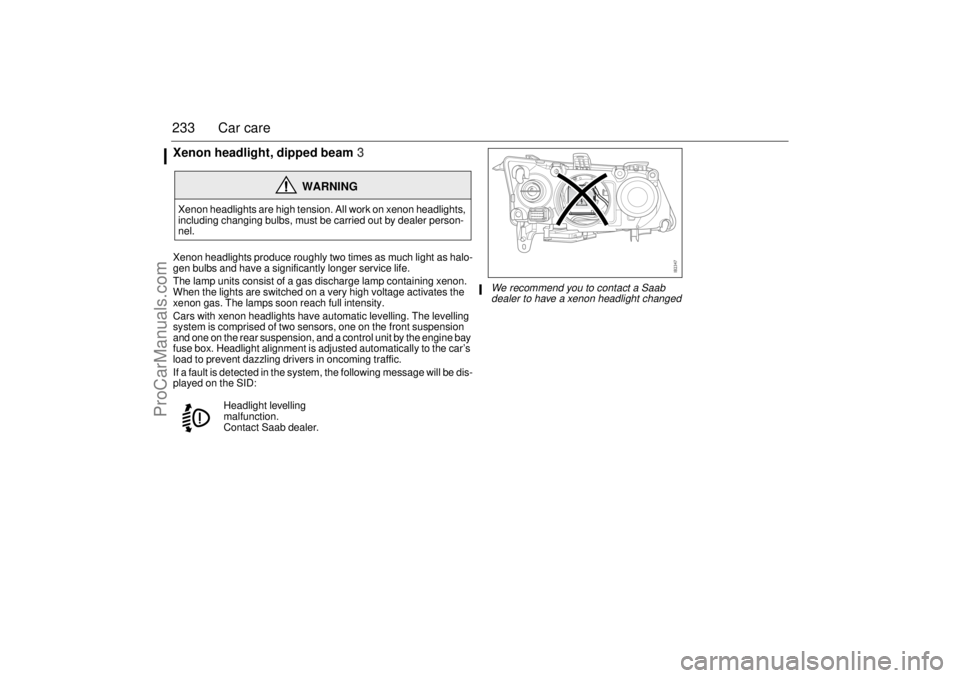
Xenon headlights are high tension. All work on xenon headlights,
including changing bulbs, must be carried out by dealer person-
nel.
Headlight levelling
malfunction.
Contact Saab dealer.
We recommend you to contact a Saab
dealer to have a xenon headlight changed
93U S M 06.book Page 233 Friday, February 18, 2005 1:15 PM
ProCarManuals.com
Page 234 of 318
234 Car care
Low beam, halogenLeft-hand side
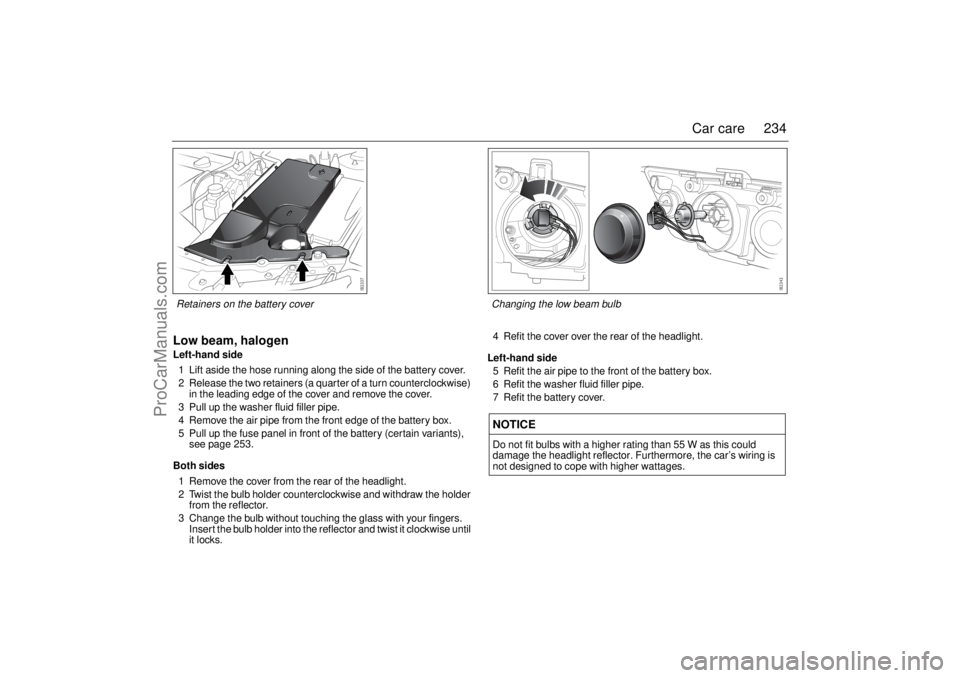
1 Lift aside the hose running along the side of the battery cover.
2 Release the two retainers (a quarter of a turn counterclockwise)
in the leading edge of the cover and remove the cover.
3 Pull up the washer fluid filler pipe.
4 Remove the air pipe from the front edge of the battery box.
5 Pull up the fuse panel in front of the battery (certain variants),
see page 253.
Both sides
1 Remove the cover from the rear of the headlight.
2 Twist the bulb holder counterclockwise and withdraw the holder
from the reflector.
3 Change the bulb without touching the glass with your fingers.
Insert the bulb holder into the reflector and twist it clockwise until
it locks.4 Refit the cover over the rear of the headlight.
Left-hand side
5 Refit the air pipe to the front of the battery box.
6 Refit the washer fluid filler pipe.
7 Refit the battery cover.
NOTICEDo not fit bulbs with a higher rating than 55 W as this could
damage the headlight reflector. Furthermore, the car’s wiring is
not designed to cope with higher wattages.
Retainers on the battery cover Changing the low beam bulb93U S M 06.book Page 234 Friday, February 18, 2005 1:15 PM
ProCarManuals.com
Page 238 of 318
238 Car careFront fog lights3
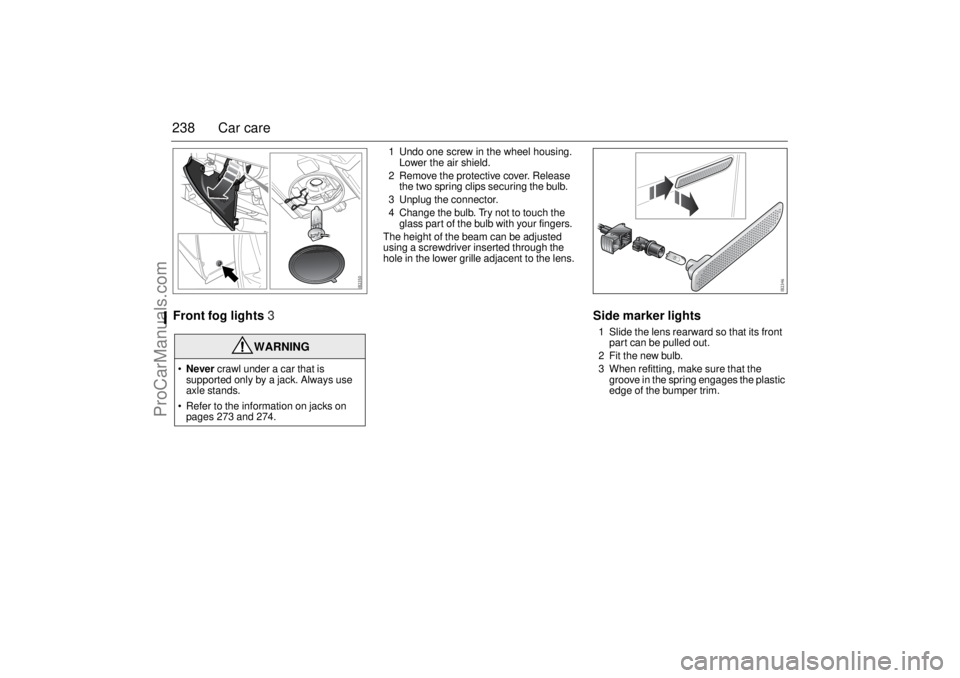
1 Undo one screw in the wheel housing.
Lower the air shield.
2 Remove the protective cover. Release
the two spring clips securing the bulb.
3 Unplug the connector.
4 Change the bulb. Try not to touch the
glass part of the bulb with your fingers.
The height of the beam can be adjusted
using a screwdriver inserted through the
hole in the lower grille adjacent to the lens.
Side marker lights1 Slide the lens rearward so that its front
part can be pulled out.
2 Fit the new bulb.
3 When refitting, make sure that the
groove in the spring engages the plastic
edge of the bumper trim.
WARNING
Never crawl under a car that is
supported only by a jack. Always use
axle stands.
Refer to the information on jacks on
pages 273 and 274.93U S M 06.book Page 238 Friday, February 18, 2005 1:15 PM
ProCarManuals.com
Page 252 of 318
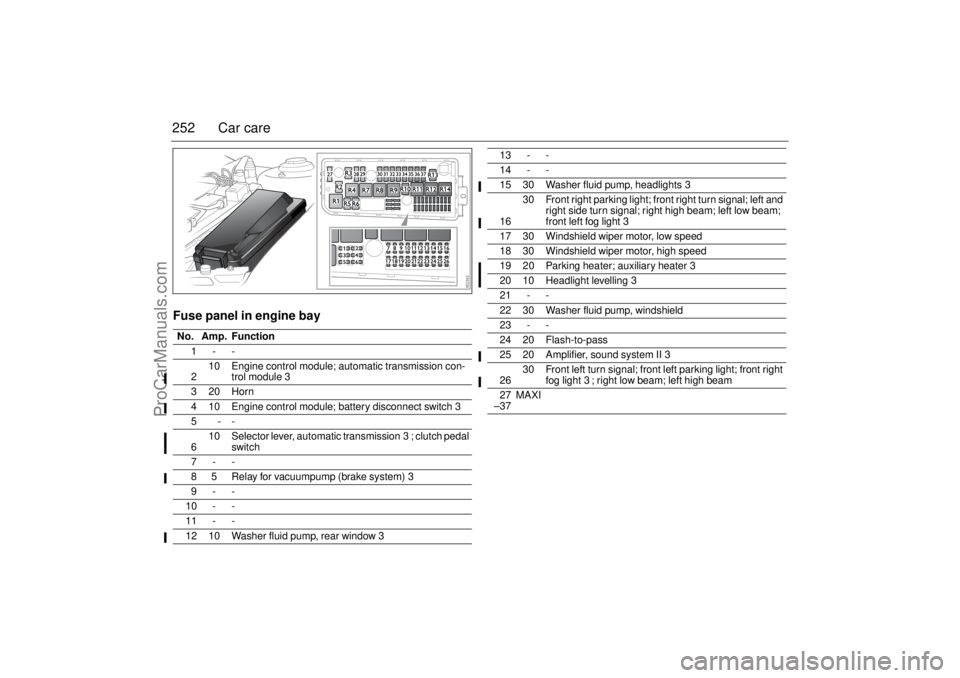
252 Car careFuse panel in engine bayNo. Amp. Function
1--
210 Engine control module; automatic transmission con-
trol module3
320Horn
4 10 Engine control module; battery disconnect switch3
5--
610 Selector lever, automatic transmission3; clutch pedal
switch
7--
8 5 Relay for vacuumpump (brake system)3
9--
10 - -
11 - -
12 10 Washer fluid pump, rear window3
13 - -
14 - -
15 30 Washer fluid pump, headlights3
1630 Front right parking light; front right turn signal; left and
right side turn signal; right high beam; left low beam;
front left fog light3
17 30 Windshield wiper motor, low speed
18 30 Windshield wiper motor, high speed
19 20 Parking heater; auxiliary heater3
20 10 Headlight levelling3
21 - -
22 30 Washer fluid pump, windshield
23 - -
24 20 Flash-to-pass
25 20 Amplifier, sound system II3
2630 Front left turn signal; front left parking light; front right
fog light3; right low beam; left high beam
27
–37MAXI
93U S M 06.book Page 252 Friday, February 18, 2005 1:15 PM
ProCarManuals.com
Page 284 of 318
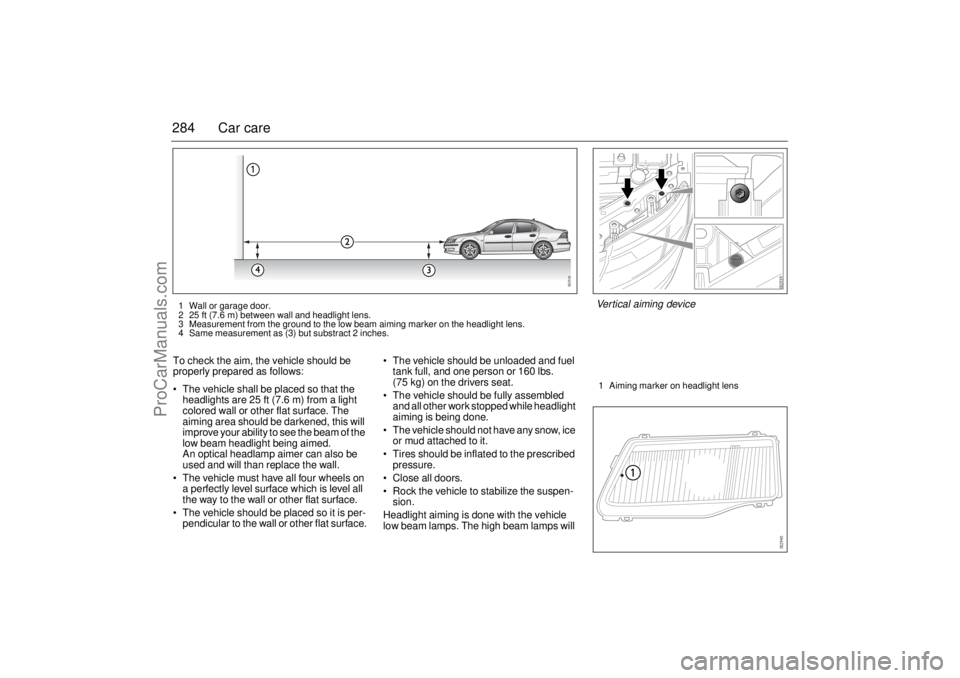
284 Car careTo check the aim, the vehicle should be
properly prepared as follows:
The vehicle shall be placed so that the
headlights are 25 ft (7.6 m) from a light
colored wall or other flat surface. The
aiming area should be darkened, this will
improve your ability to see the beam of the
low beam headlight being aimed.
An optical headlamp aimer can also be
used and will than replace the wall.
The vehicle must have all four wheels on
a perfectly level surface which is level all
the way to the wall or other flat surface.
The vehicle should be placed so it is per-
pendicular to the wall or other flat surface. The vehicle should be unloaded and fuel
tank full, and one person or 160 lbs.
(75 kg) on the drivers seat.
The vehicle should be fully assembled
and all other work stopped while headlight
aiming is being done.
The vehicle should not have any snow, ice
or mud attached to it.
Tires should be inflated to the prescribed
pressure.
Close all doors.
Rock the vehicle to stabilize the suspen-
sion.
Headlight aiming is done with the vehicle
low beam lamps. The high beam lamps will 1 Wall or garage door.
2 25 ft (7.6 m) between wall and headlight lens.
3 Measurement from the ground to the low beam aiming marker on the headlight lens.
4 Same measurement as (3) but substract 2 inches.
Vertical aiming device1 Aiming marker on headlight lens
93U S M 06.book Page 284 Friday, February 18, 2005 1:15 PM
ProCarManuals.com