lock SAAB 9-3 2008 Owner's Guide
[x] Cancel search | Manufacturer: SAAB, Model Year: 2008, Model line: 9-3, Model: SAAB 9-3 2008Pages: 320, PDF Size: 56.39 MB
Page 71 of 320
71 9-3 Convertible
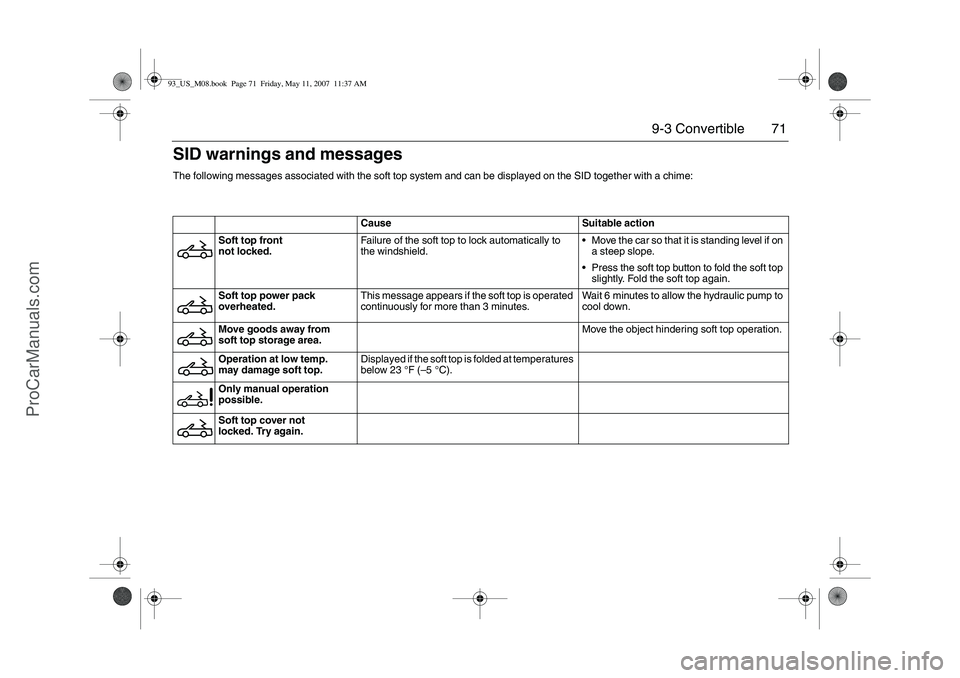
Cause Suitable action
Soft top front
not locked.Failure of the soft top to lock automatically to
the windshield.Move the car so that it is standing level if on
a steep slope.
Press the soft top button to fold the soft top
slightly. Fold the soft top again.
Soft top power pack
overheated.This message appears if the soft top is operated
continuously for more than 3 minutes.Wait 6 minutes to allow the hydraulic pump to
cool down.
Move goods away from
soft top storage area.Move the object hindering soft top operation.
Operation at low temp.
may damage soft top.Displayed if the soft top is folded at temperatures
below 23°F (–5°C).
Only manual operation
possible.
Soft top cover not
locked. Try again.
SID warnings and messagesThe following messages associated with the soft top system and can be displayed on the SID together with a chime:93_US_M08.book Page 71 Friday, May 11, 2007 11:37 AM
ProCarManuals.com
Page 72 of 320
72 9-3 Convertible
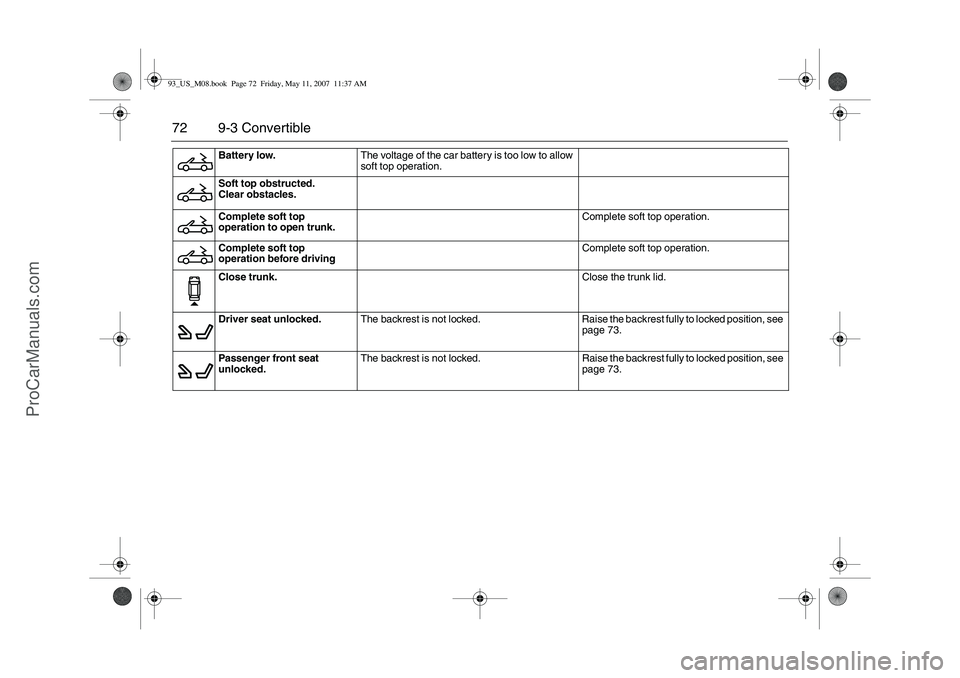
Battery low.The voltage of the car battery is too low to allow
soft top operation.
Soft top obstructed.
Clear obstacles.
Complete soft top
operation to open trunk.Complete soft top operation.
Complete soft top
operation before drivingComplete soft top operation.
Close trunk.Close the trunk lid.
Driver seat unlocked.The backrest is not locked. Raise the backrest fully to locked position, see
page 73.
Passenger front seat
unlocked.The backrest is not locked. Raise the backrest fully to locked position, see
page 73.
93_US_M08.book Page 72 Friday, May 11, 2007 11:37 AM
ProCarManuals.com
Page 73 of 320
73 9-3 Convertible
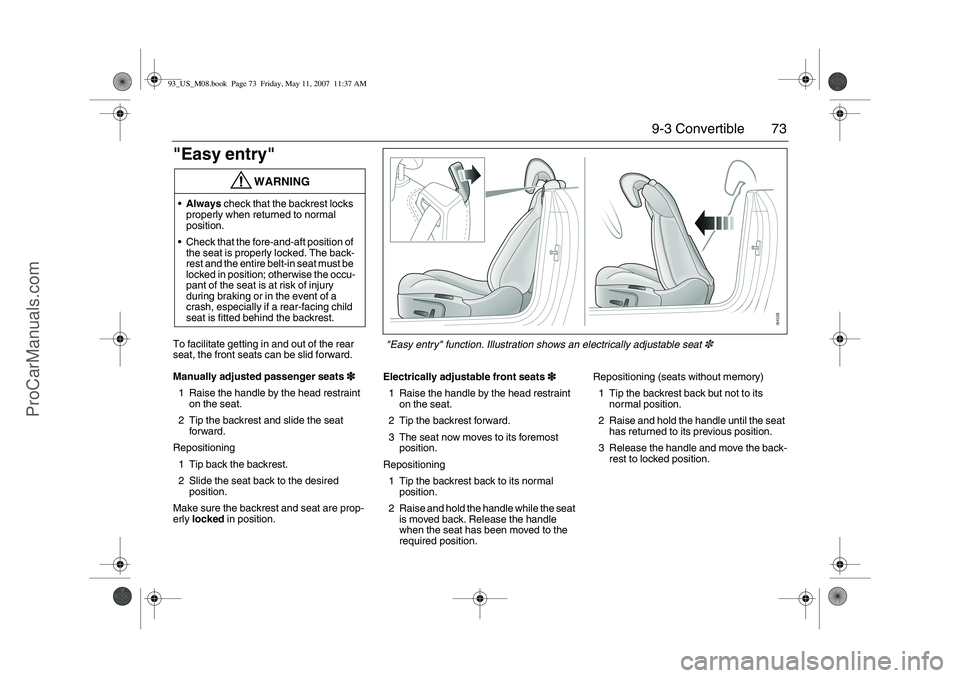
"Easy entry"To facilitate getting in and out of the rear
seat, the front seats can be slid forward.
Manually adjusted passenger seats3
33 3
1 Raise the handle by the head restraint
on the seat.
2 Tip the backrest and slide the seat
forward.
Repositioning
1 Tip back the backrest.
2 Slide the seat back to the desired
position.
Make sure the backrest and seat are prop-
erly locked in position.Electrically adjustable front seats3
33 3
1 Raise the handle by the head restraint
on the seat.
2 Tip the backrest forward.
3 The seat now moves to its foremost
position.
Repositioning
1 Tip the backrest back to its normal
position.
2 Raise and hold the handle while the seat
is moved back. Release the handle
when the seat has been moved to the
required position.Repositioning (seats without memory)
1 Tip the backrest back but not to its
normal position.
2 Raise and hold the handle until the seat
has returned to its previous position.
3 Release the handle and move the back-
rest to locked position.
WARNING
Always check that the backrest locks
properly when returned to normal
position.
Check that the fore-and-aft position of
the seat is properly locked. The back-
rest and the entire belt-in seat must be
locked in position; otherwise the occu-
pant of the seat is at risk of injury
during braking or in the event of a
crash, especially if a rear-facing child
seat is fitted behind the backrest.
"Easy entry" function. Illustration shows an electrically adjustable seat
3
93_US_M08.book Page 73 Friday, May 11, 2007 11:37 AM
ProCarManuals.com
Page 78 of 320
78 9-3 ConvertibleCalibrating front electric
windows with pinch protection3
33 3The window lifts should be calibrated if auto-
matic closing does not work or if the battery
has been disconnected. The pinch protec-
tion will not work if the windows are not
calibrated.
Perform calibration as follows:
1 Make sure the soft top is raised.
2 Make sure the doors are closed.
3 Let the engine idle.
4 Press and hold the soft top button up
until a chime sounds.
During calibration, the four windows will
be raised and lowered several times.
If calibration fails twice in a row, have the car
checked and rectified. We recommend that
you contact a Saab dealer.
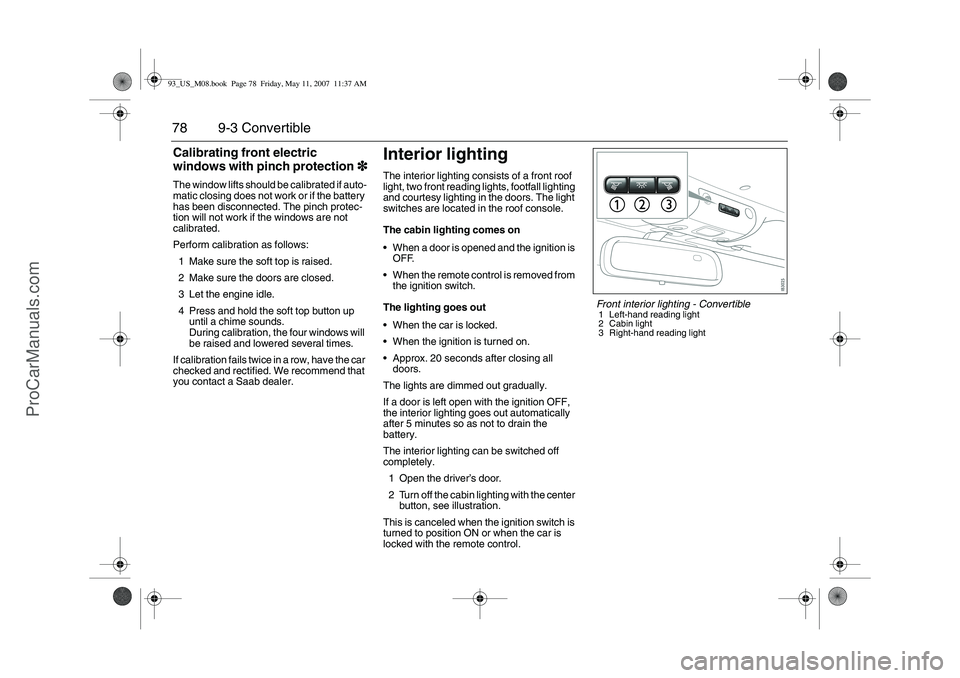
Interior lightingThe interior lighting consists of a front roof
light, two front reading lights, footfall lighting
and courtesy lighting in the doors. The light
switches are located in the roof console.
The cabin lighting comes on
When a door is opened and the ignition is
OFF.
When the remote control is removed from
the ignition switch.
The lighting goes out
When the car is locked.
When the ignition is turned on.
Approx. 20 seconds after closing all
doors.
The lights are dimmed out gradually.
If a door is left open with the ignition OFF,
the interior lighting goes out automatically
after 5 minutes so as not to drain the
battery.
The interior lighting can be switched off
completely.
1 Open the driver’s door.
2 Turn off the cabin lighting with the center
button, see illustration.
This is canceled when the ignition switch is
turned to position ON or when the car is
locked with the remote control.
Front interior lighting - Convertible1 Left-hand reading light
2 Cabin light
3 Right-hand reading light
93_US_M08.book Page 78 Friday, May 11, 2007 11:37 AM
ProCarManuals.com
Page 79 of 320
79 9-3 Convertible
Glove boxThe glove box lighting comes on when the
compartment is opened and goes out when
it is closed.
For changing bulbs, refer to page 232.Sun visorAn illuminated vanity mirror is provided on
the inside of the sun visors. The lighting
comes on when the cover is raised and goes
out when it is closed.Trunk lightingThe trunk lighting comes on and goes out
when the trunk lid is opened and closed.
If the trunk lid is left open, the lighting will be
switched off automatically after 20 minutes
to prevent the battery from running flat.
For changing bulbs, refer to page 234.
Unlocking the trunk lid
manuallyIf the trunk lid is not unlocked by the central
locking system, it can be unlocked
manually.
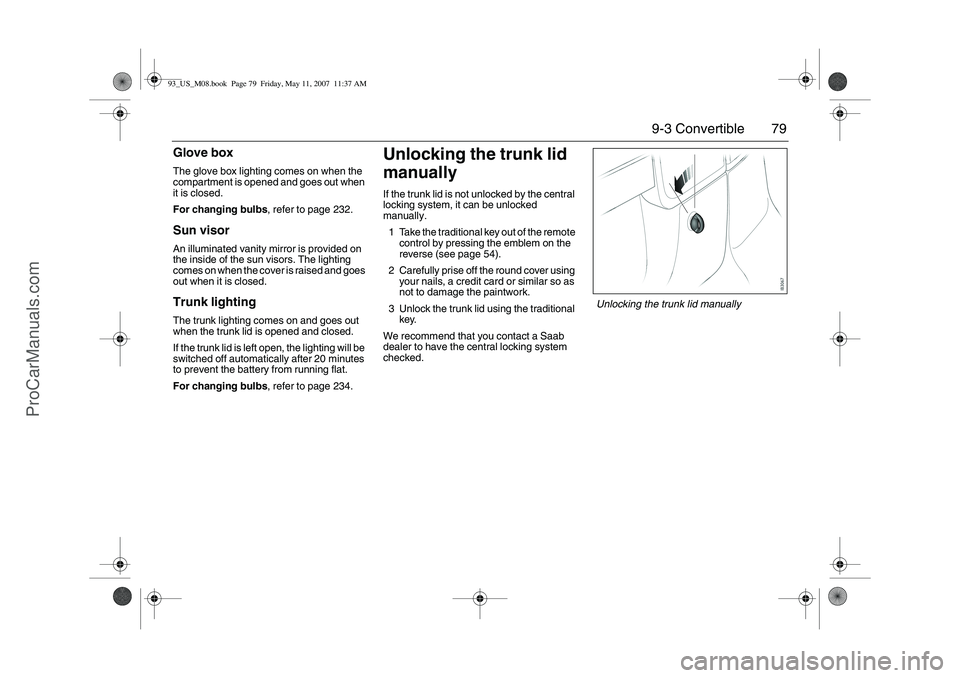
1 Take the traditional key out of the remote
control by pressing the emblem on the
reverse (see page 54).
2 Carefully prise off the round cover using
your nails, a credit card or similar so as
not to damage the paintwork.
3 Unlock the trunk lid using the traditional
key.
We recommend that you contact a Saab
dealer to have the central locking system
checked.
Unlocking the trunk lid manually
93_US_M08.book Page 79 Friday, May 11, 2007 11:37 AM
ProCarManuals.com
Page 82 of 320
82 Instruments and controls
Warning and indicator
lightsThe warnings and indications that can be
shown depend on the engine variant and
equipment level.
This warning light illuminates when a fault
arises in the antilock brake system.
The following message is shown on the
Saab Information Display (SID):
The brake system will continue to function
but without ABS modulation. See also
page 172.
Antilock braking warningAntilock brake malfunc.
Contact service.
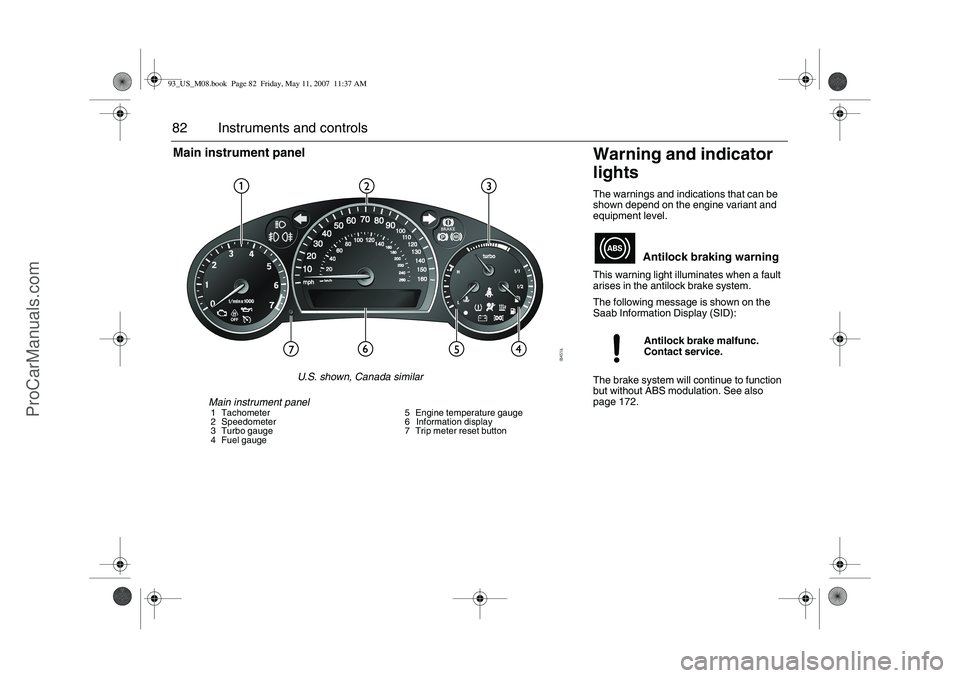
Main instrument panel1 Tachometer
2 Speedometer
3 Turbo gauge
4 Fuel gauge5 Engine temperature gauge
6 Information display
7 Trip meter reset button
Main instrument panel
U.S. shown, Canada similar
93_US_M08.book Page 82 Friday, May 11, 2007 11:37 AM
ProCarManuals.com
Page 85 of 320
85 Instruments and controls
The brake system provides Electronic
Brakeforce Distribution (EBD). This distrib-
utes the brake pressure between the front
and rear wheels, in such a way as to achieve
optimum braking performance irrespective
of the car’s load.
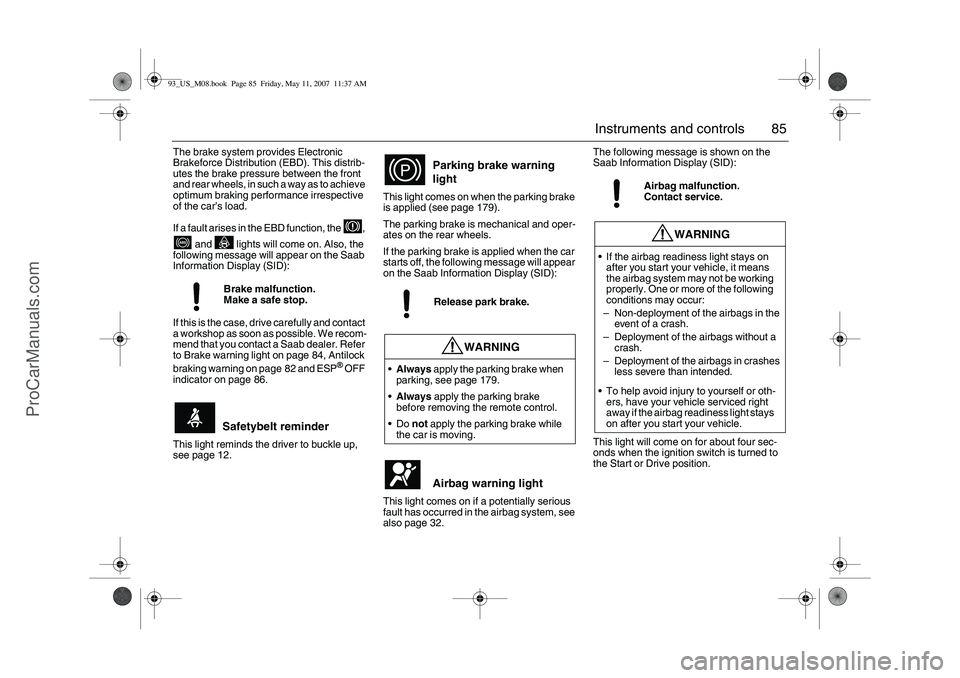
If a fault arises in the EBD function, the ,
and lights will come on. Also, the
following message will appear on the Saab
Information Display (SID):
If this is the case, drive carefully and contact
a workshop as soon as possible. We recom-
mend that you contact a Saab dealer. Refer
to Brake warning light on page 84, Antilock
braking warning on page 82 and ESP
® OFF
indicator on page 86.
This light reminds the driver to buckle up,
see page 12.This light comes on when the parking brake
is applied (see page 179).
The parking brake is mechanical and oper-
ates on the rear wheels.
If the parking brake is applied when the car
starts off, the following message will appear
on the Saab Information Display (SID):
This light comes on if a potentially serious
fault has occurred in the airbag system, see
also page 32.The following message is shown on the
Saab Information Display (SID):
This light will come on for about four sec-
onds when the ignition switch is turned to
the Start or Drive position. Brake malfunction.
Make a safe stop.
Safetybelt reminder
Parking brake warning
lightRelease park brake.
WARNING
Always apply the parking brake when
parking, see page 179.
Always apply the parking brake
before removing the remote control.
Do not apply the parking brake while
the car is moving.
Airbag warning light
Airbag malfunction.
Contact service.
WARNING
If the airbag readiness light stays on
after you start your vehicle, it means
the airbag system may not be working
properly. One or more of the following
conditions may occur:
–Non-deployment of the airbags in the
event of a crash.
–Deployment of the airbags without a
crash.
–Deployment of the airbags in crashes
less severe than intended.
To help avoid injury to yourself or oth-
ers, have your vehicle serviced right
away if the airbag readiness light stays
on after you start your vehicle.
93_US_M08.book Page 85 Friday, May 11, 2007 11:37 AM
ProCarManuals.com
Page 90 of 320
90 Instruments and controlsPress the CLR button to acknowledge a SID
message. If you acknowledge a message
but do nothing about it, the message will be
displayed again the next time you start the
car.
When the engine is switched off the warn-
ing/indicator lights still active are displayed,
this is to remind the driver. At this point the
warning/indicator lights previously acknowl-
edged with the CLR button are also dis-
played.
You can adjust the settings of several of the
car’s systems, such as the alarm3, rain
sensor3 and climate control system. These
are known as Settings se page 94.Odometer and trip meterThe odometer records the distance trav-
elled in miles on U.S. vehicles and on Cana-
dian vehicles the distance indicated is in
kilometres, and the trip meter in miles and
tenths (kilometres and tenths of kilometres
on Canadian vehicles).
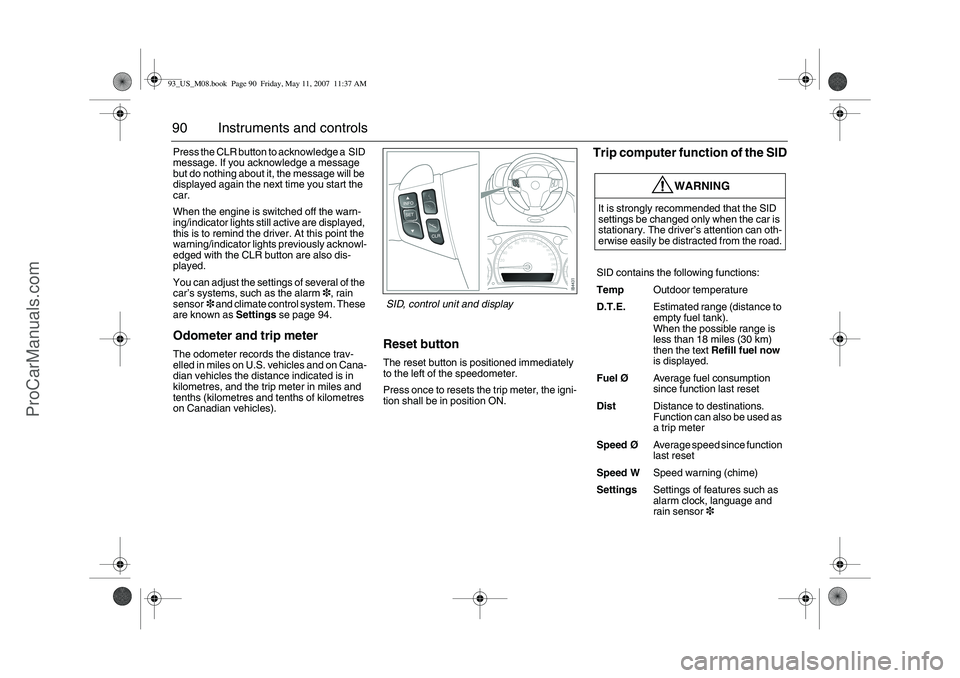
Reset buttonThe reset button is positioned immediately
to the left of the speedometer.
Press once to resets the trip meter, the igni-
tion shall be in position ON.
Trip computer function of the SID
WARNING
It is strongly recommended that the SID
settings be changed only when the car is
stationary. The driver’s attention can oth-
erwise easily be distracted from the road.
SID contains the following functions:
TempOutdoor temperature
D.T.E.Estimated range (distance to
empty fuel tank).
When the possible range is
less than 18 miles (30 km)
then the text Refill fuel now
is displayed.
FuelØAverage fuel consumption
since function last reset
DistDistance to destinations.
Function can also be used as
a trip meter
SpeedØAverage speed since function
last reset
Speed WSpeed warning (chime)
SettingsSettings of features such as
alarm clock, language and
rain sensor3
SID, control unit and display
93_US_M08.book Page 90 Friday, May 11, 2007 11:37 AM
ProCarManuals.com
Page 94 of 320
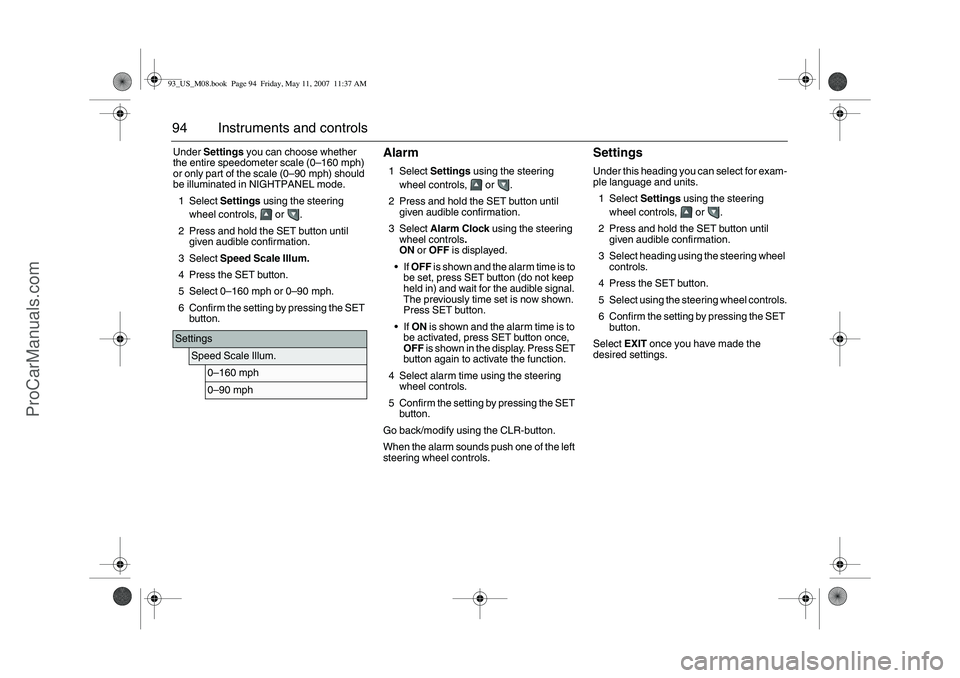
94 Instruments and controlsUnder Settings you can choose whether
the entire speedometer scale (0–160 mph)
or only part of the scale (0–90 mph) should
be illuminated in NIGHTPANEL mode.
1Select Settings using the steering
wheel controls, or .
2 Press and hold the SET button until
given audible confirmation.
3Select Speed Scale Illum.
4 Press the SET button.
5Select 0–160 mph or 0–90 mph.
6 Confirm the setting by pressing the SET
button.
Alarm1Select Settings using the steering
wheel controls, or .
2 Press and hold the SET button until
given audible confirmation.
3Select Alarm Clock using the steering
wheel controls.
ON or OFF is displayed.
If OFF is shown and the alarm time is to
be set, press SET button (do not keep
held in) and wait for the audible signal.
The previously time set is now shown.
Press SET button.
If ON is shown and the alarm time is to
be activated, press SET button once,
OFF is shown in the display. Press SET
button again to activate the function.
4 Select alarm time using the steering
wheel controls.
5 Confirm the setting by pressing the SET
button.
Go back/modify using the CLR-button.
When the alarm sounds push one of the left
steering wheel controls.
SettingsUnder this heading you can select for exam-
ple language and units.
1Select Settings using the steering
wheel controls, or .
2 Press and hold the SET button until
given audible confirmation.
3 Select heading using the steering wheel
controls.
4 Press the SET button.
5 Select using the steering wheel controls.
6 Confirm the setting by pressing the SET
button.
Select EXIT once you have made the
desired settings.
Settings
Speed Scale Illum.
0–160 mph0–90 mph
93_US_M08.book Page 94 Friday, May 11, 2007 11:37 AM
ProCarManuals.com
Page 95 of 320
95 Instruments and controls
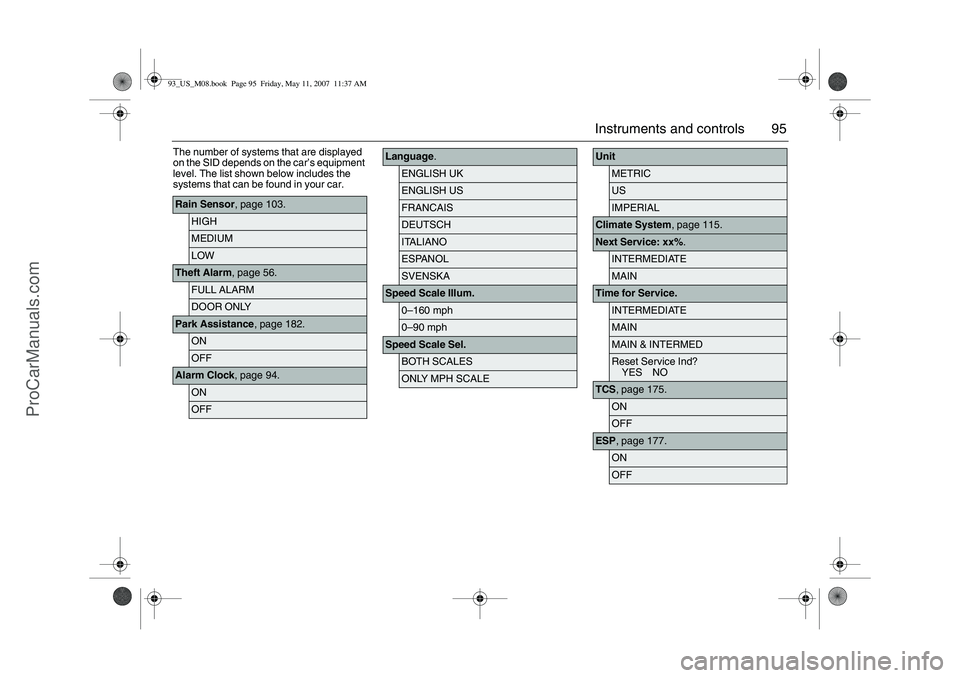
The number of systems that are displayed
on the SID depends on the car’s equipment
level. The list shown below includes the
systems that can be found in your car.Rain Sensor, page 103.
HIGHMEDIUMLOW
Theft Alarm, page 56.
FULL ALARMDOOR ONLY
Park Assistance, page 182.
ONOFF
Alarm Clock, page 94.
ONOFF
Language.
ENGLISH UKENGLISH USFRANCAISDEUTSCHITALIANOESPANOLSVENSKA
Speed Scale Illum.
0–160 mph0–90 mph
Speed Scale Sel.
BOTH SCALESONLY MPH SCALE
Unit
METRICUSIMPERIAL
Climate System, page 115.Next Service: xx%.
INTERMEDIATEMAIN
Time for Service.
INTERMEDIATEMAINMAIN & INTERMEDReset Service Ind?
YES NO
TCS, page 175.
ONOFF
ESP, page 177.
ONOFF
93_US_M08.book Page 95 Friday, May 11, 2007 11:37 AM
ProCarManuals.com