tailgate SAAB 9-5 2002 User Guide
[x] Cancel search | Manufacturer: SAAB, Model Year: 2002, Model line: 9-5, Model: SAAB 9-5 2002Pages: 272, PDF Size: 16.26 MB
Page 145 of 272

145 Starting and driving
Starting and driving
B1754
Ignition switch ................. 146
Starting the engine .......... 147
Important considerations
for driving ....................... 149
Refueling .......................... 152
Engine Break-In Period ... 155
Gear changing ................. 156
Cruise control .................. 164
Braking ............................. 165
Traction Control System . 167
Electronic Stability
Program (ESP) ............... 168 Economical motoring ..... 170
Driving in cold weather... 171
Driving in hot weather .... 173
Towing a trailer ................ 173
Driving with a roof rack
load ................................. 176
Driving with a load .......... 178
Driving considerations
with compact spare
wheel/tire fitted .............. 179
Driving with the trunk
lid/tailgate open ............. 179 Driving in deep water....... 179
Towing the car.................. 180
Jump starting ................... 182
Saab Parking Assistance 184
Parking brake ................... 185
Parking .............................. 185
ProCarManuals.com
Page 177 of 272

177 Starting and driving
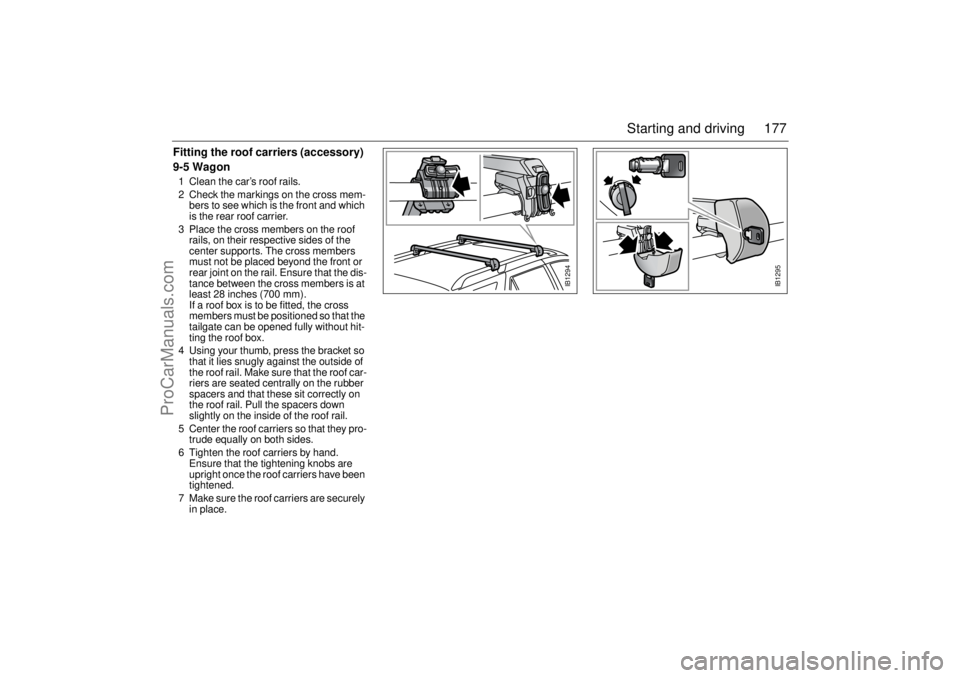
Fitting the roof carriers (accessory)
9-5 Wagon1 Clean the car’s roof rails.
2 Check the markings on the cross mem-
bers to see which is the front and which
is the rear roof carrier.
3 Place the cross members on the roof
rails, on their respective sides of the
center supports. The cross members
must not be placed beyond the front or
rear joint on the rail. Ensure that the dis-
tance between the cross members is at
least 28 inches (700 mm).
If a roof box is to be fitted, the cross
members must be positioned so that the
tailgate can be opened fully without hit-
ting the roof box.
4 Using your thumb, press the bracket so
that it lies snugly against the outside of
the roof rail. Make sure that the roof car-
riers are seated centrally on the rubber
spacers and that these sit correctly on
the roof rail. Pull the spacers down
slightly on the inside of the roof rail.
5 Center the roof carriers so that they pro-
trude equally on both sides.
6 Tighten the roof carriers by hand.
Ensure that the tightening knobs are
upright once the roof carriers have been
tightened.
7 Make sure the roof carriers are securely
in place.
IB1294
IB1295
ProCarManuals.com
Page 179 of 272

179 Starting and driving
Driving considerations
with compact spare
wheel/tire fittedThe following should be observed when the
compact spare wheel (T115/70 R16) is
fitted:
The compact spare is light and easy to
handle when changing the wheel. Do not
drive further than necessary with the com-
pact spare fitted – the maximum life of the
wheel is only just over 2000 miles
(3,500 km). Have the standard wheel
repaired and refitted as soon as possible. The car’s ground clearance is reduced with
the compact spare fitted. Note that only one
compact spare wheel may be used at any
time. Take care not to hit the curb and do not
fit snow chains. Leave the wheel cover off,
so that the warning text is readily visible.
Driving with the trunk
lid/tailgate openAvoid driving with the trunk lid/tailgate partly
or fully open, since exhaust fumes can be
drawn into the cabin.
If you must drive with the trunk lid/tailgate
open, all windows and the sunroof (if fitted)
must be closed and the cabin fan on at its
highest speed setting.Driving in deep water
WARNING
Do not exceed 50 mph (80 km/h) as the
tire can overheat and adversely affect the
handling of the car.
The tire should be inflated to 60 psi
(420 kPa).
NOTETo avoid damaging a punctured alloy
wheel it can be placed outside up in the
spare-wheel well but only while driving to
the closest workshop.
A general rule is that all heavy loads must
be well secured in the luggage compart-
ment, see page 134 and 137.
NOTEDo not drive in water deeper than
12 inches (30 cm) and do not drive faster
than at idling speed. Water can otherwise
be sucked into the engine. The engine will
be damaged if water enters the intake
system. The car´s electrical systems may
also be affected.
IB1769
ProCarManuals.com
Page 209 of 272

209 Car care and technical information
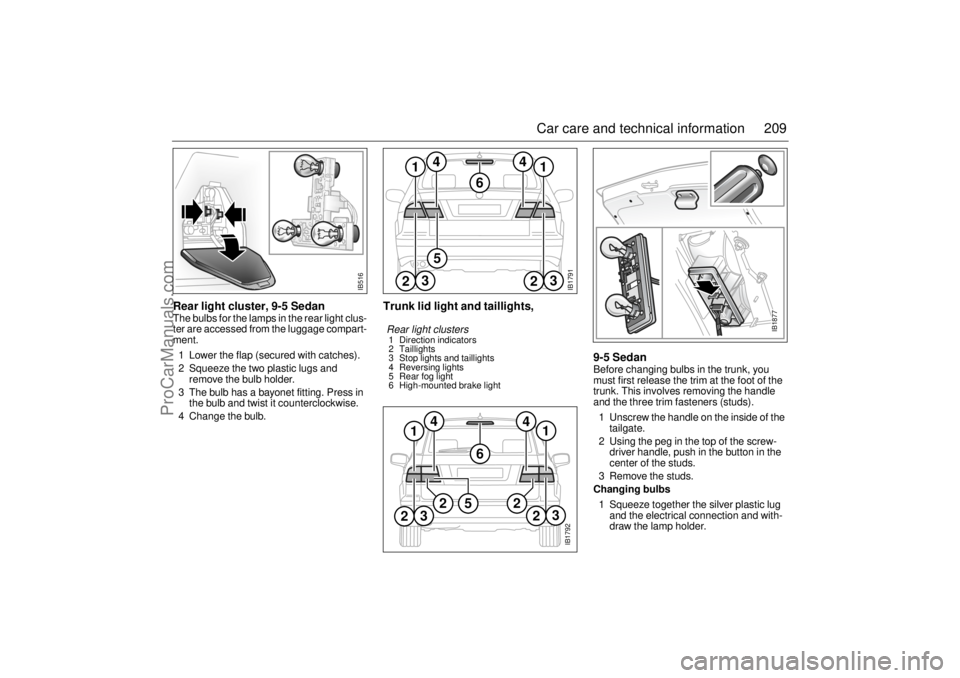
Rear light cluster, 9-5 SedanThe bulbs for the lamps in the rear light clus-
ter are accessed from the luggage compart-
ment.
1 Lower the flap (secured with catches).
2 Squeeze the two plastic lugs and
remove the bulb holder.
3 The bulb has a bayonet fitting. Press in
the bulb and twist it counterclockwise.
4 Change the bulb.
Trunk lid light and taillights,
9-5 Sedan
Before changing bulbs in the trunk, you
must first release the trim at the foot of the
trunk. This involves removing the handle
and the three trim fasteners (studs).
1 Unscrew the handle on the inside of the
tailgate.
2 Using the peg in the top of the screw-
driver handle, push in the button in the
center of the studs.
3 Remove the studs.
Changing bulbs
1 Squeeze together the silver plastic lug
and the electrical connection and with-
draw the lamp holder.
IB1791
12
3
2
3
5
6
4
1
4
Rear light clusters 1 Direction indicators
2 Taillights
3 Stop lights and taillights
4 Reversing lights
5 Rear fog light
6 High-mounted brake light
IB516
IB1792
1
1
2
3
2
6
4
4
52
2
3
IB1877
ProCarManuals.com
Page 210 of 272

210 Car care and technical information2 The bulb has a bayonet fitting. Press in
the bulb and twist it counterclockwise.
3 Change the bulb.
Refitting the trim
1 Reset the studs by pushing back the
center buttons so that they protrude by
0.2 inch (5 mm).
2 Insert the studs through the trim and tail-
gate panel. Press the center buttons in,
flush with the collar.
3 Screw the handle back onto the trunk.
High-mounted stop lights, 9-5 SedanThe bulbs can be accessed after the panel
in the rear headlining has been removed.
1 Remove the panel by carefully pushing
in the two clips, one at the time.
2 Release the bulb holder, which is
retained by a clip at either end.
3 Withdraw the bulb gently straight back.
4 Push in the new bulb.
5 Refit the bulb holder.
6 Replace the panel by carefully pushing
the panel towards the headlining so that
the two clips engage their respective
slot.
Tailgate bulbs, 9-5 Wagon1 Turn the lock a quarter turn (90 °) with a
screwdriver or the ignition key.
2 Open and remove the cover.
3 Take out the bulb holder by twisting it
slightly counterlockwise.
4 Press in the bulb and twist it
counterclockwise.
5 Change the bulb.
6 Check that the new bulb is working.
IB518
3
2
2
3
1
IB519
High-mounted stop lights1 Panel
2 Retaining clips
3 Bulbs
IB1227
ProCarManuals.com
Page 211 of 272

211 Car care and technical information
Reassembly:
1 Place the two ”hinges” in the recess in
the tailgate.
2 Then push the ”hinges” into the recess
and close the cover.
3 Turn the lock a quarter turn.
Rear lights clusters, 9-5 Wagon1 Open the tailgate.
2 Remove the cover by turning the two
catches anticlockwise one quarter turn.
3 Remove the two screws securing the
light cluster to the body. 4 Pull the light cluster rearwards and
angle it outwards (it is seated quite
firmly).
5 Release the fastener from the body.
Reinsert the fastener into the groove in
the light cluster. Press in the fastener
until you hear a click.
6 Take out the bulb holder by twisting it
slightly counterclockwise.
7 Press in the bulb and twist it counter-
clockwise.
8 Change the bulb.
9 Check that the new bulb works.
IB1228
IB1881
IB1793
ProCarManuals.com
Page 264 of 272

264 IndexSpare wheel
___________________ 226
Spare wheel and tools
___________ 142
Spark plugs
____________________ 253
Speed rating ___________________ 222
Speedometer _______________ 56
, 57
Starting in cold weather, ACC
_______ 78
Starting in hot weather, ACC _______ 78
Steering wheel adjustment
________ 122
Steering, technical data
__________ 255
Stone-chip damage, repairing
______ 234
Storage compartments
___________ 129
Sun visors
_____________________ 128
Sunroof
_______________________ 126
Suspension
____________________ 255
Suspension, technical data
________ 255
Switches
_______________________ 65
Systems, adjustment
_____________ 259
TTCS OFF
_______________________ 55
Table of fuses
__________________ 218
Tachometer
_____________________ 56
Tailgate, opening
________________ 41
Tank gauge
_____________________ 57
Technical data __________________ 247
Telematics
_____________________ 105
Temperature control, ACC
_________ 74
Temperature gauge, engine ________ 57
Temperature zones, ACC
__________ 74
Textile carpeting
________________ 232
Through-load hatch ______________ 134Tie Downs
_____________________134
Tightening torque, wheel studs
_____227
Tire markings
_____________ 222
, 223
Tire pressure
______________ 178
, 222
Tires
____________________ 222
, 256
Tools
_________________________142
Touching-in the paintwork
_________234
Towbar attachment
______________173
Towbar load
___________________175
Towing the car __________________180
Towing, automatics
______________180
Traction
_______________________167
Trailer weights
__________________249
Trionic
________________________191
Trip computer
___________________59
Trip meter
______________________56
Trunk
_________________________132
Trunk lid, opening
________________41
Turbo gauge
____________________58
Turbo, points to note
_____________149
UUnder the hood, 3.0t V6
__________190
Under the hood, 4-cyl
____________189
Upholstery and trim
______________232
Upholstery and trim, care of
_______232
Useful tips, ACC
_________________80
VVanity mirrors
__________________128Ventilated front seats
____________ 121
Viscosity, engine oil _____________ 250
WWarning labels
___________________ 8
Warning light, AIR BAG
___________ 34
Warning lights
__________________ 50
Washers
_____________________ 202
Washers, windshield
____________ 203
Washing the car
_______________ 233
Waxing and polishing
___________ 233
Wear indicators, tires ____________ 224
Wheel, change
________________ 227
Wheels and tires ___________ 222
, 256
Wheels and tires, sizes
__________ 256
Window glass sensor, car alarm
____ 44
Windshield washers
_____________ 70
Windshield wipers
_______________ 70
Wiper blades, replacing
__________ 202
Wipers and washers
_________ 70
, 202
ProCarManuals.com