jacking SAAB 9-5 2002 Owners Manual
[x] Cancel search | Manufacturer: SAAB, Model Year: 2002, Model line: 9-5, Model: SAAB 9-5 2002Pages: 272, PDF Size: 16.26 MB
Page 10 of 272

10
IB336
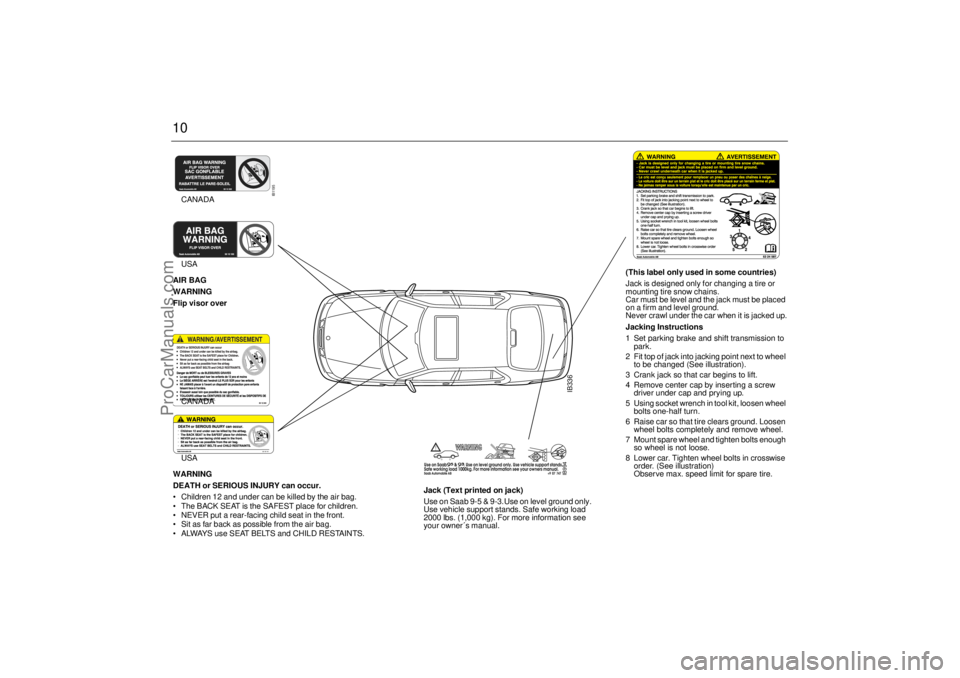
(This label only used in some countries)
Jack is designed only for changing a tire or
mounting tire snow chains.
Car must be level and the jack must be placed
on a firm and level ground.
Never crawl under the car when it is jacked up.
Jacking Instructions
1 Set parking brake and shift transmission to
park.
2 Fit top of jack into jacking point next to wheel
to be changed (See illustration).
3 Crank jack so that car begins to lift.
4 Remove center cap by inserting a screw
driver under cap and prying up.
5 Using socket wrench in tool kit, loosen wheel
bolts one-half turn.
6 Raise car so that tire clears ground. Loosen
wheel bolts completely and remove wheel.
7 Mount spare wheel and tighten bolts enough
so wheel is not loose.
8 Lower car. Tighten wheel bolts in crosswise
order. (See illustration)
Observe max. speed limit for spare tire.
Jack (Text printed on jack)
Use on Saab 9-5 & 9-3.Use on level ground only.
Use vehicle support stands. Safe working load
2000 lbs. (1,000 kg). For more information see
your owner´s manual.
IB994
IB1195
CANADAUSA
AIR BAG
WARNING
Flip visor overCANADA
50 10 111
USA
WARNING
DEATH or SERIOUS INJURY can occur.
Children 12 and under can be killed by the air bag.
The BACK SEAT is the SAFEST place for children.
NEVER put a rear-facing child seat in the front.
Sit as far back as possible from the air bag.
ALWAYS use SEAT BELTS and CHILD RESTAINTS.
ProCarManuals.com
Page 227 of 272

227 Car care and technical information
Changing a wheel
WARNING
The car jack is designed solely for use
in changing a wheel or fitting snow
chains. It must not be used to support
the car during repair work or servicing.
Never crawl under a car that is
supported only by a jack.
Special care must be taken if the car is
on a slope – use wheel chocks!
Position chocks, one ahead and one
behind, the wheel that is diagonally
opposite to the one to be changed.
Switch on the hazard warning lights if
the car is on a road.
Apply the parking brake and leave the
car in gear (1st or reverse). Automatic
transmission: move selector to the
P position.
Ensure that everybody is out of the car
before jacking it up.
Never start the engine while the car is
jacked up.
The jack must stand on a firm, level
surface.
Stow the jack in the place provided for
it under the panel in the floor of the lug-
gage compartment. Secure it properly
to avert injury to passengers in the
event of a crash.
Do not use the jack for any purpose
other than for jacking up the car.
ProCarManuals.com
Page 228 of 272

228 Car care and technical informationTo jack up the car, apply the jack to one of
the special jacking points under the sills.Pos i ti o n for j ack
IB1838
IB1553
Positioning the jack
IB1554
Jack location, between spare wheel and
sill
IB1704
The collapsible jack handle is stowed in a cloth bag by the spare wheel. With the help of
your foot, extend the handle as illustrated
ProCarManuals.com
Page 229 of 272

229 Car care and technical information
If a floor jack is used, it can be applied to the
standard jacking points used by the dealer.
A floor jack can lift both front wheels or both
rear wheels off the ground simultaneously.
A jack stand must then be applied under-
neath the front of the engine subframe (at
the fixing point for the towrope-attachment
eye) or to the rear towrope-attachment eye
(or under the trailer hitch, if fitted).
1 Put the car in 1st gear (automatic trans-
mission: move selector to the P position)
and apply the parking brake.2 Wind the jack up to a suitable height
before placing it under the recess in the
sill.
Make sure that the jack fully engages
the recess in the sill and that the base of
the jack is steady and flat on the ground.
3 Remove the wheel cover (where appli-
cable).
Loosen the wheel bolts by half a turn.
4 Wind the jack to raise the wheel clear of
the ground. Remove the wheel bolts and
lift off the wheel.
5 Clean the contact surfaces between the
wheel and brake disc.
6 Fit the wheel and screw in the bolts in the
sequence shown (opposite pairs).
Tighten the bolts enough for the bolts
and wheel to be seated correctly.
7 Lower the car and tighten the wheel
bolts to the correct torque in the
sequence shown (opposite pairs).
Tightening torqueLight-alloy wheels: 80 ft.lbs. (110 Nm)
Steel wheels: 80 ft.lbs. (110 Nm)
Do not overtighten the bolts using a per-
cussion nut tightener: not only can this
damage the wheels but it can also make it impossible to undo the bolts using the
wheel wrench in the car’s toolkit.
8 Check-tighten the wheel bolts after a
few miles.
Tightening torqueLight-alloy wheels: 80 ft.lbs. (110 Nm)
Steel wheels: 80 ft.lbs. (110 Nm)
NOTEApply the jack only to the jacking points
indicated.
NOTEWhen refitting wheel covers (where
applicable), make sure that the valve
protrudes through the hole in the wheel
cover.
IB1130
Jacking points for a trolley jack
ProCarManuals.com